SlideShare uma empresa Scribd logo
1 de 11
Baixar para ler offline
Adobe Illustrator CC
Last updated: 05/22/2014 Page 1
Beginner’s Level
Introduction
Adobe Illustrator CC is a vector-based image editing program. Illustrator is used to create scalable
vector art for using projects for both print and web. What is vector-based imaging mean? It means
that your image can be scaled ininitely without any distortion or pixelation. This allows for lexible
artwork that can be used at various different sizes. These can come in handy when needing to scale
a poster or artwork object from 8 1/2” X 11” to a digital screen with proportions of 800px by 600px.
In this tutorial, we’ll cover basics to working in Illustrator such as understanding paths, creating
shapes, creating and using artboards, working with type, and more. You’ll gain a working knowledge
of Illustrator.
Creating a New Document
1) Launch Adobe Illustrator.
2) Go to File > New...
3) A dialog box will appear that will
allow you to set the parameters for
your ile. In Illustrator, you work with
Artboards. Note that you can easi-
ly change the size of your artboard
as you work on it if you need more
space. You can even create multiple
artboards - we’ll go over that in more
detail later.
For this tutorial, we are going to create
a simple logo.
Give your ile a name. For now, let’s
start with 1 Artboard with the dimen-
sions 600px by 600px. We’ll be working pixels, but feel free to work in any units you are most com-
fortable in. Lastly, we want it to be in Landscape orientaion.
Once you’ve made all those adjustments, click OK.
Adobe Illustrator CC
Last updated: 05/22/2014 Page 2
Beginner’s Level
Navigating Your Document
Your window will look like this. Within Illustrator, it’s pretty easy to navigate around your document
using the Hand Tool (H) and the Zoom Tool (Z). Try using the tools to move your document around
and to zoom in and out of it. Use their shortcuts (H, Z) or click on them on the tool bar (circled be-
low).
Tip: If you hold down the space bar, you can use the hand tool while you’re using most other tools.
Once you let go, your cursor will go back to the tool you were using. This is helpful when you need to
move around your document while using a tool and saves you the time it takes to switch tools.
When using the zoom tool, it defaults to zooming in. Hold down the Alt key while using the zoom tool
to change it to zoom out. You’ll notice the cursor now shows a magnifying glass with a minus sign
(zoom out) in the middle instead of a plus sign (zoom in).
Adobe Illustrator CC
Last updated: 05/22/2014 Page 3
Beginner’s Level
Understanding & Creating Artboards
As noted before, when you create your ile, you can create multiple artboards from the beginning.
You can also add them later as well.
When creating a new document, you will
notice this section here. You can in-
crease the number of artboards, set the
spacing between artboards, change the
way the grid of artboards is set up (Grid
by Row, Grid by Column, etc.) and set
up how many columns of artboards you
want.
Again, you can edit them after you cre-
ate the document by using the
Artboard Tool (Shift + O) or inding it
on the toolbar.
Once in the Artboard tool, in the top
toolbar, you’ll be able to rename your
Artboard and change the dimensions
of each artboard. You can also manu-
ally hover over the markers around the
artboards until the cursor appears and
cinch it in. You can also hover over the
center of your artboard and move it
around your screen in the case that you
want more space between your art-
boards.
Again, multiple artboards can come in
handy when you want multiple artwork
to exist on the same document. It also
makes it easy to export each artwork
individually when you place them each
in their own artboard. See ‘Exporting.’
Adobe Illustrator CC
Last updated: 05/22/2014 Page 4
Beginner’s Level
Creating Shapes & Adding Fill and Strokes
For this tutorial, we only need 1 artboard for our logo. Let’s say I want to create a simple personal
logo for my website. First, i’ll come up with a concept. I want to start off with a simple box that I’m
going to have my initials running through.
1) Click on the Rectangle Tool in the tool bar. If you click
and hold on it on the toolbar, you’ll notice lots of different
shape tools at your disposal.
2) Click and drag until you’ve got the shape desired or dou-
ble click on the screen until a dialog window shows up that
allows you to input speciic dimensions for your rectangle.
You can always adjust the size manually later by dragging
the markers around the shape or on the top toolbar, you can
adjust the width and height by inputting speciic dimensions. In
this case I’ve created a rectangle that is 350 px wide and 150 px tall.
3) Now, we need to change the stroke and ill of our shape. Free free to
make it any color you want. You can access this in your side toolbar. It
usually defaults to a white ill and black stroke. I’m going to double click
on the ill box and change it to a seafoam green.
4) Single click on the stroke box and click on the handy ‘No Fill’ button
underneath the Stroke/Fill box. My Stroke and Fill now looks like this on
the toolbar:
5) My shape appears like this:
Adobe Illustrator CC
Last updated: 05/22/2014 Page 5
Beginner’s Level
Using the Paintbrush Tool
For my logo, now I want to place a cursive lettering of my intials on top of the rectangle in white. In
this case, I’m going to use the paintbrush tool. Note: you can also use a premade type here, but I
want mine to have a homemade look.
1) Open up the Paintbrush tool.
2) Hold and start painting on your artboard.
3) Change the stroke of your line to white. This is what mine looks like:
You can also make adjusts to the line you’ve created by going to your top toolbar, where you can
change the ill/stroke, stoke line width, opacity, and style.
Illustrator gives you lots of options for preset styles. In this case, I’ve used the default 5pt. Round. If
you click on the little triangle next to it, it will drop down a menu with different types of brushes that
you can use.
Adobe Illustrator CC
Last updated: 05/22/2014 Page 6
Beginner’s Level
Understanding & Drawing Path Points
Paths are the line segments that make up the overall structure of the artwork that you create (the
skeleton). For instance, a rectangle is made up of a path that has four vertical lines that all connect
and there are four anchor points (the joints) in the corners. Every shape and object will have path
and anchor points.
You can also draw your own paths using the Pen Tool, es-
entially creating your own artwork within Illustrator. The Pen
Tool has some advanced features, but we’re going to go
over basics to using the Pen Tool. Essentially, you are set-
ting the dots and drawing the lines for your artwork object.
You can create both straight and curved lines.
For my logo, I want to create some abstract shapes underneath my rectangle in different shades of
green/blue, which will serve as the background for my title: “Graphic Designer & Artist.” In this case,
I just need to draw straight lines with the Pen tool.
1) Select the Pen Tool.
2) Click anywhere to start drawing your object.
3) Continue clicking to create your object.
4) To close your object, click back on the irst point. You should
see a small circle next to the Pen tool that indicates that you are closing your path. I’m going to con-
tinue making abstract shapes until it creates a big enough cluster to add my title.
Adobe Illustrator CC
Last updated: 05/22/2014 Page 7
Beginner’s Level
My logo now looks like this:
When working with paths, you can adjust your anchor/paths by using the Direct Selection Tool.
The Direct Selection Tool will allow you to select the points within a path and move them around.
For instance, let’s say I draw that last shape and don’t like how it looks. Instead of creating a whole
new path, I can use the Direct Selection Tool to adjust the points.
1) Select the Direct Selection Tool and click on the shape. With this tool, you select points one at a
time. A selected point will be a illed in blue anchor point and an unselected point will have white in
the middle.
Adobe Illustrator CC
Last updated: 05/22/2014 Page 8
Beginner’s Level
2) Click and drag the anchor points to change the shape of your object.The shape now looks like
this.
Now my rectangle doesn’t match my bottom artwork, so now I want to adjust the shape of the rect-
angle to mimic the atstract look. With the Pen Tool, you can also add add and subtract points.
!) Click and hold down on the Pen Tool until you see a
drop down menu. Select Add Anchor Point Tool.
2) Now hover over the path of the rectangle and click any-
where on the path to add an anchor point.
3) This will create new Anchor points and you’ll see new blue points on the path. Now, you can use
the Direct Selection Tool to move those points around and create a completely new shape.
Adobe Illustrator CC
Last updated: 05/22/2014 Page 9
Beginner’s Level
Using Type & Creating Outlines
Now, I want to add “Graphic Designer & Artist on top of my shapes.
1) Select the Type Tool.
2) Click anywhere and a cursor will appear for you to start typing.
3) Once done typing, click on the Selection Tool to move your text around.
This will create a box around your text. Hover over it and you’ll get a cursor
that will allow you to move your text around your artboard.
4) Once I’ve placed it on top of my artwork, I can double click on it to highlight the text and change
the font/size using the top toolbar. I’ve changed my font to “Modern No. 20”, size 22pt.
Adobe Illustrator CC
Last updated: 05/22/2014 Page 10
Beginner’s Level
In some cases, you’ll want to convert your text to outlines. This will allow you to manipulate the text
in interesting ways. However, you will not be able to use the Text Tool to change what the text says
after creating it into outlines.
1) To convert your text to outlines, click on the text with the Selection Tool.
2) Go to Type > Create Outlines. This will create outlines around each
individual letter. However, the text is still grouped together. In order to
manipulate each letter individually, you’ll need to ungroup the text.
3) Go to Object > Ungroup.
You will not be able to select
each letter individual and
change its size and give
the letter different ill/stroke
colors.
4) Click on the G with the Selection Tool and increase the size by dragging the corner out. Hold
down shift at the same time to ensure that it keeps the same proportions.
5) Rotate the letter by using the Rotate tool. You should then be able to click and rotate the
object as desired. I did this both for the G and A as pictured below:
Adobe Illustrator CC
Last updated: 05/22/2014 Page 11
Beginner’s Level
Exporting
Now that I’ve completed my logo, I can adjust my artboard accordingly to it around my logo. This
is crucial if you want your image to export with certain border dimensions around it. However, in this
case, I’m exporting as a .png to allow the image to have a transparent background.
1) Go to File > Export...
2) A new dialog box will open that allows you to name your ile
and select the format. I’ve chosen PNG.
Notice the “Use Artboards” checkbox. This is helpful when you want it to export using the artboard
parameters. (i.e. Nothing outside of the artboard will be exported as part of the image. It is also
helpful when you have multiple artboards in a ile. With multiple artboards, it will export the image
with what you’ve titled your image and -01, -02, etc. For example, if I have Logo as the name of my
ile and I have 4 different artboards in my ile, it will export as “Logo-01.png”, “Logo-02.png”, etc.
3) Once done, click Export.
4) Depending on the format that you select, another dialog box may open that will give you more
options in terms of the quality and size of the image ile. This will depend on what you need for your
image / artwork.

Mais conteúdo relacionado

Mais procurados

Intro to Adobe Illustrator CS4 (2010)
Intro to Adobe Illustrator CS4 (2010)Intro to Adobe Illustrator CS4 (2010)
Intro to Adobe Illustrator CS4 (2010)Matteo Wyllyamz
 
Adobe illustrator 2
Adobe illustrator 2Adobe illustrator 2
Adobe illustrator 2ilaazmil2
 
Adobe Illustrator: 6 Essential Tips and Tools
Adobe Illustrator: 6 Essential Tips and ToolsAdobe Illustrator: 6 Essential Tips and Tools
Adobe Illustrator: 6 Essential Tips and ToolsNguyet Minh
 
Designing with illustrator
Designing with illustratorDesigning with illustrator
Designing with illustratorLesley Baumann
 
Intermediate Adobe Illustrator CS3 welcome & course outline (2009)
Intermediate Adobe Illustrator CS3 welcome & course outline (2009)Intermediate Adobe Illustrator CS3 welcome & course outline (2009)
Intermediate Adobe Illustrator CS3 welcome & course outline (2009)Matteo Wyllyamz
 
Adobe Illustrator - Creating the Poster
Adobe Illustrator - Creating the PosterAdobe Illustrator - Creating the Poster
Adobe Illustrator - Creating the PosterTimothy F McKenna
 
Adobe illustrator getting started
Adobe illustrator getting startedAdobe illustrator getting started
Adobe illustrator getting startedDanielle Oser, APR
 
Creating an Illustrator document for VCP118-2
Creating an Illustrator document for VCP118-2Creating an Illustrator document for VCP118-2
Creating an Illustrator document for VCP118-2Jerry Arnold
 
Vectors and Pen tool
Vectors and Pen toolVectors and Pen tool
Vectors and Pen toolclewis86
 
Adobe illustrator cs6
Adobe illustrator cs6Adobe illustrator cs6
Adobe illustrator cs6Ila Azmil
 
Illustrator assignment 1
Illustrator assignment 1Illustrator assignment 1
Illustrator assignment 1rgosselin
 
DID Unit 5 - Illustrator Basics
DID Unit 5 - Illustrator BasicsDID Unit 5 - Illustrator Basics
DID Unit 5 - Illustrator BasicsMrLawler
 
Illustrator 2018 Identity Package
Illustrator 2018 Identity PackageIllustrator 2018 Identity Package
Illustrator 2018 Identity PackageJerry Arnold
 
Illustrator 2018 Regatta Artwork
Illustrator 2018 Regatta ArtworkIllustrator 2018 Regatta Artwork
Illustrator 2018 Regatta ArtworkJerry Arnold
 
Adobe InDesign Primer
Adobe InDesign PrimerAdobe InDesign Primer
Adobe InDesign PrimerNYCCTfab
 
Adobe Illustrator CS6 Primer
Adobe Illustrator CS6 PrimerAdobe Illustrator CS6 Primer
Adobe Illustrator CS6 PrimerNYCCTfab
 
Adobe Illustrator CS6 - Magic paintbrush howto
Adobe Illustrator CS6 - Magic paintbrush howtoAdobe Illustrator CS6 - Magic paintbrush howto
Adobe Illustrator CS6 - Magic paintbrush howtoRafael Felipe Santos
 

Mais procurados (19)

Intro to Adobe Illustrator CS4 (2010)
Intro to Adobe Illustrator CS4 (2010)Intro to Adobe Illustrator CS4 (2010)
Intro to Adobe Illustrator CS4 (2010)
 
Adobe illustrator 2
Adobe illustrator 2Adobe illustrator 2
Adobe illustrator 2
 
Adobe Illustrator: 6 Essential Tips and Tools
Adobe Illustrator: 6 Essential Tips and ToolsAdobe Illustrator: 6 Essential Tips and Tools
Adobe Illustrator: 6 Essential Tips and Tools
 
Designing with illustrator
Designing with illustratorDesigning with illustrator
Designing with illustrator
 
Intermediate Adobe Illustrator CS3 welcome & course outline (2009)
Intermediate Adobe Illustrator CS3 welcome & course outline (2009)Intermediate Adobe Illustrator CS3 welcome & course outline (2009)
Intermediate Adobe Illustrator CS3 welcome & course outline (2009)
 
Adobe Illustrator - Creating the Poster
Adobe Illustrator - Creating the PosterAdobe Illustrator - Creating the Poster
Adobe Illustrator - Creating the Poster
 
Adobe illustrator getting started
Adobe illustrator getting startedAdobe illustrator getting started
Adobe illustrator getting started
 
Creating an Illustrator document for VCP118-2
Creating an Illustrator document for VCP118-2Creating an Illustrator document for VCP118-2
Creating an Illustrator document for VCP118-2
 
Vectors and Pen tool
Vectors and Pen toolVectors and Pen tool
Vectors and Pen tool
 
Adobe illustrator cs6
Adobe illustrator cs6Adobe illustrator cs6
Adobe illustrator cs6
 
Illustrator assignment 1
Illustrator assignment 1Illustrator assignment 1
Illustrator assignment 1
 
DID Unit 5 - Illustrator Basics
DID Unit 5 - Illustrator BasicsDID Unit 5 - Illustrator Basics
DID Unit 5 - Illustrator Basics
 
Illustrator 2018 Identity Package
Illustrator 2018 Identity PackageIllustrator 2018 Identity Package
Illustrator 2018 Identity Package
 
Illustrator 2018 Regatta Artwork
Illustrator 2018 Regatta ArtworkIllustrator 2018 Regatta Artwork
Illustrator 2018 Regatta Artwork
 
Corel draw
Corel drawCorel draw
Corel draw
 
Adobe illustrator basics
Adobe illustrator basicsAdobe illustrator basics
Adobe illustrator basics
 
Adobe InDesign Primer
Adobe InDesign PrimerAdobe InDesign Primer
Adobe InDesign Primer
 
Adobe Illustrator CS6 Primer
Adobe Illustrator CS6 PrimerAdobe Illustrator CS6 Primer
Adobe Illustrator CS6 Primer
 
Adobe Illustrator CS6 - Magic paintbrush howto
Adobe Illustrator CS6 - Magic paintbrush howtoAdobe Illustrator CS6 - Magic paintbrush howto
Adobe Illustrator CS6 - Magic paintbrush howto
 

Semelhante a 0313 adobe-illustrator-cc

Adobe illustrator cs6
Adobe illustrator cs6Adobe illustrator cs6
Adobe illustrator cs6ilaazmil2
 
Adobe illustrator cs6
Adobe illustrator cs6Adobe illustrator cs6
Adobe illustrator cs6Ila Azmil
 
LO4 – Be able to edit materials to produce a final print media product
LO4 – Be able to edit materials to produce a final print media productLO4 – Be able to edit materials to produce a final print media product
LO4 – Be able to edit materials to produce a final print media productmdelmar97
 
how to use design by software.pptx
how to use design by software.pptxhow to use design by software.pptx
how to use design by software.pptxNitinKumar12570
 
What is Web Designing by Zakaria
What is Web Designing by ZakariaWhat is Web Designing by Zakaria
What is Web Designing by ZakariaZakaria Abada
 
Unit 1- Introduction.pptx
Unit 1- Introduction.pptxUnit 1- Introduction.pptx
Unit 1- Introduction.pptxSanthiNivas
 
Introduction to CorelDRAW
Introduction to CorelDRAWIntroduction to CorelDRAW
Introduction to CorelDRAWSanthiNivas
 
Sketchup-Handbook.pdf
Sketchup-Handbook.pdfSketchup-Handbook.pdf
Sketchup-Handbook.pdfAhmad Maher
 
Affinity+designer+start+guide
Affinity+designer+start+guideAffinity+designer+start+guide
Affinity+designer+start+guidemoodleyveez
 
InDesign CS5 Tutorial
InDesign CS5 TutorialInDesign CS5 Tutorial
InDesign CS5 TutorialZaxapias
 
Corel Draw final presentation for software.pptx
Corel Draw final presentation for software.pptxCorel Draw final presentation for software.pptx
Corel Draw final presentation for software.pptxShoaibRajper1
 
Photoshop Tutorial Booklet
Photoshop Tutorial BookletPhotoshop Tutorial Booklet
Photoshop Tutorial BookletGraveney School
 
Introduction_to_Desktop_Publishing.pdf
Introduction_to_Desktop_Publishing.pdfIntroduction_to_Desktop_Publishing.pdf
Introduction_to_Desktop_Publishing.pdfFunkYou2
 

Semelhante a 0313 adobe-illustrator-cc (20)

Adobe illustrator cs6
Adobe illustrator cs6Adobe illustrator cs6
Adobe illustrator cs6
 
Adobe illustrator cs6
Adobe illustrator cs6Adobe illustrator cs6
Adobe illustrator cs6
 
LO4 – Be able to edit materials to produce a final print media product
LO4 – Be able to edit materials to produce a final print media productLO4 – Be able to edit materials to produce a final print media product
LO4 – Be able to edit materials to produce a final print media product
 
how to use design by software.pptx
how to use design by software.pptxhow to use design by software.pptx
how to use design by software.pptx
 
2010 11 Graphics
2010 11 Graphics2010 11 Graphics
2010 11 Graphics
 
Graphics
GraphicsGraphics
Graphics
 
What is Web Designing by Zakaria
What is Web Designing by ZakariaWhat is Web Designing by Zakaria
What is Web Designing by Zakaria
 
Unit 1- Introduction.pptx
Unit 1- Introduction.pptxUnit 1- Introduction.pptx
Unit 1- Introduction.pptx
 
Introduction to CorelDRAW
Introduction to CorelDRAWIntroduction to CorelDRAW
Introduction to CorelDRAW
 
Sketchup-Handbook.pdf
Sketchup-Handbook.pdfSketchup-Handbook.pdf
Sketchup-Handbook.pdf
 
Create logo
Create logoCreate logo
Create logo
 
Affinity+designer+start+guide
Affinity+designer+start+guideAffinity+designer+start+guide
Affinity+designer+start+guide
 
In designtutorial
In designtutorialIn designtutorial
In designtutorial
 
Sketch 3 manual
Sketch 3 manualSketch 3 manual
Sketch 3 manual
 
InDesign CS5 Tutorial
InDesign CS5 TutorialInDesign CS5 Tutorial
InDesign CS5 Tutorial
 
VECTOR.pptx
VECTOR.pptxVECTOR.pptx
VECTOR.pptx
 
Corel Draw final presentation for software.pptx
Corel Draw final presentation for software.pptxCorel Draw final presentation for software.pptx
Corel Draw final presentation for software.pptx
 
Photoshop Tutorial Booklet
Photoshop Tutorial BookletPhotoshop Tutorial Booklet
Photoshop Tutorial Booklet
 
Using illustrator for posters by hmftj
Using illustrator for posters by hmftj Using illustrator for posters by hmftj
Using illustrator for posters by hmftj
 
Introduction_to_Desktop_Publishing.pdf
Introduction_to_Desktop_Publishing.pdfIntroduction_to_Desktop_Publishing.pdf
Introduction_to_Desktop_Publishing.pdf
 

Último

REMIFENTANIL: An Ultra short acting opioid.pptx
REMIFENTANIL: An Ultra short acting opioid.pptxREMIFENTANIL: An Ultra short acting opioid.pptx
REMIFENTANIL: An Ultra short acting opioid.pptxDr. Ravikiran H M Gowda
 
Beyond_Borders_Understanding_Anime_and_Manga_Fandom_A_Comprehensive_Audience_...
Beyond_Borders_Understanding_Anime_and_Manga_Fandom_A_Comprehensive_Audience_...Beyond_Borders_Understanding_Anime_and_Manga_Fandom_A_Comprehensive_Audience_...
Beyond_Borders_Understanding_Anime_and_Manga_Fandom_A_Comprehensive_Audience_...Pooja Bhuva
 
On National Teacher Day, meet the 2024-25 Kenan Fellows
On National Teacher Day, meet the 2024-25 Kenan FellowsOn National Teacher Day, meet the 2024-25 Kenan Fellows
On National Teacher Day, meet the 2024-25 Kenan FellowsMebane Rash
 
This PowerPoint helps students to consider the concept of infinity.
This PowerPoint helps students to consider the concept of infinity.This PowerPoint helps students to consider the concept of infinity.
This PowerPoint helps students to consider the concept of infinity.christianmathematics
 
ICT Role in 21st Century Education & its Challenges.pptx
ICT Role in 21st Century Education & its Challenges.pptxICT Role in 21st Century Education & its Challenges.pptx
ICT Role in 21st Century Education & its Challenges.pptxAreebaZafar22
 
How to Add New Custom Addons Path in Odoo 17
How to Add New Custom Addons Path in Odoo 17How to Add New Custom Addons Path in Odoo 17
How to Add New Custom Addons Path in Odoo 17Celine George
 
Unit 3 Emotional Intelligence and Spiritual Intelligence.pdf
Unit 3 Emotional Intelligence and Spiritual Intelligence.pdfUnit 3 Emotional Intelligence and Spiritual Intelligence.pdf
Unit 3 Emotional Intelligence and Spiritual Intelligence.pdfDr Vijay Vishwakarma
 
How to Create and Manage Wizard in Odoo 17
How to Create and Manage Wizard in Odoo 17How to Create and Manage Wizard in Odoo 17
How to Create and Manage Wizard in Odoo 17Celine George
 
Kodo Millet PPT made by Ghanshyam bairwa college of Agriculture kumher bhara...
Kodo Millet  PPT made by Ghanshyam bairwa college of Agriculture kumher bhara...Kodo Millet  PPT made by Ghanshyam bairwa college of Agriculture kumher bhara...
Kodo Millet PPT made by Ghanshyam bairwa college of Agriculture kumher bhara...pradhanghanshyam7136
 
General Principles of Intellectual Property: Concepts of Intellectual Proper...
General Principles of Intellectual Property: Concepts of Intellectual  Proper...General Principles of Intellectual Property: Concepts of Intellectual  Proper...
General Principles of Intellectual Property: Concepts of Intellectual Proper...Poonam Aher Patil
 
Accessible Digital Futures project (20/03/2024)
Accessible Digital Futures project (20/03/2024)Accessible Digital Futures project (20/03/2024)
Accessible Digital Futures project (20/03/2024)Jisc
 
Python Notes for mca i year students osmania university.docx
Python Notes for mca i year students osmania university.docxPython Notes for mca i year students osmania university.docx
Python Notes for mca i year students osmania university.docxRamakrishna Reddy Bijjam
 
How to Manage Global Discount in Odoo 17 POS
How to Manage Global Discount in Odoo 17 POSHow to Manage Global Discount in Odoo 17 POS
How to Manage Global Discount in Odoo 17 POSCeline George
 
UGC NET Paper 1 Mathematical Reasoning & Aptitude.pdf
UGC NET Paper 1 Mathematical Reasoning & Aptitude.pdfUGC NET Paper 1 Mathematical Reasoning & Aptitude.pdf
UGC NET Paper 1 Mathematical Reasoning & Aptitude.pdfNirmal Dwivedi
 
Sensory_Experience_and_Emotional_Resonance_in_Gabriel_Okaras_The_Piano_and_Th...
Sensory_Experience_and_Emotional_Resonance_in_Gabriel_Okaras_The_Piano_and_Th...Sensory_Experience_and_Emotional_Resonance_in_Gabriel_Okaras_The_Piano_and_Th...
Sensory_Experience_and_Emotional_Resonance_in_Gabriel_Okaras_The_Piano_and_Th...Pooja Bhuva
 
Wellbeing inclusion and digital dystopias.pptx
Wellbeing inclusion and digital dystopias.pptxWellbeing inclusion and digital dystopias.pptx
Wellbeing inclusion and digital dystopias.pptxJisc
 
Google Gemini An AI Revolution in Education.pptx
Google Gemini An AI Revolution in Education.pptxGoogle Gemini An AI Revolution in Education.pptx
Google Gemini An AI Revolution in Education.pptxDr. Sarita Anand
 
Understanding Accommodations and Modifications
Understanding  Accommodations and ModificationsUnderstanding  Accommodations and Modifications
Understanding Accommodations and ModificationsMJDuyan
 
Key note speaker Neum_Admir Softic_ENG.pdf
Key note speaker Neum_Admir Softic_ENG.pdfKey note speaker Neum_Admir Softic_ENG.pdf
Key note speaker Neum_Admir Softic_ENG.pdfAdmir Softic
 

Último (20)

REMIFENTANIL: An Ultra short acting opioid.pptx
REMIFENTANIL: An Ultra short acting opioid.pptxREMIFENTANIL: An Ultra short acting opioid.pptx
REMIFENTANIL: An Ultra short acting opioid.pptx
 
Beyond_Borders_Understanding_Anime_and_Manga_Fandom_A_Comprehensive_Audience_...
Beyond_Borders_Understanding_Anime_and_Manga_Fandom_A_Comprehensive_Audience_...Beyond_Borders_Understanding_Anime_and_Manga_Fandom_A_Comprehensive_Audience_...
Beyond_Borders_Understanding_Anime_and_Manga_Fandom_A_Comprehensive_Audience_...
 
On National Teacher Day, meet the 2024-25 Kenan Fellows
On National Teacher Day, meet the 2024-25 Kenan FellowsOn National Teacher Day, meet the 2024-25 Kenan Fellows
On National Teacher Day, meet the 2024-25 Kenan Fellows
 
This PowerPoint helps students to consider the concept of infinity.
This PowerPoint helps students to consider the concept of infinity.This PowerPoint helps students to consider the concept of infinity.
This PowerPoint helps students to consider the concept of infinity.
 
ICT Role in 21st Century Education & its Challenges.pptx
ICT Role in 21st Century Education & its Challenges.pptxICT Role in 21st Century Education & its Challenges.pptx
ICT Role in 21st Century Education & its Challenges.pptx
 
How to Add New Custom Addons Path in Odoo 17
How to Add New Custom Addons Path in Odoo 17How to Add New Custom Addons Path in Odoo 17
How to Add New Custom Addons Path in Odoo 17
 
Unit 3 Emotional Intelligence and Spiritual Intelligence.pdf
Unit 3 Emotional Intelligence and Spiritual Intelligence.pdfUnit 3 Emotional Intelligence and Spiritual Intelligence.pdf
Unit 3 Emotional Intelligence and Spiritual Intelligence.pdf
 
How to Create and Manage Wizard in Odoo 17
How to Create and Manage Wizard in Odoo 17How to Create and Manage Wizard in Odoo 17
How to Create and Manage Wizard in Odoo 17
 
Kodo Millet PPT made by Ghanshyam bairwa college of Agriculture kumher bhara...
Kodo Millet  PPT made by Ghanshyam bairwa college of Agriculture kumher bhara...Kodo Millet  PPT made by Ghanshyam bairwa college of Agriculture kumher bhara...
Kodo Millet PPT made by Ghanshyam bairwa college of Agriculture kumher bhara...
 
General Principles of Intellectual Property: Concepts of Intellectual Proper...
General Principles of Intellectual Property: Concepts of Intellectual  Proper...General Principles of Intellectual Property: Concepts of Intellectual  Proper...
General Principles of Intellectual Property: Concepts of Intellectual Proper...
 
Accessible Digital Futures project (20/03/2024)
Accessible Digital Futures project (20/03/2024)Accessible Digital Futures project (20/03/2024)
Accessible Digital Futures project (20/03/2024)
 
Python Notes for mca i year students osmania university.docx
Python Notes for mca i year students osmania university.docxPython Notes for mca i year students osmania university.docx
Python Notes for mca i year students osmania university.docx
 
How to Manage Global Discount in Odoo 17 POS
How to Manage Global Discount in Odoo 17 POSHow to Manage Global Discount in Odoo 17 POS
How to Manage Global Discount in Odoo 17 POS
 
UGC NET Paper 1 Mathematical Reasoning & Aptitude.pdf
UGC NET Paper 1 Mathematical Reasoning & Aptitude.pdfUGC NET Paper 1 Mathematical Reasoning & Aptitude.pdf
UGC NET Paper 1 Mathematical Reasoning & Aptitude.pdf
 
Sensory_Experience_and_Emotional_Resonance_in_Gabriel_Okaras_The_Piano_and_Th...
Sensory_Experience_and_Emotional_Resonance_in_Gabriel_Okaras_The_Piano_and_Th...Sensory_Experience_and_Emotional_Resonance_in_Gabriel_Okaras_The_Piano_and_Th...
Sensory_Experience_and_Emotional_Resonance_in_Gabriel_Okaras_The_Piano_and_Th...
 
Wellbeing inclusion and digital dystopias.pptx
Wellbeing inclusion and digital dystopias.pptxWellbeing inclusion and digital dystopias.pptx
Wellbeing inclusion and digital dystopias.pptx
 
Mehran University Newsletter Vol-X, Issue-I, 2024
Mehran University Newsletter Vol-X, Issue-I, 2024Mehran University Newsletter Vol-X, Issue-I, 2024
Mehran University Newsletter Vol-X, Issue-I, 2024
 
Google Gemini An AI Revolution in Education.pptx
Google Gemini An AI Revolution in Education.pptxGoogle Gemini An AI Revolution in Education.pptx
Google Gemini An AI Revolution in Education.pptx
 
Understanding Accommodations and Modifications
Understanding  Accommodations and ModificationsUnderstanding  Accommodations and Modifications
Understanding Accommodations and Modifications
 
Key note speaker Neum_Admir Softic_ENG.pdf
Key note speaker Neum_Admir Softic_ENG.pdfKey note speaker Neum_Admir Softic_ENG.pdf
Key note speaker Neum_Admir Softic_ENG.pdf
 

0313 adobe-illustrator-cc

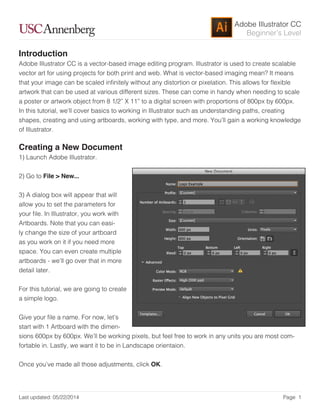
  • 1. Adobe Illustrator CC Last updated: 05/22/2014 Page 1 Beginner’s Level Introduction Adobe Illustrator CC is a vector-based image editing program. Illustrator is used to create scalable vector art for using projects for both print and web. What is vector-based imaging mean? It means that your image can be scaled ininitely without any distortion or pixelation. This allows for lexible artwork that can be used at various different sizes. These can come in handy when needing to scale a poster or artwork object from 8 1/2” X 11” to a digital screen with proportions of 800px by 600px. In this tutorial, we’ll cover basics to working in Illustrator such as understanding paths, creating shapes, creating and using artboards, working with type, and more. You’ll gain a working knowledge of Illustrator. Creating a New Document 1) Launch Adobe Illustrator. 2) Go to File > New... 3) A dialog box will appear that will allow you to set the parameters for your ile. In Illustrator, you work with Artboards. Note that you can easi- ly change the size of your artboard as you work on it if you need more space. You can even create multiple artboards - we’ll go over that in more detail later. For this tutorial, we are going to create a simple logo. Give your ile a name. For now, let’s start with 1 Artboard with the dimen- sions 600px by 600px. We’ll be working pixels, but feel free to work in any units you are most com- fortable in. Lastly, we want it to be in Landscape orientaion. Once you’ve made all those adjustments, click OK.
  • 2. Adobe Illustrator CC Last updated: 05/22/2014 Page 2 Beginner’s Level Navigating Your Document Your window will look like this. Within Illustrator, it’s pretty easy to navigate around your document using the Hand Tool (H) and the Zoom Tool (Z). Try using the tools to move your document around and to zoom in and out of it. Use their shortcuts (H, Z) or click on them on the tool bar (circled be- low). Tip: If you hold down the space bar, you can use the hand tool while you’re using most other tools. Once you let go, your cursor will go back to the tool you were using. This is helpful when you need to move around your document while using a tool and saves you the time it takes to switch tools. When using the zoom tool, it defaults to zooming in. Hold down the Alt key while using the zoom tool to change it to zoom out. You’ll notice the cursor now shows a magnifying glass with a minus sign (zoom out) in the middle instead of a plus sign (zoom in).
  • 3. Adobe Illustrator CC Last updated: 05/22/2014 Page 3 Beginner’s Level Understanding & Creating Artboards As noted before, when you create your ile, you can create multiple artboards from the beginning. You can also add them later as well. When creating a new document, you will notice this section here. You can in- crease the number of artboards, set the spacing between artboards, change the way the grid of artboards is set up (Grid by Row, Grid by Column, etc.) and set up how many columns of artboards you want. Again, you can edit them after you cre- ate the document by using the Artboard Tool (Shift + O) or inding it on the toolbar. Once in the Artboard tool, in the top toolbar, you’ll be able to rename your Artboard and change the dimensions of each artboard. You can also manu- ally hover over the markers around the artboards until the cursor appears and cinch it in. You can also hover over the center of your artboard and move it around your screen in the case that you want more space between your art- boards. Again, multiple artboards can come in handy when you want multiple artwork to exist on the same document. It also makes it easy to export each artwork individually when you place them each in their own artboard. See ‘Exporting.’
  • 4. Adobe Illustrator CC Last updated: 05/22/2014 Page 4 Beginner’s Level Creating Shapes & Adding Fill and Strokes For this tutorial, we only need 1 artboard for our logo. Let’s say I want to create a simple personal logo for my website. First, i’ll come up with a concept. I want to start off with a simple box that I’m going to have my initials running through. 1) Click on the Rectangle Tool in the tool bar. If you click and hold on it on the toolbar, you’ll notice lots of different shape tools at your disposal. 2) Click and drag until you’ve got the shape desired or dou- ble click on the screen until a dialog window shows up that allows you to input speciic dimensions for your rectangle. You can always adjust the size manually later by dragging the markers around the shape or on the top toolbar, you can adjust the width and height by inputting speciic dimensions. In this case I’ve created a rectangle that is 350 px wide and 150 px tall. 3) Now, we need to change the stroke and ill of our shape. Free free to make it any color you want. You can access this in your side toolbar. It usually defaults to a white ill and black stroke. I’m going to double click on the ill box and change it to a seafoam green. 4) Single click on the stroke box and click on the handy ‘No Fill’ button underneath the Stroke/Fill box. My Stroke and Fill now looks like this on the toolbar: 5) My shape appears like this:
  • 5. Adobe Illustrator CC Last updated: 05/22/2014 Page 5 Beginner’s Level Using the Paintbrush Tool For my logo, now I want to place a cursive lettering of my intials on top of the rectangle in white. In this case, I’m going to use the paintbrush tool. Note: you can also use a premade type here, but I want mine to have a homemade look. 1) Open up the Paintbrush tool. 2) Hold and start painting on your artboard. 3) Change the stroke of your line to white. This is what mine looks like: You can also make adjusts to the line you’ve created by going to your top toolbar, where you can change the ill/stroke, stoke line width, opacity, and style. Illustrator gives you lots of options for preset styles. In this case, I’ve used the default 5pt. Round. If you click on the little triangle next to it, it will drop down a menu with different types of brushes that you can use.
  • 6. Adobe Illustrator CC Last updated: 05/22/2014 Page 6 Beginner’s Level Understanding & Drawing Path Points Paths are the line segments that make up the overall structure of the artwork that you create (the skeleton). For instance, a rectangle is made up of a path that has four vertical lines that all connect and there are four anchor points (the joints) in the corners. Every shape and object will have path and anchor points. You can also draw your own paths using the Pen Tool, es- entially creating your own artwork within Illustrator. The Pen Tool has some advanced features, but we’re going to go over basics to using the Pen Tool. Essentially, you are set- ting the dots and drawing the lines for your artwork object. You can create both straight and curved lines. For my logo, I want to create some abstract shapes underneath my rectangle in different shades of green/blue, which will serve as the background for my title: “Graphic Designer & Artist.” In this case, I just need to draw straight lines with the Pen tool. 1) Select the Pen Tool. 2) Click anywhere to start drawing your object. 3) Continue clicking to create your object. 4) To close your object, click back on the irst point. You should see a small circle next to the Pen tool that indicates that you are closing your path. I’m going to con- tinue making abstract shapes until it creates a big enough cluster to add my title.
  • 7. Adobe Illustrator CC Last updated: 05/22/2014 Page 7 Beginner’s Level My logo now looks like this: When working with paths, you can adjust your anchor/paths by using the Direct Selection Tool. The Direct Selection Tool will allow you to select the points within a path and move them around. For instance, let’s say I draw that last shape and don’t like how it looks. Instead of creating a whole new path, I can use the Direct Selection Tool to adjust the points. 1) Select the Direct Selection Tool and click on the shape. With this tool, you select points one at a time. A selected point will be a illed in blue anchor point and an unselected point will have white in the middle.
  • 8. Adobe Illustrator CC Last updated: 05/22/2014 Page 8 Beginner’s Level 2) Click and drag the anchor points to change the shape of your object.The shape now looks like this. Now my rectangle doesn’t match my bottom artwork, so now I want to adjust the shape of the rect- angle to mimic the atstract look. With the Pen Tool, you can also add add and subtract points. !) Click and hold down on the Pen Tool until you see a drop down menu. Select Add Anchor Point Tool. 2) Now hover over the path of the rectangle and click any- where on the path to add an anchor point. 3) This will create new Anchor points and you’ll see new blue points on the path. Now, you can use the Direct Selection Tool to move those points around and create a completely new shape.
  • 9. Adobe Illustrator CC Last updated: 05/22/2014 Page 9 Beginner’s Level Using Type & Creating Outlines Now, I want to add “Graphic Designer & Artist on top of my shapes. 1) Select the Type Tool. 2) Click anywhere and a cursor will appear for you to start typing. 3) Once done typing, click on the Selection Tool to move your text around. This will create a box around your text. Hover over it and you’ll get a cursor that will allow you to move your text around your artboard. 4) Once I’ve placed it on top of my artwork, I can double click on it to highlight the text and change the font/size using the top toolbar. I’ve changed my font to “Modern No. 20”, size 22pt.
  • 10. Adobe Illustrator CC Last updated: 05/22/2014 Page 10 Beginner’s Level In some cases, you’ll want to convert your text to outlines. This will allow you to manipulate the text in interesting ways. However, you will not be able to use the Text Tool to change what the text says after creating it into outlines. 1) To convert your text to outlines, click on the text with the Selection Tool. 2) Go to Type > Create Outlines. This will create outlines around each individual letter. However, the text is still grouped together. In order to manipulate each letter individually, you’ll need to ungroup the text. 3) Go to Object > Ungroup. You will not be able to select each letter individual and change its size and give the letter different ill/stroke colors. 4) Click on the G with the Selection Tool and increase the size by dragging the corner out. Hold down shift at the same time to ensure that it keeps the same proportions. 5) Rotate the letter by using the Rotate tool. You should then be able to click and rotate the object as desired. I did this both for the G and A as pictured below:
  • 11. Adobe Illustrator CC Last updated: 05/22/2014 Page 11 Beginner’s Level Exporting Now that I’ve completed my logo, I can adjust my artboard accordingly to it around my logo. This is crucial if you want your image to export with certain border dimensions around it. However, in this case, I’m exporting as a .png to allow the image to have a transparent background. 1) Go to File > Export... 2) A new dialog box will open that allows you to name your ile and select the format. I’ve chosen PNG. Notice the “Use Artboards” checkbox. This is helpful when you want it to export using the artboard parameters. (i.e. Nothing outside of the artboard will be exported as part of the image. It is also helpful when you have multiple artboards in a ile. With multiple artboards, it will export the image with what you’ve titled your image and -01, -02, etc. For example, if I have Logo as the name of my ile and I have 4 different artboards in my ile, it will export as “Logo-01.png”, “Logo-02.png”, etc. 3) Once done, click Export. 4) Depending on the format that you select, another dialog box may open that will give you more options in terms of the quality and size of the image ile. This will depend on what you need for your image / artwork.