Tinusaur Starter - User Guide
•
0 gostou•245 visualizações

Briefly, the Tinusaur is a minimal micro-controller hardware configuration based on Atmel AVR ATtiny family of products and more specifically those with DIP-8 case such as ATtiny25/ATtiny45/ATtiny85, ATtiny13 as well as their variations. The goal of the Tinusaur project is to have a simple, cheap and accessible quick-start platform for everyone interested in learning and creating things. The Tinusaur Starter is a beginners’ kit that will help you start with microcontrollers and the Tinusaur particularly.
Recomendados

Recomendados
Mais conteúdo relacionado
Semelhante a Tinusaur Starter - User Guide
Semelhante a Tinusaur Starter - User Guide (20)
Mais de Neven Boyanov
Último
Último (20)
Tinusaur Starter - User Guide
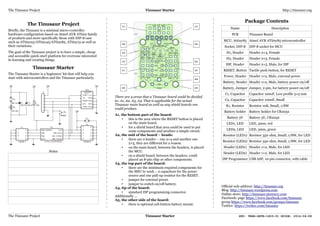
- 1. The Tinusaur Project Tinusaur Starter http://tinusaur.org The Tinusaur Project Briefly, the Tinusaur is a minimal micro-controller hardware configuration based on Atmel AVR ATtiny family of products and more specifically those with DIP-8 case such as ATtiny25/ATtiny45/ATtiny85, ATtiny13 as well as their variations. The goal of the Tinusaur project is to have a simple, cheap and accessible quick-start platform for everyone interested in learning and creating things. Tinusaur Starter The Tinusaur Starter is a beginners’ kit that will help you start with microcontrollers and the Tinusaur particularly. Notes There are 4 areas that a Tinusaur board could be divided to: A1, A2, A3, A4. That is applicable for the actual Tinusaur main board as well as any shield boards one could produce. A1, the bottom part of the board: • this is the area where the RESET button is placed on the main board. • for a shield board that area could be used to put some components and produce a simple circuit. A2, the mid of the board – heads: • there are 2 header – one 2×4 and another one 2×5, they are different for a reason. • on the main board, between the headers, is placed the MCU. • on a shield board, between the headers, could placed an 8-pin chip or other components. A3, the top part of the board: • there are the minimum required components for the MSU to work – 2 capacitors for the power source and one pull-up resistor for the RESET. • jumper for external power – red. • jumper to switch on/off battery – yellow. A4, tip of the board: • standard ISP programming connector. Additionally … A5, the other side of the board: • there is optional cell-button battery mount. Package Contents Name Description PCB Tinusaur Board MCU, Attiny85 Atmel AVR ATtiny85 microcontroller Socket, DIP-8 DIP-8 socket for MCU H1, Header Header 2×4, Female H2, Header Header 2×5, Female ISP, Header Header 2×5, Male, for ISP RESET, Button Tactile push button, for RESET Power, Header Header 1×2, Male, red – external power Battery, Header Header 1×2, Male, yellow – battery power on/off Battery, Jumper Jumper, 2-pin, yellow – for battery power on/off C1, Capacitor Capacitor 100uF, Low profile 5×5 mm C2, Capacitor Capacitor 100nF, Small R1, Resistor Resistor 10K, Small, 1/8W Battery holder Battery holder for CR2032 Battery 3V Battery 3V, CR2032 LED1, LED LED, 3mm, red LED2, LED LED, 3mm, green Resistor (LED1) Resistor 330 ohm, Small, 1/8W, for LED Resistor (LED2) Resistor 330 ohm, Small, 1/8W, for LED Header (LED1) Header 1×2, Male, for LED Header (LED2) Header 1×2, Male, for LED ISP Programmer USB ASP, 10-pin connector, with cable Official web address: http://tinusaur.org Blog: http://tinusaur.wordpress.com Online store: http://tinusaur.storenvy.com Facebook: page https://www.facebook.com/tinusaur, group https://www.facebook.com/groups/tinusaur Twitter: https://twitter.com/tinusaur The Tinusaur Project Tinusaur Starter SKU: TNSR-SRTR-1403-01 GUIDE: 2014-06-12