SlideShare uma empresa Scribd logo
1 de 13
Baixar para ler offline
1

CoFold Mortice
Fitting Instructions

Diagram 1

for top hung exterior folding doors

SYSTEM CAPACITY
Maximum leaf height
Maximum leaf weight
Maximum leaf width
Maximum leaf thickness

- 3300mm
- 100kg
- 1000mm
- 35-68mm*

*For thicker or thinner doors please contact technical@coastal-group.com.
**For doors between 35-44mm an alternative to the Cofold flushbolt is required.

INSIDE

OUTSIDE

Diagram 2

JAMB CAP
IN LINE WITH
TRACK

Diagram 3

Diagram 4

34
140

WHEN USED IN CONJUNCTION WITH
ALUMINIUM SUPPORT CHANNEL 94SC
THE OUTER CHANNEL DIMENSIONS
BECOME 23H x 25W
JAMB CAP IN LINE WITH TRACK
JAMB CAP GASKET

52

39

212

ALTERNATIVE ALUMINIUM THRESHOLD SF94T
SUPPLIED BY COASTAL - COMES COMPLETE
WITH 94P AND ENDCAPS AND IS PREDRILLED
FOR DRAINAGE. REFER TO PAGE 9
2

PREPARATION
SF1 SF2R SF2L SF3 SF4 SF5 SF6 SF7 SF8 SF9 SF10 -

Pivot Assembly Set
End Hanger Set Right Hand
End Hanger Set Left Hand
Hinge Set with Handle
Intermediate Hanger Set
Hinge Set Inward Opening
Hinge Set Offset Inward Opening
Hinge Set Offset Outward Opening
Rebated End Hanger Meeting
Pivot Hinge for Doors Over 2200mm High
Face Fix Handle (Optional)

Diagram 6

Diagram 5
3

Preparing the opening
Ensure the opening is square and all load bearing areas are suitable for the weight of the system.Take particular care to ensure there is
sufficient strength in the structure above the opening to take the concentrated weight of the doors, when in the open stacked position.
The Cofold system provides +/- 3mm of horizontal and vertical adjustment. Use a plumb line to ensure that the centre line of the track
and the centre line of the channel are offset by 19mm.

Diagram 8

OR USE ALUMINIUM
THRESHOLD BY COASTAL

Diagram 7

Diagram 9

Preparing the door frame
Refer to page 10

=

=

Diagram 10
4

Preparing the door leaves

Door leaf width calculation
1. Decide how many door leaves you want in the opening.
2. Add together all the 3mm clearances required between door leaves and the jambs (there will be one more than the number of door
leaves).This is the total clearance figure.
3. Measure the finished opening width (W) and deduct from this the total clearance figure.
4. Divide this new figure (finished opening width minus total clearance) by the number of doors to produce the actual door width. (N.B.
all doors with the CoFold system are the same width).
For example: For a 4 door leaf system with a finished opening width of 2345mm the door leaf width would be 2345mm minus (5x3mm)
divided by 4 (number of door leaves) = 582.5mm.
Door leaf height calculation
Leaf height = finished opening height (see diagram 7) minus 66mm.

Diagram 11
PREPARING THE DOOR LEAF
AT THE JAMB

Door Seals
Prepare the door leaves to accept the
AQ63B seal.

BETWEEN DOOR EDGES

Diagram 12
ADD 10mm TO
WIDTH OF EACH
LEAF TO CREATE
REBATE

ADD 10mm TO
WIDTH OF END
HANGER LEAF
FOR REBATE

Meeting Doors
Use the SF8 set for 2+2 rebated timber door
configurations. For all other configurations use
SF2L (left hand) or SF2R (right hand) end
hanger sets. For kit handing refer to diagram 6.
Diagram 13
5

Door hardware positioning

Diagram 14

End door leaf Preparation

7.5mm check In for SF1, SF2 and SF8

Diagram 15
6

Door hardware attachment
2 WHEEL ASSEMBLY
SIDE THRUST BEARING

Ø 3mm
PILOT HOLES

FIXING SCREW (6 OFF)

CHECK IN
FOR SF9

HANGER BODY
COVER (SLIDE)

IMPORTANT

WASHER
HANGER BOLT

BOTH SCREWS MUST BE
FITTED UNDER THE COVERS OF
ALL THE END HINGES

Kit SF1

Kit SF2L (or SF2R)

Kit SF8

Kit SF4

Diagram 16
7

INSTALLATION
1. Ensure that you have all the required parts. Unpack the
components and identify the parts. Lay the parts on the
ground in the same configuration as they will be when
installed. It is recommended that a light smear of general
purpose grease is applied to all bolts prior to assembly.

Diagram 17

2. Cut the track to the required length and pre-drill for
fixings in accordance with diagram 17. Please note that the
extra fixings are required where the doors stack together.

TOP PIVOT SECURING BLOCK

3. Cut the channel to the required length and fit in the
sill. Drill drainage holes (see diagram 1).

PIVOT SECURING BLOCK HEX
BOLTS

4. Remove all the wheel assemblies and pivot block from
the hanger and pivot bolts, and disassemble top pivot
block assembly.

PIVOT CAM

5. Slide the wheel assemblies and track pivot block into
the track in the correct order, orientation, and position
and fix the track in position. Reassemble top pivot block
assembly (see diagram 18).

PIVOT ADJUSTER

PIVOT CLAMP PLATE

6. Remove the bottom pivot assembly and guide roller
assembly (see diagram 19). Disassemble the bottom pivot
assembly.

ADJUSTMENT LOCK OFF
BOLTS

Diagram 18

7. For installation, assemble leaves in pairs via the hinges.
To improve the ease of installation pre-drill pilot holes for
all hinge parts. Fit kits SF1, SF7,SF4 and SF9 (optional) to
first pair of leaves.
Please ensure all 5 screws are fixed per end hinge.
8. Screw the bottom anchor of the bottom pivot assembly
to the base of the channel 11mm from the jamb. Please
note, the screw nearest the end of the bottom anchor is
closest to the jamb (see diagram 20). Reassemble the pivot
assembly leaving the clamping screws loose (see diagram 24).
9. Suspend pairs of leaves by engaging top pivot and
hanger bolts using 5mm allen key supplied (see top of
diagram 19).
10. Attach the bottom pivot and guide assembly to their
respective hinges, adjust the bottom pivot side plates
position so that it engages with the hinge bolt.Tighten
pivot and guide strap bolts (see diagram 21).
11. Lift the next pair of leaves into position and support
their weight by screwing the hanger strap bolt into the
hanger wheel assembly and fixing the second and third
leaves together.

Diagram 19

JAMB

CHANNEL

12. Continue this procedure until all leaves are fitted.
BOTTOM ANCHOR

Diagram 20

Diagram 21
8

ADJUSTMENT
Height Adjustment (± 3mm)

1. Close leaves and adjust the door height to achieve an
equal gap between the top of the leaves and the track (a
9mm gap is recommended). (see diagram 22).

INSIDE
LOCKING HANGER
GRUB SCREW
ON INSIDE OF DOOR

2. Once the adjustment is complete use the allen key to
tighten the locking hanger grub screw until secure.

Lateral Adjustment

1. With the unit still in the closed position, slide the set
of leaves towards the jamb to obtain the desired gap
between the jamb and the pivot door.A gap of 3mm is
recommended using the adjustment cam. Once in
position tighten the clamp screws. (see diagram 24).

2. Fold the leaves and adjust the bottom side plate using
the allen key provided so that the gap between the door
and the jamb is the same over the full length of the door.

3. Tighten the two clamping screws to lock the side plate
to the bottom anchor.

4. Once the pivot door is in the correct position insert
and tighten the locking pivot grub screw from the inside
position. (as shown in diagram 23)

SF4 ILLUSTRATED.
SAME METHOD OF
ADJUSTMENT APPLIED
TO SF1, SF2L, SF2R AND
SF8.

CLAMP SCREW

Diagram 22

INSIDE

LOCKING PIVOT
GRUB SCREW
ON INSIDE OF
DOOR

CLAMP SCREW
ADJUSTMENT CAM

Diagram 23

CARE AND MAINTENANCE
To provide years of trouble free operation, it is
recommended that the track is kept free from dirt and
debris. Periodically replace the general purpose grease on
all bolts.To prolong the appearance of the exposed hinge
parts, it is recommended they are periodically washed
with soap and water. Maintenance is required on all
components including stainless steel to validate
manufacturers warranty. For further maintenance details
please refer to our website.

ADJUSTMENT CAM

CLAMP SCREW
BOTTOM SIDE
PLATE

CLAMP SCREW

BOTTOM ANCHOR
JAMB SIDE

ADJUSTMENT

Diagram 24
9

Aluminium Threshold Jamb Kit

51
25.5
25.5

21
94

25

Jamb Cap

Jamb Cap Gasket

51

15

34

19

Threshold SF94T

8

27

2.5

83

Pre-drilled 10mm diameter drainage
holes at 300mm centres

Endcap
2.5

51

140
51

25.5
25.5

23
27

8
15

34

Jamb Cap
Jamb Cap

2.5
2.5

Jamb Cap Gasket
Jamb Cap Gasket

51

140

21
94

25

52

39

Endcap
Endcap

83
Jamb Cap
Jamb Cap Gasket

52

(All dimensions in mm)

39
Endcap
10

SF9 Intermediate Pivot Set
1. The Cofold SF9 intermediate pivot set shown in Diagram 1,
should
be fitted to the pivot door approximately mid way between the SF1 top
and bottom pivot assemblies. The SF9 hinge must be positioned on the
same centre line as the SF1 top and bottom pivot hinge bodies.

5. Fit the pivot door into position using the SF1 pivot set.

2. Route the door and drill the pilot holes as shown on Diagram 2. Fit the
hinge body using the five screws provided.

7. Screw the threaded link arm fully into the frame support plate. The
centre of the threaded hole in the link arm should be positioned to
receive the strap bolt. Screw the strap bolt in to the link arm until there
is a 2mm gap between the head of the strap bolt and the hinge body, as
shown in Diagram 4.

6. Fit the SF9 cover sleeve on to the SF9 hinge body and drop the hinge
strap bolt into position, as shown in Diagram 4.

3. Prepare the frame for the opening by drilling a Ø12mm hole (as shown
in Diagram 3), ensuring that the centre point of the hole is 20mm lower
than the bottom of the hinge body as shown on Diagram 4. Rebate the
frame support plate, if required.

8. Adjust the SF9 pivot set to ensure the clearance between the pivot door
and the frame is uniform (Diagram 5).

4. Screw the frame support plate on to the opening frame preparation, as
shown in Diagram 3.

Note: These fitting instructions should be used in conjunction with the
Cofold Fitting Instructions

7.5

17.5
Main strap bolt

SF1

Hinge body

100
SF9
Cover plate

R17.5

SF1
Cover sleeve

Diagram 1.

Diagram 2.

ole
ph
dee
m
28m

Opening
frame

Ø12

28mm

Pilot holes
R12.5

Rebate details
see diagram 1

2.5

mm

dee

p

25mm
41m
m

Door in closed
position

Hole centre to
door face 8mm

Ø12

Diagram 3.

Door shown in the
open position

Door shown in the
open position

8mm
2mm gap

2mm gap

Main strap bolt

Adjustment:
3mm in to the frame
6mm out to the frame

Line from bottom
of the hinge body

20mm
Threaded link arm
Frame support plate

Diagram 4.

Diagram 5.
11

Outward Opening Flush Bolt
For top hung exterior folding doors. For use in conjunction with standard outward opening fitting
instructions. Follow routing instructions for the bolt keep and flush bolt length to be fitted, fit both with
the screws supplied. Suitable pilot holes for screws are recommended.

Routing detail for
450mm Top Flush Bolt

Routing detail for
600mm Top Flush Bolt

HEAD BOARD
LINTEL

12.5
FASCIA

Routing detail for
190mm Top Flush Bolt

18

Routing detail for
190mm Bottom
Flush Bolt

PLATE

600

450

580

190

430

170

30

INSIDE

4

190

Enlarged detail showing the
sectional routing dimensions
for all 3 bolt sizes
40

OUTSIDE

170

TOP FLUSH
BOLT

22

17

Note:

Routing detail is the
same for both locking
and non-locking flush
bolts.

Door height

Recommended
Bolt length for top of door

Recommended
Bolt length for bottom of door

Upto 2200mm

190mm

190mm

Upto 2450mm

450mm

190mm

Over 2450mm

600mm

190mm

BOTTOM
FLUSH
BOLT

Routing detail for bolt keep sockets
Top Flush Bolt into Head

Bottom Flush Bolt into Sill
Fixing screw centres
40

Ø12

PLATE
Ø12

10

4

10

12.5

12.5

SILL
REBATE

40
10

40

30
25

12
65

40mm fixing screw centres - Use fixing plate as drilling template

SILL

18
12.5

Section through door showing
flush bolt rebate detail
(All dimensions in mm)
12

Inward Opening Flush Bolt
For top hung exterior folding doors. For use in conjunction with standard inward opening fitting
instructions. Follow routing instructions for the bolt keep and flush bolt length to be fitted, fit both with
the screws supplied. Suitable pilot holes for screws are recommended.
Routing detail for
600mm Top Flush Bolt

HEAD BOARD

12

LINTEL
20

Routing detail for
190mm Bottom
Flush Bolt

580

430

170

Note: Routing
detail is the same for
both locking and nonlocking flush bolts.

FASCIA

Routing detail for
450mm Top Flush Bolt

Routing detail for
190mm Top Flush Bolt

80

600

450

190

PLATE

12

29

4

40
22

17

22

40
22

17

INSIDE

4

190

Enlarged detail showing the
sectional routing dimensions
for all 3 top bolt sizes

OUTSIDE

170

TOP FLUSH
BOLT

Enlarged detail
showing the
sectional routing
dimensions for
the bottom bolt

12

Door height

Recommended
Bolt length for top of door

Recommended
Bolt length for bottom of door

Upto 2200mm

190mm

190mm

Upto 2450mm

450mm

190mm

Over 2450mm

600mm

190mm

BOTTOM FLUSH
BOLT
(Locking bolt shown)

Routing detail for top bolt keep socket

Ø12

65
10
12.5 max 7.5

12

SILL
REBATE

11

12.5 max

4
40

SILL

10
40
Plate fixing screw centres

40mm fixing screw centres - Use fixing plate as drilling template

Section through door showing
flush bolt rebate detail
(All dimensions in mm)

Coastal Joinery Hardware, Global House, Bojea Industrial Estate, Trethowel, St Austell, Cornwall, PL25 5RJ.
Tel: 01726 871726 Fax: 01726 871731 Email: sales@coastal-group.com

Part No: 220159
Issue 7 -January 2013
ENQUIRY FORM FOR BI-FOLD DOORS

Please enter your address here:
Your Details/FAO
Address

Telephone:

Fax:

PROJECT TITLE:

Email:

LOCATION:

SPECIFICATION SHEET
System Capacity:

1. Opening Size:

BI-FOLD DOORS
Maximum Leaf Height: 3300mm
Maximum Leaf Width: 1000mm
Maximum Leaf Weight: 100kg
Leaf Thickness: 35mm-68mm

mm

Height:
2. Door Configuration:
Number of leaves sliding (viewed from the outside)

Width:

mm

RH
LH

3. Outward Opening:
Due to weathering, outward opening Is
highly recomended.

Yes
No

4. Locking

None
Espagnolette
Sash lock

5. Finish

Satin Stainless Steel
PVD Brass
Polished Stainless Steel

6. System

CoFold
CoFold Ultra (High Security)

7. Gear Types
Choice only applies to CoFold system &
not the CoFold Ultra.

Mortice
Non Mortice

8. Weatherseal Required:

None

Brown

White
PRE-TENSION

Coastal Group | T 01726 871726 | F 01726 871731
Email sales@coastal-group.com | Visit www.coastal-group.com

Mais conteúdo relacionado

Mais procurados

Andrea Palladio villa rotonda
Andrea Palladio villa rotondaAndrea Palladio villa rotonda
Andrea Palladio villa rotondaAltamash Bhambro
 
Curtain wall system
Curtain wall systemCurtain wall system
Curtain wall systembee_by
 
Air Conditioning case study
Air Conditioning case studyAir Conditioning case study
Air Conditioning case studySona Rawat
 
Basements light and ventilation
Basements light and ventilationBasements light and ventilation
Basements light and ventilationDanishPathan7
 
Passive House Principles for Hot Humid Climates
Passive House Principles for Hot Humid ClimatesPassive House Principles for Hot Humid Climates
Passive House Principles for Hot Humid Climatesaiahouston
 
Partition wall
Partition wallPartition wall
Partition wallKris Kiran
 
Aluminum partition wall
Aluminum partition wallAluminum partition wall
Aluminum partition wallZuber Memon
 
Long span structures in Concrete and Steel
Long span structures in Concrete and SteelLong span structures in Concrete and Steel
Long span structures in Concrete and SteelRithika Ravishankar
 
PARTITIONS AND ROOFING SHEETS
PARTITIONS AND ROOFING SHEETSPARTITIONS AND ROOFING SHEETS
PARTITIONS AND ROOFING SHEETSsaniyamulla2
 
PRECAST CONCRETE STAIRS
  PRECAST CONCRETE STAIRS  PRECAST CONCRETE STAIRS
PRECAST CONCRETE STAIRSAbhishek Mewada
 
Space frames-modular construction technology
Space frames-modular construction technologySpace frames-modular construction technology
Space frames-modular construction technologyAnjith Augustine
 
Building materials and construction technlogoy- FALSE CEILING & FLOORING
Building materials and construction technlogoy- FALSE CEILING & FLOORINGBuilding materials and construction technlogoy- FALSE CEILING & FLOORING
Building materials and construction technlogoy- FALSE CEILING & FLOORINGAishwarya Deopujari
 

Mais procurados (20)

Gherkin london
Gherkin londonGherkin london
Gherkin london
 
Andrea Palladio villa rotonda
Andrea Palladio villa rotondaAndrea Palladio villa rotonda
Andrea Palladio villa rotonda
 
Gehry's house
Gehry's houseGehry's house
Gehry's house
 
Partition walls
Partition walls Partition walls
Partition walls
 
Space structure
Space structureSpace structure
Space structure
 
Curtain wall system
Curtain wall systemCurtain wall system
Curtain wall system
 
Wooden cladding
Wooden claddingWooden cladding
Wooden cladding
 
Space frame
Space frameSpace frame
Space frame
 
Air Conditioning case study
Air Conditioning case studyAir Conditioning case study
Air Conditioning case study
 
Basements light and ventilation
Basements light and ventilationBasements light and ventilation
Basements light and ventilation
 
Passive House Principles for Hot Humid Climates
Passive House Principles for Hot Humid ClimatesPassive House Principles for Hot Humid Climates
Passive House Principles for Hot Humid Climates
 
Partition wall
Partition wallPartition wall
Partition wall
 
Aluminum partition wall
Aluminum partition wallAluminum partition wall
Aluminum partition wall
 
Long span structures in Concrete and Steel
Long span structures in Concrete and SteelLong span structures in Concrete and Steel
Long span structures in Concrete and Steel
 
PARTITIONS AND ROOFING SHEETS
PARTITIONS AND ROOFING SHEETSPARTITIONS AND ROOFING SHEETS
PARTITIONS AND ROOFING SHEETS
 
Partition wall
Partition wallPartition wall
Partition wall
 
Curtain walls
Curtain wallsCurtain walls
Curtain walls
 
PRECAST CONCRETE STAIRS
  PRECAST CONCRETE STAIRS  PRECAST CONCRETE STAIRS
PRECAST CONCRETE STAIRS
 
Space frames-modular construction technology
Space frames-modular construction technologySpace frames-modular construction technology
Space frames-modular construction technology
 
Building materials and construction technlogoy- FALSE CEILING & FLOORING
Building materials and construction technlogoy- FALSE CEILING & FLOORINGBuilding materials and construction technlogoy- FALSE CEILING & FLOORING
Building materials and construction technlogoy- FALSE CEILING & FLOORING
 

Destaque

CoFold Non-Mortice Sliding Folding Door Gear Installation Instructions
CoFold Non-Mortice Sliding Folding Door Gear Installation InstructionsCoFold Non-Mortice Sliding Folding Door Gear Installation Instructions
CoFold Non-Mortice Sliding Folding Door Gear Installation InstructionsCoastal Joinery Hardware
 
Gm tech2 scan tool clone vs legit
Gm tech2 scan tool clone vs legitGm tech2 scan tool clone vs legit
Gm tech2 scan tool clone vs legitcareucar123
 
The World's only Double Contact Flipper Gasket for Sliding Sash Windows - Tec...
The World's only Double Contact Flipper Gasket for Sliding Sash Windows - Tec...The World's only Double Contact Flipper Gasket for Sliding Sash Windows - Tec...
The World's only Double Contact Flipper Gasket for Sliding Sash Windows - Tec...Coastal Joinery Hardware
 
Methods and points of entry in burglary incidents in the united kingdom 2002 ...
Methods and points of entry in burglary incidents in the united kingdom 2002 ...Methods and points of entry in burglary incidents in the united kingdom 2002 ...
Methods and points of entry in burglary incidents in the united kingdom 2002 ...Coastal Joinery Hardware
 
The open wall concept - bringing the outside in
The open wall concept - bringing the outside inThe open wall concept - bringing the outside in
The open wall concept - bringing the outside inCoastal Joinery Hardware
 

Destaque (8)

Should i use a split or a solid spindle
Should i use a split or a solid spindleShould i use a split or a solid spindle
Should i use a split or a solid spindle
 
CoFold Non-Mortice Sliding Folding Door Gear Installation Instructions
CoFold Non-Mortice Sliding Folding Door Gear Installation InstructionsCoFold Non-Mortice Sliding Folding Door Gear Installation Instructions
CoFold Non-Mortice Sliding Folding Door Gear Installation Instructions
 
Ce marking
Ce markingCe marking
Ce marking
 
Shanghai Green Building Subsidies
Shanghai Green Building SubsidiesShanghai Green Building Subsidies
Shanghai Green Building Subsidies
 
Gm tech2 scan tool clone vs legit
Gm tech2 scan tool clone vs legitGm tech2 scan tool clone vs legit
Gm tech2 scan tool clone vs legit
 
The World's only Double Contact Flipper Gasket for Sliding Sash Windows - Tec...
The World's only Double Contact Flipper Gasket for Sliding Sash Windows - Tec...The World's only Double Contact Flipper Gasket for Sliding Sash Windows - Tec...
The World's only Double Contact Flipper Gasket for Sliding Sash Windows - Tec...
 
Methods and points of entry in burglary incidents in the united kingdom 2002 ...
Methods and points of entry in burglary incidents in the united kingdom 2002 ...Methods and points of entry in burglary incidents in the united kingdom 2002 ...
Methods and points of entry in burglary incidents in the united kingdom 2002 ...
 
The open wall concept - bringing the outside in
The open wall concept - bringing the outside inThe open wall concept - bringing the outside in
The open wall concept - bringing the outside in
 

Semelhante a CoFold Mortice Sliding Folding Door Gear Installation Instructions

Hyster d007 (h280 xl) forklift service repair manual
Hyster d007 (h280 xl) forklift service repair manualHyster d007 (h280 xl) forklift service repair manual
Hyster d007 (h280 xl) forklift service repair manualfjskkkdmem
 
Hyster d007 (h280 xl) forklift service repair manual
Hyster d007 (h280 xl) forklift service repair manualHyster d007 (h280 xl) forklift service repair manual
Hyster d007 (h280 xl) forklift service repair manualfjekkdmmem
 
Hyster d007 (h280 xl) forklift service repair manual
Hyster d007 (h280 xl) forklift service repair manualHyster d007 (h280 xl) forklift service repair manual
Hyster d007 (h280 xl) forklift service repair manualvvcauswe274kkkmm
 
Hyster d007 (h250 xl) forklift service repair manual
Hyster d007 (h250 xl) forklift service repair manualHyster d007 (h250 xl) forklift service repair manual
Hyster d007 (h250 xl) forklift service repair manualufjsjejkksemme
 
Hyster d007 (h250 xl) forklift service repair manual
Hyster d007 (h250 xl) forklift service repair manualHyster d007 (h250 xl) forklift service repair manual
Hyster d007 (h250 xl) forklift service repair manualfjjskekkdmme
 
Hyster d007 (h280 xl) forklift service repair manual
Hyster d007 (h280 xl) forklift service repair manualHyster d007 (h280 xl) forklift service repair manual
Hyster d007 (h280 xl) forklift service repair manualfjsjeseokdme
 
Hyster d007 (h230 xl) forklift service repair manual
Hyster d007 (h230 xl) forklift service repair manualHyster d007 (h230 xl) forklift service repair manual
Hyster d007 (h230 xl) forklift service repair manualfujdfjjskekmwem
 
Hyster d007 (h230 xl) forklift service repair manual
Hyster d007 (h230 xl) forklift service repair manualHyster d007 (h230 xl) forklift service repair manual
Hyster d007 (h230 xl) forklift service repair manualifkskjdksmem
 
Hyster d007 (h230 xl) forklift service repair manual
Hyster d007 (h230 xl) forklift service repair manualHyster d007 (h230 xl) forklift service repair manual
Hyster d007 (h230 xl) forklift service repair manualfujjsefjkskem
 
Hyster d007 (h230 xl) forklift service repair manual
Hyster d007 (h230 xl) forklift service repair manualHyster d007 (h230 xl) forklift service repair manual
Hyster d007 (h230 xl) forklift service repair manualfujsefkksekfm
 
Hyster d007 (h250 xl) forklift service repair manual
Hyster d007 (h250 xl) forklift service repair manualHyster d007 (h250 xl) forklift service repair manual
Hyster d007 (h250 xl) forklift service repair manualfuksfemmeme
 
Hyster d007 (h280 xl) forklift service repair manual
Hyster d007 (h280 xl) forklift service repair manualHyster d007 (h280 xl) forklift service repair manual
Hyster d007 (h280 xl) forklift service repair manualfujdjjskekwmem
 
Hyster d007 (h250 xl) forklift service repair manual
Hyster d007 (h250 xl) forklift service repair manualHyster d007 (h250 xl) forklift service repair manual
Hyster d007 (h250 xl) forklift service repair manualfsefkksefmme
 
Hyster d007 (h280 xl) forklift service repair manual
Hyster d007 (h280 xl) forklift service repair manualHyster d007 (h280 xl) forklift service repair manual
Hyster d007 (h280 xl) forklift service repair manualuskekmemm
 
Hyster d007 (h210 xl) forklift service repair manual
Hyster d007 (h210 xl) forklift service repair manualHyster d007 (h210 xl) forklift service repair manual
Hyster d007 (h210 xl) forklift service repair manualufdujjsjekkemme
 
Hyster d007 (h165 xl) forklift service repair manual
Hyster d007 (h165 xl) forklift service repair manualHyster d007 (h165 xl) forklift service repair manual
Hyster d007 (h165 xl) forklift service repair manualusuejjskkemme
 
Hyster d007 (h210 xl) forklift service repair manual
Hyster d007 (h210 xl) forklift service repair manualHyster d007 (h210 xl) forklift service repair manual
Hyster d007 (h210 xl) forklift service repair manualjfksekmmdme
 
Hyster d007 (h190 xl) forklift service repair manual
Hyster d007 (h190 xl) forklift service repair manualHyster d007 (h190 xl) forklift service repair manual
Hyster d007 (h190 xl) forklift service repair manualfusjfjskekmem
 
Hyster d007 (h210 xl) forklift service repair manual
Hyster d007 (h210 xl) forklift service repair manualHyster d007 (h210 xl) forklift service repair manual
Hyster d007 (h210 xl) forklift service repair manualoekdmjkemme
 
Hyster d007 (h190 xl) forklift service repair manual
Hyster d007 (h190 xl) forklift service repair manualHyster d007 (h190 xl) forklift service repair manual
Hyster d007 (h190 xl) forklift service repair manualfusjejfskekemm
 

Semelhante a CoFold Mortice Sliding Folding Door Gear Installation Instructions (20)

Hyster d007 (h280 xl) forklift service repair manual
Hyster d007 (h280 xl) forklift service repair manualHyster d007 (h280 xl) forklift service repair manual
Hyster d007 (h280 xl) forklift service repair manual
 
Hyster d007 (h280 xl) forklift service repair manual
Hyster d007 (h280 xl) forklift service repair manualHyster d007 (h280 xl) forklift service repair manual
Hyster d007 (h280 xl) forklift service repair manual
 
Hyster d007 (h280 xl) forklift service repair manual
Hyster d007 (h280 xl) forklift service repair manualHyster d007 (h280 xl) forklift service repair manual
Hyster d007 (h280 xl) forklift service repair manual
 
Hyster d007 (h250 xl) forklift service repair manual
Hyster d007 (h250 xl) forklift service repair manualHyster d007 (h250 xl) forklift service repair manual
Hyster d007 (h250 xl) forklift service repair manual
 
Hyster d007 (h250 xl) forklift service repair manual
Hyster d007 (h250 xl) forklift service repair manualHyster d007 (h250 xl) forklift service repair manual
Hyster d007 (h250 xl) forklift service repair manual
 
Hyster d007 (h280 xl) forklift service repair manual
Hyster d007 (h280 xl) forklift service repair manualHyster d007 (h280 xl) forklift service repair manual
Hyster d007 (h280 xl) forklift service repair manual
 
Hyster d007 (h230 xl) forklift service repair manual
Hyster d007 (h230 xl) forklift service repair manualHyster d007 (h230 xl) forklift service repair manual
Hyster d007 (h230 xl) forklift service repair manual
 
Hyster d007 (h230 xl) forklift service repair manual
Hyster d007 (h230 xl) forklift service repair manualHyster d007 (h230 xl) forklift service repair manual
Hyster d007 (h230 xl) forklift service repair manual
 
Hyster d007 (h230 xl) forklift service repair manual
Hyster d007 (h230 xl) forklift service repair manualHyster d007 (h230 xl) forklift service repair manual
Hyster d007 (h230 xl) forklift service repair manual
 
Hyster d007 (h230 xl) forklift service repair manual
Hyster d007 (h230 xl) forklift service repair manualHyster d007 (h230 xl) forklift service repair manual
Hyster d007 (h230 xl) forklift service repair manual
 
Hyster d007 (h250 xl) forklift service repair manual
Hyster d007 (h250 xl) forklift service repair manualHyster d007 (h250 xl) forklift service repair manual
Hyster d007 (h250 xl) forklift service repair manual
 
Hyster d007 (h280 xl) forklift service repair manual
Hyster d007 (h280 xl) forklift service repair manualHyster d007 (h280 xl) forklift service repair manual
Hyster d007 (h280 xl) forklift service repair manual
 
Hyster d007 (h250 xl) forklift service repair manual
Hyster d007 (h250 xl) forklift service repair manualHyster d007 (h250 xl) forklift service repair manual
Hyster d007 (h250 xl) forklift service repair manual
 
Hyster d007 (h280 xl) forklift service repair manual
Hyster d007 (h280 xl) forklift service repair manualHyster d007 (h280 xl) forklift service repair manual
Hyster d007 (h280 xl) forklift service repair manual
 
Hyster d007 (h210 xl) forklift service repair manual
Hyster d007 (h210 xl) forklift service repair manualHyster d007 (h210 xl) forklift service repair manual
Hyster d007 (h210 xl) forklift service repair manual
 
Hyster d007 (h165 xl) forklift service repair manual
Hyster d007 (h165 xl) forklift service repair manualHyster d007 (h165 xl) forklift service repair manual
Hyster d007 (h165 xl) forklift service repair manual
 
Hyster d007 (h210 xl) forklift service repair manual
Hyster d007 (h210 xl) forklift service repair manualHyster d007 (h210 xl) forklift service repair manual
Hyster d007 (h210 xl) forklift service repair manual
 
Hyster d007 (h190 xl) forklift service repair manual
Hyster d007 (h190 xl) forklift service repair manualHyster d007 (h190 xl) forklift service repair manual
Hyster d007 (h190 xl) forklift service repair manual
 
Hyster d007 (h210 xl) forklift service repair manual
Hyster d007 (h210 xl) forklift service repair manualHyster d007 (h210 xl) forklift service repair manual
Hyster d007 (h210 xl) forklift service repair manual
 
Hyster d007 (h190 xl) forklift service repair manual
Hyster d007 (h190 xl) forklift service repair manualHyster d007 (h190 xl) forklift service repair manual
Hyster d007 (h190 xl) forklift service repair manual
 

Último

Top Rated Pune Call Girls Tingre Nagar ⟟ 6297143586 ⟟ Call Me For Genuine Se...
Top Rated  Pune Call Girls Tingre Nagar ⟟ 6297143586 ⟟ Call Me For Genuine Se...Top Rated  Pune Call Girls Tingre Nagar ⟟ 6297143586 ⟟ Call Me For Genuine Se...
Top Rated Pune Call Girls Tingre Nagar ⟟ 6297143586 ⟟ Call Me For Genuine Se...Call Girls in Nagpur High Profile
 
$ Love Spells^ 💎 (310) 882-6330 in West Virginia, WV | Psychic Reading Best B...
$ Love Spells^ 💎 (310) 882-6330 in West Virginia, WV | Psychic Reading Best B...$ Love Spells^ 💎 (310) 882-6330 in West Virginia, WV | Psychic Reading Best B...
$ Love Spells^ 💎 (310) 882-6330 in West Virginia, WV | Psychic Reading Best B...PsychicRuben LoveSpells
 
call Now 9811711561 Cash Payment乂 Call Girls in Dwarka Mor
call Now 9811711561 Cash Payment乂 Call Girls in Dwarka Morcall Now 9811711561 Cash Payment乂 Call Girls in Dwarka Mor
call Now 9811711561 Cash Payment乂 Call Girls in Dwarka Morvikas rana
 
2k Shots ≽ 9205541914 ≼ Call Girls In Jasola (Delhi)
2k Shots ≽ 9205541914 ≼ Call Girls In Jasola (Delhi)2k Shots ≽ 9205541914 ≼ Call Girls In Jasola (Delhi)
2k Shots ≽ 9205541914 ≼ Call Girls In Jasola (Delhi)Delhi Call girls
 
WOMEN EMPOWERMENT women empowerment.pptx
WOMEN EMPOWERMENT women empowerment.pptxWOMEN EMPOWERMENT women empowerment.pptx
WOMEN EMPOWERMENT women empowerment.pptxpadhand000
 
The Selfspace Journal Preview by Mindbrush
The Selfspace Journal Preview by MindbrushThe Selfspace Journal Preview by Mindbrush
The Selfspace Journal Preview by MindbrushShivain97
 
Pokemon Go... Unraveling the Conspiracy Theory
Pokemon Go... Unraveling the Conspiracy TheoryPokemon Go... Unraveling the Conspiracy Theory
Pokemon Go... Unraveling the Conspiracy Theorydrae5
 
2k Shots ≽ 9205541914 ≼ Call Girls In Mukherjee Nagar (Delhi)
2k Shots ≽ 9205541914 ≼ Call Girls In Mukherjee Nagar (Delhi)2k Shots ≽ 9205541914 ≼ Call Girls In Mukherjee Nagar (Delhi)
2k Shots ≽ 9205541914 ≼ Call Girls In Mukherjee Nagar (Delhi)Delhi Call girls
 
9892124323, Call Girls in mumbai, Vashi Call Girls , Kurla Call girls
9892124323, Call Girls in mumbai, Vashi Call Girls , Kurla Call girls9892124323, Call Girls in mumbai, Vashi Call Girls , Kurla Call girls
9892124323, Call Girls in mumbai, Vashi Call Girls , Kurla Call girlsPooja Nehwal
 
2k Shots ≽ 9205541914 ≼ Call Girls In Palam (Delhi)
2k Shots ≽ 9205541914 ≼ Call Girls In Palam (Delhi)2k Shots ≽ 9205541914 ≼ Call Girls In Palam (Delhi)
2k Shots ≽ 9205541914 ≼ Call Girls In Palam (Delhi)Delhi Call girls
 
LC_YouSaidYes_NewBelieverBookletDone.pdf
LC_YouSaidYes_NewBelieverBookletDone.pdfLC_YouSaidYes_NewBelieverBookletDone.pdf
LC_YouSaidYes_NewBelieverBookletDone.pdfpastor83
 
8377087607 Full Enjoy @24/7-CLEAN-Call Girls In Chhatarpur,
8377087607 Full Enjoy @24/7-CLEAN-Call Girls In Chhatarpur,8377087607 Full Enjoy @24/7-CLEAN-Call Girls In Chhatarpur,
8377087607 Full Enjoy @24/7-CLEAN-Call Girls In Chhatarpur,dollysharma2066
 
2k Shots ≽ 9205541914 ≼ Call Girls In Dashrath Puri (Delhi)
2k Shots ≽ 9205541914 ≼ Call Girls In Dashrath Puri (Delhi)2k Shots ≽ 9205541914 ≼ Call Girls In Dashrath Puri (Delhi)
2k Shots ≽ 9205541914 ≼ Call Girls In Dashrath Puri (Delhi)Delhi Call girls
 

Último (15)

Top Rated Pune Call Girls Tingre Nagar ⟟ 6297143586 ⟟ Call Me For Genuine Se...
Top Rated  Pune Call Girls Tingre Nagar ⟟ 6297143586 ⟟ Call Me For Genuine Se...Top Rated  Pune Call Girls Tingre Nagar ⟟ 6297143586 ⟟ Call Me For Genuine Se...
Top Rated Pune Call Girls Tingre Nagar ⟟ 6297143586 ⟟ Call Me For Genuine Se...
 
$ Love Spells^ 💎 (310) 882-6330 in West Virginia, WV | Psychic Reading Best B...
$ Love Spells^ 💎 (310) 882-6330 in West Virginia, WV | Psychic Reading Best B...$ Love Spells^ 💎 (310) 882-6330 in West Virginia, WV | Psychic Reading Best B...
$ Love Spells^ 💎 (310) 882-6330 in West Virginia, WV | Psychic Reading Best B...
 
call Now 9811711561 Cash Payment乂 Call Girls in Dwarka Mor
call Now 9811711561 Cash Payment乂 Call Girls in Dwarka Morcall Now 9811711561 Cash Payment乂 Call Girls in Dwarka Mor
call Now 9811711561 Cash Payment乂 Call Girls in Dwarka Mor
 
2k Shots ≽ 9205541914 ≼ Call Girls In Jasola (Delhi)
2k Shots ≽ 9205541914 ≼ Call Girls In Jasola (Delhi)2k Shots ≽ 9205541914 ≼ Call Girls In Jasola (Delhi)
2k Shots ≽ 9205541914 ≼ Call Girls In Jasola (Delhi)
 
WOMEN EMPOWERMENT women empowerment.pptx
WOMEN EMPOWERMENT women empowerment.pptxWOMEN EMPOWERMENT women empowerment.pptx
WOMEN EMPOWERMENT women empowerment.pptx
 
The Selfspace Journal Preview by Mindbrush
The Selfspace Journal Preview by MindbrushThe Selfspace Journal Preview by Mindbrush
The Selfspace Journal Preview by Mindbrush
 
Pokemon Go... Unraveling the Conspiracy Theory
Pokemon Go... Unraveling the Conspiracy TheoryPokemon Go... Unraveling the Conspiracy Theory
Pokemon Go... Unraveling the Conspiracy Theory
 
2k Shots ≽ 9205541914 ≼ Call Girls In Mukherjee Nagar (Delhi)
2k Shots ≽ 9205541914 ≼ Call Girls In Mukherjee Nagar (Delhi)2k Shots ≽ 9205541914 ≼ Call Girls In Mukherjee Nagar (Delhi)
2k Shots ≽ 9205541914 ≼ Call Girls In Mukherjee Nagar (Delhi)
 
9892124323, Call Girls in mumbai, Vashi Call Girls , Kurla Call girls
9892124323, Call Girls in mumbai, Vashi Call Girls , Kurla Call girls9892124323, Call Girls in mumbai, Vashi Call Girls , Kurla Call girls
9892124323, Call Girls in mumbai, Vashi Call Girls , Kurla Call girls
 
2k Shots ≽ 9205541914 ≼ Call Girls In Palam (Delhi)
2k Shots ≽ 9205541914 ≼ Call Girls In Palam (Delhi)2k Shots ≽ 9205541914 ≼ Call Girls In Palam (Delhi)
2k Shots ≽ 9205541914 ≼ Call Girls In Palam (Delhi)
 
LC_YouSaidYes_NewBelieverBookletDone.pdf
LC_YouSaidYes_NewBelieverBookletDone.pdfLC_YouSaidYes_NewBelieverBookletDone.pdf
LC_YouSaidYes_NewBelieverBookletDone.pdf
 
(Anamika) VIP Call Girls Navi Mumbai Call Now 8250077686 Navi Mumbai Escorts ...
(Anamika) VIP Call Girls Navi Mumbai Call Now 8250077686 Navi Mumbai Escorts ...(Anamika) VIP Call Girls Navi Mumbai Call Now 8250077686 Navi Mumbai Escorts ...
(Anamika) VIP Call Girls Navi Mumbai Call Now 8250077686 Navi Mumbai Escorts ...
 
(Aarini) Russian Call Girls Surat Call Now 8250077686 Surat Escorts 24x7
(Aarini) Russian Call Girls Surat Call Now 8250077686 Surat Escorts 24x7(Aarini) Russian Call Girls Surat Call Now 8250077686 Surat Escorts 24x7
(Aarini) Russian Call Girls Surat Call Now 8250077686 Surat Escorts 24x7
 
8377087607 Full Enjoy @24/7-CLEAN-Call Girls In Chhatarpur,
8377087607 Full Enjoy @24/7-CLEAN-Call Girls In Chhatarpur,8377087607 Full Enjoy @24/7-CLEAN-Call Girls In Chhatarpur,
8377087607 Full Enjoy @24/7-CLEAN-Call Girls In Chhatarpur,
 
2k Shots ≽ 9205541914 ≼ Call Girls In Dashrath Puri (Delhi)
2k Shots ≽ 9205541914 ≼ Call Girls In Dashrath Puri (Delhi)2k Shots ≽ 9205541914 ≼ Call Girls In Dashrath Puri (Delhi)
2k Shots ≽ 9205541914 ≼ Call Girls In Dashrath Puri (Delhi)
 

CoFold Mortice Sliding Folding Door Gear Installation Instructions

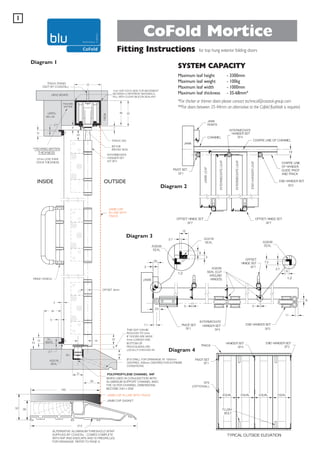
  • 1. 1 CoFold Mortice Fitting Instructions Diagram 1 for top hung exterior folding doors SYSTEM CAPACITY Maximum leaf height Maximum leaf weight Maximum leaf width Maximum leaf thickness - 3300mm - 100kg - 1000mm - 35-68mm* *For thicker or thinner doors please contact technical@coastal-group.com. **For doors between 35-44mm an alternative to the Cofold flushbolt is required. INSIDE OUTSIDE Diagram 2 JAMB CAP IN LINE WITH TRACK Diagram 3 Diagram 4 34 140 WHEN USED IN CONJUNCTION WITH ALUMINIUM SUPPORT CHANNEL 94SC THE OUTER CHANNEL DIMENSIONS BECOME 23H x 25W JAMB CAP IN LINE WITH TRACK JAMB CAP GASKET 52 39 212 ALTERNATIVE ALUMINIUM THRESHOLD SF94T SUPPLIED BY COASTAL - COMES COMPLETE WITH 94P AND ENDCAPS AND IS PREDRILLED FOR DRAINAGE. REFER TO PAGE 9
  • 2. 2 PREPARATION SF1 SF2R SF2L SF3 SF4 SF5 SF6 SF7 SF8 SF9 SF10 - Pivot Assembly Set End Hanger Set Right Hand End Hanger Set Left Hand Hinge Set with Handle Intermediate Hanger Set Hinge Set Inward Opening Hinge Set Offset Inward Opening Hinge Set Offset Outward Opening Rebated End Hanger Meeting Pivot Hinge for Doors Over 2200mm High Face Fix Handle (Optional) Diagram 6 Diagram 5
  • 3. 3 Preparing the opening Ensure the opening is square and all load bearing areas are suitable for the weight of the system.Take particular care to ensure there is sufficient strength in the structure above the opening to take the concentrated weight of the doors, when in the open stacked position. The Cofold system provides +/- 3mm of horizontal and vertical adjustment. Use a plumb line to ensure that the centre line of the track and the centre line of the channel are offset by 19mm. Diagram 8 OR USE ALUMINIUM THRESHOLD BY COASTAL Diagram 7 Diagram 9 Preparing the door frame Refer to page 10 = = Diagram 10
  • 4. 4 Preparing the door leaves Door leaf width calculation 1. Decide how many door leaves you want in the opening. 2. Add together all the 3mm clearances required between door leaves and the jambs (there will be one more than the number of door leaves).This is the total clearance figure. 3. Measure the finished opening width (W) and deduct from this the total clearance figure. 4. Divide this new figure (finished opening width minus total clearance) by the number of doors to produce the actual door width. (N.B. all doors with the CoFold system are the same width). For example: For a 4 door leaf system with a finished opening width of 2345mm the door leaf width would be 2345mm minus (5x3mm) divided by 4 (number of door leaves) = 582.5mm. Door leaf height calculation Leaf height = finished opening height (see diagram 7) minus 66mm. Diagram 11 PREPARING THE DOOR LEAF AT THE JAMB Door Seals Prepare the door leaves to accept the AQ63B seal. BETWEEN DOOR EDGES Diagram 12 ADD 10mm TO WIDTH OF EACH LEAF TO CREATE REBATE ADD 10mm TO WIDTH OF END HANGER LEAF FOR REBATE Meeting Doors Use the SF8 set for 2+2 rebated timber door configurations. For all other configurations use SF2L (left hand) or SF2R (right hand) end hanger sets. For kit handing refer to diagram 6. Diagram 13
  • 5. 5 Door hardware positioning Diagram 14 End door leaf Preparation 7.5mm check In for SF1, SF2 and SF8 Diagram 15
  • 6. 6 Door hardware attachment 2 WHEEL ASSEMBLY SIDE THRUST BEARING Ø 3mm PILOT HOLES FIXING SCREW (6 OFF) CHECK IN FOR SF9 HANGER BODY COVER (SLIDE) IMPORTANT WASHER HANGER BOLT BOTH SCREWS MUST BE FITTED UNDER THE COVERS OF ALL THE END HINGES Kit SF1 Kit SF2L (or SF2R) Kit SF8 Kit SF4 Diagram 16
  • 7. 7 INSTALLATION 1. Ensure that you have all the required parts. Unpack the components and identify the parts. Lay the parts on the ground in the same configuration as they will be when installed. It is recommended that a light smear of general purpose grease is applied to all bolts prior to assembly. Diagram 17 2. Cut the track to the required length and pre-drill for fixings in accordance with diagram 17. Please note that the extra fixings are required where the doors stack together. TOP PIVOT SECURING BLOCK 3. Cut the channel to the required length and fit in the sill. Drill drainage holes (see diagram 1). PIVOT SECURING BLOCK HEX BOLTS 4. Remove all the wheel assemblies and pivot block from the hanger and pivot bolts, and disassemble top pivot block assembly. PIVOT CAM 5. Slide the wheel assemblies and track pivot block into the track in the correct order, orientation, and position and fix the track in position. Reassemble top pivot block assembly (see diagram 18). PIVOT ADJUSTER PIVOT CLAMP PLATE 6. Remove the bottom pivot assembly and guide roller assembly (see diagram 19). Disassemble the bottom pivot assembly. ADJUSTMENT LOCK OFF BOLTS Diagram 18 7. For installation, assemble leaves in pairs via the hinges. To improve the ease of installation pre-drill pilot holes for all hinge parts. Fit kits SF1, SF7,SF4 and SF9 (optional) to first pair of leaves. Please ensure all 5 screws are fixed per end hinge. 8. Screw the bottom anchor of the bottom pivot assembly to the base of the channel 11mm from the jamb. Please note, the screw nearest the end of the bottom anchor is closest to the jamb (see diagram 20). Reassemble the pivot assembly leaving the clamping screws loose (see diagram 24). 9. Suspend pairs of leaves by engaging top pivot and hanger bolts using 5mm allen key supplied (see top of diagram 19). 10. Attach the bottom pivot and guide assembly to their respective hinges, adjust the bottom pivot side plates position so that it engages with the hinge bolt.Tighten pivot and guide strap bolts (see diagram 21). 11. Lift the next pair of leaves into position and support their weight by screwing the hanger strap bolt into the hanger wheel assembly and fixing the second and third leaves together. Diagram 19 JAMB CHANNEL 12. Continue this procedure until all leaves are fitted. BOTTOM ANCHOR Diagram 20 Diagram 21
  • 8. 8 ADJUSTMENT Height Adjustment (± 3mm) 1. Close leaves and adjust the door height to achieve an equal gap between the top of the leaves and the track (a 9mm gap is recommended). (see diagram 22). INSIDE LOCKING HANGER GRUB SCREW ON INSIDE OF DOOR 2. Once the adjustment is complete use the allen key to tighten the locking hanger grub screw until secure. Lateral Adjustment 1. With the unit still in the closed position, slide the set of leaves towards the jamb to obtain the desired gap between the jamb and the pivot door.A gap of 3mm is recommended using the adjustment cam. Once in position tighten the clamp screws. (see diagram 24). 2. Fold the leaves and adjust the bottom side plate using the allen key provided so that the gap between the door and the jamb is the same over the full length of the door. 3. Tighten the two clamping screws to lock the side plate to the bottom anchor. 4. Once the pivot door is in the correct position insert and tighten the locking pivot grub screw from the inside position. (as shown in diagram 23) SF4 ILLUSTRATED. SAME METHOD OF ADJUSTMENT APPLIED TO SF1, SF2L, SF2R AND SF8. CLAMP SCREW Diagram 22 INSIDE LOCKING PIVOT GRUB SCREW ON INSIDE OF DOOR CLAMP SCREW ADJUSTMENT CAM Diagram 23 CARE AND MAINTENANCE To provide years of trouble free operation, it is recommended that the track is kept free from dirt and debris. Periodically replace the general purpose grease on all bolts.To prolong the appearance of the exposed hinge parts, it is recommended they are periodically washed with soap and water. Maintenance is required on all components including stainless steel to validate manufacturers warranty. For further maintenance details please refer to our website. ADJUSTMENT CAM CLAMP SCREW BOTTOM SIDE PLATE CLAMP SCREW BOTTOM ANCHOR JAMB SIDE ADJUSTMENT Diagram 24
  • 9. 9 Aluminium Threshold Jamb Kit 51 25.5 25.5 21 94 25 Jamb Cap Jamb Cap Gasket 51 15 34 19 Threshold SF94T 8 27 2.5 83 Pre-drilled 10mm diameter drainage holes at 300mm centres Endcap 2.5 51 140 51 25.5 25.5 23 27 8 15 34 Jamb Cap Jamb Cap 2.5 2.5 Jamb Cap Gasket Jamb Cap Gasket 51 140 21 94 25 52 39 Endcap Endcap 83 Jamb Cap Jamb Cap Gasket 52 (All dimensions in mm) 39 Endcap
  • 10. 10 SF9 Intermediate Pivot Set 1. The Cofold SF9 intermediate pivot set shown in Diagram 1, should be fitted to the pivot door approximately mid way between the SF1 top and bottom pivot assemblies. The SF9 hinge must be positioned on the same centre line as the SF1 top and bottom pivot hinge bodies. 5. Fit the pivot door into position using the SF1 pivot set. 2. Route the door and drill the pilot holes as shown on Diagram 2. Fit the hinge body using the five screws provided. 7. Screw the threaded link arm fully into the frame support plate. The centre of the threaded hole in the link arm should be positioned to receive the strap bolt. Screw the strap bolt in to the link arm until there is a 2mm gap between the head of the strap bolt and the hinge body, as shown in Diagram 4. 6. Fit the SF9 cover sleeve on to the SF9 hinge body and drop the hinge strap bolt into position, as shown in Diagram 4. 3. Prepare the frame for the opening by drilling a Ø12mm hole (as shown in Diagram 3), ensuring that the centre point of the hole is 20mm lower than the bottom of the hinge body as shown on Diagram 4. Rebate the frame support plate, if required. 8. Adjust the SF9 pivot set to ensure the clearance between the pivot door and the frame is uniform (Diagram 5). 4. Screw the frame support plate on to the opening frame preparation, as shown in Diagram 3. Note: These fitting instructions should be used in conjunction with the Cofold Fitting Instructions 7.5 17.5 Main strap bolt SF1 Hinge body 100 SF9 Cover plate R17.5 SF1 Cover sleeve Diagram 1. Diagram 2. ole ph dee m 28m Opening frame Ø12 28mm Pilot holes R12.5 Rebate details see diagram 1 2.5 mm dee p 25mm 41m m Door in closed position Hole centre to door face 8mm Ø12 Diagram 3. Door shown in the open position Door shown in the open position 8mm 2mm gap 2mm gap Main strap bolt Adjustment: 3mm in to the frame 6mm out to the frame Line from bottom of the hinge body 20mm Threaded link arm Frame support plate Diagram 4. Diagram 5.
  • 11. 11 Outward Opening Flush Bolt For top hung exterior folding doors. For use in conjunction with standard outward opening fitting instructions. Follow routing instructions for the bolt keep and flush bolt length to be fitted, fit both with the screws supplied. Suitable pilot holes for screws are recommended. Routing detail for 450mm Top Flush Bolt Routing detail for 600mm Top Flush Bolt HEAD BOARD LINTEL 12.5 FASCIA Routing detail for 190mm Top Flush Bolt 18 Routing detail for 190mm Bottom Flush Bolt PLATE 600 450 580 190 430 170 30 INSIDE 4 190 Enlarged detail showing the sectional routing dimensions for all 3 bolt sizes 40 OUTSIDE 170 TOP FLUSH BOLT 22 17 Note: Routing detail is the same for both locking and non-locking flush bolts. Door height Recommended Bolt length for top of door Recommended Bolt length for bottom of door Upto 2200mm 190mm 190mm Upto 2450mm 450mm 190mm Over 2450mm 600mm 190mm BOTTOM FLUSH BOLT Routing detail for bolt keep sockets Top Flush Bolt into Head Bottom Flush Bolt into Sill Fixing screw centres 40 Ø12 PLATE Ø12 10 4 10 12.5 12.5 SILL REBATE 40 10 40 30 25 12 65 40mm fixing screw centres - Use fixing plate as drilling template SILL 18 12.5 Section through door showing flush bolt rebate detail (All dimensions in mm)
  • 12. 12 Inward Opening Flush Bolt For top hung exterior folding doors. For use in conjunction with standard inward opening fitting instructions. Follow routing instructions for the bolt keep and flush bolt length to be fitted, fit both with the screws supplied. Suitable pilot holes for screws are recommended. Routing detail for 600mm Top Flush Bolt HEAD BOARD 12 LINTEL 20 Routing detail for 190mm Bottom Flush Bolt 580 430 170 Note: Routing detail is the same for both locking and nonlocking flush bolts. FASCIA Routing detail for 450mm Top Flush Bolt Routing detail for 190mm Top Flush Bolt 80 600 450 190 PLATE 12 29 4 40 22 17 22 40 22 17 INSIDE 4 190 Enlarged detail showing the sectional routing dimensions for all 3 top bolt sizes OUTSIDE 170 TOP FLUSH BOLT Enlarged detail showing the sectional routing dimensions for the bottom bolt 12 Door height Recommended Bolt length for top of door Recommended Bolt length for bottom of door Upto 2200mm 190mm 190mm Upto 2450mm 450mm 190mm Over 2450mm 600mm 190mm BOTTOM FLUSH BOLT (Locking bolt shown) Routing detail for top bolt keep socket Ø12 65 10 12.5 max 7.5 12 SILL REBATE 11 12.5 max 4 40 SILL 10 40 Plate fixing screw centres 40mm fixing screw centres - Use fixing plate as drilling template Section through door showing flush bolt rebate detail (All dimensions in mm) Coastal Joinery Hardware, Global House, Bojea Industrial Estate, Trethowel, St Austell, Cornwall, PL25 5RJ. Tel: 01726 871726 Fax: 01726 871731 Email: sales@coastal-group.com Part No: 220159 Issue 7 -January 2013
  • 13. ENQUIRY FORM FOR BI-FOLD DOORS Please enter your address here: Your Details/FAO Address Telephone: Fax: PROJECT TITLE: Email: LOCATION: SPECIFICATION SHEET System Capacity: 1. Opening Size: BI-FOLD DOORS Maximum Leaf Height: 3300mm Maximum Leaf Width: 1000mm Maximum Leaf Weight: 100kg Leaf Thickness: 35mm-68mm mm Height: 2. Door Configuration: Number of leaves sliding (viewed from the outside) Width: mm RH LH 3. Outward Opening: Due to weathering, outward opening Is highly recomended. Yes No 4. Locking None Espagnolette Sash lock 5. Finish Satin Stainless Steel PVD Brass Polished Stainless Steel 6. System CoFold CoFold Ultra (High Security) 7. Gear Types Choice only applies to CoFold system & not the CoFold Ultra. Mortice Non Mortice 8. Weatherseal Required: None Brown White PRE-TENSION Coastal Group | T 01726 871726 | F 01726 871731 Email sales@coastal-group.com | Visit www.coastal-group.com