SlideShare uma empresa Scribd logo
1 de 11
Baixar para ler offline
Timekeeper™                 Guide to the PR121B Take-A-Turn System                            Alzatex, Inc.

                                                       > Customers can browse or be seated while
PR121B Take-A-Turn Printer                               waiting for their turn, instead of waiting in a line
                                                         for an indefinite period of time.


This product is a straightforward and easy system      User Benefits
to operate. The Take-A-Turn ticket design has          > This controller maintains all functions of the
already been pre-configured to contain your              printer, giving the control operator the option of
company’s desired criteria. After following the          commanding the ticket dispenser to advance to
instructions in this guide, few changes will need to     the next number, skip a number, go back a
be made over time.                                       number, change the date and time, and test the
                                                         printer.
                                                       > The tickets are user-definable. This allows the
                                                         user to specify or change the information or
                                                         logos printed on the tickets. The ticket format
                                                         can easily be edited by connecting a PC to the
                                                         controller. A simple text file contains the ticket
                                                         format information.


                                                       Installation
                                                       Equipment Provided
                                                       The Take-A-Turn system includes:
                                                       > Ticket Printer
                                                       > Take-A-Turn Controller Software. (Integrated
                                                           into the printer)
                                                       > For Ticket Dispenser: 12VAC wall transformer.
                                                       > Cable for connecting the display to the buttons.
                                                       > USB Cable
                                                       > Digital Wall Display
                                                       > One or more Buttons for the windows to
                                                           increment the count.

                                                       Getting Hooked Up (Option 1)
                                                       > Connect the 12VAC wall transformer to a
                                                         convenient 120VAC outlet, and to the printer’s
                                                         power port.
                                                       > Connect the other 12VAC wall transformer to a
                                                         convenient 120VAC outlet, and to the display’s
                                                         power port.
                                                       > Connect the buttons to the wall display with the
                                                         provded cable.
                                                       > The USB cable is not needed. It is used only
                                                         when updating the printer configuration.

                                                       Getting Hooked Up (Option 2)
Customer Benefits                                      > Connect the 12VAC wall transformer to a
> This system is easy to understand. Push the            convenient 120VAC outlet, and to the printer’s
  button on the front of the ticket dispenser to         power port.
  print out a ticket with a unique number.             > Connect the other 12VAC wall transformer to a
> Tickets are easy to read and are pre-cut by the        convenient 120VAC outlet, and to the
  dispenser’s internal cutting mechanism,                controller’s power port.
  making it a simple “push a button, take a            > Connect the printer to the wall display with the
  ticket” process.                                       Cat-5 cable.


Version V1.04                                          1                               www.alzatex.com
Timekeeper™                 Guide to the PR121B Take-A-Turn System                             Alzatex, Inc.

> Connect the “NEXT” buttons to the ticket                  ●   Knob. Used to change various setup values.
  printer.                                                  ●   Buttons labeled A and B are not used on the
> The USB cable is not needed. It is used only                  standard models. By special request,
  when updating the printer configuration.                      additional features can be added that utilize
                                                                these buttons.
Getting Hooked Up (Option 3)
> Connect the 12VAC wall transformer to a         Displays and LEDs
   convenient 120VAC outlet, and to the printer’s
                                                  The printer has the following displays and LEDs.
   power port.
                                                      ● LCD Display. Displays various setup and
> Connect the other 12VAC wall transformer to
                                                          operational menus.
   a convenient 120VAC outlet, and to the
                                                      ● LED 1. Lower left of knob. This LED
   controller’s power port.
                                                          indicates the state of remote input 1.
> Connect the DC117A-WAIT1 printer
                                                      ● LED 2. Lower right of knob. This LED
   controller with SD memory card to the printer          indicates the state of remote input 2.
   with the Cat-5 cable.                              ● LED 3. Upper left of knob. This LED
> Connect the printer controller with SD                  indicates the state of remote input 3.
   memory card to the wall display with the Cat-5     ● LED 4. Upper right of knob. This LED
   cable.                                                 indicates the state of remote input 4.
> Connect the “NEXT” buttons to the DC117A-
   WAIT1 printer controller with SD memory
   card.                                          Startup
> The USB cable is not needed. It is used only    Powering up the printer.
   when updating the printer configuration.           ● The following sequence of messages should
                                                          appear.
NOTE: The USB connection is not used during
   normal operation. The controller needs to be   Startup Mode hello message and memory test.
   connected to a computer only when
                                                   Take-A-Turn Hello
   programming a custom ticket. When needed,
                                                   Waiting for FRAM
   connect the controller to the computer using
   the USB cable.
                                                  Startup Mode checking the printer status.
External Buttons and Controls                             08Jan22 09:22:52
                                                          Waiting ...
The printer has the following external buttons and
controls.
    ● Single Ticket Service Button. The basic         Startup Mode ready to print tickets.
          ticket printer has one button. Press the        08Jan22 09:22:52
          button to generate a ticket.                    ONLINE ..
    ● Multiple Ticket Service Buttons. Each
          button is assigned to a specific service.
          Specify the number of buttons required      The printer is ready to print tickets.
          when ordering.
                                                      Daily Startup
Internal Buttons and Controls                         The Take-A-Turn remembers the last printed ticket
                                                      number and begins on the next number in sequence.
The printer has the following internal buttons and
controls. These controls are used during setup and
when changing paper.
    ● Buttons 1-4 depend on the current mode.
                                                      LED Indications
                                                      The ticket dispenser lights up in various colors
          In the Online mode these buttons print
                                                      depending on the state of the system.
          tickets
    ● Mode Button. Steps through one of
                                                      • During normal operation when the printer is not
          several operational and configuration           printing, the dispenser should be Blue.
          menus..                                     • When the Take-A-Ticket button is pressed, the
    ● Select Button. Used to select the knob              color should change to a Greenish Blue for a
          function.                                       moment.


Version V1.04                                         2                                 www.alzatex.com
Timekeeper™                   Guide to the PR121B Take-A-Turn System                                 Alzatex, Inc.

•     A ticket should begin printing. The color          Online Mode. If this message appears, refer to the
      should start flashing between Blue and             section on replacing the battery and follow the
      Magenta. The color should return to Blue once      specified procedure.
      the printing is complete.                              08Jan22 09:22:52
•     If the color is steady Magenta, either the cable       Low Battery
      is not connected, or there is a paper jam or
      other printer error.
                                                         Online Mode. This message may appear while a
                                                         ticket is being printed.
                                                             08Jan22 09:22:52
Printer modes                                                Printing...
The controller sends commands to the printer. The
controller is built into the printer enclosure.          Online Mode. This message will appear if the printer
Remove the printer cover to expose the printer           does not respond. Check for a paper jamb. Also
controls. The following describes the basic              check that the green printer paper release button is
functionality of the controller. Pressing the Mode       in the correct position.
button successively selects each of the following            08Jan22 09:22:52
modes.                                                       Printer Error
> Online Mode. Power up default. Ready to
    print tickets.
> Ticket/ Display Number Setup Mode. Used
    if you need to change the starting ticket            NUMBER SELECT MODE: This mode permits
    number.                                                     several settings to be configured.
> Date/Time Change Mode. Used to set the
    time of day clock.                                   Number Select Mode
> Offline mode. Used when changing paper.                    Take-A-TurnV1.02
> Flash drive format mode. Used if the flash                 L1 NUM xxx D3 FE
    drive becomes corrupted.

The USB mode is entered when the printer is              This system will handle up to 8 waiting lines. Press
connected to a computer using the USB cable.                 the “1” button to select the desired waiting line
> USB Mode. Used to change the ticket format.                L1 through L8. Pressing button “4” or turning
                                                             the knob changes the ticket number to be printed
                                                             to the desired number for the selected waiting
                                                             line. The ticket number is stored in non-volatile
ONLINE MODE: This is the normal operating                    memory.
      mode and the default mode at power up.
      Buttons 1-4 print tickets. This is the only mode Pressing the “4” button simulates the generation of a
      in which local and remote printing commands          ticket without actually printing the ticket.
      will be accepted.
                                                         Turning the knob changes the number for the next
Online Mode. If this message appears, refer to the           ticket. Range 0-999.
section on reformatting the flash drive and follow
the specified procedure.                                 The wall display is available as a 2, 3 or 4 digit
    08Jan22 09:22:52                                         display. You must tell the printer whether to
    USB Needs Format                                         print a two digit or three digit number. Press the
                                                             “2” button to select either a 2 or 3 digit ticket
                                                             number. The display size is stored in non-
Online Mode. This message may appear briefly at
                                                             volatile memory.
power up. If this message persists, contact the
factory repair department.
                                                         If you have multiple services, you need an extra digit
    08Jan22 09:22:52                                          on the wall display to show the type of service.
    Waiting for FRAM
                                                             Display   Number of              Number of Digits
                                                             Size      Services


Version V1.04                                            3                                  www.alzatex.com
Timekeeper™                 Guide to the PR121B Take-A-Turn System                             Alzatex, Inc.


2 digit    One service           2 digit number          08Jan22 09:22:52
3 digit    One service           3 digit number          Cal Signal OFF

3 digit    Multiple services     2 digit number
4 digit    Multiple services     3 digit number      OFFLINE MODE: Each button functions
                                                     differently in Offline Mode than when in the Online
                                                     Mode:
You can select one of 10 template files to be used
   when printing tickets. Press the “3” button to    The display flashes momentarly to the following
   select the desired template file. The files are   display.
   named FE=TEMPLATE.TXT,
   F1=TEMPLATE1.TXT through                              Take-A-TurnV1.02
                                                         OFFLINE
   F9=TEMPLATE9.TXT. The template name is
   stored in non-volatile memory.
                                                     The display changes to the status display with this
Once the desired settings are selected,              message or one of the error messages.
   momentarily press the MODE button                     Printer OFFLINE
   successively until the device is back in the          Status OK
   Online mode.

                                                     See the Printer Status section for a list of the possible
TIME/DATE CHANGE MODE: This mode                     error messages.
   sets the time and date. Press SELECT to
   switch fields between HH:MM:SS and                The button functions are as follows.
   MM:DD:YY. Rotate the knob to change the
   number. Press Button two when finished to         •     Button 1. Cut paper.
   save the changes.                                 •     Button 2. Feed paper
NOTE: The time is displayed in military time.        •     Button 3. Font test. Prints out digits 0-9 in the
NOTE: After initial setup, the internal lithium            large number font.
     battery should accurately maintain both         •     Button 4. Resets the printer.
     time and date.                                  •     Mode Button. Leaves the OFFLINE mode.

Time/Data Change Mode                                NOTE: Always return the system to ONLINE Mode
 08Jan22 09:22:52                                    after working in any other mode.
 Recall Time/Date

                                                     Printer Status
Time/Data Change Mode                                The controller display shows the printer status in
 08Jan22 09:22:52                                    either the Online or the Offline Mode. The controller
 Press BTN 2=Save                                    will also momentarily display each of the status
                                                     messages as part of the Font test. The status
                                                     messages display as follows:
Time/Data Change Mode
 08Jan22 09:22:52
                                                         Printer OFFLINE
 Time/Date Saved
                                                         Status OK

Time/Data Change Mode. Press button 3 to turn
the time of day clock calibration signal on. This
                                                           > Check Power: The printer has reported a
procedure is typically performed at the factory.
                                                             problem with its power supply.
 08Jan22 09:22:52
 Cal Signal ON
                                                         Printer OFFLINE
                                                         Check Power
Time/Data Change Mode. Press button 4 to turn
the time of day clock calibration signal off.


Version V1.04                                        4                                  www.alzatex.com
Timekeeper™                Guide to the PR121B Take-A-Turn System                           Alzatex, Inc.

    > Printer Head up: The green release             NOTE: Once partitioned, you can also format the
      button on the printer head is not secure.      device by plugging it into a PC and formating it with
                                                     the FAT12/FAT16 file system.
 Printer OFFLINE
 Printer Head up                                     Flash Drive Format Mode. This message appears if
                                                     the file system is properly formatted.

    > Printer Head Temp: The printer is                  Fdisk OK S=0200
                                                         Take-A-TurnFAT12
      overheated.

                                                     Flash Drive Format Mode. This message should
 Printer OFFLINE
 Print Head temp                                     appear when button 1 is pressed.
                                                         Fdisk Partition
    > Cutter Error: The printer has reported
      problem with the cutter.
                                                     Flash Drive Format Mode
 Printer OFFLINE                                         FdiskPartitionEr
 Cutter Error                                            FAT Format Error

                                                     If you experience a file format error, you will need to
    > Printer Busy: Action in progress.              re-format the flash drive.

 Printer OFFLINE                                     Formatting the Flash Drive
 Printer Busy
                                                     The Flash ROM must be formatted the first time the
                                                     device is plugged in or if the file system becomes
    > PRINTER ERR: A problem with the                corrupted. If the LCD display reads "NEED
      printer, such as the printer is online while   FORMAT". Use the following steps to reformat the
      green release button on the printer head is    flash drive.
      not secure. The message may also briefly
      display when the system is first plugged       •     Press the Mode button until you see the
      in. Check the printer's power and data               "Fdisk" page.
      connections.
                                                     Flash Drive Format Mode
    > Out of Paper: Replace Number receipt
      paper.                                             Fdisk OK S=0200
                                                         FAT Format Error
 Printer OFFLINE
 Out of Paper                                        •     Press Button 1 to partition the memory (can be
                                                           done at any time, it doesn't overwrite any
                                                           important data).
    > Waiting…: Controller is waiting for
      response from the printer. The printer is      Flash Drive Format Mode. This message should
      either not connected or busy.                  appear when button 1 is pressed.
                                                         Fdisk Partition
 Printer OFFLINE
  Waiting...

                                                     •     Press Button 3 to show FDisk Table page.

USB DRIVE FORMAT MODE: Each button                   Flash Drive Format Mode. Press Button 3. The
functions differently in Offline Mode than when in   following message will appear.
the online mode.
                                                         FDISK TBL FAT=0


Version V1.04                                        5                                www.alzatex.com
Timekeeper™                  Guide to the PR121B Take-A-Turn System                           Alzatex, Inc.

                                                       Contact the factory for help on generating the
•     Continue pressing button 3 successively until    required files if you do not already have a copy of
      "Fat=9" is shown.                                these files.

Flash Drive Format Mode. Press Button 3. The           The required files are listed below.
following message will appear.                         • The “Font.hex” file contains the bit image for
    FDISK TBL FAT=9                                        the large number format font.
                                                       • The “template.txt” file is user generated and
                                                           contains the ticket format. See the section on
                                                           programming a custom ticket on how to create
•     Press Button 1 to show "Confirm                      this file.
      reformat" page.                                  • Any image files in “.bmp” format using one bit
                                                           encoding to create a black and white image. You
Flash Drive Format Mode. Press Button 1. The               can use the Microsoft Windows or MAC paint
following message will appear.                             program to generate the logo in the correct
    Press BTN 2 to                                         format.
    Confirm reformat

•     Press Button 2 to format the memory. All data    Adding Paper
      will be lost!!!                                  The only part of the Take-A-Turn that needs regular
                                                       servicing is the printer paper. The printer uses
Flash Drive Format Mode. Press button 2. The           standard 60MM wide receipt thermal paper. To
following message will appear if the format was        replace the paper, follow these steps:
successful.
                                                           ●    Press the Mode button on the Controller
    Mem reformatted                                             until you enter the Offline mode. The printer
                                                                can’t be accidentally activated in this mode.

Flash Drive Format Mode. Press button 2. The               ●    Loosen the thumb screw on the rear of the
following message will appear if the format was                 top cover. Slide the cover towards the rear
not successful.                                                 and Lift off the top cover of the printer.
    Mem ERROR
                                                           ●    To remove remnants of paper: Depress the
                                                                green release button on the bottom right side
                                                                of the printer face, and gently pull out any
Now you can connect the printer to a computer                   paper scraps.
and load the printer files on to the printer
filesystem. See section on the USB Mode for                ●    Remove the empty plastic cylinder that held
details.                                                        the old paper, and install the new paper
                                                                (which will have its own plastic cylinder)
                                                                onto the metal pin, with the paper entering
USB MODE: The USB mode is entered when the                      the printer mouth from the top of the roll.
      printer is connected to a computer via the USB            The ends of the metal pin should set easily
      port. In the USB mode, all printer functions              in the grooved slots when replaced.
      are disabled. The USB mode is used to setup
      the ticket template.                                 ●    Feed the new paper through the back of the
                                                                printer mouth. The printer will automatically
                                                                grab the paper, feed it through, and cleanly
USB Mode                                                        cut off a small portion to ensure the paper is
                                                                properly lined up.
    08Jan18 HH:MM:SS
    USB
                                                           ●    If the printer does not automatically grab the
                                                                paper, push the green release button. Next,
Setting up the ticket template.                                 hand feed the paper through, then push the
                                                                Feed button (Button 2) on the controller.


Version V1.04                                          6                               www.alzatex.com
Timekeeper™                 Guide to the PR121B Take-A-Turn System                            Alzatex, Inc.

         This will grab the paper and feed it          NOTE: Be sure to remove the USB cable once setup
         through the rest of the way.                  is complete. The printer will NOT print tickets while
                                                       the USB is connected.
NOTE: You will never have to replace any ink
      cartridges because the Take-A-Turn
      Printer uses thermal ink imprinting.
NOTE: Only use the correct size and type of
      thermal printer paper in the printer. To
      obtain more paper, contact Alzatex. Order
      # 3560-Thermal Paper.


Replacing the battery
The internal lithium battery that maintains the time
and date will need to be replaced every few years.
Should replacement become necessary, the battery
is located on a circuit board under the controls and
the LCD display. Remove the housing screws and
replace with a new CR2032 battery. This battery is
available at most electronics or camera stores.


Rear Panel Connectors
The rear panel of the printer has five connectors.
The connectors are used as follows.
>   Power Connector. The power connector
    should be connected to a 12VAC output wall
    transformer to power the printer.
>   TX422 Connector. This port sends the
    serving number to a wall display. This
    connector also is used to communicate with
    the controller on models that include the
    controller with built in data capture and
    statistical analysis.
>   RX422 Connector. This port permits the
    printer to be remotely controlled from a distant
    location. This port is also used to communicate
    with the controller on models that include the
    controller with built in data capture and
    statistical analysis.
>   USB Connector. The USB connector is used
    for initial setup. When the USB is connected
    to a computer, the printer appears as a
    removable disk drive. Several files for system
    configuration are required on this USB drive.
>   Remote Connector. When using the printer to
    operate the wall displays directly, connect the
    buttons that increment the “Now Serving”
    display to this connector.


Version V1.04                                          7                               www.alzatex.com
Timekeeper™                 Guide to the PR121B Take-A-Turn System                              Alzatex, Inc.


Programming a Custom Ticket                            To achieve the desired ticket information, refer to the
                                                       following Controller Command Table.
Along with a number, the ticket can also be printed
with other data such as date, time, a company logo,    TEMPLATE.TXT commnads.
etc. This information has already been installed
into the device’s memory upon placement of the         All lines of template.txt are ignored except for
order. However, that information is available for      commands and command bodies. A valid command
you to program the system to print a custom ticket.    is a line beginning with a period character'.' (0x2E).
All tickets are printed using the selected template    The following is a table of several usable commands:
file. The file may be named "template.txt",
"templat1.txt" through "templat9.txt". The ticket          COM       RESULT
number setup menu is used to select the desired            MAND
template file. For simplicity, all references in the       .c        Performs a partial cut (if the printer has
documentation will be to "template.txt".                             a cutter)
                                                           .C        Performs a full cut (if the printer has a
To modify "template.txt", follow these steps:
                                                                     cutter)
> Connect the controller to the computer with
                                                           .         Prints a DIB file. You most likely need
     the USB cable provided with your system.
                                                           iFILE.B   to flip the image vertically before
> Find the template file currently in the
                                                           MP        saving it.
     controller. To do this, select MY
                                                           .kxt      Causes the next command to only be
     COMPUTER, then click on Removable
                                                                     executed if the specified digit
     Device. The template file appears as
                                                                     “x”corresponds to the button that was
     “TEMPLATE.TXT” on the device.
                                                                     pressed. The 't' corresponds to a letter
     Typical contents of the controller device:
                                                                     code in the range 0-9 or A-Z for the
           font.hex
                                                                     type of service associated with this
           logo.bmp
                                                                     button.
           logo2.bmp
                                                           .n123     Prints a number up to 8 digits in the
           logo3.bmp
                                                                     large number font.
           template.txt
                                                           .m        Prints a serial ticket number in standard
(“template.txt” and “font.hex” are required for
operation. Other contents may vary, such as the            .md       font size. May be followed by 'd' for
                                                           .mq       double size or 'q' for quadruple size.
number of bitmap files and their names. The other
files listed here are described later in the               .M        Prints a serial ticket number in large
Programmer's Guide.)                                       .Md       font. May be followed by 'd' for double
                                                           .Mq       size or 'q' for quadruple size. Same as
> Copy the controller's template file onto your                      above, except in bold text.
  computer so that you have a good backup
  copy of it. Then make another local copy onto            .N        Prints a serial ticket number in the
  your computer in order to edit the file.                           large number font
> Edit the local template file with a text editor to       .t        Begins a text block (prints text until the
  enter new ticket data.                                   .td       next command). May be followed by
> Save it to a simple text format that does not            .tq       'd' for double size or 'q' for quadruple
  add special formatting information into the                        size.
  file, such as font styles or colors.                     .b        Begins a bold text block (prints text
> When the file appears to be ready, copy the              .bd       until the next command). May be
  local file back to the device to replace the             .bq       followed by 'd' for double size or 'q' for
  original. The controller will now use the                          quadruple size.
  information contained in the new template file           .e        Ends a text block (NOP)
  on the device. If the template file does not             .WA       Prints the received string of text. Up to
  produce the desired results, copy the backup             Minutes   4 unique text strings may be printed.
  copy to the device, and either use that one or           .WAd      Noted as 'A' through 'D'. Up to 16
  repeat the previous process to create a new              Custom    characters may be printed following the
  working template file.                                   ers       received text string. May be followed
                                                           .WAq      by 'd' for double size or 'q' for
NOTE: Contact Alzatex to order any required files                    quadruple size. The maximum string
if they become damaged or missing                                    length is 16 characters.

Version V1.04                                          8                                 www.alzatex.com
Timekeeper™                  Guide to the PR121B Take-A-Turn System                           Alzatex, Inc.

                                                        .Mq
Within a text block, you may insert "d" to insert      .t
the date or “t” to insert the time. You can escape a
new line in a text block using "" at the end of a      .e
line. Note that font size changes do not fully take     .c
effect until a new line is encountered. To insert a
literal backslash, use "".
                                                        INSERTING A SYMBOL/IMAGE
For best results, use Offline Mode to Reset the         To insert a custom image or a symbol, follow these
printer after changing anything in the controller's     steps:
removable disk, such as the template file.              > Using Paint, Gimp or another image editing
                                                            program, create or convert the image or symbol
Following are two example template files and the            to a 1 Bit monochrome type of bitmap format.
results of using those examples on the printer.         > As a final step, vertically flip the image.
                                                        > Save it to any file location, using a filename not
                                                            to exceed 8 characters, and that ends with a .bmp
                                                            filename extension.

Example#1 TEMPLATE.TXT                                  NOTE: The bitmap file name should only contain
                                                        letters, numbers, and underscore. For example the
.t                                                      file names “12345678.bmp” and
                                                        “MYLOGO_5.BMP” will work, but “logo.jpg” and
.e                                                      “This file! name .bmp” will not work. The printer
.N                                                      will print an error if the bitmap file is missing or
.t                                                      incorrect.

Welcome to Alzatex                                      > Copy the saved file to the USB/Removable Disk
.e                                                        drive.
.iALZATEX.BMP                                           > To insert the copied image into the template.txt
.bq                                                       file, enter the command .iFILE.BMP
TodayIs                                                   into the template file.
.e                                                        (For example, if file is named logo1.bmp, type
.t                                                        .ilogo1.bmp ) into the template.txt file.
d
.e
Another line of comments
.td
Time:
t
.e
.C


Example#2 TEMPLATE.TXT
.ilogo.bmp
.b

.e
.td
d t
    Ticket Number
      
.e
.k1A
.Mq
.k2B


Version V1.04                                           9                               www.alzatex.com
Timekeeper™                   Guide to the PR121B Take-A-Turn System                               Alzatex, Inc.

Progammer's Guide                                                            service.
The following information regards advanced                 “LAxxxxxx         One of several text strings may
techniques and topics not necessary for normal             “LBxxxxxx         be printer. The commands .WA,
operation of the system. The information here also         “LCxxxxxx         .WB, .WC and .WD print these
regards settings that have already been applied at         “LDxxxxxx         strings onto the ticket. Each
the factory and typically should not be adjusted                             string may be up to 16
once the system is in operation.                                             characters long.
                                                           TMY20yymm         Set the time and date.
Serial Communication                                       ddThhmmss
The controller will accept several commands via            TMEhhmmss         Set the time of day only.
the serial port. These commands can cause the              TMY20yymm         Set the date only.
printer to print specific tickets if the controller uses   dd
a template file containing “.kx commands. For
example, if the template file contains the command          Custom Fonts
“.k3”, the printer is online, and a “KP3 command            The controller comes with a font definition supplied
sent to the serial port, then it will print that ticket.    by Alzatex. This definition is contained in the
These commands can also be used to emulate                  controller's FONT.HEX file, and is required to print a
button presses and knob turns on the controller             ticket number. If you wish to use another font,
These commands are initially only recognized by             contact Alzatex. If you are replacing the font file on
the controller when it is in normal Online Mode.            the controller with a new one from Alzatex, be sure
Each command consists of a double-quote                     to create a backup copy of the original file first. The
character '”', upper-case “K” character, upper-case         FONT.HEX file is a binary file and should not be
“P” character (optional), and then a character or           edited.
characters for a specific instruction.

The serial port operates at 2400 baud.                       Errata
                                                            The controller will become unresponsive if the
The set of serial commands are:                             printer power is disconnected while the printer is
                                                            printing a ticket. To restore normal operation, simply
COMMAND            RESULT                                   disconnect power from the controller and then restore
“KPA               Equivalent to a single press of          power to both the controller and printer.
“KA0A              the MODE key.
“KPB               Equivalent to a single press of
“KA0B              the SELECT key.
“KPK               Puts the printer into the normal
“KA0K              running online mode.
“KP+               Equivalent to a single clockwise
“K+                click of the knob.
“KP-               Equivalent to a single counter-
“K-                clockwise click of the knob.
“KP0 through       If the unit is in the ONLINE
“KP9               mode, these buttons print a
“KA00              ticket with a particular button
through            ID when using conditional
“KA09              printing statements. Examples:
                   “KP3 prints a “Registration”
                   ticket , and “KP4 prints a
                   “License renewal” ticket.

“KP1 through       In the other modes, these
“KP4               commands respond the same as
“KA01              pressing buttons 1 through 4 on
through            the front panel.
“KA04
“N0bsnnn           Set the starting ticket number,
                   button number and type of


Version V1.04                                              10                               www.alzatex.com
Timekeeper™                 Guide to the PR121B Take-A-Turn System       Alzatex, Inc.


Formatting The USB Memory Device
This is normally performed at the factory and
should not be performed by the user unless the file
system becomes corrupted.

The Flash ROM must be formatted the first time
the device is plugged in; if the displays reads
"NEED FORMAT". Perform the following steps:

    1.   Press the Mode button until you see the
         "Fdisk" page.
    2.   Press Button #1 to partition the memory
         (can be done at any time, it doesn't
         overwrite any important data).
    3.   Press Button #3 to show FDisk Table
         page, continue pressing #3 until "Fat=9" is
         shown.
    4.   Press Button #1 to show "Confirm
         Format" page.
    5.   Press Button #2 to format the memory.
         All data will be lost!!!
    6.   Connect the printer to a computer using
         the USB port.
    7.   The computer will recognize the printer as
         a flash drive.
    8.   Re-load the required files font.hex and
         template.txt.
    9.   Re-Load other files including logo.bmp
         and any other files.

NOTE: The above procedure partitions the drive
and formats the device with the FAT12/FAT16
filesystem.


Version V1.04                                          11            www.alzatex.com

Mais conteúdo relacionado

Mais procurados

We Don’t Just Sell Rugged Computers...We Sell Rugged Customized Solutions
We Don’t Just Sell Rugged Computers...We Sell Rugged Customized SolutionsWe Don’t Just Sell Rugged Computers...We Sell Rugged Customized Solutions
We Don’t Just Sell Rugged Computers...We Sell Rugged Customized SolutionsAlbaro Ibarra MBA
 
Z wave.me controller set for duro 200 manual
Z wave.me controller set for duro 200 manualZ wave.me controller set for duro 200 manual
Z wave.me controller set for duro 200 manualDomotica daVinci
 
Presentation2.1
Presentation2.1Presentation2.1
Presentation2.1slabdans
 
5808spec
5808spec5808spec
5808specfredotm
 
LPK25 Keyboard Controller Quickstart Guide
LPK25 Keyboard Controller Quickstart GuideLPK25 Keyboard Controller Quickstart Guide
LPK25 Keyboard Controller Quickstart GuideAkai Pro
 
IOS/Android Touch lcd gsm alarm system LS-GSM-215
IOS/Android Touch lcd gsm alarm system LS-GSM-215IOS/Android Touch lcd gsm alarm system LS-GSM-215
IOS/Android Touch lcd gsm alarm system LS-GSM-215Alice Hsu
 
Honeywell 5883h-install-guide
Honeywell 5883h-install-guideHoneywell 5883h-install-guide
Honeywell 5883h-install-guideAlarm Grid
 
Training material wmt 2012 ctnc
Training material wmt 2012 ctncTraining material wmt 2012 ctnc
Training material wmt 2012 ctncNuttaphol Wongmun
 
M-9000 Digital Matrix Mixer
M-9000 Digital Matrix MixerM-9000 Digital Matrix Mixer
M-9000 Digital Matrix MixerRomAudioVideo
 

Mais procurados (16)

We Don’t Just Sell Rugged Computers...We Sell Rugged Customized Solutions
We Don’t Just Sell Rugged Computers...We Sell Rugged Customized SolutionsWe Don’t Just Sell Rugged Computers...We Sell Rugged Customized Solutions
We Don’t Just Sell Rugged Computers...We Sell Rugged Customized Solutions
 
Düwi Control Manual
Düwi Control ManualDüwi Control Manual
Düwi Control Manual
 
Duw 05443 manual
Duw 05443 manualDuw 05443 manual
Duw 05443 manual
 
Dektec dtu-215
Dektec dtu-215Dektec dtu-215
Dektec dtu-215
 
Z wave.me controller set for duro 200 manual
Z wave.me controller set for duro 200 manualZ wave.me controller set for duro 200 manual
Z wave.me controller set for duro 200 manual
 
Presentation2.1
Presentation2.1Presentation2.1
Presentation2.1
 
5808spec
5808spec5808spec
5808spec
 
LPK25 Keyboard Controller Quickstart Guide
LPK25 Keyboard Controller Quickstart GuideLPK25 Keyboard Controller Quickstart Guide
LPK25 Keyboard Controller Quickstart Guide
 
DVC
DVCDVC
DVC
 
miniDSP Balanced 2x4
miniDSP Balanced 2x4miniDSP Balanced 2x4
miniDSP Balanced 2x4
 
IOS/Android Touch lcd gsm alarm system LS-GSM-215
IOS/Android Touch lcd gsm alarm system LS-GSM-215IOS/Android Touch lcd gsm alarm system LS-GSM-215
IOS/Android Touch lcd gsm alarm system LS-GSM-215
 
784323_Tebevert_dsp_gb
784323_Tebevert_dsp_gb784323_Tebevert_dsp_gb
784323_Tebevert_dsp_gb
 
Honeywell 5883h-install-guide
Honeywell 5883h-install-guideHoneywell 5883h-install-guide
Honeywell 5883h-install-guide
 
Training material wmt 2012 ctnc
Training material wmt 2012 ctncTraining material wmt 2012 ctnc
Training material wmt 2012 ctnc
 
Solutions
SolutionsSolutions
Solutions
 
M-9000 Digital Matrix Mixer
M-9000 Digital Matrix MixerM-9000 Digital Matrix Mixer
M-9000 Digital Matrix Mixer
 

Semelhante a Take A Number Printer1

Door_Control_Unit_User_Manual_2.pdf
Door_Control_Unit_User_Manual_2.pdfDoor_Control_Unit_User_Manual_2.pdf
Door_Control_Unit_User_Manual_2.pdfnyakmutia2
 
Machine monitoring system
Machine monitoring systemMachine monitoring system
Machine monitoring systemPrem Baboo
 
Pc mouse operated electrical load control using vb application
Pc mouse operated electrical load control using vb applicationPc mouse operated electrical load control using vb application
Pc mouse operated electrical load control using vb applicationEdgefxkits & Solutions
 
Home automation control system using dtmf technology
Home automation control system using dtmf technologyHome automation control system using dtmf technology
Home automation control system using dtmf technologyGovind Ekshinge
 
Voice Control Home Automation
Voice Control Home AutomationVoice Control Home Automation
Voice Control Home AutomationAbhishek Neb
 
Wireless agro automation system
Wireless agro automation systemWireless agro automation system
Wireless agro automation systemkarthikpunuru
 
Sellenis s jet-800_series_valvejet lcp_printer_user_manual - 12 dec 2017
Sellenis s jet-800_series_valvejet lcp_printer_user_manual - 12 dec 2017Sellenis s jet-800_series_valvejet lcp_printer_user_manual - 12 dec 2017
Sellenis s jet-800_series_valvejet lcp_printer_user_manual - 12 dec 2017Ammar lecheheb
 
Secured voting machine with touch screen & smart card
Secured voting machine with touch screen & smart cardSecured voting machine with touch screen & smart card
Secured voting machine with touch screen & smart cardAlbert Jose
 
Kalyan abstrct googl
Kalyan abstrct googlKalyan abstrct googl
Kalyan abstrct googldevakalyan143
 
voicecontrolhomeautomation-130627021245-phpapp01 (1).ppt
voicecontrolhomeautomation-130627021245-phpapp01 (1).pptvoicecontrolhomeautomation-130627021245-phpapp01 (1).ppt
voicecontrolhomeautomation-130627021245-phpapp01 (1).pptAnkitaVerma776806
 
Smart under and over voltage protection system for
Smart under and over voltage protection system forSmart under and over voltage protection system for
Smart under and over voltage protection system forShuvadip das
 
Cockpit White Box
Cockpit White BoxCockpit White Box
Cockpit White Boxncct
 
BeneVision N22N19_Service Training_V1.0_EN - Copy.pdf
BeneVision N22N19_Service Training_V1.0_EN - Copy.pdfBeneVision N22N19_Service Training_V1.0_EN - Copy.pdf
BeneVision N22N19_Service Training_V1.0_EN - Copy.pdfAtiqurRahman7153
 

Semelhante a Take A Number Printer1 (20)

Power plex
Power plexPower plex
Power plex
 
Door_Control_Unit_User_Manual_2.pdf
Door_Control_Unit_User_Manual_2.pdfDoor_Control_Unit_User_Manual_2.pdf
Door_Control_Unit_User_Manual_2.pdf
 
Machine monitoring system
Machine monitoring systemMachine monitoring system
Machine monitoring system
 
VK_Product.pdf
VK_Product.pdfVK_Product.pdf
VK_Product.pdf
 
Brochure Blink Automotive
Brochure Blink AutomotiveBrochure Blink Automotive
Brochure Blink Automotive
 
Pc mouse operated electrical load control using vb application
Pc mouse operated electrical load control using vb applicationPc mouse operated electrical load control using vb application
Pc mouse operated electrical load control using vb application
 
Brochure Blink Marine
Brochure Blink MarineBrochure Blink Marine
Brochure Blink Marine
 
embedded system for green g
embedded system for green gembedded system for green g
embedded system for green g
 
Home automation control system using dtmf technology
Home automation control system using dtmf technologyHome automation control system using dtmf technology
Home automation control system using dtmf technology
 
Voice Control Home Automation
Voice Control Home AutomationVoice Control Home Automation
Voice Control Home Automation
 
Wireless agro automation system
Wireless agro automation systemWireless agro automation system
Wireless agro automation system
 
Sellenis s jet-800_series_valvejet lcp_printer_user_manual - 12 dec 2017
Sellenis s jet-800_series_valvejet lcp_printer_user_manual - 12 dec 2017Sellenis s jet-800_series_valvejet lcp_printer_user_manual - 12 dec 2017
Sellenis s jet-800_series_valvejet lcp_printer_user_manual - 12 dec 2017
 
Secured voting machine with touch screen & smart card
Secured voting machine with touch screen & smart cardSecured voting machine with touch screen & smart card
Secured voting machine with touch screen & smart card
 
Kalyan abstrct googl
Kalyan abstrct googlKalyan abstrct googl
Kalyan abstrct googl
 
voicecontrolhomeautomation-130627021245-phpapp01 (1).ppt
voicecontrolhomeautomation-130627021245-phpapp01 (1).pptvoicecontrolhomeautomation-130627021245-phpapp01 (1).ppt
voicecontrolhomeautomation-130627021245-phpapp01 (1).ppt
 
Smart under and over voltage protection system for
Smart under and over voltage protection system forSmart under and over voltage protection system for
Smart under and over voltage protection system for
 
Cockpit White Box
Cockpit White BoxCockpit White Box
Cockpit White Box
 
Overview of embedded system
Overview of embedded systemOverview of embedded system
Overview of embedded system
 
Manual danfos danehc10
Manual danfos danehc10Manual danfos danehc10
Manual danfos danehc10
 
BeneVision N22N19_Service Training_V1.0_EN - Copy.pdf
BeneVision N22N19_Service Training_V1.0_EN - Copy.pdfBeneVision N22N19_Service Training_V1.0_EN - Copy.pdf
BeneVision N22N19_Service Training_V1.0_EN - Copy.pdf
 

Mais de Alzatex, Inc.

Mais de Alzatex, Inc. (13)

Timekeeper Wiring5
Timekeeper Wiring5Timekeeper Wiring5
Timekeeper Wiring5
 
Takeaturn Ds590a Rc
Takeaturn Ds590a RcTakeaturn Ds590a Rc
Takeaturn Ds590a Rc
 
Ryg 19 B Reference Guide
Ryg 19 B Reference GuideRyg 19 B Reference Guide
Ryg 19 B Reference Guide
 
Replace Chip Ds512
Replace Chip Ds512Replace Chip Ds512
Replace Chip Ds512
 
Replace Chip Qc115a
Replace Chip Qc115aReplace Chip Qc115a
Replace Chip Qc115a
 
Encryptor Install2
Encryptor Install2Encryptor Install2
Encryptor Install2
 
Ds231 Alarm Timer V0.06
Ds231 Alarm Timer V0.06Ds231 Alarm Timer V0.06
Ds231 Alarm Timer V0.06
 
Dsa244 B Um
Dsa244 B UmDsa244 B Um
Dsa244 B Um
 
Ds017 E Rate1
Ds017 E Rate1Ds017 E Rate1
Ds017 E Rate1
 
Ds017afm Cutout
Ds017afm CutoutDs017afm Cutout
Ds017afm Cutout
 
Dc117 A Production Timer
Dc117 A Production TimerDc117 A Production Timer
Dc117 A Production Timer
 
Dc117a Wiring0
Dc117a Wiring0Dc117a Wiring0
Dc117a Wiring0
 
Code Encryptor Um
Code Encryptor UmCode Encryptor Um
Code Encryptor Um
 

Último

Finology Group – Insurtech Innovation Award 2024
Finology Group – Insurtech Innovation Award 2024Finology Group – Insurtech Innovation Award 2024
Finology Group – Insurtech Innovation Award 2024The Digital Insurer
 
08448380779 Call Girls In Diplomatic Enclave Women Seeking Men
08448380779 Call Girls In Diplomatic Enclave Women Seeking Men08448380779 Call Girls In Diplomatic Enclave Women Seeking Men
08448380779 Call Girls In Diplomatic Enclave Women Seeking MenDelhi Call girls
 
Powerful Google developer tools for immediate impact! (2023-24 C)
Powerful Google developer tools for immediate impact! (2023-24 C)Powerful Google developer tools for immediate impact! (2023-24 C)
Powerful Google developer tools for immediate impact! (2023-24 C)wesley chun
 
What Are The Drone Anti-jamming Systems Technology?
What Are The Drone Anti-jamming Systems Technology?What Are The Drone Anti-jamming Systems Technology?
What Are The Drone Anti-jamming Systems Technology?Antenna Manufacturer Coco
 
CNv6 Instructor Chapter 6 Quality of Service
CNv6 Instructor Chapter 6 Quality of ServiceCNv6 Instructor Chapter 6 Quality of Service
CNv6 Instructor Chapter 6 Quality of Servicegiselly40
 
Mastering MySQL Database Architecture: Deep Dive into MySQL Shell and MySQL R...
Mastering MySQL Database Architecture: Deep Dive into MySQL Shell and MySQL R...Mastering MySQL Database Architecture: Deep Dive into MySQL Shell and MySQL R...
Mastering MySQL Database Architecture: Deep Dive into MySQL Shell and MySQL R...Miguel Araújo
 
Automating Google Workspace (GWS) & more with Apps Script
Automating Google Workspace (GWS) & more with Apps ScriptAutomating Google Workspace (GWS) & more with Apps Script
Automating Google Workspace (GWS) & more with Apps Scriptwesley chun
 
Tech Trends Report 2024 Future Today Institute.pdf
Tech Trends Report 2024 Future Today Institute.pdfTech Trends Report 2024 Future Today Institute.pdf
Tech Trends Report 2024 Future Today Institute.pdfhans926745
 
Data Cloud, More than a CDP by Matt Robison
Data Cloud, More than a CDP by Matt RobisonData Cloud, More than a CDP by Matt Robison
Data Cloud, More than a CDP by Matt RobisonAnna Loughnan Colquhoun
 
TrustArc Webinar - Stay Ahead of US State Data Privacy Law Developments
TrustArc Webinar - Stay Ahead of US State Data Privacy Law DevelopmentsTrustArc Webinar - Stay Ahead of US State Data Privacy Law Developments
TrustArc Webinar - Stay Ahead of US State Data Privacy Law DevelopmentsTrustArc
 
08448380779 Call Girls In Friends Colony Women Seeking Men
08448380779 Call Girls In Friends Colony Women Seeking Men08448380779 Call Girls In Friends Colony Women Seeking Men
08448380779 Call Girls In Friends Colony Women Seeking MenDelhi Call girls
 
The 7 Things I Know About Cyber Security After 25 Years | April 2024
The 7 Things I Know About Cyber Security After 25 Years | April 2024The 7 Things I Know About Cyber Security After 25 Years | April 2024
The 7 Things I Know About Cyber Security After 25 Years | April 2024Rafal Los
 
Artificial Intelligence: Facts and Myths
Artificial Intelligence: Facts and MythsArtificial Intelligence: Facts and Myths
Artificial Intelligence: Facts and MythsJoaquim Jorge
 
Presentation on how to chat with PDF using ChatGPT code interpreter
Presentation on how to chat with PDF using ChatGPT code interpreterPresentation on how to chat with PDF using ChatGPT code interpreter
Presentation on how to chat with PDF using ChatGPT code interpreternaman860154
 
Evaluating the top large language models.pdf
Evaluating the top large language models.pdfEvaluating the top large language models.pdf
Evaluating the top large language models.pdfChristopherTHyatt
 
GenCyber Cyber Security Day Presentation
GenCyber Cyber Security Day PresentationGenCyber Cyber Security Day Presentation
GenCyber Cyber Security Day PresentationMichael W. Hawkins
 
ProductAnonymous-April2024-WinProductDiscovery-MelissaKlemke
ProductAnonymous-April2024-WinProductDiscovery-MelissaKlemkeProductAnonymous-April2024-WinProductDiscovery-MelissaKlemke
ProductAnonymous-April2024-WinProductDiscovery-MelissaKlemkeProduct Anonymous
 
Partners Life - Insurer Innovation Award 2024
Partners Life - Insurer Innovation Award 2024Partners Life - Insurer Innovation Award 2024
Partners Life - Insurer Innovation Award 2024The Digital Insurer
 
The Role of Taxonomy and Ontology in Semantic Layers - Heather Hedden.pdf
The Role of Taxonomy and Ontology in Semantic Layers - Heather Hedden.pdfThe Role of Taxonomy and Ontology in Semantic Layers - Heather Hedden.pdf
The Role of Taxonomy and Ontology in Semantic Layers - Heather Hedden.pdfEnterprise Knowledge
 
08448380779 Call Girls In Civil Lines Women Seeking Men
08448380779 Call Girls In Civil Lines Women Seeking Men08448380779 Call Girls In Civil Lines Women Seeking Men
08448380779 Call Girls In Civil Lines Women Seeking MenDelhi Call girls
 

Último (20)

Finology Group – Insurtech Innovation Award 2024
Finology Group – Insurtech Innovation Award 2024Finology Group – Insurtech Innovation Award 2024
Finology Group – Insurtech Innovation Award 2024
 
08448380779 Call Girls In Diplomatic Enclave Women Seeking Men
08448380779 Call Girls In Diplomatic Enclave Women Seeking Men08448380779 Call Girls In Diplomatic Enclave Women Seeking Men
08448380779 Call Girls In Diplomatic Enclave Women Seeking Men
 
Powerful Google developer tools for immediate impact! (2023-24 C)
Powerful Google developer tools for immediate impact! (2023-24 C)Powerful Google developer tools for immediate impact! (2023-24 C)
Powerful Google developer tools for immediate impact! (2023-24 C)
 
What Are The Drone Anti-jamming Systems Technology?
What Are The Drone Anti-jamming Systems Technology?What Are The Drone Anti-jamming Systems Technology?
What Are The Drone Anti-jamming Systems Technology?
 
CNv6 Instructor Chapter 6 Quality of Service
CNv6 Instructor Chapter 6 Quality of ServiceCNv6 Instructor Chapter 6 Quality of Service
CNv6 Instructor Chapter 6 Quality of Service
 
Mastering MySQL Database Architecture: Deep Dive into MySQL Shell and MySQL R...
Mastering MySQL Database Architecture: Deep Dive into MySQL Shell and MySQL R...Mastering MySQL Database Architecture: Deep Dive into MySQL Shell and MySQL R...
Mastering MySQL Database Architecture: Deep Dive into MySQL Shell and MySQL R...
 
Automating Google Workspace (GWS) & more with Apps Script
Automating Google Workspace (GWS) & more with Apps ScriptAutomating Google Workspace (GWS) & more with Apps Script
Automating Google Workspace (GWS) & more with Apps Script
 
Tech Trends Report 2024 Future Today Institute.pdf
Tech Trends Report 2024 Future Today Institute.pdfTech Trends Report 2024 Future Today Institute.pdf
Tech Trends Report 2024 Future Today Institute.pdf
 
Data Cloud, More than a CDP by Matt Robison
Data Cloud, More than a CDP by Matt RobisonData Cloud, More than a CDP by Matt Robison
Data Cloud, More than a CDP by Matt Robison
 
TrustArc Webinar - Stay Ahead of US State Data Privacy Law Developments
TrustArc Webinar - Stay Ahead of US State Data Privacy Law DevelopmentsTrustArc Webinar - Stay Ahead of US State Data Privacy Law Developments
TrustArc Webinar - Stay Ahead of US State Data Privacy Law Developments
 
08448380779 Call Girls In Friends Colony Women Seeking Men
08448380779 Call Girls In Friends Colony Women Seeking Men08448380779 Call Girls In Friends Colony Women Seeking Men
08448380779 Call Girls In Friends Colony Women Seeking Men
 
The 7 Things I Know About Cyber Security After 25 Years | April 2024
The 7 Things I Know About Cyber Security After 25 Years | April 2024The 7 Things I Know About Cyber Security After 25 Years | April 2024
The 7 Things I Know About Cyber Security After 25 Years | April 2024
 
Artificial Intelligence: Facts and Myths
Artificial Intelligence: Facts and MythsArtificial Intelligence: Facts and Myths
Artificial Intelligence: Facts and Myths
 
Presentation on how to chat with PDF using ChatGPT code interpreter
Presentation on how to chat with PDF using ChatGPT code interpreterPresentation on how to chat with PDF using ChatGPT code interpreter
Presentation on how to chat with PDF using ChatGPT code interpreter
 
Evaluating the top large language models.pdf
Evaluating the top large language models.pdfEvaluating the top large language models.pdf
Evaluating the top large language models.pdf
 
GenCyber Cyber Security Day Presentation
GenCyber Cyber Security Day PresentationGenCyber Cyber Security Day Presentation
GenCyber Cyber Security Day Presentation
 
ProductAnonymous-April2024-WinProductDiscovery-MelissaKlemke
ProductAnonymous-April2024-WinProductDiscovery-MelissaKlemkeProductAnonymous-April2024-WinProductDiscovery-MelissaKlemke
ProductAnonymous-April2024-WinProductDiscovery-MelissaKlemke
 
Partners Life - Insurer Innovation Award 2024
Partners Life - Insurer Innovation Award 2024Partners Life - Insurer Innovation Award 2024
Partners Life - Insurer Innovation Award 2024
 
The Role of Taxonomy and Ontology in Semantic Layers - Heather Hedden.pdf
The Role of Taxonomy and Ontology in Semantic Layers - Heather Hedden.pdfThe Role of Taxonomy and Ontology in Semantic Layers - Heather Hedden.pdf
The Role of Taxonomy and Ontology in Semantic Layers - Heather Hedden.pdf
 
08448380779 Call Girls In Civil Lines Women Seeking Men
08448380779 Call Girls In Civil Lines Women Seeking Men08448380779 Call Girls In Civil Lines Women Seeking Men
08448380779 Call Girls In Civil Lines Women Seeking Men
 

Take A Number Printer1

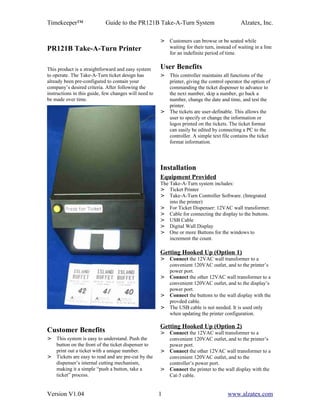
  • 1. Timekeeper™ Guide to the PR121B Take-A-Turn System Alzatex, Inc. > Customers can browse or be seated while PR121B Take-A-Turn Printer waiting for their turn, instead of waiting in a line for an indefinite period of time. This product is a straightforward and easy system User Benefits to operate. The Take-A-Turn ticket design has > This controller maintains all functions of the already been pre-configured to contain your printer, giving the control operator the option of company’s desired criteria. After following the commanding the ticket dispenser to advance to instructions in this guide, few changes will need to the next number, skip a number, go back a be made over time. number, change the date and time, and test the printer. > The tickets are user-definable. This allows the user to specify or change the information or logos printed on the tickets. The ticket format can easily be edited by connecting a PC to the controller. A simple text file contains the ticket format information. Installation Equipment Provided The Take-A-Turn system includes: > Ticket Printer > Take-A-Turn Controller Software. (Integrated into the printer) > For Ticket Dispenser: 12VAC wall transformer. > Cable for connecting the display to the buttons. > USB Cable > Digital Wall Display > One or more Buttons for the windows to increment the count. Getting Hooked Up (Option 1) > Connect the 12VAC wall transformer to a convenient 120VAC outlet, and to the printer’s power port. > Connect the other 12VAC wall transformer to a convenient 120VAC outlet, and to the display’s power port. > Connect the buttons to the wall display with the provded cable. > The USB cable is not needed. It is used only when updating the printer configuration. Getting Hooked Up (Option 2) Customer Benefits > Connect the 12VAC wall transformer to a > This system is easy to understand. Push the convenient 120VAC outlet, and to the printer’s button on the front of the ticket dispenser to power port. print out a ticket with a unique number. > Connect the other 12VAC wall transformer to a > Tickets are easy to read and are pre-cut by the convenient 120VAC outlet, and to the dispenser’s internal cutting mechanism, controller’s power port. making it a simple “push a button, take a > Connect the printer to the wall display with the ticket” process. Cat-5 cable. Version V1.04 1 www.alzatex.com
  • 2. Timekeeper™ Guide to the PR121B Take-A-Turn System Alzatex, Inc. > Connect the “NEXT” buttons to the ticket ● Knob. Used to change various setup values. printer. ● Buttons labeled A and B are not used on the > The USB cable is not needed. It is used only standard models. By special request, when updating the printer configuration. additional features can be added that utilize these buttons. Getting Hooked Up (Option 3) > Connect the 12VAC wall transformer to a Displays and LEDs convenient 120VAC outlet, and to the printer’s The printer has the following displays and LEDs. power port. ● LCD Display. Displays various setup and > Connect the other 12VAC wall transformer to operational menus. a convenient 120VAC outlet, and to the ● LED 1. Lower left of knob. This LED controller’s power port. indicates the state of remote input 1. > Connect the DC117A-WAIT1 printer ● LED 2. Lower right of knob. This LED controller with SD memory card to the printer indicates the state of remote input 2. with the Cat-5 cable. ● LED 3. Upper left of knob. This LED > Connect the printer controller with SD indicates the state of remote input 3. memory card to the wall display with the Cat-5 ● LED 4. Upper right of knob. This LED cable. indicates the state of remote input 4. > Connect the “NEXT” buttons to the DC117A- WAIT1 printer controller with SD memory card. Startup > The USB cable is not needed. It is used only Powering up the printer. when updating the printer configuration. ● The following sequence of messages should appear. NOTE: The USB connection is not used during normal operation. The controller needs to be Startup Mode hello message and memory test. connected to a computer only when Take-A-Turn Hello programming a custom ticket. When needed, Waiting for FRAM connect the controller to the computer using the USB cable. Startup Mode checking the printer status. External Buttons and Controls 08Jan22 09:22:52 Waiting ... The printer has the following external buttons and controls. ● Single Ticket Service Button. The basic Startup Mode ready to print tickets. ticket printer has one button. Press the 08Jan22 09:22:52 button to generate a ticket. ONLINE .. ● Multiple Ticket Service Buttons. Each button is assigned to a specific service. Specify the number of buttons required The printer is ready to print tickets. when ordering. Daily Startup Internal Buttons and Controls The Take-A-Turn remembers the last printed ticket number and begins on the next number in sequence. The printer has the following internal buttons and controls. These controls are used during setup and when changing paper. ● Buttons 1-4 depend on the current mode. LED Indications The ticket dispenser lights up in various colors In the Online mode these buttons print depending on the state of the system. tickets ● Mode Button. Steps through one of • During normal operation when the printer is not several operational and configuration printing, the dispenser should be Blue. menus.. • When the Take-A-Ticket button is pressed, the ● Select Button. Used to select the knob color should change to a Greenish Blue for a function. moment. Version V1.04 2 www.alzatex.com
  • 3. Timekeeper™ Guide to the PR121B Take-A-Turn System Alzatex, Inc. • A ticket should begin printing. The color Online Mode. If this message appears, refer to the should start flashing between Blue and section on replacing the battery and follow the Magenta. The color should return to Blue once specified procedure. the printing is complete. 08Jan22 09:22:52 • If the color is steady Magenta, either the cable Low Battery is not connected, or there is a paper jam or other printer error. Online Mode. This message may appear while a ticket is being printed. 08Jan22 09:22:52 Printer modes Printing... The controller sends commands to the printer. The controller is built into the printer enclosure. Online Mode. This message will appear if the printer Remove the printer cover to expose the printer does not respond. Check for a paper jamb. Also controls. The following describes the basic check that the green printer paper release button is functionality of the controller. Pressing the Mode in the correct position. button successively selects each of the following 08Jan22 09:22:52 modes. Printer Error > Online Mode. Power up default. Ready to print tickets. > Ticket/ Display Number Setup Mode. Used if you need to change the starting ticket NUMBER SELECT MODE: This mode permits number. several settings to be configured. > Date/Time Change Mode. Used to set the time of day clock. Number Select Mode > Offline mode. Used when changing paper. Take-A-TurnV1.02 > Flash drive format mode. Used if the flash L1 NUM xxx D3 FE drive becomes corrupted. The USB mode is entered when the printer is This system will handle up to 8 waiting lines. Press connected to a computer using the USB cable. the “1” button to select the desired waiting line > USB Mode. Used to change the ticket format. L1 through L8. Pressing button “4” or turning the knob changes the ticket number to be printed to the desired number for the selected waiting line. The ticket number is stored in non-volatile ONLINE MODE: This is the normal operating memory. mode and the default mode at power up. Buttons 1-4 print tickets. This is the only mode Pressing the “4” button simulates the generation of a in which local and remote printing commands ticket without actually printing the ticket. will be accepted. Turning the knob changes the number for the next Online Mode. If this message appears, refer to the ticket. Range 0-999. section on reformatting the flash drive and follow the specified procedure. The wall display is available as a 2, 3 or 4 digit 08Jan22 09:22:52 display. You must tell the printer whether to USB Needs Format print a two digit or three digit number. Press the “2” button to select either a 2 or 3 digit ticket number. The display size is stored in non- Online Mode. This message may appear briefly at volatile memory. power up. If this message persists, contact the factory repair department. If you have multiple services, you need an extra digit 08Jan22 09:22:52 on the wall display to show the type of service. Waiting for FRAM Display Number of Number of Digits Size Services Version V1.04 3 www.alzatex.com
  • 4. Timekeeper™ Guide to the PR121B Take-A-Turn System Alzatex, Inc. 2 digit One service 2 digit number 08Jan22 09:22:52 3 digit One service 3 digit number Cal Signal OFF 3 digit Multiple services 2 digit number 4 digit Multiple services 3 digit number OFFLINE MODE: Each button functions differently in Offline Mode than when in the Online Mode: You can select one of 10 template files to be used when printing tickets. Press the “3” button to The display flashes momentarly to the following select the desired template file. The files are display. named FE=TEMPLATE.TXT, F1=TEMPLATE1.TXT through Take-A-TurnV1.02 OFFLINE F9=TEMPLATE9.TXT. The template name is stored in non-volatile memory. The display changes to the status display with this Once the desired settings are selected, message or one of the error messages. momentarily press the MODE button Printer OFFLINE successively until the device is back in the Status OK Online mode. See the Printer Status section for a list of the possible TIME/DATE CHANGE MODE: This mode error messages. sets the time and date. Press SELECT to switch fields between HH:MM:SS and The button functions are as follows. MM:DD:YY. Rotate the knob to change the number. Press Button two when finished to • Button 1. Cut paper. save the changes. • Button 2. Feed paper NOTE: The time is displayed in military time. • Button 3. Font test. Prints out digits 0-9 in the NOTE: After initial setup, the internal lithium large number font. battery should accurately maintain both • Button 4. Resets the printer. time and date. • Mode Button. Leaves the OFFLINE mode. Time/Data Change Mode NOTE: Always return the system to ONLINE Mode 08Jan22 09:22:52 after working in any other mode. Recall Time/Date Printer Status Time/Data Change Mode The controller display shows the printer status in 08Jan22 09:22:52 either the Online or the Offline Mode. The controller Press BTN 2=Save will also momentarily display each of the status messages as part of the Font test. The status messages display as follows: Time/Data Change Mode 08Jan22 09:22:52 Printer OFFLINE Time/Date Saved Status OK Time/Data Change Mode. Press button 3 to turn the time of day clock calibration signal on. This > Check Power: The printer has reported a procedure is typically performed at the factory. problem with its power supply. 08Jan22 09:22:52 Cal Signal ON Printer OFFLINE Check Power Time/Data Change Mode. Press button 4 to turn the time of day clock calibration signal off. Version V1.04 4 www.alzatex.com
  • 5. Timekeeper™ Guide to the PR121B Take-A-Turn System Alzatex, Inc. > Printer Head up: The green release NOTE: Once partitioned, you can also format the button on the printer head is not secure. device by plugging it into a PC and formating it with the FAT12/FAT16 file system. Printer OFFLINE Printer Head up Flash Drive Format Mode. This message appears if the file system is properly formatted. > Printer Head Temp: The printer is Fdisk OK S=0200 Take-A-TurnFAT12 overheated. Flash Drive Format Mode. This message should Printer OFFLINE Print Head temp appear when button 1 is pressed. Fdisk Partition > Cutter Error: The printer has reported problem with the cutter. Flash Drive Format Mode Printer OFFLINE FdiskPartitionEr Cutter Error FAT Format Error If you experience a file format error, you will need to > Printer Busy: Action in progress. re-format the flash drive. Printer OFFLINE Formatting the Flash Drive Printer Busy The Flash ROM must be formatted the first time the device is plugged in or if the file system becomes > PRINTER ERR: A problem with the corrupted. If the LCD display reads "NEED printer, such as the printer is online while FORMAT". Use the following steps to reformat the green release button on the printer head is flash drive. not secure. The message may also briefly display when the system is first plugged • Press the Mode button until you see the in. Check the printer's power and data "Fdisk" page. connections. Flash Drive Format Mode > Out of Paper: Replace Number receipt paper. Fdisk OK S=0200 FAT Format Error Printer OFFLINE Out of Paper • Press Button 1 to partition the memory (can be done at any time, it doesn't overwrite any important data). > Waiting…: Controller is waiting for response from the printer. The printer is Flash Drive Format Mode. This message should either not connected or busy. appear when button 1 is pressed. Fdisk Partition Printer OFFLINE Waiting... • Press Button 3 to show FDisk Table page. USB DRIVE FORMAT MODE: Each button Flash Drive Format Mode. Press Button 3. The functions differently in Offline Mode than when in following message will appear. the online mode. FDISK TBL FAT=0 Version V1.04 5 www.alzatex.com
  • 6. Timekeeper™ Guide to the PR121B Take-A-Turn System Alzatex, Inc. Contact the factory for help on generating the • Continue pressing button 3 successively until required files if you do not already have a copy of "Fat=9" is shown. these files. Flash Drive Format Mode. Press Button 3. The The required files are listed below. following message will appear. • The “Font.hex” file contains the bit image for FDISK TBL FAT=9 the large number format font. • The “template.txt” file is user generated and contains the ticket format. See the section on programming a custom ticket on how to create • Press Button 1 to show "Confirm this file. reformat" page. • Any image files in “.bmp” format using one bit encoding to create a black and white image. You Flash Drive Format Mode. Press Button 1. The can use the Microsoft Windows or MAC paint following message will appear. program to generate the logo in the correct Press BTN 2 to format. Confirm reformat • Press Button 2 to format the memory. All data Adding Paper will be lost!!! The only part of the Take-A-Turn that needs regular servicing is the printer paper. The printer uses Flash Drive Format Mode. Press button 2. The standard 60MM wide receipt thermal paper. To following message will appear if the format was replace the paper, follow these steps: successful. ● Press the Mode button on the Controller Mem reformatted until you enter the Offline mode. The printer can’t be accidentally activated in this mode. Flash Drive Format Mode. Press button 2. The ● Loosen the thumb screw on the rear of the following message will appear if the format was top cover. Slide the cover towards the rear not successful. and Lift off the top cover of the printer. Mem ERROR ● To remove remnants of paper: Depress the green release button on the bottom right side of the printer face, and gently pull out any Now you can connect the printer to a computer paper scraps. and load the printer files on to the printer filesystem. See section on the USB Mode for ● Remove the empty plastic cylinder that held details. the old paper, and install the new paper (which will have its own plastic cylinder) onto the metal pin, with the paper entering USB MODE: The USB mode is entered when the the printer mouth from the top of the roll. printer is connected to a computer via the USB The ends of the metal pin should set easily port. In the USB mode, all printer functions in the grooved slots when replaced. are disabled. The USB mode is used to setup the ticket template. ● Feed the new paper through the back of the printer mouth. The printer will automatically grab the paper, feed it through, and cleanly USB Mode cut off a small portion to ensure the paper is properly lined up. 08Jan18 HH:MM:SS USB ● If the printer does not automatically grab the paper, push the green release button. Next, Setting up the ticket template. hand feed the paper through, then push the Feed button (Button 2) on the controller. Version V1.04 6 www.alzatex.com
  • 7. Timekeeper™ Guide to the PR121B Take-A-Turn System Alzatex, Inc. This will grab the paper and feed it NOTE: Be sure to remove the USB cable once setup through the rest of the way. is complete. The printer will NOT print tickets while the USB is connected. NOTE: You will never have to replace any ink cartridges because the Take-A-Turn Printer uses thermal ink imprinting. NOTE: Only use the correct size and type of thermal printer paper in the printer. To obtain more paper, contact Alzatex. Order # 3560-Thermal Paper. Replacing the battery The internal lithium battery that maintains the time and date will need to be replaced every few years. Should replacement become necessary, the battery is located on a circuit board under the controls and the LCD display. Remove the housing screws and replace with a new CR2032 battery. This battery is available at most electronics or camera stores. Rear Panel Connectors The rear panel of the printer has five connectors. The connectors are used as follows. > Power Connector. The power connector should be connected to a 12VAC output wall transformer to power the printer. > TX422 Connector. This port sends the serving number to a wall display. This connector also is used to communicate with the controller on models that include the controller with built in data capture and statistical analysis. > RX422 Connector. This port permits the printer to be remotely controlled from a distant location. This port is also used to communicate with the controller on models that include the controller with built in data capture and statistical analysis. > USB Connector. The USB connector is used for initial setup. When the USB is connected to a computer, the printer appears as a removable disk drive. Several files for system configuration are required on this USB drive. > Remote Connector. When using the printer to operate the wall displays directly, connect the buttons that increment the “Now Serving” display to this connector. Version V1.04 7 www.alzatex.com
  • 8. Timekeeper™ Guide to the PR121B Take-A-Turn System Alzatex, Inc. Programming a Custom Ticket To achieve the desired ticket information, refer to the following Controller Command Table. Along with a number, the ticket can also be printed with other data such as date, time, a company logo, TEMPLATE.TXT commnads. etc. This information has already been installed into the device’s memory upon placement of the All lines of template.txt are ignored except for order. However, that information is available for commands and command bodies. A valid command you to program the system to print a custom ticket. is a line beginning with a period character'.' (0x2E). All tickets are printed using the selected template The following is a table of several usable commands: file. The file may be named "template.txt", "templat1.txt" through "templat9.txt". The ticket COM RESULT number setup menu is used to select the desired MAND template file. For simplicity, all references in the .c Performs a partial cut (if the printer has documentation will be to "template.txt". a cutter) .C Performs a full cut (if the printer has a To modify "template.txt", follow these steps: cutter) > Connect the controller to the computer with . Prints a DIB file. You most likely need the USB cable provided with your system. iFILE.B to flip the image vertically before > Find the template file currently in the MP saving it. controller. To do this, select MY .kxt Causes the next command to only be COMPUTER, then click on Removable executed if the specified digit Device. The template file appears as “x”corresponds to the button that was “TEMPLATE.TXT” on the device. pressed. The 't' corresponds to a letter Typical contents of the controller device: code in the range 0-9 or A-Z for the font.hex type of service associated with this logo.bmp button. logo2.bmp .n123 Prints a number up to 8 digits in the logo3.bmp large number font. template.txt .m Prints a serial ticket number in standard (“template.txt” and “font.hex” are required for operation. Other contents may vary, such as the .md font size. May be followed by 'd' for .mq double size or 'q' for quadruple size. number of bitmap files and their names. The other files listed here are described later in the .M Prints a serial ticket number in large Programmer's Guide.) .Md font. May be followed by 'd' for double .Mq size or 'q' for quadruple size. Same as > Copy the controller's template file onto your above, except in bold text. computer so that you have a good backup copy of it. Then make another local copy onto .N Prints a serial ticket number in the your computer in order to edit the file. large number font > Edit the local template file with a text editor to .t Begins a text block (prints text until the enter new ticket data. .td next command). May be followed by > Save it to a simple text format that does not .tq 'd' for double size or 'q' for quadruple add special formatting information into the size. file, such as font styles or colors. .b Begins a bold text block (prints text > When the file appears to be ready, copy the .bd until the next command). May be local file back to the device to replace the .bq followed by 'd' for double size or 'q' for original. The controller will now use the quadruple size. information contained in the new template file .e Ends a text block (NOP) on the device. If the template file does not .WA Prints the received string of text. Up to produce the desired results, copy the backup Minutes 4 unique text strings may be printed. copy to the device, and either use that one or .WAd Noted as 'A' through 'D'. Up to 16 repeat the previous process to create a new Custom characters may be printed following the working template file. ers received text string. May be followed .WAq by 'd' for double size or 'q' for NOTE: Contact Alzatex to order any required files quadruple size. The maximum string if they become damaged or missing length is 16 characters. Version V1.04 8 www.alzatex.com
  • 9. Timekeeper™ Guide to the PR121B Take-A-Turn System Alzatex, Inc. .Mq Within a text block, you may insert "d" to insert .t the date or “t” to insert the time. You can escape a new line in a text block using "" at the end of a .e line. Note that font size changes do not fully take .c effect until a new line is encountered. To insert a literal backslash, use "". INSERTING A SYMBOL/IMAGE For best results, use Offline Mode to Reset the To insert a custom image or a symbol, follow these printer after changing anything in the controller's steps: removable disk, such as the template file. > Using Paint, Gimp or another image editing program, create or convert the image or symbol Following are two example template files and the to a 1 Bit monochrome type of bitmap format. results of using those examples on the printer. > As a final step, vertically flip the image. > Save it to any file location, using a filename not to exceed 8 characters, and that ends with a .bmp filename extension. Example#1 TEMPLATE.TXT NOTE: The bitmap file name should only contain letters, numbers, and underscore. For example the .t file names “12345678.bmp” and “MYLOGO_5.BMP” will work, but “logo.jpg” and .e “This file! name .bmp” will not work. The printer .N will print an error if the bitmap file is missing or .t incorrect. Welcome to Alzatex > Copy the saved file to the USB/Removable Disk .e drive. .iALZATEX.BMP > To insert the copied image into the template.txt .bq file, enter the command .iFILE.BMP TodayIs into the template file. .e (For example, if file is named logo1.bmp, type .t .ilogo1.bmp ) into the template.txt file. d .e Another line of comments .td Time: t .e .C Example#2 TEMPLATE.TXT .ilogo.bmp .b .e .td d t Ticket Number .e .k1A .Mq .k2B Version V1.04 9 www.alzatex.com
  • 10. Timekeeper™ Guide to the PR121B Take-A-Turn System Alzatex, Inc. Progammer's Guide service. The following information regards advanced “LAxxxxxx One of several text strings may techniques and topics not necessary for normal “LBxxxxxx be printer. The commands .WA, operation of the system. The information here also “LCxxxxxx .WB, .WC and .WD print these regards settings that have already been applied at “LDxxxxxx strings onto the ticket. Each the factory and typically should not be adjusted string may be up to 16 once the system is in operation. characters long. TMY20yymm Set the time and date. Serial Communication ddThhmmss The controller will accept several commands via TMEhhmmss Set the time of day only. the serial port. These commands can cause the TMY20yymm Set the date only. printer to print specific tickets if the controller uses dd a template file containing “.kx commands. For example, if the template file contains the command Custom Fonts “.k3”, the printer is online, and a “KP3 command The controller comes with a font definition supplied sent to the serial port, then it will print that ticket. by Alzatex. This definition is contained in the These commands can also be used to emulate controller's FONT.HEX file, and is required to print a button presses and knob turns on the controller ticket number. If you wish to use another font, These commands are initially only recognized by contact Alzatex. If you are replacing the font file on the controller when it is in normal Online Mode. the controller with a new one from Alzatex, be sure Each command consists of a double-quote to create a backup copy of the original file first. The character '”', upper-case “K” character, upper-case FONT.HEX file is a binary file and should not be “P” character (optional), and then a character or edited. characters for a specific instruction. The serial port operates at 2400 baud. Errata The controller will become unresponsive if the The set of serial commands are: printer power is disconnected while the printer is printing a ticket. To restore normal operation, simply COMMAND RESULT disconnect power from the controller and then restore “KPA Equivalent to a single press of power to both the controller and printer. “KA0A the MODE key. “KPB Equivalent to a single press of “KA0B the SELECT key. “KPK Puts the printer into the normal “KA0K running online mode. “KP+ Equivalent to a single clockwise “K+ click of the knob. “KP- Equivalent to a single counter- “K- clockwise click of the knob. “KP0 through If the unit is in the ONLINE “KP9 mode, these buttons print a “KA00 ticket with a particular button through ID when using conditional “KA09 printing statements. Examples: “KP3 prints a “Registration” ticket , and “KP4 prints a “License renewal” ticket. “KP1 through In the other modes, these “KP4 commands respond the same as “KA01 pressing buttons 1 through 4 on through the front panel. “KA04 “N0bsnnn Set the starting ticket number, button number and type of Version V1.04 10 www.alzatex.com
  • 11. Timekeeper™ Guide to the PR121B Take-A-Turn System Alzatex, Inc. Formatting The USB Memory Device This is normally performed at the factory and should not be performed by the user unless the file system becomes corrupted. The Flash ROM must be formatted the first time the device is plugged in; if the displays reads "NEED FORMAT". Perform the following steps: 1. Press the Mode button until you see the "Fdisk" page. 2. Press Button #1 to partition the memory (can be done at any time, it doesn't overwrite any important data). 3. Press Button #3 to show FDisk Table page, continue pressing #3 until "Fat=9" is shown. 4. Press Button #1 to show "Confirm Format" page. 5. Press Button #2 to format the memory. All data will be lost!!! 6. Connect the printer to a computer using the USB port. 7. The computer will recognize the printer as a flash drive. 8. Re-load the required files font.hex and template.txt. 9. Re-Load other files including logo.bmp and any other files. NOTE: The above procedure partitions the drive and formats the device with the FAT12/FAT16 filesystem. Version V1.04 11 www.alzatex.com