
Recomendados
Mais conteúdo relacionado
Mais procurados
Mais procurados (14)
Semelhante a Timekeeper RYG15A and RYG19B Reference Guide
Semelhante a Timekeeper RYG15A and RYG19B Reference Guide (19)
Mais de Alzatex, Inc.
Último
Último (20)
Timekeeper RYG15A and RYG19B Reference Guide
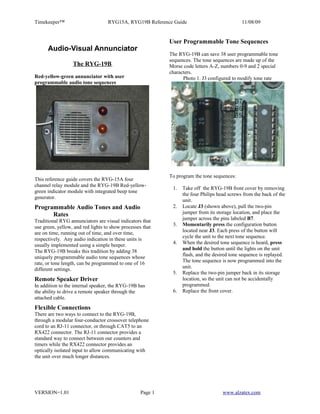
- 1. Timekeeper™ RYG15A, RYG19B Reference Guide 11/08/09 User Programmable Tone Sequences Audio-Visual Annunciator The RYG-19B can save 38 user programmable tone sequences. The tone sequences are made up of the The RYG-19B Morse code letters A-Z, numbers 0-9 and 2 special characters. Red-yellow-green annunciator with user Photo 1. J3 configured to modify tone rate programmable audio tone sequences To program the tone sequences: This reference guide covers the RYG-15A four channel relay module and the RYG-19B Red-yellow- 1. Take off the RYG-19B front cover by removing green indicator module with integrated beep tone the four Philips head screws from the back of the generator. unit. Programmable Audio Tones and Audio 2. Locate J3 (shown above), pull the two-pin Rates jumper from its storage location, and place the Traditional RYG annunciators are visual indicators that jumper across the pins labeled B7. 3. Momentarily press the configuration button use green, yellow, and red lights to show processes that are on time, running out of time, and over time, located near J3. Each press of the button will cycle the unit to the next tone sequence. respectively. Any audio indication in these units is usually implemented using a simple beeper. 4. When the desired tone sequence is heard, press and hold the button until the lights on the unit The RYG-19B breaks this tradition by adding 38 uniquely programmable audio tone sequences whose flash, and the desired tone sequence is replayed. The tone sequence is now programmed into the rate, or tone length, can be programmed to one of 16 different settings. unit. 5. Replace the two-pin jumper back in its storage Remote Speaker Driver location, so the unit can not be accidentally In addition to the internal speaker, the RYG-19B has programmed. the ability to drive a remote speaker through the 6. Replace the front cover. attached cable. Flexible Connections There are two ways to connect to the RYG-19B, through a modular four-conductor crossover telephone cord to an RJ-11 connector, or through CAT5 to an RX422 connector. The RJ-11 connector provides a standard way to connect between our counters and timers while the RX422 connector provides an optically isolated input to allow communicating with the unit over much longer distances. VERSION=1.01 Page 1 www.alzatex.com
- 2. Timekeeper™ RYG15A, RYG19B Reference Guide 11/08/09 Table of beep sequences 0 0 ----- 22 F ..-. 1 1 .---- 23 G --. 2 2 ..--- 24 H .... 3 3 ...-- 25 I .. 4 4 ....- 26 J .--- 5 5 ..... 27 K -.- 6 6 -.... 28 L .-.. 7 7 --... 29 M -- 8 8 ---.. 30 N -. 9 9 ----. 31 O --- 10 : ---... 32 P .--. 11 ; -.-.-. 33 Q --.- 12 period .-.-.- 34 R .-. 13 = -...- 35 S ... 14 RT -.-- 36 T - 15 ? ..--.. 37 U ..- 16 @ .--.-. 38 V ...- 17 A .- 39 W .-- 18 B -... 40 X -..- 19 C -.-. 41 Y -.-- 20 D -.. 42 Z --.. 21 E . 43 RS .-.... - Short tone - Long tone Table 1. Programmable Tone Sequences User Programmable Tone Lengths The RYG-19B can save 16 user programmable tone lengths. The tone lengths sequence from fast to slow. To program the tone length: 1. Take off the RYG-19B front cover by removing the four Philips head screws from the back of the unit. 2. Locate J3 (shown above), pull the two-pin jumper from its storage location, and place the jumper across the pins labeled B6. 3. Momentarily press the configuration button located near J3. Each press of the button will cycle the unit to the next tone length. 4. When the desired tone length is heard, press and hold the button until the lights on the unit flash, and the desired tone length is replayed. The tone length is now programmed into the unit. 5. Replace the two-pin jumper back in its storage location, so the unit can not be accidentally programmed. 6. Replace the front cover. VERSION=1.01 Page 2 www.alzatex.com