SlideShare uma empresa Scribd logo
1 de 5
Baixar para ler offline
Guide pour Dan Wesson
                                        16101, 16182, 16183, 17115, 17176, 17177
         Instructions pour installer le kit de réparation des joints de valve – 17131


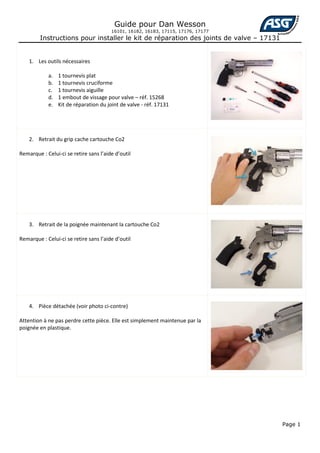
    1. Les outils nécessaires

            a.   1 tournevis plat
            b.   1 tournevis cruciforme
            c.   1 tournevis aiguille
            d.   1 embout de vissage pour valve – réf. 15268
            e.   Kit de réparation du joint de valve - réf. 17131


    2. Retrait du grip cache cartouche Co2

Remarque : Celui-ci se retire sans l’aide d’outil


    3. Retrait de la poignée maintenant la cartouche Co2

Remarque : Celui-ci se retire sans l’aide d’outil


    4. Pièce détachée (voir photo ci-contre)

Attention à ne pas perdre cette pièce. Elle est simplement maintenue par la
poignée en plastique.


                                                                                        Page 1
Guide pour Dan Wesson
                                      16101, 16182, 16183, 17115, 17176, 17177
        Instructions pour installer le kit de réparation des joints de valve – 17131

    5. Retirez la plaque de recouvrement

            a. Dévissez les 4 vis (voir photo ci-contre)


    6. Retirez la plaque de recouvrement

            a. Soulevez simplement la plaque, sans l’incliner


    7. Retirez le chien

            a. Le chien peut être enlevé directement

Remarque: Veillez à ce que le ressort ne s’enlève pas. Maintenez le chien
comme montré sur la photo.


    8. Retirez la valve

            a. Dévissez la vis (voir photo ci-contre)


                                                                                       Page 2
Guide pour Dan Wesson
                                        16101, 16182, 16183, 17115, 17176, 17177
        Instructions pour installer le kit de réparation des joints de valve – 17131

    9. Retirez la valve

            a. Enlevez la valve maintenue par la goupille de retenue


    10. Retrait de la bague interne de la valve

            a. Dévissez la bague interne à l’aide du tournevis plat

Remarque: Faire attention à ne pas abimer la bague


    11. Retrait du joint de la valve

            a. Faire sortir le joint à l’aide du tournevis aiguille

Remarque : Vous pouvez également utiliser un petit tournevis plat pour
cette opération


    12. Retirez la valve du marteau

            a. Utilisez l’embout de vissage pour valve – réf.15268
            b. Dévissez en sens anti-horaire

Remarque : Prenez soin de visualiser l’assemblage des différentes pièces
contenu à l’intérieur du bloc de valve métallique


                                                                                       Page 3
Guide pour Dan Wesson
                                       16101, 16182, 16183, 17115, 17176, 17177
        Instructions pour installer le kit de réparation des joints de valve – 17131

    13. Contenu du bloc de valve métallique

            a. La photo ci-contre montre les différentes pièces dans l’ordre
               d’assemblage (incluant le kit de réparation du joint de valve)


    14. Placez les nouveaux joints dans la valve du marteau

            a. Placez les nouveaux joints dans et autour de la valve (voir
               photo ci-contre)

Remarque : Attention de ne pas abîmer les joints en les insérant

            b. Remettez les différentes pièces à l’intérieur du bloc de valve

Remarque : Le joint vert à l’exterieur de la valve de marteau ne doit plus être
visible une fois revissée.


    15. Placez les nouveaux joints

            a. Positionnez la face creuse du joint vers le haut
            b. Insérez le joint avant de revisser la bague interne de la valve


    16. Placez les nouveaux joints

            a. Placez le joint comme indiqué sur la photo ci-contre


                                                                                       Page 4
Guide pour Dan Wesson
                                      16101, 16182, 16183, 17115, 17176, 17177
        Instructions pour installer le kit de réparation des joints de valve – 17131

    17. Remettez la valve en place
           a. Insérez la valve dans le boulon de retenue
           b. Revissez la vis de fixation


    18. Remettez le bloc du chien

            a. Insérez le guide du ressort
            b. Glissez le montage à l’intérieur du boulon de retenue


    19. Remontez la plaque de recouvrement

Remarque : Attention de ne pas trop serrer les vis


    20. Réinstallez les 2 éléments de poignée

Note : Mettez la poignée qui maintient la cartouche Co2 en premier


L’opération de montage du « kit de réparation des joints de valve » est
maintenant terminée.


                                                                                       Page 5

Mais conteúdo relacionado

Destaque

2024 State of Marketing Report – by Hubspot
2024 State of Marketing Report – by Hubspot2024 State of Marketing Report – by Hubspot
2024 State of Marketing Report – by HubspotMarius Sescu
 
Everything You Need To Know About ChatGPT
Everything You Need To Know About ChatGPTEverything You Need To Know About ChatGPT
Everything You Need To Know About ChatGPTExpeed Software
 
Product Design Trends in 2024 | Teenage Engineerings
Product Design Trends in 2024 | Teenage EngineeringsProduct Design Trends in 2024 | Teenage Engineerings
Product Design Trends in 2024 | Teenage EngineeringsPixeldarts
 
How Race, Age and Gender Shape Attitudes Towards Mental Health
How Race, Age and Gender Shape Attitudes Towards Mental HealthHow Race, Age and Gender Shape Attitudes Towards Mental Health
How Race, Age and Gender Shape Attitudes Towards Mental HealthThinkNow
 
AI Trends in Creative Operations 2024 by Artwork Flow.pdf
AI Trends in Creative Operations 2024 by Artwork Flow.pdfAI Trends in Creative Operations 2024 by Artwork Flow.pdf
AI Trends in Creative Operations 2024 by Artwork Flow.pdfmarketingartwork
 
PEPSICO Presentation to CAGNY Conference Feb 2024
PEPSICO Presentation to CAGNY Conference Feb 2024PEPSICO Presentation to CAGNY Conference Feb 2024
PEPSICO Presentation to CAGNY Conference Feb 2024Neil Kimberley
 
Content Methodology: A Best Practices Report (Webinar)
Content Methodology: A Best Practices Report (Webinar)Content Methodology: A Best Practices Report (Webinar)
Content Methodology: A Best Practices Report (Webinar)contently
 
How to Prepare For a Successful Job Search for 2024
How to Prepare For a Successful Job Search for 2024How to Prepare For a Successful Job Search for 2024
How to Prepare For a Successful Job Search for 2024Albert Qian
 
Social Media Marketing Trends 2024 // The Global Indie Insights
Social Media Marketing Trends 2024 // The Global Indie InsightsSocial Media Marketing Trends 2024 // The Global Indie Insights
Social Media Marketing Trends 2024 // The Global Indie InsightsKurio // The Social Media Age(ncy)
 
Trends In Paid Search: Navigating The Digital Landscape In 2024
Trends In Paid Search: Navigating The Digital Landscape In 2024Trends In Paid Search: Navigating The Digital Landscape In 2024
Trends In Paid Search: Navigating The Digital Landscape In 2024Search Engine Journal
 
5 Public speaking tips from TED - Visualized summary
5 Public speaking tips from TED - Visualized summary5 Public speaking tips from TED - Visualized summary
5 Public speaking tips from TED - Visualized summarySpeakerHub
 
ChatGPT and the Future of Work - Clark Boyd
ChatGPT and the Future of Work - Clark Boyd ChatGPT and the Future of Work - Clark Boyd
ChatGPT and the Future of Work - Clark Boyd Clark Boyd
 
Getting into the tech field. what next
Getting into the tech field. what next Getting into the tech field. what next
Getting into the tech field. what next Tessa Mero
 
Google's Just Not That Into You: Understanding Core Updates & Search Intent
Google's Just Not That Into You: Understanding Core Updates & Search IntentGoogle's Just Not That Into You: Understanding Core Updates & Search Intent
Google's Just Not That Into You: Understanding Core Updates & Search IntentLily Ray
 
Time Management & Productivity - Best Practices
Time Management & Productivity -  Best PracticesTime Management & Productivity -  Best Practices
Time Management & Productivity - Best PracticesVit Horky
 
The six step guide to practical project management
The six step guide to practical project managementThe six step guide to practical project management
The six step guide to practical project managementMindGenius
 
Beginners Guide to TikTok for Search - Rachel Pearson - We are Tilt __ Bright...
Beginners Guide to TikTok for Search - Rachel Pearson - We are Tilt __ Bright...Beginners Guide to TikTok for Search - Rachel Pearson - We are Tilt __ Bright...
Beginners Guide to TikTok for Search - Rachel Pearson - We are Tilt __ Bright...RachelPearson36
 

Destaque (20)

2024 State of Marketing Report – by Hubspot
2024 State of Marketing Report – by Hubspot2024 State of Marketing Report – by Hubspot
2024 State of Marketing Report – by Hubspot
 
Everything You Need To Know About ChatGPT
Everything You Need To Know About ChatGPTEverything You Need To Know About ChatGPT
Everything You Need To Know About ChatGPT
 
Product Design Trends in 2024 | Teenage Engineerings
Product Design Trends in 2024 | Teenage EngineeringsProduct Design Trends in 2024 | Teenage Engineerings
Product Design Trends in 2024 | Teenage Engineerings
 
How Race, Age and Gender Shape Attitudes Towards Mental Health
How Race, Age and Gender Shape Attitudes Towards Mental HealthHow Race, Age and Gender Shape Attitudes Towards Mental Health
How Race, Age and Gender Shape Attitudes Towards Mental Health
 
AI Trends in Creative Operations 2024 by Artwork Flow.pdf
AI Trends in Creative Operations 2024 by Artwork Flow.pdfAI Trends in Creative Operations 2024 by Artwork Flow.pdf
AI Trends in Creative Operations 2024 by Artwork Flow.pdf
 
Skeleton Culture Code
Skeleton Culture CodeSkeleton Culture Code
Skeleton Culture Code
 
PEPSICO Presentation to CAGNY Conference Feb 2024
PEPSICO Presentation to CAGNY Conference Feb 2024PEPSICO Presentation to CAGNY Conference Feb 2024
PEPSICO Presentation to CAGNY Conference Feb 2024
 
Content Methodology: A Best Practices Report (Webinar)
Content Methodology: A Best Practices Report (Webinar)Content Methodology: A Best Practices Report (Webinar)
Content Methodology: A Best Practices Report (Webinar)
 
How to Prepare For a Successful Job Search for 2024
How to Prepare For a Successful Job Search for 2024How to Prepare For a Successful Job Search for 2024
How to Prepare For a Successful Job Search for 2024
 
Social Media Marketing Trends 2024 // The Global Indie Insights
Social Media Marketing Trends 2024 // The Global Indie InsightsSocial Media Marketing Trends 2024 // The Global Indie Insights
Social Media Marketing Trends 2024 // The Global Indie Insights
 
Trends In Paid Search: Navigating The Digital Landscape In 2024
Trends In Paid Search: Navigating The Digital Landscape In 2024Trends In Paid Search: Navigating The Digital Landscape In 2024
Trends In Paid Search: Navigating The Digital Landscape In 2024
 
5 Public speaking tips from TED - Visualized summary
5 Public speaking tips from TED - Visualized summary5 Public speaking tips from TED - Visualized summary
5 Public speaking tips from TED - Visualized summary
 
ChatGPT and the Future of Work - Clark Boyd
ChatGPT and the Future of Work - Clark Boyd ChatGPT and the Future of Work - Clark Boyd
ChatGPT and the Future of Work - Clark Boyd
 
Getting into the tech field. what next
Getting into the tech field. what next Getting into the tech field. what next
Getting into the tech field. what next
 
Google's Just Not That Into You: Understanding Core Updates & Search Intent
Google's Just Not That Into You: Understanding Core Updates & Search IntentGoogle's Just Not That Into You: Understanding Core Updates & Search Intent
Google's Just Not That Into You: Understanding Core Updates & Search Intent
 
How to have difficult conversations
How to have difficult conversations How to have difficult conversations
How to have difficult conversations
 
Introduction to Data Science
Introduction to Data ScienceIntroduction to Data Science
Introduction to Data Science
 
Time Management & Productivity - Best Practices
Time Management & Productivity -  Best PracticesTime Management & Productivity -  Best Practices
Time Management & Productivity - Best Practices
 
The six step guide to practical project management
The six step guide to practical project managementThe six step guide to practical project management
The six step guide to practical project management
 
Beginners Guide to TikTok for Search - Rachel Pearson - We are Tilt __ Bright...
Beginners Guide to TikTok for Search - Rachel Pearson - We are Tilt __ Bright...Beginners Guide to TikTok for Search - Rachel Pearson - We are Tilt __ Bright...
Beginners Guide to TikTok for Search - Rachel Pearson - We are Tilt __ Bright...
 

Guide de réparation dan wesson

  • 1. Guide pour Dan Wesson 16101, 16182, 16183, 17115, 17176, 17177 Instructions pour installer le kit de réparation des joints de valve – 17131 1. Les outils nécessaires a. 1 tournevis plat b. 1 tournevis cruciforme c. 1 tournevis aiguille d. 1 embout de vissage pour valve – réf. 15268 e. Kit de réparation du joint de valve - réf. 17131 2. Retrait du grip cache cartouche Co2 Remarque : Celui-ci se retire sans l’aide d’outil 3. Retrait de la poignée maintenant la cartouche Co2 Remarque : Celui-ci se retire sans l’aide d’outil 4. Pièce détachée (voir photo ci-contre) Attention à ne pas perdre cette pièce. Elle est simplement maintenue par la poignée en plastique. Page 1
  • 2. Guide pour Dan Wesson 16101, 16182, 16183, 17115, 17176, 17177 Instructions pour installer le kit de réparation des joints de valve – 17131 5. Retirez la plaque de recouvrement a. Dévissez les 4 vis (voir photo ci-contre) 6. Retirez la plaque de recouvrement a. Soulevez simplement la plaque, sans l’incliner 7. Retirez le chien a. Le chien peut être enlevé directement Remarque: Veillez à ce que le ressort ne s’enlève pas. Maintenez le chien comme montré sur la photo. 8. Retirez la valve a. Dévissez la vis (voir photo ci-contre) Page 2
  • 3. Guide pour Dan Wesson 16101, 16182, 16183, 17115, 17176, 17177 Instructions pour installer le kit de réparation des joints de valve – 17131 9. Retirez la valve a. Enlevez la valve maintenue par la goupille de retenue 10. Retrait de la bague interne de la valve a. Dévissez la bague interne à l’aide du tournevis plat Remarque: Faire attention à ne pas abimer la bague 11. Retrait du joint de la valve a. Faire sortir le joint à l’aide du tournevis aiguille Remarque : Vous pouvez également utiliser un petit tournevis plat pour cette opération 12. Retirez la valve du marteau a. Utilisez l’embout de vissage pour valve – réf.15268 b. Dévissez en sens anti-horaire Remarque : Prenez soin de visualiser l’assemblage des différentes pièces contenu à l’intérieur du bloc de valve métallique Page 3
  • 4. Guide pour Dan Wesson 16101, 16182, 16183, 17115, 17176, 17177 Instructions pour installer le kit de réparation des joints de valve – 17131 13. Contenu du bloc de valve métallique a. La photo ci-contre montre les différentes pièces dans l’ordre d’assemblage (incluant le kit de réparation du joint de valve) 14. Placez les nouveaux joints dans la valve du marteau a. Placez les nouveaux joints dans et autour de la valve (voir photo ci-contre) Remarque : Attention de ne pas abîmer les joints en les insérant b. Remettez les différentes pièces à l’intérieur du bloc de valve Remarque : Le joint vert à l’exterieur de la valve de marteau ne doit plus être visible une fois revissée. 15. Placez les nouveaux joints a. Positionnez la face creuse du joint vers le haut b. Insérez le joint avant de revisser la bague interne de la valve 16. Placez les nouveaux joints a. Placez le joint comme indiqué sur la photo ci-contre Page 4
  • 5. Guide pour Dan Wesson 16101, 16182, 16183, 17115, 17176, 17177 Instructions pour installer le kit de réparation des joints de valve – 17131 17. Remettez la valve en place a. Insérez la valve dans le boulon de retenue b. Revissez la vis de fixation 18. Remettez le bloc du chien a. Insérez le guide du ressort b. Glissez le montage à l’intérieur du boulon de retenue 19. Remontez la plaque de recouvrement Remarque : Attention de ne pas trop serrer les vis 20. Réinstallez les 2 éléments de poignée Note : Mettez la poignée qui maintient la cartouche Co2 en premier L’opération de montage du « kit de réparation des joints de valve » est maintenant terminée. Page 5