

Recomendados
Mais conteúdo relacionado
Mais de Alona Galvez
Último
Último (20)
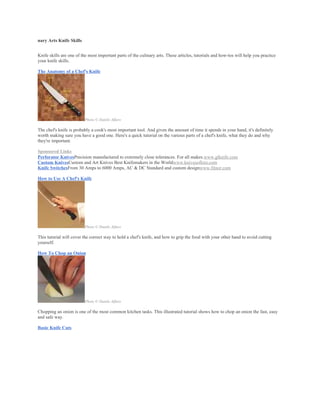
Anatomy of knife
- 1. nary Arts Knife Skills Knife skills are one of the most important parts of the culinary arts. These articles, tutorials and how-tos will help you practice your knife skills. The Anatomy of a Chef's Knife Photo © Danilo Alfaro The chef's knife is probably a cook's most important tool. And given the amount of time it spends in your hand, it's definitely worth making sure you have a good one. Here's a quick tutorial on the various parts of a chef's knife, what they do and why they're important. Sponsored Links Perforator KnivesPrecision manufactured to extremely close tolerances. For all makes.www.glknife.com Custom KnivesCustom and Art Knives Best Knifemakers in the Worldwww.knivesoflore.com Knife SwitchesFrom 30 Amps to 6000 Amps, AC & DC Standard and custom designwww.filnor.com How to Use A Chef's Knife Photo © Danilo Alfaro This tutorial will cover the correct way to hold a chef's knife, and how to grip the food with your other hand to avoid cutting yourself. How To Chop an Onion Photo © Danilo Alfaro Chopping an onion is one of the most common kitchen tasks. This illustrated tutorial shows how to chop an onion the fast, easy and safe way. Basic Knife Cuts
- 2. Photo © Danilo Alfaro Good knife skills helps improve the quality of the food you cook by ensuring uniform cooking times and making it look nicer. Check out these illustrated examples of all the basic culinary arts knife cuts. Knife Cut Photo Gallery Photo © Danilo Alfaro Want to see examples of all the basic culinary arts knife cuts and shapes? This photo gallery highlights nine common culinary knife cuts including the batonnet, allumette, julienne and more. Video: Make Batonnet & Allumette Knife Cuts Photo © Danilo Alfaro Here's a video that shows how to make the batonnet and the allumette cuts. These long and thin cuts also form the starting point for the dice cuts. For example, to make the small dice, you'd start with the allumette and just trim it down into cubes. How to Make an Allumette Cut Photo © Danilo Alfaro The word allumette is French for "matchstick," and these slender knife cuts are perfect for lending a touch of elegance to soups, salads and other vegetable preparations. Keep Your Chef's Knife Sharp
- 3. Photo © Danilo Alfaro Keeping your chef's knife sharp will make your job in the kitchen easier — and safer, too. That's because when you're using a dull knife you have to apply more pressure than you would with a sharper blade, making the knife more likely to slip. Sponsored Links Live and Study in CanadaGovernment Approved Cooking School Fast track to Canadian Residencywww.culinaryartsinternational.ca Maxpedition Hard-Use GearBuy High Quality Flashlight Sheaths From Belt Pouches to Carry Systemswww.maxpedition.com Sharpen Your Knife with a Whetstone Photo © Danilo Alfaro Learning how to sharpen your knife with a whetstone may take a bit of practice, but once you get the hang of it you'll be able to keep knives razor sharp, and save time and money. Also check out thisvideo on using a whetstone. Hone Your Knife with a Honing Steel Photo © Danilo Alfaro Using a knife steel, also called a sharpening steel or honing steel, helps align the knife's edge so that it cuts smoothly and easily. Basic Cooking Principles: Basic Knife Cuts & Shapes Why Are Good Knife Skills So Important? Even if you don't work in a commercial kitchen, developing your knife skills will help improve the quality of the food you cook. Here's how: 1. Uniform cooking times. Large pieces of vegetables take longer to cook than smaller ones. So if you're sautéing carrots that are cut to different sizes and shapes, you'll either overcook the smaller pieces by the time the bigger ones are done, or you'll cook the smaller pieces properly but leave the bigger ones undercooked. Consistent cutting technique ensures your food is cooked to a uniform degree of doneness.
- 4. 2. Enhanced visual appeal. Again, it's the art part of the culinary arts. Of course, no one's going to take out a ruler and measure your knife cuts — unless you're in culinary school. But sloppy knife work makes for a sloppy-looking dish. Skilled knife work indicates a cook who takes pride in their work and doesn't take shortcuts. It's a way of paying a compliment to whoever you're serving the dish to — saying to them, in effect, "You're worth the trouble." See the individual summaries below for more information on each of the different knife cuts: Mayonnaise Recipe This basic mayonnaise makes a great sandwich spread, and it can also form the base for salad dressings such as Blue Cheese, Thousand Island and Ranch. For more detailed instructions, see this illustratedtutorial on how to make mayonnaise. Also, here's a tutorial on how to separate eggs. A light, neutral-flavored oil like safflower, canola or soybean oil will give the best results, but any blended oil labeled "vegetable oil" or "salad oil" will do the trick. Finally, it can't be said too often: For safety reasons, use pasteurized eggs for this and any other preparation that contains raw eggs. Prep Time: 20 minutes Total Time: 20 minutes Ingredients: • 3 egg yolks (for safety reasons, use pasteurized eggs) • 1 pint vegetable oil • 1 Tbsp plus 2 tsp white wine vinegar • 2-3 tsp lemon juice • 1 tsp Kosher salt, or to taste • Pinch cayenne pepper (optional) Preparation: 1. Let all your ingredients come to room temperature before you begin. 2. Using an electric hand mixer, stand mixer or a wire whisk, whip the egg yolks for a minute or two, until they're thoroughly beaten. 3. Add the 2 tsp vinegar and whisk for about half a minute. Then add the salt, and the cayenne if you're using it, and beat for another 30 seconds or so. 4. Now, with the mixer going full speed (or with your arm whisking as hard as it can) add the oil very slowly, as little as a drop at a time.
- 5. 5. When the emulsion starts to form, you can add the oil more quickly, but keep it at a fairly moderate stream. Adding the oil too fast will break your mayonnaise. 6. When the emulsion thickens, add a teaspoon or so of vinegar to thin it out. Continue adding oil, stopping occasionally to add more vinegar if the mixture gets too thick. 7. Finish with the lemon juice, both to add a bit of tang as well as to achieve the right consistency. 8. Store unused portion in the refrigerator, where it should keep for a day or two. Makes 1 pint of mayonnaise. omemade mayonnaise Ingredients • 2 egg yolks • 12 fl oz (340 ml) of vegetable or olive oil • 1 - tbsp of lemon juice or white wine vinegar • 1 - 2 tsp of Dijon mustard • salt and pepper Method 1. In a large mixing bowl whisk together the egg yolks with a pinch of salt. 2. Add one drop of oil to the egg yolks and whisk together with an electric whisk. 3. Continue to add one drop of oil at a time, whisking continuously until the mixture begins to blend together and thicken. The process is to add one drop of oil and then blend it in before adding the next drop. This will take several minutes. 4. After a quarter of the oil has been blended, add the lemon juice or vinegar and beat into the mixture. 5. Continue to whisk in the remaining oil, which you should be able to add a lot quicker by now, in a thin stream. 6. Once all the oil has been beaten in, add the mustard to give extra taste and season with salt and pepper. 7. If the mayonnaise is too thick, you can whisk in a few teaspoons of boiling water. 8. Chill the mayonnaise in the refrigerator before serving. 9. The mayonnaise may be stored in the refrigerator for 3 - 4 days in an airtight container or jar. © Copyright 2001-2011 helpwithcooking.com
- 6. Mayonnaise in a blender Ingredients • 2 whole eggs • 10 fl oz (285 ml) of vegetable or olive oil • 1 tsp of white wine vinegar • 1 tsp of dry English mustard powder • 1 crushed clove of garlic • salt and pepper Method 1. Place the eggs into the blender or food processor, along with the mustard, garlic, salt and pepper and blend together. 2. Pour all of the oil into the blender in a steady stream whilst the machine is operating, so that it is immediately whisked into the egg yolk mixture. 3. Switch off the machine and taste the mayonnaise. Add the vinegar and any extra seasoning to taste and whisk together one last time. Garlic Mayonnaise (aioli) Use the recipe above for homemade mayonnaise adding 3 - 6 crushed cloves of garlic to the beaten egg yolks and salt. Proceed as above. Blue Cheese Mayonnaise Using the above recipe for homemade mayonnaise, add 8 oz (225 g) of crumbled blue cheese into the mayonnaise at the end and mix well. Spicy Mayonnaise Using the top recipe for homemade mayonnaise, instead of 1 - 2 tsp of mustard, increase this to 1 tbsp and then add 1 tsp of Worcestershire sauce and a few drops of Tabasco. How to Dice an Onion By keeping the root end intact, this method ensures that you can quickly dice an entire onion without creating a mess. Keep in mind that the more narrow your incisions, the finer the dice.
- 7. Step 1: Slice off the top of the onion, about ½ an inch into the surface. Step 2: Rest the onion vertically, slice in half through the root end, and peel back the outer layer.
- 8. Step 3: Make vertical incisions down to the root end. Step 4: Make horizontal incisions down to the root end.
- 9. Step 5: Dice the onion accordingly and repeat with the remaining half. How to Mince Garlic This method will allow you to quickly peel and mince garlic. By smashing the entire clove, you also release the flavorful juices. Adding kosher salt and making a paste comes in handy when adding garlic to a salad dressing or marinade. Step 1: Smash the entire clove, skin on, with the sharp end of the blade pointed away from your body.
- 10. Step 2: Peel away skin, and run the knife through the garlic until it is finely and evenly chopped. Step 3: Add a few pinches of kosher salt to work as an abrasive.
- 11. Step 4: Use pressure and the flat side of your knife to work the ingredients back and forth on the board, until the mixture resembles the consistency of a paste. How to Chop Fine Herbs This process is actually defined as a “chiffonade.” For herbs which bruise easily (basil, sage, etc), this method allows you to cleanly and delicately slice herbs without damaging their texture. Step 1: Stack 6-8 leaves on top of one another.
- 12. Step 2: Carefully roll up the leaves starting from the root end up to the tip. Step 3: Use a knife to finely chop the herbs, resulting in long, thin strips. Of course, these are just the fundamentals. Master everything here, and we’ll move on to butchering wild game in the near future. Keep those knives sharp! MM harpening Up on Knife Skills by Jessica McGovern About a month ago Tufts University Slow Foods Student Organization approached me to host a skillshare at my apartment to discuss knives, I gladly obliged. The evening began with some basics that included an overview of knives and knife skills and ended by using all of those meticulously cut
- 13. vegetables in a tasty vegetable and herb soup. Here are some of the topics that we discussed: Overview of Knives You don't have to be a trained chef to produce a great meal. Knife skills are one of the fundamental components to becoming an exceptional cook. Knives come in many shapes and sizes, each having its own specific purpose. Many people become discouraged by all of the different options that are available, but it really is not necessary to have more than the four basic types of knives. * Chef's Knife- The most versatile of all knives, with a wide blade that is 8" to 10" long. It is best to choose a knife that feels good and balanced in your hand. The knife should have a full tang (this means that the blade should go all the way through the handle for the best wear and stability). * Paring Knife- Paring knives are generally 2-1/2-4" in length. It is ideal for peeling and coring fruits and vegetables, cutting small objects, slicing, and other hand tasks. * Boning Knife- This type of knife has a more flexible blade to curve around meat and bone. Generally 4-5" long. * Bread Knife- Bread knives are usually serrated (having teeth like a saw). Most experts recommend a serrated knife that has pointed serrations instead of wavy serrations for better control and longer knife life. You must use a sawing motion when using a serrated knife. Knife Cuts The main point I stressed when discussing knife cuts was uniformity. If all of the pieces are about the same size the vegetables will cook evenly. One of the best ways to learn, besides doing, is by seeing. Check out this video by Bobby Flay to see how to cut red peppers and garlic (his favorite). Knife Safety Tips 1. Chop slowly and carefully.
- 14. 2. Always cut away from your body. 3. Make sure your hands are dry. 4. Make sure that you curl your fingers under on the hand holding the food. This takes a while to get used to, but will become second nature with practice. If your fingers are curled under, the chances are good you will never cut yourself. 5. Watch what you're doing at all times. 6. Using your dominant hand, hold the knife firmly and using a rocking motion, cut through the food. The knife should not leave the surface you're working on. Move your hand (with the curled under fingers) along as the knife cuts the food. 7. Always make sure that your cutting board is secured and will not move while you are cutting. Try placing a wet paper towel or dishrag underneath your board. Sharpening and Truing A chef once told me "a sharp knife is a happy knife." It's a little sentimental for my taste. I prefer the saying "a sharp knife is a safe and efficient knife." Having a sharp knife ensures that you have even cuts. Dull knives can become dangerous when you apply extra pressure while pressing down on the knife, the extra pressure leads to less control. There are several ways to sharpen your knife such as using a wet stone, a handheld sharpener and an electric sharpener. Personally, I prefer the handheld sharpener because it is cheap, effective, light and safe to use.
- 15. Another tool used to keep your knife sharp, but it does not actually sharpen your knife, is called a truing steel. This long, round object keeps knives sharper by straightening out the edge. To use a steel hold the knife in your dominant hand and the steel in the other, with the steel point pressed into a solid waist-high surface. Hold the knife base at the top of the steel at a 20 degree angle. Slowly draw the knife down the length of the steel, pulling the knife back so the entire blade, from base to tip, moves against the steel, as if you were slicing off pieces of the steel. Repeat on the other side. Do this five or six times. Simple Vegetable Soup Recipe Ingredients: 5 medium red potatoes- cut into medium cubes 2 red onions- cut into a large dice 4 carrots- peeled and cut into a large dice 1 cup mushrooms- cleaned and roughly chopped Slow Foods members cutting up vegetables. 1 large yellow squash- cut into a large dice 1 head of garlic- peeled and finely chopped 2 tablespoons olive oil 8 cups vegetable stock 5 sprigs fresh thyme 3 fresh sage leaves 4 sprigs fresh rosemary Directions: 1. In a large saute pan heat the olive oil and add the onions, carrots, mushrooms and yellow squash. 2. Cook the vegetables on medium-high heat for 4 minutes, stirring often. Add the garlic and cook for
- 16. an additional minute. 3. Transfer the cooked vegetables to a large sauce pan. Add the potatoes and cover with the vegetable stock. 4. Bring the soup to a boil, reduce the heat and simmer for 15 minutes. 5. Add the thyme, rosemary and sage and cook for an additional 5 minutes or until vegetables are tender. 6. Season with salt and pepper if necessary and serve hot.