Integrating Telephony Systems with Salesforce: Insights and Considerations, B...
Creating a prezi handout
1. Creating a Prezi: A guide for the Youth Librarian
In reading/viewing this programming guide, the first question a librarian might have is, why would I want to
create a Prezi for use in programming? There are several answers to that question. My personal favorite is why
would you not want to create a Prezi for any presentation, advertising campaign, explanation or website design?
However, this does not help you, the reader, to understand the versatility and usefulness of Prezi as a tool.
Below are only a few of the ways I imagine that a librarian could use Prezi, in programming and other settings.
Once you are convinced of Prezi's awesomeness, move on the the details of creating an account, and then a
Prezi of your own.
Example Prezis for the skeptical:
http://prezi.com/1fydxnfu_sjh/express-yourself-your-library/
http://prezi.com/up2mf2fmoz3c/the-power-of-creative-writing/
http://prezi.com/wgnnvuhdnb2h/teen-read-week-2009/
http://prezi.com/jm5anh_dckuy/tig/
http://prezi.com/w6vxaryt-rym/ya-librarians-internet-safety-and-privacy/ (the Prezi I created for 767)
Use a Prezi to:
create a visual background for a Book Talk!
create a visual instruction set for a
program that requires instruction!
replace PowerPoint in any employee
meeting!
create and embed a multimedia
presentation into a website!
advertise current youth events at the
library!
create passive programming for
access via desktop, laptop, or iPad!
As a program, teach others to Prezi!
Creating an Account:
1) To create your Prezi, go to
http://prezi.com/profile/signup/
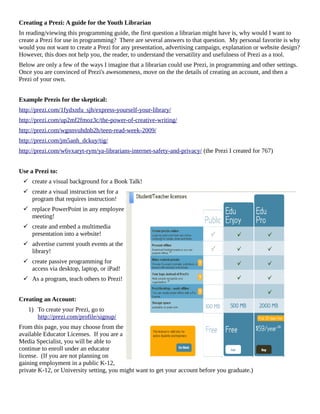
From this page, you may choose from the
available Educator Licenses. If you are a
Media Specialist, you will be able to
continue to enroll under an educator
license. (If you are not planning on
gaining employment in a public K-12,
private K-12, or University setting, you might want to get your account before you graduate.)
2. 2) Follow the instructions provided by Prezi to set up your account. The registration is very similar to most
online registrations and the two options will differ only in the credit card information required for a Edu
Pro license (your card will not be billed until the 30-day trial is completed).
3) Once you are logged into Prezi.com, you will see a screen similar to the one above.
*I will be guiding you through creating Prezis online through Prezi.com. The Edu Pro subscription comes with
a downloadable Desktop client. While the location and save space is on your desktop, the creation and most
options are the same as those available on Prezi.com. If there are differences, I will note them throughout the
guide.
Basic Navigation
4) From the initial screen you can access the following Prezi features
3. Creating a Prezi
5) To begin your Prezi, click the button that says New Prezi in the top left corner of the main screen.
6) You will be given space in which to name and describe your Prezi. (Later, you can make your Prezi
public. If you plan to do so, make sure that your title and description reflect on the material contained
within the presentation.) Once you have finished, click on New Prezi to open your canvas.
7) When your canvas
opens, the screen to
the left will be
available.
8) The Prezi canvas has
three major menus
shown. These three
menus apply to the
canvas as a whole and
how you navigate
through the canvas. A
fourth menu becomes
available when you click on a
particular piece of text, and
navigation buttons appear in
the bottom right corner when
in Show mode.
The Design Menu (Top left corner)
9) Designing the color scheme/style of a Prezi can be simple or complex,
depending on your level of expertise and interest.
10) To choose your colors/style, click on the Colors & Fonts circle located at the
bottom left of the Design Menu.
11) For a preset theme, click on any of the
lower buttons beginning with clean
Whitepaper to use that theme. The
button Original Theme will revert your
settings to the theme that was saved for
your Prezi.
12) For more advanced color and style
control, click on the Theme Wizard.
4. 13) The Theme Wizard includes both a wizard style selection tool for colors for the various elements of your
Prezi
14)
14) Or a manual Theme design tool (button in the
bottom left corner) to input RGB codes to get
the exact colors required by the designer.
15)
15) In addition, for the advanced designer, Prezi includes a CSS editor to maintain higher level of control
over style.
16) For those with a logo, Prezi offers the option of showing (and replacing) a company or personal logo.
This logo will appear in the bottom left corner of the Prezi at all times. Therefore, it is best if the
background of the logo is part of the logo, or transparent so that it does not interfere with the colors of
the Prezi.
5. Working with Text
17) To write in your Prezi, click on any section of the canvas and
type your text.
18) In the same box, you can determine the alignment (left, right,
centered, or justified), the Font/Color (the two are combined),
and if you would like to add bullet points to the text or not.
19) Once the content of your text is completed, click anywhere
else on the canvas to stop editing.
20) Once you have finished writing your text, you will use a
tool called The Wheel to manipulate that text.
21) The rings on the wheel allow the user to manipulate the
size and rotation of text, images, and videos embedded in
the presentation.
22) The outer ring manipulates the rotation of the material.
Once a path is set (see below), the presentation will rotate
to view that text.
23) The second ring manipulates the size of the material. You
can make the text, video, or image larger or smaller by
dragging the mouse out or in through that ring.
24)
24) In addition, the Wheel menu, located in the plus button on the bottom left corner of the outer ring,
allows the user to delete the item, duplicated the item (as seen to the right), select more items (shift), and
bring the item forward or send it back on the
canvas.
6. 25) Moving items in Prezi is also simple.
Click on an item and then click on the
center circle in the wheel to move that
item anywhere on the canvas. Click on an
item while pressing the shift button; hold
the shift button while clicking on multiple
items to select several items to move
together. Release the shift button when
you are ready to move your items, and
click on the center circle in the wheel. All
the items you selected will move together
(be careful to select all of the items you
wish to move).
The Frame
26) Framing can help you to focus the Prezi presentation on the material you want to feature in each section,
somewhat similar to a slide on PowerPoint. By using a frame and directing the path to the frame instead
of the content, the Prezi will focus on as much or as little information as you want.
27) There are four types of Frames available in Prezi, the edge frame, the
circle, the rectangle, and the invisible frame.
28) The invisible frame helps you to center the presentation image on a set of
data without viewing the frame around it.
29) The Insert menu allows you to input files from your computer (currently
.pdf and picture files only), to embed You Tube videos in your Prezi (other
videos may be linked via text html link), and to insert a set of shapes.
30) You may draw an arrow, a line, or use
the highlight tool anywhere in a Prezi
(Note: the line and highlight tool are
dependent upon the steadiness of your
hand. I suggest keeping a small .jpeg of a line to use when a straight
line is needed.)
7. 31) Once you have completed your Prezi's design, use the Path menu to
create the presentation order. The Path menu allows the user to add
items in the presentation path, capture views of multiple items
(similar to the functionality of invisible frame), and delete all paths.
32) Paths can have a few items, or many.
33) Once you have established a presentation
path, you can add to it by clicking on one
of the transparent circles between two
items and dragging it onto another item
(to add an item in the middle of the
current path) or add an item to the end
by clicking on the item.
34) You can also move a path number
(position) from one item to another by
dragging that number to the new item.
Show
35) Use the Show button to preview your
presentation at any time.
36) Once you are finished, save and exit to
view your Prezi
Using your Prezi
37) Depending upon the purpose of your Prezi, preparing it for presentation may vary.
1. If you are going to embed the presentation in a web site, the embed code will allow you to do so.
2. If you are planning to show the Prezi on a computer that may not have internet access, download the
Prezi onto a drive.
3. If you will be sharing with others via e-mail, get a permanent link to your Prezi.
8. 38) Below, view all of your options once your Prezi is completed. (Note: be aware that others who copy
your presentation will be able to change it and post it online for their own use.)
Any Questions?