SlideShare uma empresa Scribd logo
1 de 42
Baixar para ler offline


2. Periodic Maintenance > Periodic Maintenance Chart


XCITING 400i 
 

Maintenance Schedule 


Perform the pre-ride inspection (Owner's Manual) at each scheduled maintenance
period. This interval should be judged by odometer reading or months, whichever
comes first.


Maintenance schedule legend 


I: INSPECT AND CLEAN, ADJUST, LUBRICATE OR REPLACE IF NECESSARY
C: CLEAN
A: ADJUST 
R: REPLACE
L: LUBRICATE
I: INSPECTION
D: DIAGNOSE 

 
The maintenance schedule specifies the maintenance required to keep your XCITING
400i scooter in peak operating condition. Maintenance work should be performed in
accordance with KYMCO standards and specifications by properly trained and
equipped technicians. Your KYMCO dealer meets all of these requirements.

 
* Should be serviced by your KYMCO dealer, unless you have the proper tools, service
data and are technically qualified.

 
** In the interest of safety, we recommend these items be serviced only by your
KYMCO dealer. KYMCO recommends that your KYMCO dealer road test your
scooter after each periodic maintenance service is completed.
 

Maintenance schedule notes:
1.
2.
3.
4.
5.
6.
7.

At higher odometer readings, repeat at the frequency interval established here.
Service more frequently if the scooter is ridden in unusually wet or dusty areas.
Service more frequently when riding in rain or at full throttle.
Inspect every 12,000 mi (20,000 km) after replacement.
Replace every 1 year, or every 6,000 mi (10,000 km), whichever comes first.
Replacement requires mechanical skill.
Replace every 2 years, or at the indicated odometer interval, whichever comes
first. Replacement requires mechanical skill.
Replace every 2 years. Replacement requires mechanical skill.


2-1


XCITING 400i 

2. Periodic Maintenance > Periodic Maintenance Chart


FREQUENCY

WHICHEVER
COMES FIRST

ODOMETER READING

X 1000km

Note

5

10

15

20

25

30

35

40

X 1000mi

ITEM

1
0.6

3

6

9

12

15

18

22

24

1

6

12

18

24

30

36

42

46

R

R

R

R

R

R

R

R

Month

*

AIR CLEANER


SPARK PLUGS

I

R

I

R

I

R

I

R

* 

THROTTLE OPERATION

I

I

I

I

I

I

I

I

* 

VALVE CLEARANCE

I

A

I

A

I

A

I

A

* 

FUEL LINE


CRANKCASE BREATHER

* 

ENGINE OIL

* 

ENGINE OIL SCREEN

* 

ENGINE OIL FILTER

* 

ENGINE IDLE SPEED

* 

TRANSMISSION FLUID

Note5

*

DRIVE BELT

Note4

**

CLUTCH SHOE WEAR
BRAKE FLUID

Note2

I

I

I

I

C

C

C

C

C

C

C

C

C

R

R

R

R

R

R

R

R

R

C

Note3

R

C

R

C

R

C

R

R

R

R

R

R

R

R

R

R

D

I

D

D

R

R

D
R

R

R

I

I

I

R

I

I

I

I

I

R
I

I

R

I

R

I

R

I

R

BRAKE PAD WEAR

I

I

I

I

I

I

I

I

BRAKE SYSTEM

I

I

I

I

I

I

I

I

*

BRAKE LIGHT SWITCH

I

I

I

I

I

I

I

I

**

STEERING BEARINGS

I

I

I

I

I

I

I

I

*

HEADLIGHT AIM

I

I

I

I

I

I

I

I

*

NUTS, BOLTS,

I

I

I

I

I

I

I

I

**

WHEELS/TIRES

I

I

I

I

I

I

I

I

**

COOLANT

Note7

FASTENERS

**

INJECTOR

**

I

CLUTCH SHOE WEAR

I

I

I

I

R

I

C

D

C

D

C

D

C

I


2-2
 

I

D

Note6

I

I

I


2. Periodic Maintenance > Air Filter Servicing

XCITING 400i 

Air Filter Servicing
Replace the air filter according to the Maintenance Schedule, and more often in
exceptionally rainy or dusty areas.

Removal

Remove the 8 air filter cover screws with a #2 Phillips screwdriver.

Remove the air filter cover.
2‐3 


2. Periodic Maintenance > Air Filter Servicing

XCITING 400i 

Remove the 7 air filter bolts with an 8 mm socket or a #2 Phillips
screwdriver.

Remove the air filter from the airbox. Discard the air filter in favor
of a new item.
Caution:
• The air cleaner element has a viscous type paper element. Do not clean it with
compressed air.
• Be sure to install the air cleaner element and cover securely.
2‐4 


2. Periodic Maintenance > Air Filter Servicing

Installation

Fit the new air filter into place.

Insert the 7 air filter bolts. Tighten the air filter bolts securely with
an 8 mm socket or a #2 Phillips screwdriver.

2‐5 
 

XCITING 400i 


2. Periodic Maintenance > Air Filter Servicing

Install the air filter cover.

Install the 8 air filter cover screws and tighten them securely with
a #2 Phillips screwdriver.

2‐6 
 

XCITING 400i 


XCITING 400i 

2. Periodic Maintenance > Brake Fluid
 

Brake Fluid
The KYMCO XCITING 400i uses DOT 4 brake fluid that should be
inspected after 3,000 mi (5,000 km) of use. It should be flushed and bled
every 12 months, 6,000 mi (10,000 km), whenever the brakes feel spongy,
or if the brake system has been taken apart and rebuilt. Always use fresh
brake fluid from a tightly sealed container.
SAFETY FIRST: Protective gloves and eyewear are recommended at this
point.
Warning: Brake fluid is very caustic and can damage paint, chrome and
plastic. Wipe up any spills immediately.

Inspection

Turn the handlebars until the top of the master cylinder reservoir
is level with the ground. Do this for both master cylinder
reservoirs and check the level of brake fluid.

2‐7 


XCITING 400i 

2. Periodic Maintenance > Brake Fluid
 

Draining
The brake bleeding process is the same for the front and rear brakes.

Remove the two master cylinder cover screws with a #2 Phillips head
screwdriver.

Remove the master cylinder cover, plastic piece and rubber diaphragm.
Clean and inspect the rubber diaphragm for tears or other damage.
Replace as necessary.

2‐8 


XCITING 400i 

2. Periodic Maintenance > Brake Fluid
 

Pull off the rubber cap over the bleeder valve and crack open
the bleeder valve on the brake caliper using an 8 mm wrench.
This valve is usually very tight so use a box end wrench or a 6
point socket and ratchet to prevent rounding off the head.
Snug the bleeder valve back down.

Open the valve and remove the old brake fluid with a Mighty -Vac or a
similar device.

2‐9 


XCITING 400i 

2. Periodic Maintenance > Brake Fluid
 

Bleeding

Place a length of 6 mm inside diameter clear hose on the
bleeder valve and place the other end in a suitable container.
A spare battery vent hose works well for this job.

Fill the brake fluid with the proper type from a fresh, newly
opened container.

2‐10 


XCITING 400i 

2. Periodic Maintenance > Brake Fluid
 

Pump the brake lever several times and hold the lever in.
While holding the lever in, crack open the bleeder valve. The
front brake lever will travel all the way to the grip and brake
fluid and/or air will come out of the bleeder valve into the 6 mm
hose. Tighten the bleeder valve before releasing the front
brake lever. Pump the lever several times again and repeat the
process.
Be certain to check the master cylinder reservoir occasionally
to make sure the reservoir doesn't run dry. Add more brake
fluid as necessary. Continue this process until clean brake fluid
comes out of the bleeder valve and there are no air bubbles.
The brake lever should feel firm.
Tighten the bleeder valve to specification and push its rubber
cover over the nipple.
(Air Bleeder Valve Torque: 7.5 N-m or 5.5 lb-ft)

Make sure the reservoir has the proper amount of fluid.

2‐11 


XCITING 400i 

2. Periodic Maintenance > Brake Fluid
 

Place the rubber diaphragm, plastic piece and cover over the reservoir.

Thread in the reservoir cover screws and tighten them securely with a
#2 Phillips screwdriver.

2‐12 


XCITING 400i

2. PeriodicMaintenance > Compression Test
 

Engine Compression Test
SAFETY FIRST: Protective gloves and eyewear are recommended at this point.
Before testing the compression make sure the cylinder head bolts are tightened
securely and the valve clearance is specification.

Thread a compression tester into the spark plug hole hand tight.
Hold the throttle all the way open. Crank the engine with the
starter motor until the needle on the gauge stops rising. Do not
crank the engine more than a few seconds.
Cylinder compression

15 kg/cm2

228 ± 28.4 psi

Low compression is an indication of excessive engine wear, possibly worn rings or
poorly sealing valves, or maybe a tight valve with not enough valve clearance. High
compression is possibly an indication of excessive carbon buildup on the piston or
performance modifications.
Install the spark plug.

2‐13 
 
2. Periodic Maintenance > Engine Oil

XCITING 400i

Engine Oil
SAFETY FIRST: Protective gloves and eyewear are recommended at this point.
Caution: Hot engine oil can burn. Avoid letting used motor oil contact exposed skin.

TROUBLESHOOTING
Oil level too low
1. Natural oil consumption
2. Oil leaks
3. Worn or poorly installed piston rings
4. Worn valve guide or seal
Poor lubrication pressure
1. Oil level too low
2. Clogged filter or oil passages
3. No use the specified oil

Oil Specifications
Use a fully synthetic quality 4-stroke engine oil to ensure longer service
life of the scooter. Only use oils that have a SJ rating above per the API
service classification.
Engine oil viscosity : SAE 5W-50

2‐14 
 
2. Periodic Maintenance > Engine Oil

XCITING 400i

If these viscosities are not available, select an alternative engine oil
according to the chart shown above.
Engine oil capacity
At disassembly
At change

1.5 Liter
1.3 Liter

Inspection
Oil Level
Check the engine oil level each day before operating the scooter.
Place the motorcycle upright on level ground for engine oil level check.
Run the engine for 2 ~ 3 minutes and check the oil level after the engine is
stopped for 2 ~ 3 minutes.

2‐15 
 
2. Periodic Maintenance > Engine Oil

XCITING 400i

The oil filler cap/dipstick is located on the right side of the engine.

Remove the oil filler cap/dipstick and wipe off the oil. Inspect the
O-ring and replace it as needed. Insert the dipstick in without
threading it in. Remove the dipstick and check the oil level.

2‐16 
 
2. Periodic Maintenance > Engine Oil

XCITING 400i

The level must be maintained between the upper (1) and lower level (2)
marks on the oil filler cap/dipstick.

If the oil level is at or below the lower mark add more of the
same type and brand of oil to the engine through the oil filler
hole. If the oil level is to high remove the drain plug and the
excess oil.

Servicing
Draining
Warm the engine as with the inspection, this will heat the engine and
allow the oil to drain out faster and more completely. The vehicle should
be on level ground. Stop the engine.
Caution: Hot engine oil can burn. Avoid letting used motor oil contact
exposed skin.
2‐17 
 
2. Periodic Maintenance > Engine Oil

XCITING 400i

Place an oil pan under the engine. The oil drain bolt is located
on the left side of the engine.

Loosen the engine oil drain bolt with a 17 mm socket. Remove
the bolt and allow the oil to drain into the pan.

2‐18 
 
2. Periodic Maintenance > Engine Oil

XCITING 400i

Discard the old sealing washer.

Remove the oil filler cap to allow for faster oil draining. Inspect
the oil filler cap O-ring and replace it as needed.

2‐19 
 
2. Periodic Maintenance > Engine Oil

XCITING 400i

When the oil has drained completely Install the drain bolt with a
new sealing washer. Tighten the drain bolt to specification with
a 17 mm socket.
Torque
Item

Qty

Oil Drain bolt

1

kgf-m

lb-ft

2.5

18.08

Remarks
New sealing washer

Strainer Screen

Remove the oil strainer screen bolt with a 17 mm socket.
Inspect the strainer screen bolt O-ring and replace it as needed.

2‐20 
 
2. Periodic Maintenance > Engine Oil

XCITING 400i

Remove the oil strainer screen.

Remove the O-rings from the oil strainer screen and inspect
them. Replace the O-rings if they are in poor condition. Inspect
the oil strainer screen for debris and damage. Clean it with a
high flash point solvent and compressed air. Metal debris in the
strainer screen can be an indicator of engine wear or damage.

2‐21 
 
2. Periodic Maintenance > Engine Oil

XCITING 400i

Return the O-rings to the oil strainer screen and install it into the left
side of the engine. Tighten the oil strainer screen cap to
specification with a 17 mm socket.
Item
Engine oil strainer cap

Qty
1

Torque
kgf-m
1.0

lb-ft
7.2

Filter Replacement

The oil filter compartment is located on the bottom of the engine
below the oil filler cap/dipstick. Ready an oil drain pan to catch
any remaining engine oil.

2‐22 
 
2. Periodic Maintenance > Engine Oil

XCITING 400i

Loosen the oil filter cap with a 24 mm socket.

Remove the oil filter cap with spring and take out the used oil filter.

2‐23 
 
2. Periodic Maintenance > Engine Oil

XCITING 400i

Inspect the oil filter cap O-ring and spring. Replace the items if they are
in poor condition.

Install the spring to the oil filter cap. Apply a light coat of engine oil to the
oil filter cap O-ring.

2‐24 
 
2. Periodic Maintenance > Engine Oil

XCITING 400i

Pour a small amount of fresh engine oil into the oil filter. Insert
the oil filter into place with the rubber seal side facing up.

Install the oil filter cap with spring. Makes sure the spring fits
against the filter correctly. Tighten the oil filter cap securely with
a 24 mm socket.

2‐25 
 
2. Periodic Maintenance > Engine Oil

XCITING 400i

Filling

Add the oil to the engine through the oil filler/dipstick hole.
Use a fully synthetic quality 4-stroke engine oil to ensure longer service
life of the scooter. Only use oils that have a SJ rating above per the API
service classification.
Engine oil viscosity : SAE 5W-50
Engine oil capacity
At disassembly
At change

1.5 Liter
1.3 Liter

2‐26 
 
 
2. Periodic Maintenance > General Lubrication

XCITING 400i

General Lubrication
SAFETY FIRST: Protective gloves and eyewear are recommended at this point.

The frame lubrication points are listed below. Use general purpose
grease. Apply clean engine oil or grease to cables and movable parts
not specified. This will avoid abnormal noise and increase the durability
of the motorcycle.





Front Wheel Axle
Side Stand Pivot
Center Stand Pivot
Rear Wheel axle

2‐27 
 
XCITING 400i

2. Periodic Maintenance > Hose Inspection

Hose Inspection

Inspect the breather hose for damage and deterioration.

Inspect the fuel hose for damage and deterioration.

2‐28 
 
XCITING 400i 

2. Periodic Maintenance > Spark Plug

Spark Plug
SAFETY FIRST: Protective gloves and eyewear are recommended at this point.

Removal

The spark plug is located on the left side of the cylinder.

Remove the spark plug wire off of the spark plug.

2‐29 
 
XCITING 400i 

2. Periodic Maintenance > Spark Plug

Remove the spark plug with a spark plug with a 5/8 in socket.
Spark plug

NGK-CR7E

Inspection

Always check the gap of the spark plug before installation. If the gap
needs to be adjusted bend the ground electrode carefully. Inspect the
color of the porcelain nose of the spark plug. The color of the spark plug
can indicate how the mixture is burning. A white colored plug shows a
lean mixture, where a dark plug shows a rich mixture. Do not hesitate to
replace a spark plug. Always replace a spark plug if any part of it is
damaged.

Spark plug gap

0.6 - 0.7 mm

2‐30 
 
XCITING 400i 

2. Periodic Maintenance > Spark Plug

Installation

Thread the spark plug by hand before using a socket to tighten.
Torque to specification with a 5/8" spark plug socket. Do not
over tighten the spark plug. The cylinder head is made out of
soft metal, and it can be easily damaged.

Item

Torque

Spark plug

17.2 N-m (1.5 - 2 ft-lb, 10.84 - 14.47 kgf-m)

Install the spark plug wire over the plug.

2‐31 
 
 
XCITING 400i 

2. Periodic Maintenance > Steering

Steering
SAFETY FIRST: Protective gloves and eyewear are recommended at this
point.

Inspection

Raise the front wheel off the ground and check that the steering
handlebar rotates freely. If the handlebar moves unevenly, binds, or has
vertical movement, adjust the steering head bearing.

2‐32 
 
XCITING 400i 

2. Periodic Maintenance > Suspension
 

Suspension
SAFETY FIRST: Protective gloves and eyewear are recommended at this point.

Front Suspension

Check the action of the front shock absorbers by compressing them
several times. Check the entire shock absorber assembly for oil leaks,
looseness or damage.

2‐33 
 
XCITING 400i 

2. Periodic Maintenance > Suspension
 

Pre-Load Setting
Each shock absorber on the scooter has 5 spring preload adjustment
positions for different load or riding conditions.
Position 1 is for light loads and smooth road conditions. Position 3 to 5
increase spring preload for stiffer rear suspension and can be used
when the scooters heavily loaded. Be certain to adjust both shock
absorbers to the same spring preload positions.

Use a pin spanner to adjust the rear shock spring preload. The shock
absorbers are adjustable for pre-load. There are 5 settings. Position 1
is the softest and 5 is the stiffest.
Caution: Always adjust the shock absorber pre-load position in
sequence (1-2-3-4-5 or 5-4-3-2-1). Attempting to adjust directly from 1
to 5 or 5 to 1 may damage the shock absorber. (Pre-Load Standard
Setting: Position 3)

2‐34 
 
XCITING 400i 

2. PeriodicMaintenance > Tires
 

Tires
SAFETY FIRST: Protective gloves and eyewear are recommended at this point.
Check tires before each ride for wear and air pressure.

Check tire air pressure before riding when tires are cold.

Solo riding
Cold inflation tire
Dual riding
pressure

Front
Rear
Front
Rear

2.00 kg/cm2(28.4 psi)
2.25 kg/cm2(32 psi)
2.00 kg/cm2(28.4 psi)
2.25 kg/cm2(32 psi)

2‐35 
 
XCITING 400i 

2. PeriodicMaintenance > Tires
 

Replace tires if the tread depth reaches the wear mark or fails to meet
the minimum tread depth.
Tires

Front wheel
Rear wheel

120/70-15
150/70-14

2‐36 
 
2. Periodic Maintenance > Valve Adjustment

XCITING 400i


Valve Clearance
SAFETY FIRST: Protective gloves and eyewear are recommended
at this point.
The valve clearance specification is only relevant if the engine is cold
(below 35°C or 95°F).

Inspection

Remove the crankcase cover protector on the left side of the
engine with a 8mm socket.

Remove the timing inspection cap from the right side of the
engine with a large flat blade screwdriver. Inspect the O-ring
on the cap and replace it as needed.

2‐37 
 
XCITING 400i

2. Periodic Maintenance > Valve Adjustment
 

The crankshaft must be rotate until the piston is at top dead
center (TDC) on the compression stroke.

Turn crankshaft clockwise until the "T" mark aligns with the
index notch in the timing inspection hole.

2‐38 
 
XCITING 400i

2. Periodic Maintenance > Valve Adjustment
 

For correct engine timing the marks on the camshaft sprocket
must be even with the cylinder head mating surface at the
same time the "T" mark is lined up with the with the index notch
in the timing inspection hole. Also the camshaft sprocket
mounting boss should be visible above the cylinder head
surface.
If this is not the case, rotate the crankshaft 360° clockwise until
the "T" mark is once again aligned with the notch on the case
cover.

2‐39 
 
XCITING 400i

2. Periodic Maintenance > Valve Adjustment
 

Measure the valve clearance with a thickness feeler gauge.
Insert the feeler gauge between the tappet adjusting screw and
the valve stem. The clearance is correct when there is a light
drag on the feeler gauge. The clearance is the same for the
exhaust and intake valves. If the clearance is out of spec,
move on to the adjustment section.
Valve clearance

IN: 0.10 mm

EX: 0.10 mm

Adjustment

Use a tappet adjuster tool to adjust the valves.
2‐40 
 
XCITING 400i

2. Periodic Maintenance > Valve Adjustment
 

ITEM

SPECIAL TOOLS
TOOL NO.

TAPPET ADJUSTER

A120E000012

DESCRIPTION
Tappet adjustment

Place a 9 mm box end wrench over the locknut, and loosen the
locknut. If the valve clearance is tight back out the valve tappet
adjusting screws with the tappet adjustment tool. If the
clearance is to loose turn in the adjusting screw until there is a
light drag on the feeler gauge. Hold the adjusting screw locknut
in place with the wrench to make sure it doesn't interfere with
the adjustment.
Lubricate the tappet adjusting screw threads with fresh engine
oil. Hold the adjuster in place and tighten the locknut. Always
recheck the clearance after tightening the locknut. Also,
recheck after turning the engine over a full 360°.

Item

Valve adjusting lock nut

Qty

4

Thread
siize (mm)

Remarks
kgf-m

lb-ft

0.7-1.1

5

2‐41 
 

Torque

5.06-7.96

Apply oil to thread
XCITING 400i

2. Periodic Maintenance > Valve Adjustment
 

Make sure the O-rings on the timing plugs are in good
condition. Replace it as needed. Install the timing inspection to
the right side of the engine. Tighten the caps securely but not
overly with a large flat blade screwdriver.

2‐42 
 

Mais conteúdo relacionado

Mais procurados

2009 Polaris Outlaw 90 Service Repair Manual
2009 Polaris Outlaw 90 Service Repair Manual2009 Polaris Outlaw 90 Service Repair Manual
2009 Polaris Outlaw 90 Service Repair Manualjdnnnd efjmdd
 
Still r70 20 fork truck service repair manual
Still r70 20 fork truck service repair manualStill r70 20 fork truck service repair manual
Still r70 20 fork truck service repair manualfhjsekfksemert
 
1999 TOYOTA COROLLA Service Repair Manual
1999 TOYOTA COROLLA Service Repair Manual1999 TOYOTA COROLLA Service Repair Manual
1999 TOYOTA COROLLA Service Repair Manualjksmemd eudkmmd
 
PERKINS 4.99M DIESEL ENGINE Service Repair Manual
PERKINS 4.99M DIESEL ENGINE Service Repair ManualPERKINS 4.99M DIESEL ENGINE Service Repair Manual
PERKINS 4.99M DIESEL ENGINE Service Repair Manualjknmms ekdms
 
Jcb 8290 fastrac (agricultural tractor) service repair manual (from 1351000 t...
Jcb 8290 fastrac (agricultural tractor) service repair manual (from 1351000 t...Jcb 8290 fastrac (agricultural tractor) service repair manual (from 1351000 t...
Jcb 8290 fastrac (agricultural tractor) service repair manual (from 1351000 t...udfjjkskekmee
 
Massey ferguson mf 425 tractor 4 wd (0000000001 425-237827) parts catalogue...
Massey ferguson mf 425 tractor 4 wd (0000000001   425-237827) parts catalogue...Massey ferguson mf 425 tractor 4 wd (0000000001   425-237827) parts catalogue...
Massey ferguson mf 425 tractor 4 wd (0000000001 425-237827) parts catalogue...fjskedsxmmem
 
Claas targo k60 telehandlers service repair manual
Claas targo k60 telehandlers service repair manualClaas targo k60 telehandlers service repair manual
Claas targo k60 telehandlers service repair manualfjskekdmjekm
 
Hyster (p005) h100 ft forklift service repair manual
Hyster (p005) h100 ft forklift service repair manualHyster (p005) h100 ft forklift service repair manual
Hyster (p005) h100 ft forklift service repair manualfjskefkksemm
 

Mais procurados (8)

2009 Polaris Outlaw 90 Service Repair Manual
2009 Polaris Outlaw 90 Service Repair Manual2009 Polaris Outlaw 90 Service Repair Manual
2009 Polaris Outlaw 90 Service Repair Manual
 
Still r70 20 fork truck service repair manual
Still r70 20 fork truck service repair manualStill r70 20 fork truck service repair manual
Still r70 20 fork truck service repair manual
 
1999 TOYOTA COROLLA Service Repair Manual
1999 TOYOTA COROLLA Service Repair Manual1999 TOYOTA COROLLA Service Repair Manual
1999 TOYOTA COROLLA Service Repair Manual
 
PERKINS 4.99M DIESEL ENGINE Service Repair Manual
PERKINS 4.99M DIESEL ENGINE Service Repair ManualPERKINS 4.99M DIESEL ENGINE Service Repair Manual
PERKINS 4.99M DIESEL ENGINE Service Repair Manual
 
Jcb 8290 fastrac (agricultural tractor) service repair manual (from 1351000 t...
Jcb 8290 fastrac (agricultural tractor) service repair manual (from 1351000 t...Jcb 8290 fastrac (agricultural tractor) service repair manual (from 1351000 t...
Jcb 8290 fastrac (agricultural tractor) service repair manual (from 1351000 t...
 
Massey ferguson mf 425 tractor 4 wd (0000000001 425-237827) parts catalogue...
Massey ferguson mf 425 tractor 4 wd (0000000001   425-237827) parts catalogue...Massey ferguson mf 425 tractor 4 wd (0000000001   425-237827) parts catalogue...
Massey ferguson mf 425 tractor 4 wd (0000000001 425-237827) parts catalogue...
 
Claas targo k60 telehandlers service repair manual
Claas targo k60 telehandlers service repair manualClaas targo k60 telehandlers service repair manual
Claas targo k60 telehandlers service repair manual
 
Hyster (p005) h100 ft forklift service repair manual
Hyster (p005) h100 ft forklift service repair manualHyster (p005) h100 ft forklift service repair manual
Hyster (p005) h100 ft forklift service repair manual
 

Semelhante a Ch2 periodic maintenance_v1

How to change oil
How to change oilHow to change oil
How to change oiljonespub
 
Jcb 300 skid steer loader service repair manual sn from 2499351 to 2499500
Jcb 300 skid steer loader service repair manual sn from 2499351 to 2499500Jcb 300 skid steer loader service repair manual sn from 2499351 to 2499500
Jcb 300 skid steer loader service repair manual sn from 2499351 to 2499500fjseolseksmem
 
Jcb 280 skid steer loader service repair manual sn from 2427801 to 2428800
Jcb 280 skid steer loader service repair manual sn from 2427801 to 2428800Jcb 280 skid steer loader service repair manual sn from 2427801 to 2428800
Jcb 280 skid steer loader service repair manual sn from 2427801 to 2428800fjjksqweekfsmemm
 
Jcb 330 skid steer loader service repair manual sn from 2499351 to 2499500
Jcb 330 skid steer loader service repair manual sn from 2499351 to 2499500Jcb 330 skid steer loader service repair manual sn from 2499351 to 2499500
Jcb 330 skid steer loader service repair manual sn from 2499351 to 2499500ufjjsjkekdmme
 
Jcb 280 skid steer loader service repair manual sn from 2499351 to 2499500
Jcb 280 skid steer loader service repair manual sn from 2499351 to 2499500Jcb 280 skid steer loader service repair manual sn from 2499351 to 2499500
Jcb 280 skid steer loader service repair manual sn from 2499351 to 2499500fujsjefkksekmm
 
Jcb 300 t skid steer loader service repair manual sn from 2427801 to 2428800
Jcb 300 t skid steer loader service repair manual sn from 2427801 to 2428800Jcb 300 t skid steer loader service repair manual sn from 2427801 to 2428800
Jcb 300 t skid steer loader service repair manual sn from 2427801 to 2428800fusjefjskekemm
 
Jcb 260 t skid steer loader service repair manual sn from 2499351 to 2499500
Jcb 260 t skid steer loader service repair manual sn from 2499351 to 2499500Jcb 260 t skid steer loader service repair manual sn from 2499351 to 2499500
Jcb 260 t skid steer loader service repair manual sn from 2499351 to 2499500fjjksqweekfsmemm
 
Jcb 330 skid steer loader service repair manual sn from 2584341 to 2584840
Jcb 330 skid steer loader service repair manual sn from 2584341 to 2584840Jcb 330 skid steer loader service repair manual sn from 2584341 to 2584840
Jcb 330 skid steer loader service repair manual sn from 2584341 to 2584840fjjskedmmemm
 
Jcb 300 t skid steer loader service repair manual sn from 2427801 to 2428800
Jcb 300 t skid steer loader service repair manual sn from 2427801 to 2428800Jcb 300 t skid steer loader service repair manual sn from 2427801 to 2428800
Jcb 300 t skid steer loader service repair manual sn from 2427801 to 2428800fjskekmdm
 
Jcb 320 t skid steer loader service repair manual sn from 2491771 to 2492270
Jcb 320 t skid steer loader service repair manual sn from 2491771 to 2492270Jcb 320 t skid steer loader service repair manual sn from 2491771 to 2492270
Jcb 320 t skid steer loader service repair manual sn from 2491771 to 2492270fjskkeksmemm
 
Jcb 330 skid steer loader service repair manual sn from 2503001 to 2503500
Jcb 330 skid steer loader service repair manual sn from 2503001 to 2503500Jcb 330 skid steer loader service repair manual sn from 2503001 to 2503500
Jcb 330 skid steer loader service repair manual sn from 2503001 to 2503500fujsjfjksekem
 
Jcb 280 skid steer loader service repair manual sn from 2503001 to 2503500
Jcb 280 skid steer loader service repair manual sn from 2503001 to 2503500Jcb 280 skid steer loader service repair manual sn from 2503001 to 2503500
Jcb 280 skid steer loader service repair manual sn from 2503001 to 2503500fjsjjekdkme
 
Jcb 330 skid steer loader service repair manual sn from 2491771 to 2492270
Jcb 330 skid steer loader service repair manual sn from 2491771 to 2492270Jcb 330 skid steer loader service repair manual sn from 2491771 to 2492270
Jcb 330 skid steer loader service repair manual sn from 2491771 to 2492270fujjsjkkekmm
 
Jcb 300 t skid steer loader service repair manual sn from 2427801 to 2428800
Jcb 300 t skid steer loader service repair manual sn from 2427801 to 2428800Jcb 300 t skid steer loader service repair manual sn from 2427801 to 2428800
Jcb 300 t skid steer loader service repair manual sn from 2427801 to 2428800fjseolseksmem
 
Jcb 320 t skid steer loader service repair manual sn from 2556651 to 2556850
Jcb 320 t skid steer loader service repair manual sn from 2556651 to 2556850Jcb 320 t skid steer loader service repair manual sn from 2556651 to 2556850
Jcb 320 t skid steer loader service repair manual sn from 2556651 to 2556850fujjsjkkekmm
 
Jcb 225 t skid steer loader service repair manual sn from 2427501 to 2427800
Jcb 225 t skid steer loader service repair manual sn from 2427501 to 2427800Jcb 225 t skid steer loader service repair manual sn from 2427501 to 2427800
Jcb 225 t skid steer loader service repair manual sn from 2427501 to 2427800fujsjefkksekmm
 
Jcb 300 skid steer loader service repair manual sn from 2584341 to 2584840
Jcb 300 skid steer loader service repair manual sn from 2584341 to 2584840Jcb 300 skid steer loader service repair manual sn from 2584341 to 2584840
Jcb 300 skid steer loader service repair manual sn from 2584341 to 2584840fjskekmdm
 

Semelhante a Ch2 periodic maintenance_v1 (18)

Preodic mentenence
Preodic mentenence Preodic mentenence
Preodic mentenence
 
How to change oil
How to change oilHow to change oil
How to change oil
 
Jcb 300 skid steer loader service repair manual sn from 2499351 to 2499500
Jcb 300 skid steer loader service repair manual sn from 2499351 to 2499500Jcb 300 skid steer loader service repair manual sn from 2499351 to 2499500
Jcb 300 skid steer loader service repair manual sn from 2499351 to 2499500
 
Jcb 280 skid steer loader service repair manual sn from 2427801 to 2428800
Jcb 280 skid steer loader service repair manual sn from 2427801 to 2428800Jcb 280 skid steer loader service repair manual sn from 2427801 to 2428800
Jcb 280 skid steer loader service repair manual sn from 2427801 to 2428800
 
Jcb 330 skid steer loader service repair manual sn from 2499351 to 2499500
Jcb 330 skid steer loader service repair manual sn from 2499351 to 2499500Jcb 330 skid steer loader service repair manual sn from 2499351 to 2499500
Jcb 330 skid steer loader service repair manual sn from 2499351 to 2499500
 
Jcb 280 skid steer loader service repair manual sn from 2499351 to 2499500
Jcb 280 skid steer loader service repair manual sn from 2499351 to 2499500Jcb 280 skid steer loader service repair manual sn from 2499351 to 2499500
Jcb 280 skid steer loader service repair manual sn from 2499351 to 2499500
 
Jcb 300 t skid steer loader service repair manual sn from 2427801 to 2428800
Jcb 300 t skid steer loader service repair manual sn from 2427801 to 2428800Jcb 300 t skid steer loader service repair manual sn from 2427801 to 2428800
Jcb 300 t skid steer loader service repair manual sn from 2427801 to 2428800
 
Jcb 260 t skid steer loader service repair manual sn from 2499351 to 2499500
Jcb 260 t skid steer loader service repair manual sn from 2499351 to 2499500Jcb 260 t skid steer loader service repair manual sn from 2499351 to 2499500
Jcb 260 t skid steer loader service repair manual sn from 2499351 to 2499500
 
Jcb 330 skid steer loader service repair manual sn from 2584341 to 2584840
Jcb 330 skid steer loader service repair manual sn from 2584341 to 2584840Jcb 330 skid steer loader service repair manual sn from 2584341 to 2584840
Jcb 330 skid steer loader service repair manual sn from 2584341 to 2584840
 
Jcb 300 t skid steer loader service repair manual sn from 2427801 to 2428800
Jcb 300 t skid steer loader service repair manual sn from 2427801 to 2428800Jcb 300 t skid steer loader service repair manual sn from 2427801 to 2428800
Jcb 300 t skid steer loader service repair manual sn from 2427801 to 2428800
 
Jcb 320 t skid steer loader service repair manual sn from 2491771 to 2492270
Jcb 320 t skid steer loader service repair manual sn from 2491771 to 2492270Jcb 320 t skid steer loader service repair manual sn from 2491771 to 2492270
Jcb 320 t skid steer loader service repair manual sn from 2491771 to 2492270
 
Jcb 330 skid steer loader service repair manual sn from 2503001 to 2503500
Jcb 330 skid steer loader service repair manual sn from 2503001 to 2503500Jcb 330 skid steer loader service repair manual sn from 2503001 to 2503500
Jcb 330 skid steer loader service repair manual sn from 2503001 to 2503500
 
Jcb 280 skid steer loader service repair manual sn from 2503001 to 2503500
Jcb 280 skid steer loader service repair manual sn from 2503001 to 2503500Jcb 280 skid steer loader service repair manual sn from 2503001 to 2503500
Jcb 280 skid steer loader service repair manual sn from 2503001 to 2503500
 
Jcb 330 skid steer loader service repair manual sn from 2491771 to 2492270
Jcb 330 skid steer loader service repair manual sn from 2491771 to 2492270Jcb 330 skid steer loader service repair manual sn from 2491771 to 2492270
Jcb 330 skid steer loader service repair manual sn from 2491771 to 2492270
 
Jcb 300 t skid steer loader service repair manual sn from 2427801 to 2428800
Jcb 300 t skid steer loader service repair manual sn from 2427801 to 2428800Jcb 300 t skid steer loader service repair manual sn from 2427801 to 2428800
Jcb 300 t skid steer loader service repair manual sn from 2427801 to 2428800
 
Jcb 320 t skid steer loader service repair manual sn from 2556651 to 2556850
Jcb 320 t skid steer loader service repair manual sn from 2556651 to 2556850Jcb 320 t skid steer loader service repair manual sn from 2556651 to 2556850
Jcb 320 t skid steer loader service repair manual sn from 2556651 to 2556850
 
Jcb 225 t skid steer loader service repair manual sn from 2427501 to 2427800
Jcb 225 t skid steer loader service repair manual sn from 2427501 to 2427800Jcb 225 t skid steer loader service repair manual sn from 2427501 to 2427800
Jcb 225 t skid steer loader service repair manual sn from 2427501 to 2427800
 
Jcb 300 skid steer loader service repair manual sn from 2584341 to 2584840
Jcb 300 skid steer loader service repair manual sn from 2584341 to 2584840Jcb 300 skid steer loader service repair manual sn from 2584341 to 2584840
Jcb 300 skid steer loader service repair manual sn from 2584341 to 2584840
 

Mais de _AXE_PM

Xciting 400i part list sk80_aa(pl)
Xciting 400i part list sk80_aa(pl)Xciting 400i part list sk80_aa(pl)
Xciting 400i part list sk80_aa(pl)_AXE_PM
 
Wiring schematic diagram xciting400i
Wiring schematic diagram xciting400iWiring schematic diagram xciting400i
Wiring schematic diagram xciting400i_AXE_PM
 
Ch14 quick reference_v1
Ch14 quick reference_v1Ch14 quick reference_v1
Ch14 quick reference_v1_AXE_PM
 
Ch12 wheels
Ch12 wheelsCh12 wheels
Ch12 wheels_AXE_PM
 
Ch11 rear suspension
Ch11 rear suspensionCh11 rear suspension
Ch11 rear suspension_AXE_PM
 
Ch10 front suspension
Ch10 front suspensionCh10 front suspension
Ch10 front suspension_AXE_PM
 
Ch9 brakes v1
Ch9 brakes v1Ch9 brakes v1
Ch9 brakes v1_AXE_PM
 
Ch8 steering
Ch8 steeringCh8 steering
Ch8 steering_AXE_PM
 
Ch7 fuel injection system_v2
Ch7 fuel injection system_v2Ch7 fuel injection system_v2
Ch7 fuel injection system_v2_AXE_PM
 
Ch6 cooling system
Ch6 cooling systemCh6 cooling system
Ch6 cooling system_AXE_PM
 
Ch5 final drive
Ch5 final driveCh5 final drive
Ch5 final drive_AXE_PM
 
Ch4 cvt continuously_variabletransmission
Ch4 cvt continuously_variabletransmissionCh4 cvt continuously_variabletransmission
Ch4 cvt continuously_variabletransmission_AXE_PM
 
2w guia de_recomendacoes_de_seguranca
2w guia de_recomendacoes_de_seguranca2w guia de_recomendacoes_de_seguranca
2w guia de_recomendacoes_de_seguranca_AXE_PM
 

Mais de _AXE_PM (13)

Xciting 400i part list sk80_aa(pl)
Xciting 400i part list sk80_aa(pl)Xciting 400i part list sk80_aa(pl)
Xciting 400i part list sk80_aa(pl)
 
Wiring schematic diagram xciting400i
Wiring schematic diagram xciting400iWiring schematic diagram xciting400i
Wiring schematic diagram xciting400i
 
Ch14 quick reference_v1
Ch14 quick reference_v1Ch14 quick reference_v1
Ch14 quick reference_v1
 
Ch12 wheels
Ch12 wheelsCh12 wheels
Ch12 wheels
 
Ch11 rear suspension
Ch11 rear suspensionCh11 rear suspension
Ch11 rear suspension
 
Ch10 front suspension
Ch10 front suspensionCh10 front suspension
Ch10 front suspension
 
Ch9 brakes v1
Ch9 brakes v1Ch9 brakes v1
Ch9 brakes v1
 
Ch8 steering
Ch8 steeringCh8 steering
Ch8 steering
 
Ch7 fuel injection system_v2
Ch7 fuel injection system_v2Ch7 fuel injection system_v2
Ch7 fuel injection system_v2
 
Ch6 cooling system
Ch6 cooling systemCh6 cooling system
Ch6 cooling system
 
Ch5 final drive
Ch5 final driveCh5 final drive
Ch5 final drive
 
Ch4 cvt continuously_variabletransmission
Ch4 cvt continuously_variabletransmissionCh4 cvt continuously_variabletransmission
Ch4 cvt continuously_variabletransmission
 
2w guia de_recomendacoes_de_seguranca
2w guia de_recomendacoes_de_seguranca2w guia de_recomendacoes_de_seguranca
2w guia de_recomendacoes_de_seguranca
 

Último

Almora call girls 📞 8617697112 At Low Cost Cash Payment Booking
Almora call girls 📞 8617697112 At Low Cost Cash Payment BookingAlmora call girls 📞 8617697112 At Low Cost Cash Payment Booking
Almora call girls 📞 8617697112 At Low Cost Cash Payment BookingNitya salvi
 
Contact:- 8860008073 Call Girls in Karnal Escort Service Available at Afforda...
Contact:- 8860008073 Call Girls in Karnal Escort Service Available at Afforda...Contact:- 8860008073 Call Girls in Karnal Escort Service Available at Afforda...
Contact:- 8860008073 Call Girls in Karnal Escort Service Available at Afforda...Apsara Of India
 
Call Girl Nashik Saloni 7001305949 Independent Escort Service Nashik
Call Girl Nashik Saloni 7001305949 Independent Escort Service NashikCall Girl Nashik Saloni 7001305949 Independent Escort Service Nashik
Call Girl Nashik Saloni 7001305949 Independent Escort Service NashikCall Girls in Nagpur High Profile
 
Top Rated Pune Call Girls Pimpri Chinchwad ⟟ 6297143586 ⟟ Call Me For Genuin...
Top Rated  Pune Call Girls Pimpri Chinchwad ⟟ 6297143586 ⟟ Call Me For Genuin...Top Rated  Pune Call Girls Pimpri Chinchwad ⟟ 6297143586 ⟟ Call Me For Genuin...
Top Rated Pune Call Girls Pimpri Chinchwad ⟟ 6297143586 ⟟ Call Me For Genuin...Call Girls in Nagpur High Profile
 
Karnal Call Girls 8860008073 Dyal Singh Colony Call Girls Service in Karnal E...
Karnal Call Girls 8860008073 Dyal Singh Colony Call Girls Service in Karnal E...Karnal Call Girls 8860008073 Dyal Singh Colony Call Girls Service in Karnal E...
Karnal Call Girls 8860008073 Dyal Singh Colony Call Girls Service in Karnal E...Apsara Of India
 
Call Girls Nashik Gayatri 7001305949 Independent Escort Service Nashik
Call Girls Nashik Gayatri 7001305949 Independent Escort Service NashikCall Girls Nashik Gayatri 7001305949 Independent Escort Service Nashik
Call Girls Nashik Gayatri 7001305949 Independent Escort Service NashikCall Girls in Nagpur High Profile
 
Call Girls Manjri Call Me 7737669865 Budget Friendly No Advance Booking
Call Girls Manjri Call Me 7737669865 Budget Friendly No Advance BookingCall Girls Manjri Call Me 7737669865 Budget Friendly No Advance Booking
Call Girls Manjri Call Me 7737669865 Budget Friendly No Advance Bookingroncy bisnoi
 
Russian Escorts Agency In Goa 💚 9316020077 💚 Russian Call Girl Goa
Russian Escorts Agency In Goa  💚 9316020077 💚 Russian Call Girl GoaRussian Escorts Agency In Goa  💚 9316020077 💚 Russian Call Girl Goa
Russian Escorts Agency In Goa 💚 9316020077 💚 Russian Call Girl Goasexy call girls service in goa
 
↑Top Model (Kolkata) Call Girls Howrah ⟟ 8250192130 ⟟ High Class Call Girl In...
↑Top Model (Kolkata) Call Girls Howrah ⟟ 8250192130 ⟟ High Class Call Girl In...↑Top Model (Kolkata) Call Girls Howrah ⟟ 8250192130 ⟟ High Class Call Girl In...
↑Top Model (Kolkata) Call Girls Howrah ⟟ 8250192130 ⟟ High Class Call Girl In...noor ahmed
 
Model Call Girls In Velappanchavadi WhatsApp Booking 7427069034 call girl ser...
Model Call Girls In Velappanchavadi WhatsApp Booking 7427069034 call girl ser...Model Call Girls In Velappanchavadi WhatsApp Booking 7427069034 call girl ser...
Model Call Girls In Velappanchavadi WhatsApp Booking 7427069034 call girl ser... Shivani Pandey
 
Independent Hatiara Escorts ✔ 8250192130 ✔ Full Night With Room Online Bookin...
Independent Hatiara Escorts ✔ 8250192130 ✔ Full Night With Room Online Bookin...Independent Hatiara Escorts ✔ 8250192130 ✔ Full Night With Room Online Bookin...
Independent Hatiara Escorts ✔ 8250192130 ✔ Full Night With Room Online Bookin...Riya Pathan
 
Independent Joka Escorts ✔ 8250192130 ✔ Full Night With Room Online Booking 2...
Independent Joka Escorts ✔ 8250192130 ✔ Full Night With Room Online Booking 2...Independent Joka Escorts ✔ 8250192130 ✔ Full Night With Room Online Booking 2...
Independent Joka Escorts ✔ 8250192130 ✔ Full Night With Room Online Booking 2...noor ahmed
 
👙 Kolkata Call Girls Shyam Bazar 💫💫7001035870 Model escorts Service
👙  Kolkata Call Girls Shyam Bazar 💫💫7001035870 Model escorts Service👙  Kolkata Call Girls Shyam Bazar 💫💫7001035870 Model escorts Service
👙 Kolkata Call Girls Shyam Bazar 💫💫7001035870 Model escorts Serviceanamikaraghav4
 
2k Shot Call girls Laxmi Nagar Delhi 9205541914
2k Shot Call girls Laxmi Nagar Delhi 92055419142k Shot Call girls Laxmi Nagar Delhi 9205541914
2k Shot Call girls Laxmi Nagar Delhi 9205541914Delhi Call girls
 
VIP Call Girls Service Banjara Hills Hyderabad Call +91-8250192130
VIP Call Girls Service Banjara Hills Hyderabad Call +91-8250192130VIP Call Girls Service Banjara Hills Hyderabad Call +91-8250192130
VIP Call Girls Service Banjara Hills Hyderabad Call +91-8250192130Suhani Kapoor
 
↑Top Model (Kolkata) Call Girls Rajpur ⟟ 8250192130 ⟟ High Class Call Girl In...
↑Top Model (Kolkata) Call Girls Rajpur ⟟ 8250192130 ⟟ High Class Call Girl In...↑Top Model (Kolkata) Call Girls Rajpur ⟟ 8250192130 ⟟ High Class Call Girl In...
↑Top Model (Kolkata) Call Girls Rajpur ⟟ 8250192130 ⟟ High Class Call Girl In...noor ahmed
 
5* Hotels Call Girls In Goa {{07028418221}} Call Girls In North Goa Escort Se...
5* Hotels Call Girls In Goa {{07028418221}} Call Girls In North Goa Escort Se...5* Hotels Call Girls In Goa {{07028418221}} Call Girls In North Goa Escort Se...
5* Hotels Call Girls In Goa {{07028418221}} Call Girls In North Goa Escort Se...Apsara Of India
 

Último (20)

Almora call girls 📞 8617697112 At Low Cost Cash Payment Booking
Almora call girls 📞 8617697112 At Low Cost Cash Payment BookingAlmora call girls 📞 8617697112 At Low Cost Cash Payment Booking
Almora call girls 📞 8617697112 At Low Cost Cash Payment Booking
 
Desi Bhabhi Call Girls In Goa 💃 730 02 72 001💃desi Bhabhi Escort Goa
Desi Bhabhi Call Girls  In Goa  💃 730 02 72 001💃desi Bhabhi Escort GoaDesi Bhabhi Call Girls  In Goa  💃 730 02 72 001💃desi Bhabhi Escort Goa
Desi Bhabhi Call Girls In Goa 💃 730 02 72 001💃desi Bhabhi Escort Goa
 
Contact:- 8860008073 Call Girls in Karnal Escort Service Available at Afforda...
Contact:- 8860008073 Call Girls in Karnal Escort Service Available at Afforda...Contact:- 8860008073 Call Girls in Karnal Escort Service Available at Afforda...
Contact:- 8860008073 Call Girls in Karnal Escort Service Available at Afforda...
 
Call Girl Nashik Saloni 7001305949 Independent Escort Service Nashik
Call Girl Nashik Saloni 7001305949 Independent Escort Service NashikCall Girl Nashik Saloni 7001305949 Independent Escort Service Nashik
Call Girl Nashik Saloni 7001305949 Independent Escort Service Nashik
 
Top Rated Pune Call Girls Pimpri Chinchwad ⟟ 6297143586 ⟟ Call Me For Genuin...
Top Rated  Pune Call Girls Pimpri Chinchwad ⟟ 6297143586 ⟟ Call Me For Genuin...Top Rated  Pune Call Girls Pimpri Chinchwad ⟟ 6297143586 ⟟ Call Me For Genuin...
Top Rated Pune Call Girls Pimpri Chinchwad ⟟ 6297143586 ⟟ Call Me For Genuin...
 
Karnal Call Girls 8860008073 Dyal Singh Colony Call Girls Service in Karnal E...
Karnal Call Girls 8860008073 Dyal Singh Colony Call Girls Service in Karnal E...Karnal Call Girls 8860008073 Dyal Singh Colony Call Girls Service in Karnal E...
Karnal Call Girls 8860008073 Dyal Singh Colony Call Girls Service in Karnal E...
 
Call Girls Nashik Gayatri 7001305949 Independent Escort Service Nashik
Call Girls Nashik Gayatri 7001305949 Independent Escort Service NashikCall Girls Nashik Gayatri 7001305949 Independent Escort Service Nashik
Call Girls Nashik Gayatri 7001305949 Independent Escort Service Nashik
 
Call Girls Manjri Call Me 7737669865 Budget Friendly No Advance Booking
Call Girls Manjri Call Me 7737669865 Budget Friendly No Advance BookingCall Girls Manjri Call Me 7737669865 Budget Friendly No Advance Booking
Call Girls Manjri Call Me 7737669865 Budget Friendly No Advance Booking
 
Russian Escorts Agency In Goa 💚 9316020077 💚 Russian Call Girl Goa
Russian Escorts Agency In Goa  💚 9316020077 💚 Russian Call Girl GoaRussian Escorts Agency In Goa  💚 9316020077 💚 Russian Call Girl Goa
Russian Escorts Agency In Goa 💚 9316020077 💚 Russian Call Girl Goa
 
↑Top Model (Kolkata) Call Girls Howrah ⟟ 8250192130 ⟟ High Class Call Girl In...
↑Top Model (Kolkata) Call Girls Howrah ⟟ 8250192130 ⟟ High Class Call Girl In...↑Top Model (Kolkata) Call Girls Howrah ⟟ 8250192130 ⟟ High Class Call Girl In...
↑Top Model (Kolkata) Call Girls Howrah ⟟ 8250192130 ⟟ High Class Call Girl In...
 
Model Call Girls In Velappanchavadi WhatsApp Booking 7427069034 call girl ser...
Model Call Girls In Velappanchavadi WhatsApp Booking 7427069034 call girl ser...Model Call Girls In Velappanchavadi WhatsApp Booking 7427069034 call girl ser...
Model Call Girls In Velappanchavadi WhatsApp Booking 7427069034 call girl ser...
 
Independent Hatiara Escorts ✔ 8250192130 ✔ Full Night With Room Online Bookin...
Independent Hatiara Escorts ✔ 8250192130 ✔ Full Night With Room Online Bookin...Independent Hatiara Escorts ✔ 8250192130 ✔ Full Night With Room Online Bookin...
Independent Hatiara Escorts ✔ 8250192130 ✔ Full Night With Room Online Bookin...
 
Independent Joka Escorts ✔ 8250192130 ✔ Full Night With Room Online Booking 2...
Independent Joka Escorts ✔ 8250192130 ✔ Full Night With Room Online Booking 2...Independent Joka Escorts ✔ 8250192130 ✔ Full Night With Room Online Booking 2...
Independent Joka Escorts ✔ 8250192130 ✔ Full Night With Room Online Booking 2...
 
👙 Kolkata Call Girls Shyam Bazar 💫💫7001035870 Model escorts Service
👙  Kolkata Call Girls Shyam Bazar 💫💫7001035870 Model escorts Service👙  Kolkata Call Girls Shyam Bazar 💫💫7001035870 Model escorts Service
👙 Kolkata Call Girls Shyam Bazar 💫💫7001035870 Model escorts Service
 
Call Girls South Avenue Delhi WhatsApp Number 9711199171
Call Girls South Avenue Delhi WhatsApp Number 9711199171Call Girls South Avenue Delhi WhatsApp Number 9711199171
Call Girls South Avenue Delhi WhatsApp Number 9711199171
 
2k Shot Call girls Laxmi Nagar Delhi 9205541914
2k Shot Call girls Laxmi Nagar Delhi 92055419142k Shot Call girls Laxmi Nagar Delhi 9205541914
2k Shot Call girls Laxmi Nagar Delhi 9205541914
 
VIP Call Girls Service Banjara Hills Hyderabad Call +91-8250192130
VIP Call Girls Service Banjara Hills Hyderabad Call +91-8250192130VIP Call Girls Service Banjara Hills Hyderabad Call +91-8250192130
VIP Call Girls Service Banjara Hills Hyderabad Call +91-8250192130
 
↑Top Model (Kolkata) Call Girls Rajpur ⟟ 8250192130 ⟟ High Class Call Girl In...
↑Top Model (Kolkata) Call Girls Rajpur ⟟ 8250192130 ⟟ High Class Call Girl In...↑Top Model (Kolkata) Call Girls Rajpur ⟟ 8250192130 ⟟ High Class Call Girl In...
↑Top Model (Kolkata) Call Girls Rajpur ⟟ 8250192130 ⟟ High Class Call Girl In...
 
5* Hotels Call Girls In Goa {{07028418221}} Call Girls In North Goa Escort Se...
5* Hotels Call Girls In Goa {{07028418221}} Call Girls In North Goa Escort Se...5* Hotels Call Girls In Goa {{07028418221}} Call Girls In North Goa Escort Se...
5* Hotels Call Girls In Goa {{07028418221}} Call Girls In North Goa Escort Se...
 
CHEAP Call Girls in Malviya Nagar, (-DELHI )🔝 9953056974🔝(=)/CALL GIRLS SERVICE
CHEAP Call Girls in  Malviya Nagar, (-DELHI )🔝 9953056974🔝(=)/CALL GIRLS SERVICECHEAP Call Girls in  Malviya Nagar, (-DELHI )🔝 9953056974🔝(=)/CALL GIRLS SERVICE
CHEAP Call Girls in Malviya Nagar, (-DELHI )🔝 9953056974🔝(=)/CALL GIRLS SERVICE
 

Ch2 periodic maintenance_v1

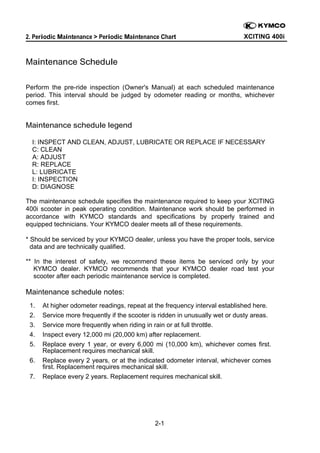
  • 1.     2. Periodic Maintenance > Periodic Maintenance Chart     XCITING 400i    Maintenance Schedule        Perform the pre-ride inspection (Owner's Manual) at each scheduled maintenance period. This interval should be judged by odometer reading or months, whichever comes first.       Maintenance schedule legend      I: INSPECT AND CLEAN, ADJUST, LUBRICATE OR REPLACE IF NECESSARY C: CLEAN A: ADJUST  R: REPLACE L: LUBRICATE I: INSPECTION D: DIAGNOSE    The maintenance schedule specifies the maintenance required to keep your XCITING 400i scooter in peak operating condition. Maintenance work should be performed in accordance with KYMCO standards and specifications by properly trained and equipped technicians. Your KYMCO dealer meets all of these requirements.   * Should be serviced by your KYMCO dealer, unless you have the proper tools, service data and are technically qualified.   ** In the interest of safety, we recommend these items be serviced only by your KYMCO dealer. KYMCO recommends that your KYMCO dealer road test your scooter after each periodic maintenance service is completed.   Maintenance schedule notes: 1. 2. 3. 4. 5. 6. 7. At higher odometer readings, repeat at the frequency interval established here. Service more frequently if the scooter is ridden in unusually wet or dusty areas. Service more frequently when riding in rain or at full throttle. Inspect every 12,000 mi (20,000 km) after replacement. Replace every 1 year, or every 6,000 mi (10,000 km), whichever comes first. Replacement requires mechanical skill. Replace every 2 years, or at the indicated odometer interval, whichever comes first. Replacement requires mechanical skill. Replace every 2 years. Replacement requires mechanical skill.       2-1  
  • 2.     XCITING 400i  2. Periodic Maintenance > Periodic Maintenance Chart         FREQUENCY WHICHEVER COMES FIRST ODOMETER READING X 1000km Note 5 10 15 20 25 30 35 40 X 1000mi ITEM 1 0.6 3 6 9 12 15 18 22 24 1 6 12 18 24 30 36 42 46 R R R R R R R R Month * AIR CLEANER   SPARK PLUGS I R I R I R I R *  THROTTLE OPERATION I I I I I I I I *  VALVE CLEARANCE I A I A I A I A *  FUEL LINE   CRANKCASE BREATHER *  ENGINE OIL *  ENGINE OIL SCREEN *  ENGINE OIL FILTER *  ENGINE IDLE SPEED *  TRANSMISSION FLUID Note5 * DRIVE BELT Note4 ** CLUTCH SHOE WEAR BRAKE FLUID Note2 I I I I C C C C C C C C C R R R R R R R R R C Note3 R C R C R C R R R R R R R R R R D I D D R R D R R R I I I R I I I I I R I I R I R I R I R BRAKE PAD WEAR I I I I I I I I BRAKE SYSTEM I I I I I I I I * BRAKE LIGHT SWITCH I I I I I I I I ** STEERING BEARINGS I I I I I I I I * HEADLIGHT AIM I I I I I I I I * NUTS, BOLTS, I I I I I I I I ** WHEELS/TIRES I I I I I I I I ** COOLANT Note7 FASTENERS ** INJECTOR ** I CLUTCH SHOE WEAR I I I I R I C D C D C D C I                           2-2   I D Note6 I I I
  • 3.       2. Periodic Maintenance > Air Filter Servicing XCITING 400i  Air Filter Servicing Replace the air filter according to the Maintenance Schedule, and more often in exceptionally rainy or dusty areas. Removal Remove the 8 air filter cover screws with a #2 Phillips screwdriver. Remove the air filter cover. 2‐3   
  • 4.       2. Periodic Maintenance > Air Filter Servicing XCITING 400i  Remove the 7 air filter bolts with an 8 mm socket or a #2 Phillips screwdriver. Remove the air filter from the airbox. Discard the air filter in favor of a new item. Caution: • The air cleaner element has a viscous type paper element. Do not clean it with compressed air. • Be sure to install the air cleaner element and cover securely. 2‐4   
  • 5.       2. Periodic Maintenance > Air Filter Servicing Installation Fit the new air filter into place. Insert the 7 air filter bolts. Tighten the air filter bolts securely with an 8 mm socket or a #2 Phillips screwdriver. 2‐5    XCITING 400i 
  • 6.       2. Periodic Maintenance > Air Filter Servicing Install the air filter cover. Install the 8 air filter cover screws and tighten them securely with a #2 Phillips screwdriver. 2‐6    XCITING 400i 
  • 7.     XCITING 400i  2. Periodic Maintenance > Brake Fluid   Brake Fluid The KYMCO XCITING 400i uses DOT 4 brake fluid that should be inspected after 3,000 mi (5,000 km) of use. It should be flushed and bled every 12 months, 6,000 mi (10,000 km), whenever the brakes feel spongy, or if the brake system has been taken apart and rebuilt. Always use fresh brake fluid from a tightly sealed container. SAFETY FIRST: Protective gloves and eyewear are recommended at this point. Warning: Brake fluid is very caustic and can damage paint, chrome and plastic. Wipe up any spills immediately. Inspection Turn the handlebars until the top of the master cylinder reservoir is level with the ground. Do this for both master cylinder reservoirs and check the level of brake fluid. 2‐7   
  • 8.     XCITING 400i  2. Periodic Maintenance > Brake Fluid   Draining The brake bleeding process is the same for the front and rear brakes. Remove the two master cylinder cover screws with a #2 Phillips head screwdriver. Remove the master cylinder cover, plastic piece and rubber diaphragm. Clean and inspect the rubber diaphragm for tears or other damage. Replace as necessary. 2‐8   
  • 9.     XCITING 400i  2. Periodic Maintenance > Brake Fluid   Pull off the rubber cap over the bleeder valve and crack open the bleeder valve on the brake caliper using an 8 mm wrench. This valve is usually very tight so use a box end wrench or a 6 point socket and ratchet to prevent rounding off the head. Snug the bleeder valve back down. Open the valve and remove the old brake fluid with a Mighty -Vac or a similar device. 2‐9   
  • 10.     XCITING 400i  2. Periodic Maintenance > Brake Fluid   Bleeding Place a length of 6 mm inside diameter clear hose on the bleeder valve and place the other end in a suitable container. A spare battery vent hose works well for this job. Fill the brake fluid with the proper type from a fresh, newly opened container. 2‐10   
  • 11.     XCITING 400i  2. Periodic Maintenance > Brake Fluid   Pump the brake lever several times and hold the lever in. While holding the lever in, crack open the bleeder valve. The front brake lever will travel all the way to the grip and brake fluid and/or air will come out of the bleeder valve into the 6 mm hose. Tighten the bleeder valve before releasing the front brake lever. Pump the lever several times again and repeat the process. Be certain to check the master cylinder reservoir occasionally to make sure the reservoir doesn't run dry. Add more brake fluid as necessary. Continue this process until clean brake fluid comes out of the bleeder valve and there are no air bubbles. The brake lever should feel firm. Tighten the bleeder valve to specification and push its rubber cover over the nipple. (Air Bleeder Valve Torque: 7.5 N-m or 5.5 lb-ft) Make sure the reservoir has the proper amount of fluid. 2‐11   
  • 12.     XCITING 400i  2. Periodic Maintenance > Brake Fluid   Place the rubber diaphragm, plastic piece and cover over the reservoir. Thread in the reservoir cover screws and tighten them securely with a #2 Phillips screwdriver. 2‐12   
  • 13.     XCITING 400i 2. PeriodicMaintenance > Compression Test   Engine Compression Test SAFETY FIRST: Protective gloves and eyewear are recommended at this point. Before testing the compression make sure the cylinder head bolts are tightened securely and the valve clearance is specification. Thread a compression tester into the spark plug hole hand tight. Hold the throttle all the way open. Crank the engine with the starter motor until the needle on the gauge stops rising. Do not crank the engine more than a few seconds. Cylinder compression 15 kg/cm2 228 ± 28.4 psi Low compression is an indication of excessive engine wear, possibly worn rings or poorly sealing valves, or maybe a tight valve with not enough valve clearance. High compression is possibly an indication of excessive carbon buildup on the piston or performance modifications. Install the spark plug. 2‐13   
  • 14. 2. Periodic Maintenance > Engine Oil XCITING 400i Engine Oil SAFETY FIRST: Protective gloves and eyewear are recommended at this point. Caution: Hot engine oil can burn. Avoid letting used motor oil contact exposed skin. TROUBLESHOOTING Oil level too low 1. Natural oil consumption 2. Oil leaks 3. Worn or poorly installed piston rings 4. Worn valve guide or seal Poor lubrication pressure 1. Oil level too low 2. Clogged filter or oil passages 3. No use the specified oil Oil Specifications Use a fully synthetic quality 4-stroke engine oil to ensure longer service life of the scooter. Only use oils that have a SJ rating above per the API service classification. Engine oil viscosity : SAE 5W-50 2‐14   
  • 15. 2. Periodic Maintenance > Engine Oil XCITING 400i If these viscosities are not available, select an alternative engine oil according to the chart shown above. Engine oil capacity At disassembly At change 1.5 Liter 1.3 Liter Inspection Oil Level Check the engine oil level each day before operating the scooter. Place the motorcycle upright on level ground for engine oil level check. Run the engine for 2 ~ 3 minutes and check the oil level after the engine is stopped for 2 ~ 3 minutes. 2‐15   
  • 16. 2. Periodic Maintenance > Engine Oil XCITING 400i The oil filler cap/dipstick is located on the right side of the engine. Remove the oil filler cap/dipstick and wipe off the oil. Inspect the O-ring and replace it as needed. Insert the dipstick in without threading it in. Remove the dipstick and check the oil level. 2‐16   
  • 17. 2. Periodic Maintenance > Engine Oil XCITING 400i The level must be maintained between the upper (1) and lower level (2) marks on the oil filler cap/dipstick. If the oil level is at or below the lower mark add more of the same type and brand of oil to the engine through the oil filler hole. If the oil level is to high remove the drain plug and the excess oil. Servicing Draining Warm the engine as with the inspection, this will heat the engine and allow the oil to drain out faster and more completely. The vehicle should be on level ground. Stop the engine. Caution: Hot engine oil can burn. Avoid letting used motor oil contact exposed skin. 2‐17   
  • 18. 2. Periodic Maintenance > Engine Oil XCITING 400i Place an oil pan under the engine. The oil drain bolt is located on the left side of the engine. Loosen the engine oil drain bolt with a 17 mm socket. Remove the bolt and allow the oil to drain into the pan. 2‐18   
  • 19. 2. Periodic Maintenance > Engine Oil XCITING 400i Discard the old sealing washer. Remove the oil filler cap to allow for faster oil draining. Inspect the oil filler cap O-ring and replace it as needed. 2‐19   
  • 20. 2. Periodic Maintenance > Engine Oil XCITING 400i When the oil has drained completely Install the drain bolt with a new sealing washer. Tighten the drain bolt to specification with a 17 mm socket. Torque Item Qty Oil Drain bolt 1 kgf-m lb-ft 2.5 18.08 Remarks New sealing washer Strainer Screen Remove the oil strainer screen bolt with a 17 mm socket. Inspect the strainer screen bolt O-ring and replace it as needed. 2‐20   
  • 21. 2. Periodic Maintenance > Engine Oil XCITING 400i Remove the oil strainer screen. Remove the O-rings from the oil strainer screen and inspect them. Replace the O-rings if they are in poor condition. Inspect the oil strainer screen for debris and damage. Clean it with a high flash point solvent and compressed air. Metal debris in the strainer screen can be an indicator of engine wear or damage. 2‐21   
  • 22. 2. Periodic Maintenance > Engine Oil XCITING 400i Return the O-rings to the oil strainer screen and install it into the left side of the engine. Tighten the oil strainer screen cap to specification with a 17 mm socket. Item Engine oil strainer cap Qty 1 Torque kgf-m 1.0 lb-ft 7.2 Filter Replacement The oil filter compartment is located on the bottom of the engine below the oil filler cap/dipstick. Ready an oil drain pan to catch any remaining engine oil. 2‐22   
  • 23. 2. Periodic Maintenance > Engine Oil XCITING 400i Loosen the oil filter cap with a 24 mm socket. Remove the oil filter cap with spring and take out the used oil filter. 2‐23   
  • 24. 2. Periodic Maintenance > Engine Oil XCITING 400i Inspect the oil filter cap O-ring and spring. Replace the items if they are in poor condition. Install the spring to the oil filter cap. Apply a light coat of engine oil to the oil filter cap O-ring. 2‐24   
  • 25. 2. Periodic Maintenance > Engine Oil XCITING 400i Pour a small amount of fresh engine oil into the oil filter. Insert the oil filter into place with the rubber seal side facing up. Install the oil filter cap with spring. Makes sure the spring fits against the filter correctly. Tighten the oil filter cap securely with a 24 mm socket. 2‐25   
  • 26. 2. Periodic Maintenance > Engine Oil XCITING 400i Filling Add the oil to the engine through the oil filler/dipstick hole. Use a fully synthetic quality 4-stroke engine oil to ensure longer service life of the scooter. Only use oils that have a SJ rating above per the API service classification. Engine oil viscosity : SAE 5W-50 Engine oil capacity At disassembly At change 1.5 Liter 1.3 Liter 2‐26   
  • 27.   2. Periodic Maintenance > General Lubrication XCITING 400i General Lubrication SAFETY FIRST: Protective gloves and eyewear are recommended at this point. The frame lubrication points are listed below. Use general purpose grease. Apply clean engine oil or grease to cables and movable parts not specified. This will avoid abnormal noise and increase the durability of the motorcycle.     Front Wheel Axle Side Stand Pivot Center Stand Pivot Rear Wheel axle 2‐27   
  • 28. XCITING 400i 2. Periodic Maintenance > Hose Inspection Hose Inspection Inspect the breather hose for damage and deterioration. Inspect the fuel hose for damage and deterioration. 2‐28   
  • 29. XCITING 400i  2. Periodic Maintenance > Spark Plug Spark Plug SAFETY FIRST: Protective gloves and eyewear are recommended at this point. Removal The spark plug is located on the left side of the cylinder. Remove the spark plug wire off of the spark plug. 2‐29   
  • 30. XCITING 400i  2. Periodic Maintenance > Spark Plug Remove the spark plug with a spark plug with a 5/8 in socket. Spark plug NGK-CR7E Inspection Always check the gap of the spark plug before installation. If the gap needs to be adjusted bend the ground electrode carefully. Inspect the color of the porcelain nose of the spark plug. The color of the spark plug can indicate how the mixture is burning. A white colored plug shows a lean mixture, where a dark plug shows a rich mixture. Do not hesitate to replace a spark plug. Always replace a spark plug if any part of it is damaged. Spark plug gap 0.6 - 0.7 mm 2‐30   
  • 31. XCITING 400i  2. Periodic Maintenance > Spark Plug Installation Thread the spark plug by hand before using a socket to tighten. Torque to specification with a 5/8" spark plug socket. Do not over tighten the spark plug. The cylinder head is made out of soft metal, and it can be easily damaged. Item Torque Spark plug 17.2 N-m (1.5 - 2 ft-lb, 10.84 - 14.47 kgf-m) Install the spark plug wire over the plug. 2‐31   
  • 32.   XCITING 400i  2. Periodic Maintenance > Steering Steering SAFETY FIRST: Protective gloves and eyewear are recommended at this point. Inspection Raise the front wheel off the ground and check that the steering handlebar rotates freely. If the handlebar moves unevenly, binds, or has vertical movement, adjust the steering head bearing. 2‐32   
  • 33. XCITING 400i  2. Periodic Maintenance > Suspension   Suspension SAFETY FIRST: Protective gloves and eyewear are recommended at this point. Front Suspension Check the action of the front shock absorbers by compressing them several times. Check the entire shock absorber assembly for oil leaks, looseness or damage. 2‐33   
  • 34. XCITING 400i  2. Periodic Maintenance > Suspension   Pre-Load Setting Each shock absorber on the scooter has 5 spring preload adjustment positions for different load or riding conditions. Position 1 is for light loads and smooth road conditions. Position 3 to 5 increase spring preload for stiffer rear suspension and can be used when the scooters heavily loaded. Be certain to adjust both shock absorbers to the same spring preload positions. Use a pin spanner to adjust the rear shock spring preload. The shock absorbers are adjustable for pre-load. There are 5 settings. Position 1 is the softest and 5 is the stiffest. Caution: Always adjust the shock absorber pre-load position in sequence (1-2-3-4-5 or 5-4-3-2-1). Attempting to adjust directly from 1 to 5 or 5 to 1 may damage the shock absorber. (Pre-Load Standard Setting: Position 3) 2‐34   
  • 35. XCITING 400i  2. PeriodicMaintenance > Tires   Tires SAFETY FIRST: Protective gloves and eyewear are recommended at this point. Check tires before each ride for wear and air pressure. Check tire air pressure before riding when tires are cold. Solo riding Cold inflation tire Dual riding pressure Front Rear Front Rear 2.00 kg/cm2(28.4 psi) 2.25 kg/cm2(32 psi) 2.00 kg/cm2(28.4 psi) 2.25 kg/cm2(32 psi) 2‐35   
  • 36. XCITING 400i  2. PeriodicMaintenance > Tires   Replace tires if the tread depth reaches the wear mark or fails to meet the minimum tread depth. Tires Front wheel Rear wheel 120/70-15 150/70-14 2‐36   
  • 37. 2. Periodic Maintenance > Valve Adjustment XCITING 400i   Valve Clearance SAFETY FIRST: Protective gloves and eyewear are recommended at this point. The valve clearance specification is only relevant if the engine is cold (below 35°C or 95°F). Inspection Remove the crankcase cover protector on the left side of the engine with a 8mm socket. Remove the timing inspection cap from the right side of the engine with a large flat blade screwdriver. Inspect the O-ring on the cap and replace it as needed. 2‐37   
  • 38. XCITING 400i 2. Periodic Maintenance > Valve Adjustment   The crankshaft must be rotate until the piston is at top dead center (TDC) on the compression stroke. Turn crankshaft clockwise until the "T" mark aligns with the index notch in the timing inspection hole. 2‐38   
  • 39. XCITING 400i 2. Periodic Maintenance > Valve Adjustment   For correct engine timing the marks on the camshaft sprocket must be even with the cylinder head mating surface at the same time the "T" mark is lined up with the with the index notch in the timing inspection hole. Also the camshaft sprocket mounting boss should be visible above the cylinder head surface. If this is not the case, rotate the crankshaft 360° clockwise until the "T" mark is once again aligned with the notch on the case cover. 2‐39   
  • 40. XCITING 400i 2. Periodic Maintenance > Valve Adjustment   Measure the valve clearance with a thickness feeler gauge. Insert the feeler gauge between the tappet adjusting screw and the valve stem. The clearance is correct when there is a light drag on the feeler gauge. The clearance is the same for the exhaust and intake valves. If the clearance is out of spec, move on to the adjustment section. Valve clearance IN: 0.10 mm EX: 0.10 mm Adjustment Use a tappet adjuster tool to adjust the valves. 2‐40   
  • 41. XCITING 400i 2. Periodic Maintenance > Valve Adjustment   ITEM SPECIAL TOOLS TOOL NO. TAPPET ADJUSTER A120E000012 DESCRIPTION Tappet adjustment Place a 9 mm box end wrench over the locknut, and loosen the locknut. If the valve clearance is tight back out the valve tappet adjusting screws with the tappet adjustment tool. If the clearance is to loose turn in the adjusting screw until there is a light drag on the feeler gauge. Hold the adjusting screw locknut in place with the wrench to make sure it doesn't interfere with the adjustment. Lubricate the tappet adjusting screw threads with fresh engine oil. Hold the adjuster in place and tighten the locknut. Always recheck the clearance after tightening the locknut. Also, recheck after turning the engine over a full 360°. Item Valve adjusting lock nut Qty 4 Thread siize (mm) Remarks kgf-m lb-ft 0.7-1.1 5 2‐41    Torque 5.06-7.96 Apply oil to thread
  • 42. XCITING 400i 2. Periodic Maintenance > Valve Adjustment   Make sure the O-rings on the timing plugs are in good condition. Replace it as needed. Install the timing inspection to the right side of the engine. Tighten the caps securely but not overly with a large flat blade screwdriver. 2‐42