Mais conteúdo relacionado
Semelhante a Windows 7-cheat-sheet (20)
Mais de William McIntosh (20)
Windows 7-cheat-sheet
- 1. Microsoft®
Windows 7
Cheat Sheet
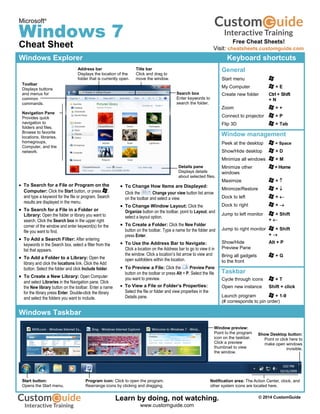
Windows Explorer Keyboard shortcuts
General
Start menu
My Computer + E
Create new folder Ctrl + Shift
+ N
Zoom + +
Connect to projector + P
Flip 3D + Tab
Window management
Peek at the desktop + Space
Show/Hide desktop + D
Minimize all windows + M
Minimize other + Home
windows
Maximize +
Minimize/Restore +
Dock to left +
Dock to right +
Jump to left monitor + Shift
+
Jump to right monitor + Shift
+
Show/Hide Alt + P
Preview Pane
Bring all gadgets + G
to the front
Taskbar
Cycle through icons + T
Open new instance Shift + click
Launch program + 1-9
(# corresponds to pin order)
To Search for a File or Program on the
Computer: Click the Start button, or press ,
and type a keyword for the file or program. Search
results are displayed in the menu.
To Search for a File in a Folder or
Library: Open the folder or library you want to
search. Click the Search box in the upper right
corner of the window and enter keyword(s) for the
file you want to find.
To Add a Search Filter: After entering
keywords in the Search box, select a filter from the
list that appears.
To Add a Folder to a Library: Open the
library and click the locations link. Click the Add
button. Select the folder and click Include folder.
To Create a New Library: Open Computer
and select Libraries in the Navigation pane. Click
the New library button on the toolbar. Enter a name
for the library press Enter. Double-click the library
and select the folders you want to include.
To Change How Items are Displayed:
Click the Change your view button list arrow
on the toolbar and select a view.
To Change Window Layout: Click the
Organize button on the toolbar, point to Layout, and
select a layout option.
To Create a Folder: Click the New Folder
button on the toolbar. Type a name for the folder and
press Enter.
To Use the Address Bar to Navigate:
Click a location on the Address bar to go to view it in
the window. Click a location’s list arrow to view and
open subfolders within the location.
To Preview a File: Click the Preview Pane
button on the toolbar or press Alt + P. Select the file
you want to preview.
To View a File or Folder’s Properties:
Select the file or folder and view properties in the
Details pane.
Windows Taskbar
Search box
Enter keywords to
search the folder.
Details pane
Displays details
about selected files.
Title bar
Click and drag to
move the window.
Toolbar
Displays buttons
and menus for
common
commands.
Navigation Pane
Provides quick
navigation to
folders and files.
Browse to favorite
locations, libraries,
homegroups,
Computer, and the
network.
Address bar
Displays the location of the
folder that is currently open.
Notification area: The Action Center, clock, and
other system icons are located here.
Window preview:
Point to the program
icon on the taskbar.
Click a preview
thumbnail to view
the window.
Start button:
Opens the Start menu.
Program icon: Click to open the program.
Rearrange icons by clicking and dragging.
Show Desktop button:
Point or click here to
make open windows
invisible.
Free Cheat Sheets!
Visit: cheatsheets.customguide.com
© 2014 CustomGuide
Free Cheat
Sheets!
Learn by doing, not watching.
www.customguide.com
- 2. Aero Jump Lists
To See Through Windows with Aero Peek: Point to the Show
Desktop button on the right edge of the taskbar or press + Space.
To View Open Windows with Aero Peek: Point to the program
icon on the taskbar that contains the file or window you want to view. Click the
thumbnail preview to view the window.
To Minimize Other Windows with Aero Shake: Click and drag a
window's title bar quickly from side to side. Or, press + Home.
To Compare Windows Side by Side with Aero Snap: Click and
drag a window's title bar to the right side of the screen, and drag the other
window to the left side of the screen. Or, press + and
+ .
To Maximize an Open Window with Aero Snap: Click and drag
the window's title bar to the top of the screen or, drag the bottom border of the
window down to the taskbar. Or, press + .
To Flip through Windows with Flip 3D: Press + Tab; continue
to hold down the key while pressing Tab to scroll through the open
windows.
Personalization
To Personalize Windows 7 Appearance and Sounds:
Right-click the desktop and select Personalize. The Personalization window
appears. Click the appropriate links to personalize these settings:
Themes – Change menus, icons, backgrounds and sounds all at once.
Desktop Background – Choose built-in colors and pictures, or use your own.
Select more than one picture to start a slide show.
Window Color – Change window color and transparency.
Sounds – Change which sounds play when you perform different tasks.
Screen Savers – Adjust what it displays and when it appears.
Desktop Icons – Add icons to the desktop, such as Computer and Network.
Mouse Pointers – Change how the pointer looks and acts, reverse buttons.
Maintenance
To Defragment your Hard Disk: Open the Computer window (click
the Start button and select Computer). Right-click the disk you want to
defragment and select Properties from the contextual menu. Click the Tools
tab and click the Defragment now button.
To Use Disk Cleanup to Free Space on Your Hard Drive:
Open the Computer window (click the Start button and select Computer),
right-click the hard disk, select Properties from the contextual menu and click
the Disk Cleanup button.
To Uninstall a Program: Click the Start button and select Control
Panel. Click the Uninstall a program link under Programs. Select the
program you wish to uninstall from your computer, and click the Uninstall
button on the toolbar.
Jump Lists are quick shortcuts to files and commands that a program uses
frequently. The items that appear in a jump list change according to the
program selected. For example, Internet Explorer displays frequently visited
pages, Microsoft Word displays frequently opened documents.
To View a Jump List: Right-click an icon on the Windows 7 taskbar. Or,
click the list arrow next to a program icon in the Start menu.
To Pin a Program to the Taskbar: Open the program you want to
pin, right-click the program icon on the taskbar and select Pin this program
to taskbar from the jump list.
To Pin an Item to the Jump List: View the program jump list. Right-
click the item you want to pin and select Pin to this list. Or, point to an item
on the jump list and click the Pin to this list button.
To Remove an Item from the Jump List: View the program jump
list. Right-click an item that appears in the jump list and select Remove from
this list from the contextual menu.
Gadgets
To Add Gadgets to the Desktop: Right-click the desktop and select
Gadgets from the contextual menu. Double-click the gadget you want to add
to the desktop.
To View Gadgets: Press + G. The gadgets on your desktop appear
on top of the windows that are open.
To Remove a Gadget from the Desktop: Point to a gadget and
click the Close button that appears.
To Download New Gadgets: Right-click the desktop and select
Gadgets from the contextual menu. Click the Get more gadgets online link
at the bottom of the window, click the Desktop gadgets tab, and click the
Download button for the gadget you want to add.
To View a Gadget’s Options: Point at the gadget, then click the
Options button to view and change settings for that gadget.
HomeGroup
To Join a Homegroup: Before you begin, make sure you have the
homegroup password. Click the Start button and select Control Panel. Click
the Network and Internet link. Click the HomeGroup link and click Join
Now. Complete the wizard and enter the homegroup password as prompted.
To Create a Homegroup: Click the Start button and select Control
Panel. Click the Network and Internet link. Click the HomeGroup link and
click Create a homegroup. Complete the wizard to create the homegroup.
Aero Peek makes open
windows invisible so you
can view the gadgets and
icons on the desktop.
Right-click an icon
on the taskbar…
…to view the jump list
for the program.
Items at the top of
the list are pinned to
the program’s
jump list.
The Frequent
section displays
files or pages that
have been
frequently used.
© 2014 CustomGuide
Free Cheat
Learn by doing, not watching.
www.customguide.com