

Recomendados
Mais conteúdo relacionado
Mais procurados
Mais procurados (20)
Destaque
Destaque (11)
Semelhante a Workshop Facilitation Plan
Semelhante a Workshop Facilitation Plan (20)
Mais de Viewpoints, University of Ulster
Mais de Viewpoints, University of Ulster (17)
Último
Último (20)
Workshop Facilitation Plan
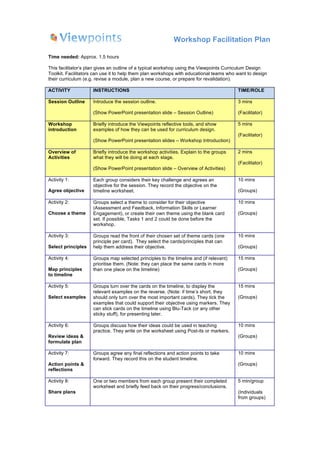
- 1. Workshop Facilitation Plan Time needed: Approx. 1.5 hours This facilitator’s plan gives an outline of a typical workshop using the Viewpoints Curriculum Design Toolkit. Facilitators can use it to help them plan workshops with educational teams who want to design their curriculum (e.g. revise a module, plan a new course, or prepare for revalidation). ACTIVITY INSTRUCTIONS TIME/ROLE Session Outline Introduce the session outline. (Show PowerPoint presentation slide – Session Outline) 3 mins (Facilitator) Workshop introduction Briefly introduce the Viewpoints reflective tools, and show examples of how they can be used for curriculum design. (Show PowerPoint presentation slides – Workshop Introduction) 5 mins (Facilitator) Overview of Activities Briefly introduce the workshop activities. Explain to the groups what they will be doing at each stage. (Show PowerPoint presentation slide – Overview of Activities) 2 mins (Facilitator) Activity 1: Agree objective Each group considers their key challenge and agrees an objective for the session. They record the objective on the timeline worksheet. 10 mins (Groups) Activity 2: Choose a theme Groups select a theme to consider for their objective (Assessment and Feedback, Information Skills or Learner Engagement), or create their own theme using the blank card set. If possible, Tasks 1 and 2 could be done before the workshop. 10 mins (Groups) Activity 3: Select principles Groups read the front of their chosen set of theme cards (one principle per card). They select the cards/principles that can help them address their objective. 10 mins (Groups) Activity 4: Map principles to timeline Groups map selected principles to the timeline and (if relevant) prioritise them. (Note: they can place the same cards in more than one place on the timeline) 15 mins (Groups) Activity 5: Select examples Groups turn over the cards on the timeline, to display the relevant examples on the reverse. (Note: if time’s short, they should only turn over the most important cards). They tick the examples that could support their objective using markers. They can stick cards on the timeline using Blu-Tack (or any other sticky stuff), for presenting later. 15 mins (Groups) Activity 6: Review ideas & formulate plan Groups discuss how their ideas could be used in teaching practice. They write on the worksheet using Post-its or markers. 10 mins (Groups) Activity 7: Action points & reflections Groups agree any final reflections and action points to take forward. They record this on the student timeline. 10 mins (Groups) Activity 8: Share plans One or two members from each group present their completed worksheet and briefly feed back on their progress/conclusions. 5 min/group (Individuals from groups)