HMCS Vancouver Pre-Deployment Brief - May 2024 (Web Version).pptx
Bandicam5.0(April 2021)
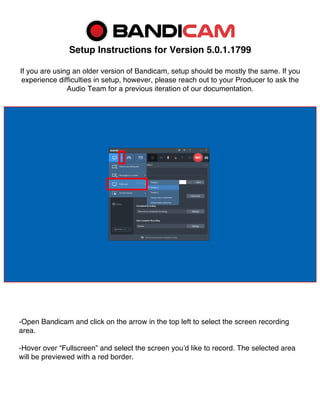
1. Setup Instructions for Version 5.0.1.1799
If you are using an older version of Bandicam, setup should be mostly the same. If you
experience difficulties in setup, however, please reach out to your Producer to ask the
Audio Team for a previous iteration of our documentation.
-Open Bandicam and click on the arrow in the top left to select the screen recording
area.
-Hover over “Fullscreen” and select the screen you’d like to record. The selected area
will be previewed with a red border.
2. -Navigate to the “General” tab on the left side of Bandicam and click on Advanced.
-In the Output tab, select the folder in which you will save the recorded movies.
-Set the “File naming settings” dropdown menus to Custom Prefix and Date/Time.
-Set the Custom Prefix text field to “AdminID_XX_XX_XR30”
3. -Navigate to the “Video” tab in the Bandicam menu.
-Set your preferred Record/Stop Hotkey, and ensure the box is checked.
-Ensure the “Show mouse cursor” box is checked.
-Click on the “Settings” button under the Record section and click on the Sound tab.
-Ensure the “Record sound” box is checked and the “Save audio tracks while recording
(.wav)” box remains unchecked.
-Under the “Primary Sound Device” section, select – Disable -- from the first
dropdown.
-Select Digital Audio Interface (USBPre2) from the “Microphone” dropdown. If you
are using a Scarlett Solo, please select the Focusrite option instead.
-Set the “Volume” slider to at least 80% (we recommend between 90 and 100).
-Select the – Disable (Recommended) – setting from the Secondary dropdown menu.
4. -Navigate to the Speakers “Settings” menu and set
the USBPre2 (or Scarlett Solo) as default.
-Click “Properties,” go to the “Advanced” tab, and
set the format to 16 bit, 48000 Hz (DVD Quality).
-Click on “Filter” and set the
“Noise Suppression” filter to Off.
-Navigate to the Microphone “Settings” menu and set the USBPre2
(or Scarlett Solo) as default.
-Click “Properties,” navigate to the “Advanced” tab, and set the
format to 2 channel, 16 bit, 48000 Hz (DVD Quality).
5. -Click on the “Options” tab in the
Record settings menu.
-Set the “Recording priority” to [High]
Higher than normal priority.
-Ensure that the “Play sound effects”
box is checked.
-Check the “Show countdown timer”
box.
-Leave the “Use enhanced capture
method” box unchecked.
-Return to the Bandicam
Video tab.
-Click on the “Settings”
button under the “Format”
section.
6. -Click on the ellipses next to the “FPS”
dropdown.
-Select Prefer CFR – Constant Frame Rate
-Click on the ellipses next to the “Codec”
dropdown.
-Set “Rate control” to VBR – quality-based
-Set “Optimization” to Faster encoding speed
-Set the “Keyframe interval” to 60
-Under the “Video” section, set the “Size”
dropdown to Full Size.
-Set the “FPS” dropdown to 30.
-Set the “Codec” dropdown to H264
(CPU).
-Set the “Quality” dropdown to 80.
*Note: this option may not be available
until the ellipses menus are set up.*
-Select MP4 as the “File Type.”
-Under the “Audio” section, set the
“Codec” to AAC.
-Set the “Bitrate” to 192 kbps.
-Set the “Channels” to Stereo.
-Set the “Frequency” to 48000 Hz. After this step, you should
be all set to begin recording!