The Most Attractive Pune Call Girls Manchar 8250192130 Will You Miss This Cha...
Computer Networks Omnet
1. 2/3/2016
https://omnetpp.org/doc/omnetpp/tictoctutorial/part1.html 1/7
Main Page Related Pages Namespaces Classes Files
UP: Contents
application area of OMNeT++ is the simulation of telecommunications networks.
begin with a "network" that consists of two nodes. The nodes will do something simple: one of the nodes will create a packet, and the two nodes will keep
passing the same packet back and forth. We'll call the nodes "tic" and "toc".
1. Create a working directory called tictoc, and cd to this directory.
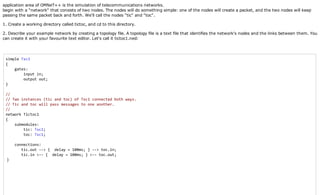
2. Describe your example network by creating a topology file. A topology file is a text file that identifies the network's nodes and the links between them. You
can create it with your favourite text editor. Let's call it tictoc1.ned:
simple Txc1
{
gates:
input in;
output out;
}
//
// Two instances (tic and toc) of Txc1 connected both ways.
// Tic and toc will pass messages to one another.
//
network Tictoc1
{
submodules:
tic: Txc1;
toc: Txc1;
connections:
tic.out ‐‐> { delay = 100ms; } ‐‐> toc.in;
tic.in <‐‐ { delay = 100ms; } <‐‐ toc.out;
}
2. 2/3/2016 Tictoc Tutorial: 1. Getting started
https://omnetpp.org/doc/omnetpp/tictoctutorial/part1.html 2/7
Tictoc1 is a network, which is assembled from two submodules, tic and toc. tic and toc are instances of the same module type called Txc1. We connect
tic's output gate (named out) to toc's input gate (named in), and vica versa (network ... { ... }). There will be a 100ms propagation delay both
ways;
Txc1 is a simple module type (which means it is atomic on NED level, and will be implemented in C++). Txc1 has one input gate named in, and one
output gate named out (simple ... { ... }).
3. We now need to implement the functionality of the simple module Txc1. This is achieved by writing a C++ file txc1::cc:
#include <string.h>
#include <omnetpp.h>
class Txc1 : public cSimpleModule
{
protected:
// The following redefined virtual function holds the algorithm.
virtual void initialize();
virtual void handleMessage(cMessage *msg);
};
// The module class needs to be registered with OMNeT++
Define_Module(Txc1);
void Txc1::initialize()
{ // Initialize is called at the beginning of the simulation.
// To bootstrap the tic‐toc‐tic‐toc process, one of the modules needs
// to send the first message. Let this be `tic'.
// Am I Tic or Toc?
if (strcmp("tic", getName()) == 0)
{
// create and send first message on gate "out". "tictocMsg" is an
// arbitrary string which will be the name of the message object.
cMessage *msg = new cMessage("tictocMsg");
send(msg, "out");
}
}
3. 2/3/2016 Tictoc Tutorial: 1. Getting started
https://omnetpp.org/doc/omnetpp/tictoctutorial/part1.html 3/7
void Txc1::handleMessage(cMessage *msg)
{ // The handleMessage() method is called whenever a message arrives
// at the module. Here, we just send it to the other module, through
// gate `out'. Because both `tic' and `toc' does the same, the message
// will bounce between the two.
send(msg, "out");
}
The Txc1 simple module type is represented by the C++ class Txc1, which has to be subclassed from cSimpleModule, and registered in OMNeT++ with the
Define_Module() macro. We redefine two methods from cSimpleModule: initialize() and handleMessage(). They are invoked from the simulation kernel: the
first one only once, and the second one whenever a message arrives at the module.
In initialize() we create a message object (cMessage), and send it out on gate out. Since this gate is connected to the other module's input gate, the
simulation kernel will deliver this message to the other module in the argument to handleMessage() after a 100ms propagation delay assigned to the link
in the NED file. The other module just sends it back (another 100ms delay), so it will result in a continuous pingpong.
Messages (packets, frames, jobs, etc) and events (timers, timeouts) are all represented by cMessage objects (or its subclasses) in OMNeT++. After you send
or schedule them, they will be held by the simulation kernel in the "scheduled events" or "future events" list until their time comes and they are delivered to
the modules via handleMessage().
Note that there is no stopping condition built into this simulation: it would continue forever. You will be able to stop it from the GUI. (You could also specify a
simulation time limit or CPU time limit in the configuration file, but we don't do that in the tutorial.)
4. We now create the Makefile which will help us to compile and link our program to create the executable tictoc:
$ opp_makemake
This command should have now created a Makefile in the working directory tictoc.
4. 2/3/2016 Tictoc Tutorial: 1. Getting started
https://omnetpp.org/doc/omnetpp/tictoctutorial/part1.html 4/7
OMNEST.
5. Let's now compile and link our very first simulation by issuing the make command:
$ make
If there are compilation errors, you need to rectify those and repeat the make until you get an errorfree compilation and linking.
6. If you start the executable now, it will complain that it cannot find the file omnetpp.ini, so you have to create one. omnetpp.ini tells the simulation
program which network you want to simulate (yes, several networks can live in the same simulation program), you can pass parameters to the model,
explicitly specify seeds for the random number generators etc.
Create the following very simple omnetpp.ini:
[General]
network = Tictoc1
tictoc2 and further steps will all share the following omnetpp.ini:
# This file is shared by all tictoc simulations.
# Lines beginning with `#' are comments
[General]
# nothing here
[Config Tictoc1]
network = Tictoc1
[Config Tictoc2]
network = Tictoc2
[Config Tictoc3]
network = Tictoc3
[Config Tictoc4]
network = Tictoc4
Tictoc4.toc.limit = 5
[Config Tictoc5]
network = Tictoc5
6. 2/3/2016 Tictoc Tutorial: 1. Getting started
https://omnetpp.org/doc/omnetpp/tictoctutorial/part1.html 6/7
$ ./tictoc
and hopefully you should now get the OMNeT++ simulation window.
8. Press the Run button on the toolbar to start the simulation. What you should see is that tic and toc are exchanging messages with each other.
The main window toolbar displays the simulated time. This is virtual time, it has nothing to do with the actual (or wallclock) time that the program takes to
execute. Actually, how many seconds you can simulate in one realworld second depends highly on the speed of your hardware and even more on the nature
and complexity of the simulation model itself.Note that it takes zero simulation time for a node to process the message. The only thing that makes the
simulation time pass in this model is the propagation delay on the connections.9. You can play with slowing down the animation or making it faster with the
slider at the top of the graphics window. You can stop the simulation by hitting F8 (equivalent to the STOP button on the toolbar), single
step through it (F4), run it with (F5) or without (F6) animation. F7 (express mode) completely turns off tracing features for maximum speed. Note the event/
sec and simsec/sec gauges on the status bar of the main window.10. You can exit the simulation program by clicking its Close icon or choosing File|Exit.
10. You can exit the simulation program by clicking its Close icon or choosing File|Exit.
7. 2/3/2016 Tictoc Tutorial: 2. Enhancing the 2node TicToc
https://omnetpp.org/doc/omnetpp/tictoctutorial/part2.html 1/12
Main Page Related Pages Namespaces Classes Files Directories
2. Enhancing the 2node TicToc
PREV: 1. Getting started UP: Contents
Step 2: Refining the graphics, and adding debugging output
Here we make the model look a bit prettier in the GUI. We assign the "block/routing" icon (the file images/block/routing.png), and paint it cyan for tic and
yellow for toc. This is achieved by adding display strings to the NED file. The i= tag in the display string specifies the icon.
// "block/routing" icon to the simple module. All submodules of type
// Txc2 will use this icon by default
//
simple Txc2
{
parameters:
@display("i=block/routing"); // add a default icon
gates:
input in;
output out;
}
//
// Make the two module look a bit different with colorization effect.
// Use cyan for `tic', and yellow for `toc'.
//
network Tictoc2
{
submodules:
tic: Txc2 {
parameters:
@display("i=,cyan"); // do not change the icon (first arg of i=) just colorize it
}
toc: Txc2 {
parameters:
@display("i=,gold"); // here too
}
connections:
You can see the result here:
10. 2/3/2016 Tictoc Tutorial: 2. Enhancing the 2node TicToc
https://omnetpp.org/doc/omnetpp/tictoctutorial/part2.html 4/12
In this step we add a counter to the module, and delete the message after ten exchanges.
We add the counter as a class member:
class Txc3 : public cSimpleModule
{
private:
int counter; // Note the counter here
protected:
We set the variable to 10 in initialize() and decrement in handleMessage(), that is, on every message arrival. After it reaches zero, the simulation will run out
of events and terminate.
Note the
WATCH(counter);
line in the source: this makes it possible to see the counter value in Tkenv. Doubleclick on tic's icon, then choose the Contents page from the inspector
window that pops up.
As you continue running the simulation, you can follow as the counter keeps decrementing until it reaches zero.
Step 4: Adding parameters
12. 2/3/2016 Tictoc Tutorial: 2. Enhancing the 2node TicToc
https://omnetpp.org/doc/omnetpp/tictoctutorial/part2.html 6/12
Tictoc4.toc.limit = 5
Note that because omnetpp.ini supports wildcards, and parameters assigned from NED files take precedence over the ones in omnetpp.ini, we could have
used
Tictoc4.t*c.limit=5
or
Tictoc4.*.limit=5
or even
**.limit=5
with the same effect. (The difference between * and ** is that * will not match a dot and ** will.)
In Tkenv, you can inspect module parameters either in the object tree on the lefthand side of the main window, or in the Parameters page of the module
inspector (opened via doubleclicking on the module icon).
The module with the smaller limit will delete the message and thereby conclude the simulation.
Step 5: Using inheritance
If we take a closer look at the NED file we will realize that tic and toc differs only in their parameter values and their display string. We can create a new
simple module type by inheriting from an other one and specifying or overriding some of its parameters. In our case we will derive two simple module types
(Tic and Toc). Later we can use these types when defining the submodules in the network.
Deriving from an existing simple module is easy. Here is the base module:
simple Txc5
{
parameters:
bool sendMsgOnInit = default(false);
int limit = default(2);
@display("i=block/routing");
gates:
input in;
output out;
}
And here is the derived module. We just simply specify the parameter values and add some display properties.
13. 2/3/2016 Tictoc Tutorial: 2. Enhancing the 2node TicToc
https://omnetpp.org/doc/omnetpp/tictoctutorial/part2.html 7/12
simple Tic5 extends Txc5
{
parameters:
@display("i=,cyan");
sendMsgOnInit = true; // Tic modules should send a message on init
}
The Toc module looks similar, but with different parameter values.
simple Toc5 extends Txc5
{
parameters:
@display("i=,gold");
sendMsgOnInit = false; // Toc modules should NOT send a message on init
}
Note:
The C++ implementation is inherited from the base simple module (Txc4).
Once we created the new simple modules, we can use them as submodule types in our network:
network Tictoc5
{
submodules:
tic: Tic5; // the limit parameter is still unbound here. We will get it from the ini file
toc: Toc5;
connections:
As you can see, the network definition is much shorter and simpler now. Inheritance allows you to use common types in your network and avoid redundant
definitions and parameter settings.
Step 6: Modeling processing delay
In the previous models, tic and toc immediately sent back the received message. Here we'll add some timing: tic and toc will hold the message for 1
simulated second before sending it back. In OMNeT++ such timing is achieved by the module sending a message to itself. Such messages are called self
messages (but only because of the way they are used, otherwise they are ordinary message objects).
We added two cMessage * variables, event and tictocMsg to the class, to remember the message we use for timing and message whose processing delay we
are simulating.
class Txc6 : public cSimpleModule
{
private:
cMessage *event; // pointer to the event object which we'll use for timing
15. 2/3/2016 Tictoc Tutorial: 2. Enhancing the 2node TicToc
https://omnetpp.org/doc/omnetpp/tictoctutorial/part2.html 9/12
Step 7: Random numbers and parameters
In this step we'll introduce random numbers. We change the delay from 1s to a random value which can be set from the NED file or from omnetpp.ini.
Module parameters are able to return random variables; however, to make use of this feature we have to read the parameter in handleMessage() every time
we use it.
// The "delayTime" module parameter can be set to values like
// "exponential(5)" (tictoc7.ned, omnetpp.ini), and then here
// we'll get a different delay every time.
simtime_t delay = par("delayTime");
EV << "Message arrived, starting to wait " << delay << " secs...n";
tictocMsg = msg;
scheduleAt(simTime()+delay, event);
In addition, we'll "lose" (delete) the packet with a small (hardcoded) probability.
16. 2/3/2016 Tictoc Tutorial: 2. Enhancing the 2node TicToc
https://omnetpp.org/doc/omnetpp/tictoctutorial/part2.html 10/12
if (uniform(0,1) < 0.1)
{
EV << ""Losing" messagen";
delete msg;
}
We'll assign the parameters in omnetpp.ini:
Tictoc7.tic.delayTime = exponential(3s)
Tictoc7.toc.delayTime = truncnormal(3s,1s)
You can try that no matter how many times you rerun the simulation (or restart it, Simulate|Rebuild network menu item), you'll get exactly the same
results. This is because OMNeT++ uses a deterministic algorithm (by default the Mersenne Twister RNG) to generate random numbers, and initializes it to
the same seed. This is important for reproducible simulations. You can experiment with different seeds if you add the following lines to omnetpp.ini:
[General]
seed‐0‐mt=532569 # or any other 32‐bit value
From the syntax you have probably guessed that OMNeT++ supports more than one RNGs. That's right, however, all models in this tutorial use RNG 0.
Step 8: Timeout, cancelling timers
In order to get one step closer to modelling networking protocols, let us transform our model into a stopandwait simulation. This time we'll have separate
classes for tic and toc. The basic scenario is similar to the previous ones: tic and toc will be tossing a message to one another. However, toc will "lose" the
message with some nonzero probability, and in that case tic will have to resend it.
Here's toc's code:
void Toc8::handleMessage(cMessage *msg)
{
if (uniform(0,1) < 0.1)
{
EV << ""Losing" message.n";
bubble("message lost"); // making animation more informative...
delete msg;
}
else
Thanks to the bubble() call in the code, toc'll display a callout whenever it drops the message.
17. 2/3/2016 Tictoc Tutorial: 2. Enhancing the 2node TicToc
https://omnetpp.org/doc/omnetpp/tictoctutorial/part2.html 11/12
So, tic will start a timer whenever it sends the message. When the timer expires, we'll assume the message was lost and send another one. If toc's reply
arrives, the timer has to be cancelled. The timer will be (what else?) a selfmessage.
scheduleAt(simTime()+timeout, timeoutEvent);
Cancelling the timer will be done with the cancelEvent() call. Note that this does not prevent us from being able to reuse the same timeout message over
and over.
cancelEvent(timeoutEvent);
Step 9: Retransmitting the same message
In this step we refine the previous model. There we just created another packet if we needed to retransmit. This is OK because the packet didn't contain
much, but in real life it's usually more practical to keep a copy of the original packet so that we can resend it without the need to build it again.
What we do here is keep the original packet and send only copies of it. We delete the original when toc's acknowledgement arrives. To make it easier to
visually verify the model, we'll include a message sequence number the message names.
In order to avoid handleMessage() growing too large, we'll put the corresponding code into two new functions, generateNewMessage() and sendCopyOf() and
call them from handleMessage().
18. 2/3/2016 Tictoc Tutorial: 2. Enhancing the 2node TicToc
https://omnetpp.org/doc/omnetpp/tictoctutorial/part2.html 12/12
The functions:
cMessage *Tic9::generateNewMessage()
{
// Generate a message with a different name every time.
char msgname[20];
sprintf(msgname, "tic‐%d", ++seq);
cMessage *msg = new cMessage(msgname);
return msg;
}
void Tic9::sendCopyOf(cMessage *msg)
{
// Duplicate message and send the copy.
cMessage *copy = (cMessage *) msg‐>dup();
send(copy, "out");
}
NEXT: 3. Turning it into a real network
Generated on Tue Dec 2 11:16:33 2014 for Tictoc Tutorial by 1.6.3
19. 2/3/2016 Tictoc Tutorial: 3. Turning it into a real network
https://omnetpp.org/doc/omnetpp/tictoctutorial/part3.html 1/8
Main Page Related Pages Namespaces Classes Files Directories
3. Turning it into a real network
PREV: 2. Enhancing the 2node TicToc UP: Contents
Step 10: More than two nodes
Now we'll make a big step: create several tic modules and connect them into a network. For now, we'll keep it simple what they do: one of the nodes
generates a message, and the others keep tossing it around in random directions until it arrives at a predetermined destination node.
The NED file will need a few changes. First of all, the Txc module will need to have multiple input and output gates:
simple Txc10
{
parameters:
@display("i=block/routing");
gates:
input in[]; // declare in[] and out[] to be vector gates
output out[];
}
The [ ] turns the gates into gate vectors. The size of the vector (the number of gates) will be determined where we use Txc to build the network.
network Tictoc10
{
submodules:
tic[6]: Txc10;
connections:
tic[0].out++ ‐‐> { delay = 100ms; } ‐‐> tic[1].in++;
tic[0].in++ <‐‐ { delay = 100ms; } <‐‐ tic[1].out++;
tic[1].out++ ‐‐> { delay = 100ms; } ‐‐> tic[2].in++;
tic[1].in++ <‐‐ { delay = 100ms; } <‐‐ tic[2].out++;
tic[1].out++ ‐‐> { delay = 100ms; } ‐‐> tic[4].in++;
tic[1].in++ <‐‐ { delay = 100ms; } <‐‐ tic[4].out++;
tic[3].out++ ‐‐> { delay = 100ms; } ‐‐> tic[4].in++;
tic[3].in++ <‐‐ { delay = 100ms; } <‐‐ tic[4].out++;
tic[4].out++ ‐‐> { delay = 100ms; } ‐‐> tic[5].in++;
tic[4].in++ <‐‐ { delay = 100ms; } <‐‐ tic[5].out++;
}
21. 2/3/2016 Tictoc Tutorial: 3. Turning it into a real network
https://omnetpp.org/doc/omnetpp/tictoctutorial/part3.html 3/8
void Txc10::forwardMessage(cMessage *msg)
{
// In this example, we just pick a random gate to send it on.
// We draw a random number between 0 and the size of gate `out[]'.
int n = gateSize("out");
int k = intuniform(0,n‐1);
EV << "Forwarding message " << msg << " on port out[" << k << "]n";
send(msg, "out", k);
}
When the message arrives at tic[3], its handleMessage() will delete the message.
Step 11: Channels and inner type definitions
Our new network definition is getting quite complex and long, especially the connections section. Let's try to simplify it. The first thing we notice is that the
connections always use the same delay parameter. It is possible to create types for the connections (they are called channels) similarly to simple modules.
We should create a channel type which specifies the delay parameter and we will use that type for all connections in the network.
network Tictoc11
{
types:
channel Channel extends ned.DelayChannel {
delay = 100ms;
}
submodules:
As you have noticed we have defined the new channel type inside the network definition by adding a types section. This type definition is only visible inside
the network. It is called as a local or inner type. You can use simple modules as inner types too, if you wish.
Note:
We have created the channel by specializing the builtin DelayChannel. (builtin channels can be found inside the ned package. Thats why we used the
full type name ned.DelayChannel) after the extends keyword.
Now let's check how the connections section changed.
connections:
22. 2/3/2016 Tictoc Tutorial: 3. Turning it into a real network
https://omnetpp.org/doc/omnetpp/tictoctutorial/part3.html 4/8
tic[0].out++ ‐‐> Channel ‐‐> tic[1].in++;
tic[0].in++ <‐‐ Channel <‐‐ tic[1].out++;
tic[1].out++ ‐‐> Channel ‐‐> tic[2].in++;
tic[1].in++ <‐‐ Channel <‐‐ tic[2].out++;
tic[1].out++ ‐‐> Channel ‐‐> tic[4].in++;
tic[1].in++ <‐‐ Channel <‐‐ tic[4].out++;
tic[3].out++ ‐‐> Channel ‐‐> tic[4].in++;
tic[3].in++ <‐‐ Channel <‐‐ tic[4].out++;
tic[4].out++ ‐‐> Channel ‐‐> tic[5].in++;
tic[4].in++ <‐‐ Channel <‐‐ tic[5].out++;
}
As you see we just specify the channel name inside the connection definition. This allows to easily change the delay parameter for the whole network.
Step 12: Using twoway connections
If we check the connections section a little more, we will realize that each node pair is connected with two connections. One for each direction. OMNeT++ 4
supports two way connections, so let's use them.
First of all, we have to define twoway (or so called inout) gates instead of the separate input and output gates we used previously.
simple Txc12
{
parameters:
@display("i=block/routing");
gates:
inout gate[]; // declare two way connections
}
The new connections section would look like this:
connections:
tic[0].gate++ <‐‐> Channel <‐‐> tic[1].gate++;
tic[1].gate++ <‐‐> Channel <‐‐> tic[2].gate++;
tic[1].gate++ <‐‐> Channel <‐‐> tic[4].gate++;
tic[3].gate++ <‐‐> Channel <‐‐> tic[4].gate++;
tic[4].gate++ <‐‐> Channel <‐‐> tic[5].gate++;
}
23. 2/3/2016 Tictoc Tutorial: 3. Turning it into a real network
https://omnetpp.org/doc/omnetpp/tictoctutorial/part3.html 5/8
We have modified the gate names so we have to make some modifications to the C++ code.
void Txc12::forwardMessage(cMessage *msg)
{
// In this example, we just pick a random gate to send it on.
// We draw a random number between 0 and the size of gate `gate[]'.
int n = gateSize("gate");
int k = intuniform(0,n‐1);
EV << "Forwarding message " << msg << " on gate[" << k << "]n";
// $o and $i suffix is used to identify the input/output part of a two way gate
send(msg, "gate$o", k);
}
Note:
The special $i and $o suffix after the gate name allows us to use the connection's two direction separately.
Step 13: Defining our message class
In this step the destination address is no longer hardcoded tic[3] we draw a random destination, and we'll add the destination address to the message.
The best way is to subclass cMessage and add destination as a data member. Handcoding the message class is usually tedious because it contains a lot of
boilerplate code, so we let OMNeT++ generate the class for us. The message class specification is in tictoc13.msg:
message TicTocMsg13
{
int source;
int destination;
int hopCount = 0;
}
The makefile is set up so that the message compiler, opp_msgc is invoked and it generates tictoc13_m.h and tictoc13_m.cc from the message declaration.
They will contain a generated TicTocMsg13 class subclassed from cMessage; the class will have getter and setter methods for every field.
We'll include tictoc13_m.h into our C++ code, and we can use TicTocMsg13 as any other class.
#include "tictoc13_m.h"
For example, we use the following lines in generateMessage() to create the message and fill its fields.
TicTocMsg13 *msg = new TicTocMsg13(msgname);
msg‐>setSource(src);
24. 2/3/2016 Tictoc Tutorial: 3. Turning it into a real network
https://omnetpp.org/doc/omnetpp/tictoctutorial/part3.html 6/8
msg‐>setDestination(dest);
return msg;
Then, handleMessage() begins like this:
void Txc13::handleMessage(cMessage *msg)
{
TicTocMsg13 *ttmsg = check_and_cast<TicTocMsg13 *>(msg);
if (ttmsg‐>getDestination()==getIndex())
In the argument to handleMessage(), we get the message as a cMessage * pointer. However, we can only access its fields defined in TicTocMsg13 if we cast
msg to TicTocMsg13 *. Plain Cstyle cast ((TicTocMsg13 *)msg) is not safe because if the message is not a TicTocMsg13 after all the program will just crash,
causing an error which is difficult to explore.
C++ offers a solution which is called dynamic_cast. Here we use check_and_cast<>() which is provided by OMNeT++: it tries to cast the pointer via
dynamic_cast, and if it fails it stops the simulation with an error message, similar to the following:
In the next line, we check if the destination address is the same as the node's address. The getIndex() member function returns the index of the module in
the submodule vector (remember, in the NED file we declarared it as tic: Txc13[6], so our nodes have addresses 0..5).
To make the model execute longer, after a message arrives to its destination the destination node will generate another message with a random destination
address, and so forth. Read the full code: txc13.cc.
When you run the model, it'll look like this:
26. 2/3/2016 Tictoc Tutorial: 3. Turning it into a real network
https://omnetpp.org/doc/omnetpp/tictoctutorial/part3.html 8/8
Exercise: In this model, there is only one message underway at any given moment: nodes only generate a message when another message arrives at them.
We did it this way to make it easier to follow the simulation. Change the module class so that instead, it generates messages periodically. The interval
between messages should be a module parameter, returning exponentially distributed random numbers.
NEXT: 4. Adding statistics collection
Generated on Tue Dec 2 11:16:33 2014 for Tictoc Tutorial by 1.6.3
27. 2/3/2016 Tictoc Tutorial: 4. Adding statistics collection
https://omnetpp.org/doc/omnetpp/tictoctutorial/part4.html 1/8
Main Page Related Pages Namespaces Classes Files Directories
4. Adding statistics collection
Step 14: Displaying the number of packets sent/received
To get an overview at runtime how many messages each node sent or received, we've added two counters to the module class: numSent and numReceived.
class Txc14 : public cSimpleModule
{
private:
long numSent;
long numReceived;
protected:
They are set to zero and WATCH'ed in the initialize() method. Now we can use the Find/inspect objects dialog (Inspect menu; it is also on the toolbar) to
learn how many packets were sent or received by the various nodes.
32. 2/3/2016 Tictoc Tutorial: 4. Adding statistics collection
https://omnetpp.org/doc/omnetpp/tictoctutorial/part4.html 6/8
When you think enough data has been collected, you can stop the simulation and then we'll analyse the result files (Tictoc15‐0.vec and Tictoc15‐
0.sca) offline. You'll need to choose Simulate|Call finish() from the menu (or click the corresponding toolbar button) before exiting this will cause the finish()
functions to run and data to be written into Tictoc15‐0.sca.
Step 16: Statistic collection without modifying your model
In the previous step we have added statistic collection to our model. While we can compute and save any value we wish, usually it is not known at the time
of writing the model, what data the enduser will need.
OMNeT++ 4.1 provides an additional mechanism to record values and events. Any model can emit 'signals' that can carry a value or an object. The model
writer just have to decide what signals to emit, what data to attach to them and when to emit them. The enduser can attach 'listeners' to these signals that
can process or record these data items. This way the model code does not have to contain any code that is specific to the statistics collection and the enduser
can freely add additional statistics without even looking into the C++ code.
We will rewrite the statistic collection introduced in the last step to use signals. First of all, we can safely remove all statistic related variables from our
module. There is no need for the cOutVector and cLongHistogram classes either. We will need only a single signal that carries the hopCount of the message at
the time of message arrival at the destination.
33. 2/3/2016 Tictoc Tutorial: 4. Adding statistics collection
https://omnetpp.org/doc/omnetpp/tictoctutorial/part4.html 7/8
First we need to define our signal. The arrivalSignal is just an identifier that can be used later to easily refer to our signal.
class Txc16 : public cSimpleModule
{
private:
simsignal_t arrivalSignal;
protected:
We must register all signals before using them. The best place to do this is the initialize() method of the module.
void Txc16::initialize()
{
arrivalSignal = registerSignal("arrival");
// Module 0 sends the first message
if (getIndex()==0)
Now we can emit our signal, when the message has arrived to the destination node.
void Txc16::handleMessage(cMessage *msg)
{
TicTocMsg16 *ttmsg = check_and_cast<TicTocMsg16 *>(msg);
if (ttmsg‐>getDestination()==getIndex())
{
// Message arrived
int hopcount = ttmsg‐>getHopCount();
// send a signal
emit(arrivalSignal, hopcount);
EV << "Message " << ttmsg << " arrived after " << hopcount << " hops.n";
As we do not have to save or store anything manually, the finish() method can be deleted. We no longer need it.
The last step is that we have to define the emitted signal also in the NED file. Declaring signals in the NED file allows you to have all information about your
module in one place. You will see the parameters it takes, its input and output gates, and also the signals and statistics it provides.
simple Txc16
{
parameters:
@signal[arrival](type="long");
@statistic[hopCount](title="hop count"; source="arrival"; record=vector,stats; interpolationmode=none);
@display("i=block/routing");
34. 2/3/2016 Tictoc Tutorial: 4. Adding statistics collection
https://omnetpp.org/doc/omnetpp/tictoctutorial/part4.html 8/8
Now we can define also a statistic that should be collected by default. Our previous example has collected statistics (max,min,mean,count etc) about the hop
count of the arriving messages, so let's collect the same data here too.
The source key specifies the signal we want our statistic to attach to. The record key can be used to tell what should be done with the received data. In our
case we sepcify that each value must be saved in a vector file (vector) and also we need to calculate min,max,mean,count etc. (stats). (NOTE: stats is just a
shorthand for min, max, mean, sum, count etc.) With this step we have finished our model.
Now we have just realized that we would like to see a histogram of the hopCount on the tic[1] module. On the other hand we are short on disk storage and
we are not interested having the vector data for the first three module tic 0,1,2. No problem. We can add our histogram and remove the unneeded vector
recording without even touching the C++ or NED files. Just open the INI file and modify the statistic recording:
[Config Tictoc16]
network = Tictoc16
**.tic[1].hopCount.result‐recording‐modes = +histogram
**.tic[0..2].hopCount.result‐recording‐modes = ‐vector
We can configure a wide range of statistics without even looking into the C++ code, provided that the original model emits the necessary signals for us.
NEXT: 5. Visualizing the results with the OMNeT++ IDE
Generated on Tue Dec 2 11:16:33 2014 for Tictoc Tutorial by 1.6.3
35. 2/3/2016 Tictoc Tutorial: 5. Visualizing the results with the OMNeT++ IDE
https://omnetpp.org/doc/omnetpp/tictoctutorial/part5.html 1/5
Main Page Related Pages Namespaces Classes Files Directories
5. Visualizing the results with the OMNeT++ IDE
Visualizing output scalars and vectors
The OMNeT++ IDE can help you to analyze your results. It supports filtering, processing and displaying vector and scalar data, and can display histograms
too. The following diagrams have been created with the Result Analysis tool of the IDE.
Our last model records the hopCount of a message each time the message reaches its destination. The following plot shows these vectors for nodes 0 and 1.
If we apply a mean operation we can see how the hopCount in the different nodes converge to an average: