Samsung Camera ST10 User Manual
•
1 gostou•2,225 visualizações

Samsung Camera ST10 User Manual

Recomendados
Mais conteúdo relacionado
Mais procurados
Mais procurados (20)
Semelhante a Samsung Camera ST10 User Manual
Semelhante a Samsung Camera ST10 User Manual (20)
Mais de Imaging Samsung
Mais de Imaging Samsung (9)
Último
Último (20)
Samsung Camera ST10 User Manual
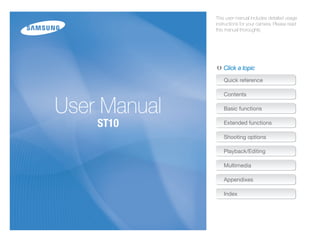
- 1. This user manual includes detailed usage instructions for your camera. Please read this manual thoroughly. Click a topic Quick reference Contents User Manual Basic functions ST10 Extended functions Shooting options Playback/Editing Multimedia Appendixes Index
- 2. Health and safety information Always comply with the following precautions and usage tips to avoid dangerous situations and ensure peak performance of your camera. Prevent damage to subjects’ eyesight Warning—situations that could cause injury to yourself or others Do not use the flash in close proximity (closer than 1 m/3 ft) to people or animals. Using the flash too close to your subject’s Caution—situations that could cause damage to your eyes can cause temporary or permanent damage. camera or other equipment Handle and dispose of batteries and chargers with care Note—notes, usage tips, or additional information Use only Samsung-approved batteries and chargers. Incompatible batteries and chargers can cause serious injuries or damage to your camera. Never dispose of batteries in a fire. Follow all local regulations Safety warnings when disposing of used batteries. Never place batteries or cameras on or in heating devices, Do not use your camera near flammable or explosive such as microwave ovens, stoves, or radiators. Batteries may gases and liquids explode when overheated. Do not use your camera near fuels, combustibles, or flammable chemicals. Do not store or carry flammable liquids, gases, or explosive materials in the same compartment as the camera or its Safety precautions accessories. Handle and store your camera carefully and sensibly Keep your camera away from small children and pets Do not allow your camera to get wet—liquids can cause serious Keep your camera and all accessories out of the reach of small damage. Do not handle your camera with wet hands. Water children and animals. Small parts may cause choking or serious damage to your camera can void your manufacturer’s warranty. injury if swallowed. Moving parts and accessories may present physical dangers as well. 1
- 3. Health and safety information Do not expose the camera to direct sunlight or high Protect batteries, chargers, and memory cards from temperatures for an extended period of time. Prolonged damage exposure to sunlight or extreme temperatures can cause permanent damage to your camera’s internal components. Avoid exposing batteries or memory cards to very cold or very hot temperatures (below 0º C/32º F or above 40º C/104º F). Avoid using or storing your camera in dusty, dirty, humid, or Extreme temperatures can reduce the charging capacity of your poorly-ventilated areas to prevent damage to moving parts and batteries and can cause memory cards to malfunction. internal components. Prevent batteries from making contact with metal objects, as Remove the batteries from your camera when storing it for an this can create a connection between the + and – terminals extended period of time. Installed batteries may leak or corrode of your battery and lead to temporary or permanent battery over time and cause serious damage to your camera. damage. Protect your camera from sand and dirt when using it on Prevent memory cards from making contact with liquids, dirt, or beaches or in other similar areas. foreign substances. If dirty, wipe the memory card clean with a Protect your camera and monitor from impact, rough handling, soft cloth before inserting in your camera. and excessive vibration to avoid serious damage. Turn off the camera when inserting or removing the memory Exercise caution when connecting cables or adapters and card. installing batteries and memory cards. Forcing the connectors, Do not bend, drop, or subject memory cards to heavy impact improperly connecting cables, or improperly installing batteries or pressure. and memory cards can damage ports, connectors, and accessories. Do not use memory cards that have been formatted by other cameras or by a computer. Reformat the memory card with Do not insert foreign objects into any of your camera’s your camera. compartments, slots, or access points. Damage due to improper use may not be covered by your warranty. Never use a damaged charger, battery, or memory card. 2
- 4. Health and safety information Use only Samsung-approved accessories Ensure maximum battery and charger life Using incompatible accessories may damage your camera, Overcharging batteries may shorten battery life. After charging is cause injury, or void your warranty. finished, disconnect the cable from your camera. Over time, unused batteries will discharge and must be Protect your camera’s lens recharged before use. Disconnect chargers from power sources when not in use. Do not expose the lens to direct sunlight, as this may discolour the image sensor or cause it to malfunction. Use batteries only for their intended purpose. Protect your lens from fingerprints and scratches. Clean your lens with a soft, clean, debris-free lens cloth. Exercise caution when using the camera in humid environments Use earphones with caution When transferring the camera from a cold environment to a warm Do not use earphones while driving, cycling, or operating and humid one, condensation can form on the delicate electronic motorised vehicles. Doing so may create a traffic hazard and circuitry and memory card. In this situation, wait for at least 1 hour may be illegal in some areas. until all moisture has evaporated before using the camera. Use only the minimum volume setting necessary. Listening to earphones at high volume can damage your hearing. Check that the camera is operating properly before use The manufacturer takes no responsibility for any loss of files or damage that may result from camera malfunction or improper use. Important usage information Allow only qualified personnel to service your camera Do not allow unqualified personnel to service the camera or attempt to service the camera yourself. Any damage that results from unqualified service is not covered by your warranty. 3
- 5. Organisation of the user manual Basic functions 10 ©2009 SAMSUNG DIGITAL IMAGING CO., LTD. Learn about your camera’s layout, icons, and basic Camera specifications or contents of this manual may be functions for shooting, and how to transfer files to and changed without prior notice due to upgrade of camera from your computer. functions. Extended functions 31 Learn how to take a photo by selecting a mode and how to record a video or voice memo. Copyright information Shooting options 40 Microsoft Windows and the Windows logo are registered trademarks of the Microsoft Corporation. Learn about the options you can set in Shooting mode. Mac is a registered trademark of the Apple Corporation. is a registered trademark of SRS Labs, Inc. WOW Playback/Editing 61 HD technology is incorporated under license from SRS Learn how to play back photos, videos, or voice Labs, Inc. memos and edit photos or videos. Also, learn how to connect your camera to your photo printer or TV. Multimedia 77 Learn to use Multimedia modes: Music mode, Videos mode, and Text Viewer mode. Appendixes 86 Refer to settings, error messages, specifications, and maintenance tips. 4
- 6. Indications used in this manual Icons used in this manual Shooting mode Indication Icon Function Smart Auto S Additional information Auto a Safety warnings and precautions Program p Camera buttons; for example: [Shutter] (represents the [ ] Scene s shutter button) DIS d ( ) Page number of related information Movie v The order of options or menus you must select to perform a step; for example: Select > Multimedia m (represents Select >, and then ) *† Annotation Shooting mode icons These icons indicate that a function is available in the corresponding modes. The s mode may not support functions Abbreviations used in this manual for all scenes. Abbreviation Definition e.g.) ACB Auto Contrast Balance Available in the AEB Auto Exposure Bracket Program, DIS, and Movie modes AF Auto Focus DIS Digital Image Stabilisation DPOF Digital Print Order Format EV Exposure Value WB White Balance 5
- 7. Expressions used in this manual Pressing the shutter Exposure (Brightness) Half-press [Shutter]: press the shutter halfway down The amount of light that enters your camera determines the Press [Shutter]: press the shutter all the way down exposure. You can alter the exposure with shutter speed, aperture value, and ISO speed. By altering the exposure, your photos will be darker or lighter. Half-press [Shutter] Press [Shutter] Normal exposure Overexposure (too bright) Subject, background, and composition Subject: the main object of a scene, such as a person, animal, or still life Background: the objects around the subject Composition: the combination of a subject and background Subject Composition Background 6
- 8. Quick reference Taking photos of people Adjusting the exposure (brightness) Connecting your camera to a computer 22 s mode > Beauty Shot, Portrait, Children 33 ISO speed (to adjust the sensitivity to light) 46 Viewing files by category in Red-eye, Red-eye Fix (to prevent or correct red-eye) EV (to adjust exposure) 53 Smart Album 63 45 ACB (to compensate for subjects against bright Deleting all files on the Face Detection 50 backgrounds) 54 memory card 65 Metering 55 Viewing files as a slide show AEB (to take 3 photos of the same scene with different 67 Taking photos at night or in the dark exposures) 58 Viewing files on a TV 74 Using a multimedia mode s mode > Night, Dawn, Firework 33 (listen to music, play videos Flash options 45 Applying a different effect and view text files) 78 ISO speed (to adjust the sensitivity to light) 46 Adjusting sound and volume Photo styles (to apply tones) 59 88 Image adjustment (to adjust saturation, sharpness, or Adjusting the brightness of Taking action photos contrast) 60 the display 88 Changing the display Continuous, Motion Capture 58 language 88 Reducing camera shake Setting the date and time 89 Taking photos of text, insects, or d mode 36 Formatting the memory card 89 flowers Troubleshooting 96 s mode > Close Up, Text 33 Macro, Auto Macro, Super Macro (to take close-up photos) 47 White balance (to change the colour tone) 56 7
- 9. Contents Basic functions ...................................................................... 10 Adjusting the exposure in the Night mode .............................. 35 Unpacking ......................................................................... 11 Using the DIS mode ............................................................ 36 Camera layout ................................................................... 12 Using the Program mode ..................................................... 36 Icons ................................................................................. 14 Recording a video ............................................................... 37 Turning your camera on or off ........................................... 15 Recording voice memos ................................................... 39 Using the touch screen ..................................................... 16 Recording a voice memo ..................................................... 39 Adding a voice memo to a photo .......................................... 39 Setting the touch screen ................................................... 18 Selecting a display type ....................................................... 18 Setting the touch vibration or sound ...................................... 18 Shooting options ................................................................... 40 Selecting a resolution and quality ...................................... 41 Taking photos .................................................................... 19 Selecting a resolution ........................................................... 41 Zooming ............................................................................. 20 Selecting image quality ........................................................ 42 Transferring files to your computer (for Windows) .............. 21 Using the timer .................................................................. 43 Installing programs ............................................................... 21 Transferring files to your PC .................................................. 22 Shooting in the dark .......................................................... 45 Preventing red-eye .............................................................. 45 Disconnecting the camera (for Windows XP) .......................... 23 Using the flash .................................................................... 45 Transferring multimedia files to the camera ............................. 23 Adjusting the ISO speed ...................................................... 46 Using Samsung Converter ................................................... 25 Using Samsung Master ....................................................... 26 Changing the camera’s focus ............................................ 47 Using macro ....................................................................... 47 Transferring files to your computer (for Mac users) ............ 28 Using auto focus ................................................................. 47 Transferring files to your computer ......................................... 28 Using smart touch focus ...................................................... 48 Transferring multimedia files to the camera ............................. 28 Adjusting the focus area ....................................................... 49 Tips for getting a clearer photo .......................................... 29 Using face detection ......................................................... 50 Extended functions .............................................................. 31 Detecting faces ................................................................... 50 Taking a self portrait shot ...................................................... 51 Shooting modes ................................................................ 32 Taking a smile shot .............................................................. 51 Using the Smart Auto mode ................................................. 32 Detecting eye blinking .......................................................... 51 Using the Scene mode ........................................................ 33 Using smart face recognition ................................................ 52 Using the Beauty Shot mode ................................................ 33 Using the frame guide .......................................................... 34 8
- 10. Contents Adjusting brightness and colour ........................................ 53 Multimedia .............................................................................. 77 Adjusting the exposure manually (EV) .................................... 53 Using Multimedia mode .................................................... 78 Compensating for backlighting (ACB) .................................... 54 Using the Music mode ...................................................... 80 Changing the metering option ............................................... 55 Using the Videos mode ..................................................... 82 Selecting a light source (White balance) ................................. 56 Using the Text Viewer mode .............................................. 83 Using burst modes ............................................................ 58 Multimedia mode settings menu ....................................... 84 Improving your photos ...................................................... 59 Applying photo styles ........................................................... 59 Appendixes ............................................................................ 86 Defining your own RGB tone ................................................ 59 Settings menu ................................................................... 87 Adjusting your photos .......................................................... 60 Accessing the settings menu ................................................ 87 Sound settings ................................................................... 88 Playback/Editing ................................................................... 61 Display settings ................................................................... 88 Playing back ...................................................................... 62 Camera settings .................................................................. 89 Starting Playback mode ....................................................... 62 Error messages ................................................................. 91 Viewing photos ................................................................... 66 Camera maintenance ........................................................ 92 Playing a video .................................................................... 68 Cleaning your camera .......................................................... 92 Playing a voice memo .......................................................... 69 About memory cards ........................................................... 93 Editing a photo .................................................................. 70 About the battery ................................................................. 94 Rotating a photo .................................................................. 70 Before contacting a service centre .................................... 96 Resizing photos .................................................................. 70 Camera specifications ....................................................... 98 Editing colour ...................................................................... 71 Index ............................................................................... 103 Defining your own RGB tone ................................................ 71 Applying a special effect ...................................................... 72 Correcting exposure problems ............................................. 72 Creating a print order (DPOF) ................................................ 73 Viewing files on a TV ......................................................... 74 Printing photos with a photo printer (PictBridge) ............... 75 9
- 11. Basic functions Learn about your camera’s layout, icons, and basic functions for shooting, and how to transfer files to and from your computer. Unpacking …………………………………… 11 Transferring files to your computer Camera layout ……………………………… 12 (for Mac users) ……………………………… 28 Icons …………………………………………… 14 Transferring files to your computer …………… 28 Transferring multimedia files to the camera … 28 Turning your camera on or off …………… 15 Tips for getting a clearer photo …………… 29 Using the touch screen …………………… 16 Setting the touch screen …………………… 18 Selecting a display type ……………………… 18 Setting the touch vibration or sound ………… 18 Taking photos ………………………………… 19 Zooming ……………………………………… 20 Transferring files to your computer (for Windows) ………………………………… 21 Installing programs …………………………… 21 Transferring files to your PC …………………… 22 Disconnecting the camera (for Windows XP) … 23 Transferring multimedia files to the camera … 23 Using Samsung Converter …………………… 25 Using Samsung Master ……………………… 26
- 12. Unpacking Check your product box for the following items. Optional accessories Camera AC adapter/ Touch pen USB cable Camera case Rechargeable battery Strap Software CD-ROM Memory cards (User manual included) The illustrations may differ from your actual items. A/V cable Earphones Quick Start Manual Basic functions 11
- 13. Camera layout Before you start, familiarise yourself with your camera's parts and their functions. POWER button Speaker Shutter button Microphone AF-assist light/timer lamp Flash Lens Lens cover Multifunction jack Accepts USB, A/V cable, or Tripod mount earphones Battery chamber cover Basic functions 12
- 14. Camera layout Status lamp Blinking: When saving a photo or video, being read by a computer or printer, or out of focus Steady: When connecting to a computer or in focus Touch screen Zoom button Zoom in or out Zoom in on part of a photo or view files as thumbnails MENU button Access options and settings menu, or return to the previous mode Playback button Basic functions 13
- 15. Icons The icons displayed will change according to the mode you select or the options you set. A B. Status icons C. Option icons (touch) Icon Description Icon Description Aperture and shutter speed Flash option B Photo resolution Auto focus option Exposure value Timer option ISO speed Display type White balance Image setting options : Exposure value C Face detection : White balance Burst mode : ISO speed A. Mode icons (touch) Image adjustment (sharpness, : Face tone contrast, saturation) Icon Description : Face retouch Available number of photos : Focus area option Take a photo by letting the camera Available recording time S select a scene mode as it detects : Face detection option Internal memory : Photo resolution Take a photo quickly and easily with a minimal settings Memory card inserted : Video resolution : Fully charged : Photo quality f : Frame rate p Take a photo by setting options : Partially charged : Charging needed : Exposure with ACB Take a photo with options preset for a : Video stabiliser s specific scene Zoom ratio : Metering option : Burst type Take a photo with options suitable for Voice memo d reducing camera shake : Style effect Auto focus frame : Image adjustment (sharpness, v Record a video Camera shake contrast, saturation) : Long time shutter Option set 1 (of 3) Listen to MP3s, play videos, and view : Audio recording m text files Current date and time <>: Another row of options Basic functions 14
- 16. Turning your camera on or off Learn how to start your camera. Rotate the lens cover to open. You can also press [POWER] with Turning on your camera in Playback mode the lens cover open. Press [Playback]. The camera turns on and accesses Playback mode immediately. MENU To turn off the camera, rotate the lens cover to close or press [POWER]. Press and hold [Playback] to mute camera sounds. Do not rotate the lens cover by pulling on the opening. Doing this may cause you to touch or damage the lens. Basic functions 15
- 17. Using the touch screen Learn basic actions to use the touch screen. Use the supplied touch pen to touch or drag on the screen. Do not use other sharp objects, such as pens or pencils, to touch the screen. Touching Doing so may damage the screen. Touch an icon to select a menu or option. When you touch or drag on the screen, discolourations will occur. It is not a malfunction but a characteristic of the touch screen. Touch or drag lightly to reduce these annoying effects. The touch screen may not recognise your touches correctly when: - you touch multiple items at the same time - you use the camera in high humidity environments - you use the camera with an LCD protection film or another LCD accessory If you touch the screen with your finger, the screen may not recognise your input. Dragging Drag left or right to scroll horizontally. EV -2 -1 0 +1 +2 Basic functions 16
- 18. Using the touch screen Using gestures Perform certain functions by drawing commands on the touch screen. Gesture Description Draw a horizontal bar from left to right to view the next file. Draw a horizontal bar from right to left to view the previous file. Draw an X to delete a photo. Basic functions 17
- 19. Setting the touch screen Learn how to change the basic settings for the touch screen according to your preferences. Selecting a display type Setting the touch vibration or sound In Shooting or Playback mode, select an option. Set whether your camera vibrates or emits a specified sound when you touch on the screen. 1 In Shooting or Playback mode, press [MENU]. Full 2 Select Haptic&Sound. Volume :Medium Haptic Strength Off Haptic&Sound Haptic Option Description Shutter Sound Sound Full: Display the name of an option when you select an icon. Start Sound All Basic: Display icons without the name of an option. This option is available only in Playback mode. Hide: Hide icons on the screen if you perform no operations 3 Select an option. for 3 seconds (touch the screen to display icons again). Option Description Off The camera will neither vibrate nor sound. Haptic The camera will vibrate. Sound The camera will sound. The camera will vibrate and sound All simultaneously. 4 Press [MENU] to return to the previous mode. Basic functions 18
- 20. Taking photos Learn basic actions to take photos easily and quickly in the Auto mode. 1 Make sure that the camera is in the a mode (Auto), the 2 Align your subject in the frame. camera’s default shooting mode. 3 Half-press [Shutter] to focus. A green frame means the subject in focus. If not, select the mode icon a. This mode minimizes user settings for quick, convenient shooting. Auto 4 Press [Shutter] to take a photo. See page 29 for tips to get clearer photos. Basic functions 19
- 21. Taking photos Zooming Digital zoom You can shoot close-up photos by adjusting the zoom. Your If the zoom indicator is in the digital range, your camera is using camera has a 3X optical zoom and 5X digital zoom. By using the digital zoom. The picture quality may deteriorate when you both, you can zoom in up to 15 times. use the digital zoom. Push [Zoom] up to zoom in on your subject. Push [Zoom] down Zoom indicator to zoom out. Zoom ratio Digital range Zoom in Optical range Zoom out The digital zoom is not available when using S, d, s (in some scenes), and v modes and when used with Face Detection. It may take longer to save a photo when using the digital zoom. Basic functions 20
- 22. Transferring files to your computer (for Windows) Transfer files by connecting your camera to your PC. Installing programs Programs contained on the CD Hardware and software requirements Program Purpose Samsung Master Edit photos and videos. Item Requirements Convert videos so that they can be played Samsung Converter* on the camera. Pentium III 500 MHz or better CPU Xvid Codec Code and decode video files. (Pentium III 800 MHz or better recommended) RAM 256 MB or more (512 MB or more recommended) Adobe Reader View the user manual. OS Windows 2000/XP/Vista * Pentium IV or better is recommended to use the program. Hard disk 250 MB or more (1 GB or more recommended) capacity USB port CD-ROM drive Others 1024 x 768 pixels, 16-bit colour display compatible monitor (24-bit colour display recommended) Microsoft Direct X 9.0C or later Using a self-assembled PC or a PC and OS that are not supported may void your warranty. These programs may not work properly on 64-bit Edition of Windows XP and Vista. Basic functions 21
- 23. Transferring files to your computer (for Windows) 1 Insert the installation CD in a compatible CD-ROM drive. Transferring files to your PC 2 When the setup screen is displayed, click Samsung Once you connect the camera to your PC, the camera will be recognised as a removable drive. Digital Camera Installer to start installation. The battery will be charged while the camera is connected to a PC with the USB cable. 1 Connect your camera to your PC with the USB cable. You must plug the end of the cable with the indicator light ( ) into your camera. If the cable is reversed, it may damage your files. The manufacturer is not responsible for any loss of data. 3 Click Preview to check if a movie sample plays properly. 4 If the sample plays properly, select Do not install and click Next. If it does not, select Install the codec program and click Install. The codec program is installed. 2 Turn on the camera. 5 Select programs to install and follow the onscreen The computer recognises the camera automatically. instructions. If the camera fails to connect, a pop-up window will appear. Select Computer. 6 Click Exit to complete the installation and restart your computer. Basic functions 22
- 24. Transferring files to your computer (for Windows) 3 On your PC, select My Computer Removable Disk Transferring multimedia files to the camera DCIM 100SSCAM. Requirements 4 Select the files you want and drag or save them to your Your camera will support the following file types. PC. Multimedia Supported type mode File type: MP3 (MPEG-1/2/2.5 Layer 3) Music Bit rate: 48 - 320 Kbps (including VBR) Disconnecting the camera (for Windows XP) Videos File type: PMP SDC* The way to disconnect the USB cable for Windows 2000/Vista File type: TXT (up to 99,999 pages) is similar. Encoding type 1 If the status lamp on your camera is blinking, wait until - Windows: ANSI (Windows 98 or later)/ Unicode/Unicode (Big-Endian)/ it stops. UTF-8 (Windows 2000/XP) Text Viewer 2 Click on the tool bar at the bottom right of your PC - Mac: ANSI, Unicode (UTF-16) Language†: English, Korean, French, German, screen. Spanish, Italian, Chinese, Taiwanese, Japanese, Russian, Portuguese, Dutch, Danish, Swedish, Finnish, Bahasa, Polish, Hungarian, Czech, Turkish * A file type that is converted with Samsung Converter (p. 25) 3 † Subject to change without prior notice Click the pop-up message. 4 Remove the USB cable. Duplicating multimedia files may violate copyright laws. Without permission of the manufacturer, you cannot duplicate, modify and/or distribute any part or all MP3 or PMP files provided in the internal memory. Basic functions 23
- 25. Transferring files to your computer (for Windows) Transferring multimedia files to the camera 4 Copy multimedia files to the corresponding folders. MP3 files to MP3 folder 1 Connect the camera to your PC. (p. 22) SDC files to PMP folder 2 On your PC, select My Computer Removable Disk. TXT files to TEXT folder 3 Create new folders named “MP3,” “PMP,” and “TEXT.” Multimedia files cannot be played or viewed if the folder names are incorrect. Subfolders nested directly within the MP3, PMP and TEXT folders can be created. Files saved in deeply-nested subfolders may not be played or viewed. You can save up to 200 files or 100 subfolders in each folder. You can save up to 200 total files and subfolders in combination. File names or folder names with more than 120 characters (60 characters for 2-byte languages, such as Chinese or Korean) will not appear in the playlist. Basic functions 24
- 26. Transferring files to your computer (for Windows) Using Samsung Converter No. Description Convert videos so that they can be played on the camera. For Add video files (AVI, WMV, ASF, MPG [MPEG1]). details, see the Help menu. Add subtitles. Specify the folder path and file name for the converted file. Convert the file. Preview. Cropping slider; move to the point where you want the video to begin or end. Pause and resume playback. Set the frame size and rate or the file size limit. Basic functions 25
- 27. Transferring files to your computer (for Windows) Using Samsung Master No. Description You can download files or edit photos or videos stored on your Select a location for downloaded files. PC. For details, see the Help menu. Click to download the selected files. Thumbnails of files; click an image to download. Downloading files using Samsung Master When you connect the camera to the PC, a window for downloading files automatically appears. 1 Select the files you want to download. 2 Click Next and follow the onscreen instructions. Basic functions 26
- 28. Transferring files to your computer (for Windows) Using the Samsung Master Interface No. Description Toolbar Menus Click for more information about the program. Click to enlarge or reduce the thumbnails in the list. Change the mode. : View mode : Edit mode for photos : Edit mode for videos Preview information about the selected file. The photos in the selected folder; double-click to switch to full-screen view. Basic functions 27
- 29. Transferring files to your computer (for Mac users) When you connect the camera to a Macintosh computer, the computer will recognise the device automatically. You can transfer files directly from the camera to the computer without installing any programs. Mac OS X version 10.3 or later is supported. Supported file types and languages are shown on page 23. To use PMP files, you must first convert the files using Samsung Converter on a Windows computer. Transferring files to your computer Transferring multimedia files to the camera 1 Connect your camera to a Macintosh computer with the 1 Connect the camera to a Macintosh computer with the USB cable. USB cable. You must plug the end of the cable with the indicator light ( ) into your camera. If the cable is reversed, it may damage your files. The 2 Turn on your camera. The computer recognises the camera automatically and a manufacturer is not responsible for any loss of data. removable disk icon will be displayed. 3 Double-click the removable disk icon. 4 Create new folders named “MP3,” “PMP,” and “TEXT.” 5 Copy multimedia files to the corresponding folders. MP3 files to MP3 folder SDC files to PMP folder TXT files to TEXT folder 2 Turn on the camera. The computer recognises the camera automatically and a removable disk icon will be displayed. 3 Double-click the removable disk icon. 4 Transfer photos or videos to the computer. Basic functions 28
- 30. Tips for getting a clearer photo Holding your camera correctly Reducing camera shake Make sure nothing is Select the d mode to reduce camera shake blocking the lens. digitally. (p. 36) Half-pressing the shutter button When is displayed When shooting in the dark, avoid Half-press [Shutter] and adjust the setting the flash option to Slow focus. Focus and exposure will be Sync or Off. The aperture remains adjusted automatically. open longer and it may be harder to hold the camera still. Use a tripod or set the flash option to Fill in. (p. 45) Set ISO speed options. (p. 46) The aperture value and shutter Camera shake speed are automatically set. Focus frame Press [Shutter] to take the photo if displayed in green. Change the frame and half-press [Shutter] again if displayed in red. Basic functions 29
- 31. Preventing your subject from being out of focus It may be difficult to get your subject in focus when: When you take photos in low light - there is little contrast between the subject and background (When your subject is wearing a colour of clothing that is similar to the Turn on the flash. background) (p. 45) - the light source behind the subject is too bright - the subject is shiny - the subject includes horizontal patterns, such as blinds - the subject is not positioned in the centre of the frame When subjects are moving fast Use the continuous or motion capture function. (p. 58) Use the focus lock Half-press [Shutter] to focus. When the subject is in focus, you can reposition the frame to change the composition. When you are ready, press [Shutter] to take your photo. Basic functions 30
- 32. Extended functions Learn how to take a photo by selecting a mode and how to record a video or voice memo. Shooting modes …………………………………………… 32 Using the Smart Auto mode ……………………………… 32 Using the Scene mode ……………………………………… 33 Using the Beauty Shot mode ……………………………… 33 Using the frame guide ……………………………………… 34 Adjusting the exposure in the Night mode ………………… 35 Using the DIS mode ………………………………………… 36 Using the Program mode …………………………………… 36 Recording a video …………………………………………… 37 Recording voice memos ………………………………… 39 Recording a voice memo …………………………………… 39 Adding a voice memo to a photo ………………………… 39
- 33. Shooting modes Take photos or record videos by selecting the best shooting mode for the conditions. Using the Smart Auto mode Icon Description In this mode, your camera automatically chooses the appropriate Appears when taking photos of landscapes with camera settings based on a detected type of scene. It will be backlighting. helpful if you are not familiar with the camera settings for various Appears when taking portraits with backlighting. scenes. Appears when taking portraits. 1 In Shooting mode, select a S. Appears when taking close-up photos. 2 Align your subject in the frame. Appears when taking close-up photos of text. The camera selects a scene automatically. An appropriate Appears when the camera and subject are stable for a mode icon will appear at the top left of the screen. while. Appears when taking photos of actively moving subjects. 3 Half-press [Shutter] to focus. 4 Press [Shutter] to take the photo. If the camera does not recognise a proper scene mode, S will not change and the default settings will be used. Even if there is a face detected, the camera may not select a portrait Icon Description mode depending on the subject's position or lighting. Appears when taking photos of landscapes. The camera may not select the correct scene depending on shooting environments, such as camera shake, lighting and distance to the Appears when taking photos of bright backgrounds. subject. Even if you use a tripod, the mode may not be detected depending Appears when taking photos of landscapes at night. on the subject's movement. This is available only when the flash is off. Appears when taking portraits at night. Extended functions 32
- 34. Shooting modes Using the Scene mode 3 Align your subject in the frame and half-press [Shutter] Take a photo with options preset for a specific scene. to focus. 1 In Shooting mode, select a s. 4 Press [Shutter] to take the photo. 2 Select a scene. This mode allows you to choose an appropriate scene for a variety of situations. Scene Using the Beauty Shot mode Take a photo of a person with options to hide facial imperfections. 1 In Shooting mode, select a s . 2 To make the subject's skin tone appear lighter (face only), select f an option. Select a higher setting to make skin tone appear lighter. For the Beauty Shot mode, see “Using the Beauty Shot mode.” For the Frame Guide mode, see “Using the frame guide” on page 34. Level 2 For the Night mode, see “Adjusting the exposure in the Night mode” on page 35. Extended functions 33
- 35. Shooting modes 3 To hide facial imperfections, select f an Using the frame guide option. When you want another person to take a photo of you, you can Select a higher setting to hide a greater number of compose the scene with the frame guide feature. The frame imperfections. guide will help the other person take a photo of you by showing the part of the pre-composed scene. 1 In Shooting mode, select a s . Level 1 2 Align your subject in the frame and press [Shutter]. Transparent guides will appear on the left and right of the frame. Cancel Frame:Back 4 Align your subject in the frame and half-press [Shutter] to focus. 5 Press [Shutter] to take the photo. The focus distance will be set to Auto Macro. 3 Ask another person to take a photo. The person must align the subject in the frame by using the guides, and then press [Shutter] to take the photo. 4 To cancel the guides, select . Extended functions 34
- 36. Shooting modes Adjusting the exposure in the Night mode 6 Align your subject in the frame and half-press [Shutter] In the Night mode, you can catch brief flashes of light as curved to focus. streaks by extending the exposure. Use a slow shutter speed to extend the time until the shutter closes. Increase the aperture 7 Press [Shutter] to take the photo. value to prevent overexposure. Use a tripod to prevent your photos from blurring. 1 In Shooting mode, select a s . 2 Select f Aperture. Aperture Shutter Speed 3 Select an option. 4 Select f Shutter Speed. 5 Select a value to adjust the shutter speed and select . Extended functions 35
- 37. Shooting modes Using the DIS mode Using the Program mode Reduce camera shake and prevent blurred photos with Digital Set various options (except for shutter speed and aperture value) Image Stabilisation (DIS) functions. in the Program mode. 1 In Shooting mode, select a p. 2 Set options. (For a list of options, refer to “Shooting options.”) Before correction After correction 1 In Shooting mode, select a d. 2 Align your subject in the frame and half-press [Shutter] to focus. 3 Press [Shutter] to take the photo. The digital zoom will not work in this mode. 3 Align your subject in the frame and half-press [Shutter] to focus. If your subject is moving rapidly, the photo may be blurry. 4 Press [Shutter] to take the photo. Extended functions 36
- 38. Shooting modes Recording a video 3 Select f > a sound option. Record videos of up to 20 minutes in length. The recorded video Option Description is saved as an MPEG4.AVI file. Off: Record a video without sound. The zoom sound may be recorded if you use the zoom while recording a On: Record a video with sound. video. 4 Select f a stabiliser option. Option Description 1 In Shooting mode, select a v. Off: Record a video with the image stabilisation function 2 Select f a frame rate (the number of frames turned off. On: Record a video with the image stabilisation function per second). turned on to prevent your video from blurring. You can change the frame rate only for 640 x 480 or 320 x 240 resolution. (p. 41) As the number of frames increases, action appears more 5 Set other options as desired. (For options, refer to natural, but the file size is increased. “Shooting options.”) 6 Press [Shutter] to start recording. 30 FPS 7 Press [Shutter] again to stop recording. Extended functions 37
- 39. Shooting modes To pause recording The camera allows you to pause temporarily while recording a video. With this function, you can record your favourite scenes as a single video. Select to pause while recording. Select it again to resume. Stop: Shutter Extended functions 38
- 40. Recording voice memos apsd Learn how to record a voice memo that you can play back at any time. You can add a voice memo to a photo as a short reminder of shooting conditions. You will get the best sound quality when recording 40 cm away from the camera. Recording a voice memo Adding a voice memo to a photo 1 In Shooting mode, select f > . 1 In Shooting mode, select f > . Record Memo 2 Press [Shutter] to record. 2 Align your subject in the frame and take a photo. Select to pause and to resume. You will begin recording a voice memo right after taking the The available recording time will be displayed on the top of photo. the screen. You can record voice memos of up to 10 hours in length. 3 Record a short voice memo (10 seconds maximum). Press [Shutter] to stop recording a voice memo. 3 Press [Shutter] to stop. 4 Select to switch to Shooting mode. Extended functions 39
- 41. Shooting options Learn about the options you can set in Shooting mode. Selecting a resolution and quality ………… 41 Adjusting brightness and colour ………… 53 Selecting a resolution ………………………… 41 Adjusting the exposure manually (EV) ………… 53 Selecting image quality ………………………… 42 Compensating for backlighting (ACB) ………… 54 Using the timer ……………………………… 43 Changing the metering option ………………… 55 Selecting a light source (White balance) ……… 56 Shooting in the dark ………………………… 45 Preventing red-eye …………………………… 45 Using burst modes ………………………… 58 Using the flash ………………………………… 45 Improving your photos ……………………… 59 Adjusting the ISO speed ……………………… 46 Applying photo styles ………………………… 59 Changing the camera’s focus ……………… 47 Defining your own RGB tone ………………… 59 Using macro …………………………………… 47 Adjusting your photos ………………………… 60 Using auto focus ……………………………… 47 Using smart touch focus ……………………… 48 Adjusting the focus area ……………………… 49 Using face detection ………………………… 50 Detecting faces ………………………………… 50 Taking a self portrait shot ……………………… 51 Taking a smile shot …………………………… 51 Detecting eye blinking ………………………… 51 Using smart face recognition ………………… 52
- 42. Selecting a resolution and quality Learn how to change the image resolution and quality settings. Selecting a resolution Sapsdv When recording a video: As you increase the resolution, your photo or video will include more pixels, so it can be printed on larger paper or displayed on 1 In the v mode, select f . a larger screen. When you use a high resolution, the file size will also increase. 2 Select an option. When taking a photo: 800 X 592 1 In Shooting mode, select f . (In some modes, select f > .) 2 Select an option. Option Description 3456 X 2592 800 X 592: Play back on an SDTV. 640 X 480: Play back on a general TV. 320 X 240: Post on a web page. Option Description 3456 X 2592: Print on A2 paper. 3456 X 2304: Print on A3 paper in wide ratio (3:2). 3456 X 1944: Print on A3 paper in panorama ratio (16:9). 2592 X 1944: Print on A4 paper. 2048 X 1536: Print on A5 paper. 1024 X 768: Attach to email. Shooting options 41
- 43. Selecting a resolution and quality Selecting image quality apsd Photos you take are compressed and saved in JPEG format. Higher quality images will result in larger sizes. 1 In Shooting mode, select f . (In some modes, select f > .) 2 Select an option. Fine Option Description Super Fine Fine Normal The options may differ depending on the shooting mode. Shooting options 42
- 44. Using the timer Sapsdv Learn how to set the timer to delay shooting. 1 In Shooting mode, select . 3 Press [Shutter] to start the timer. The AF-assist light/timer lamp blinks. The camera will 2 Select an option. automatically take a photo at the specified time. Select the timer icon to cancel the timer. Depending on the selected face defection option, the timer is not Off available or some timer options are not available. Option Description Off: The timer is not active. 10 Sec: Take a photo in 10 seconds. 2 Sec: Take a photo in 2 seconds. Double: Take a photo in 10 seconds and take another in 2 seconds. Motion Timer: Detect your movement and then take a photo. (p. 44) The options may differ depending on the shooting mode. Shooting options 43
- 45. Using the timer Using the motion timer 5 Pose for your photo while the AF-assist light/timer lamp is blinking. 1 In Shooting mode, select . The AF-assist light/timer lamp will stop blinking just before the 2 Press [Shutter]. camera automatically takes a photo. 3 Stand within 3 m from the camera within 6 seconds after pressing [Shutter]. 4 Make a motion, such as waving your arms, to activate the timer. The AF-assist light/timer lamp will start to blink rapidly when the camera detects you. The motion timer may not work when: you are more than 3 m away from the camera your movements are too subtle there is too much light or backlight The detection range of the motion timer Shooting options 44
- 46. Shooting in the dark Learn how to take photos at night or in low light conditions. Preventing red-eye aps Using the flash Saps If the flash fires when you take a photo of a person in the dark, a Use the flash when taking photos in the dark or when you need red glow may appear in the eyes. To prevent this, select Red-eye more light on your photos. or Red-eye Fix. 1 In Shooting mode, select . 2 Select an option. Off Option Description Off: The flash will not fire. Camera shake warning ( ) will be displayed when shooting in low light. Auto: The camera will select a proper flash setting for the detected scene in the S mode. Auto: The flash fires automatically when the subject or background is dark. Shooting options 45
- 47. Shooting in the dark Option Description Adjusting the ISO speed p Red-eye*: The ISO speed is the measure of a film’s sensitivity to light as The flash fires when the subject or background is defined by the International Organisation for Standardisation (ISO). dark. The higher ISO speed you select, the more sensitive to light your The camera reduces red-eyes. camera becomes. With a higher ISO speed, you can get a better Fill in: photo without using the flash. The flash always fires. Light intensity is adjusted automatically. 1 In Shooting mode, select f . Slow Sync: 2 Select an option. The flash fires and the shutter stays open longer. Select to use an appropriate ISO speed based on the Select this when you want to capture ambient light to brightness of the subject and lighting. reveal more details in the background. Use a tripod to prevent your photos from blurring. Red-eye Fix*: Auto The flash fires when the subject or background is dark. The camera corrects red-eyes through its advanced software analysis. The options may differ depending on the shooting mode. * There is an interval between two bursts of the flash. Do not move until the flash fires a second time. The higher ISO speed you select, the more image noise you may get. Flash options are not available if you set burst options or select Self-Portrait or Blink Detection. Make sure that your subjects are within the recommended distance from the flash. (p. 98) If there is reflected light or much dust in the air, tiny spots may appear on your photo. Shooting options 46
- 48. Changing the camera’s focus Learn how to adjust the camera's focus according to your subjects. Using macro apdv Using auto focus apdv Use macro to take close-up photos of subjects, such as flowers To take sharp photos, select the appropriate focus according to or insects. Refer to macro options in “Using auto focus.” your distance from the subject. 1 In Shooting mode, select . 2 Select an option. Normal (AF) Option Description Normal (AF): Focus on a subject farther than 80 cm. Try to hold the camera very still to prevent blurry photos. Auto Macro: Focus on a subject farther than 5 cm Turn off the flash if the distance to the subject is less than 40 cm. (farther than 50 cm when using zoom). Macro: Focus on a subject 5 - 80 cm (50 - 80 cm when using zoom). Super Macro: Focus on a subject between 1 to 5 cm. The options may differ depending on the shooting mode. Shooting options 47