Call Girls In Mumbai Just Genuine Call ☎ 7738596112✅ Call Girl Andheri East G...
Kusudama tutorial
1. Kusudama Tutorial
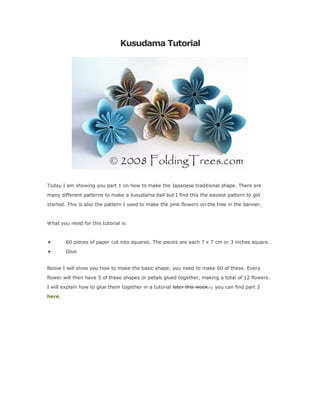
Today I am showing you part 1 on how to make the Japanese traditional shape. There are
many different patterns to make a kusudama ball but I find this the easiest pattern to get
started. This is also the pattern I used to make the pink flowers on the tree in the banner.
What you need for this tutorial is:
60 pieces of paper cut into squares. The pieces are each 7 x 7 cm or 3 inches square.
Glue
Below I will show you how to make the basic shape, you need to make 60 of these. Every
flower will then have 5 of these shapes or petals glued together, making a total of 12 flowers.
I will explain how to glue them together in a tutorial later this week…, you can find part 2
here.
2. Fold the bottom corner to the top. This will make a triangle.
Fold the left and right corners up to the middle corner. This make a square.
3. Fold the same points down. The folded edge will line up exactly on top of the outside edge of
the square.
Open up the flaps you have just created and flatten them.
Fold the top triangles towards you so they are level with the edges of the paper. (This will
result in 3 little petals on the inside of your petal; if you fold the top triangles away from you,
this will result in only 1 petal on the inside of the petal - see variation on pattern below.)
4. Fold the triangles back using the crease you made earlier and glue the outside triangles
together.
Now make 5 more of these petals and glue them all together. Make sure you wait until the
glue is dry after every petal and take your time. You will need 12 flowers to complete the
kusudama ball; I will show you how to complete it later this week, you can find part 2 here.
5. In part 1, I showed you have to make the individual flowers; you should now have 12 flowers
made from 60 individual petals.
For part 2 you will need:
12 flowers (made from 60 petals)
Glue
String or a ribbon
Bead(s)
6. As you might be able to see from the finished kusudama at the top of the page, I made 6
flowers from blue paper and 6 flowers from a recycled map. To make it easier to see how I am
putting the ball together I will use 1 blue flower in the middle and 5 map flowers around it.
Start to glue the flowers together one petal at the time - this will give the nicest result. In the
photo (right) you can see that you apply the glue a little to the right of the middle line. Hold
the 2 pieces together in place with your fingers until the glue is dry. Then glue the second
petal in the same way.
7. When you add the 3rd flower, there are 3 petals to connect. Make sure you work from the
middle; glue, hold in place, wait until the glue is dry. Now work your way all around the first
flower.
After you have attached all 6 flowers you end up with 2 sets of half a kusudama. Now it is
time to attach the cord.
8. I used 3 beads on the bottom. (Left pic) I made a knot over the first bead to lock it in place
and then put the other beads on the string, locking it in again with an overhand knot.
Now take one of your 1/2 kusudamas and put some glue on the top. You can see the yellow
glue I used on the right-hand picture.
9. Glue your string down, making sure it is nice and straight. Now glue the other half of the
string down, making sure this time that you put the glue exactly on the middle of the petal.
After this is nice and dry, start gluing the other half of the kusudama on top of the first half. I
normally work around from the top.
That’s it! You have finished your kusudama ball, now find a nice spot in your home for it.
In the last photo you can see another kusudama I finished earlier. As you can see, I used the
variation on the pattern I showed you in part 1, so the flowers look a little different.
10. If you are having a go with this 2 part tutorial we would love to see your work! Please upload
your pics to the Folding Trees Flickr group and maybe you will be featured in our next
round up.
If you’d like to see some more original Folding Trees tutorials by Eve or June have a look
here.