SlideShare uma empresa Scribd logo
1 de 5
Baixar para ler offline
Creating an Embedded System Lab

Objectives
This lab demonstrates how to create an embedded system for the PowerPC 405 using the Xilinx Platform Studio
(XPS) Base System Builder (BSB). The lab will show
• How to start Base System Builder from Project Navigator
• How to generate a PowerPC embedded system
• What are the files generated
• How to use the software environment (SDK) to test a simple application

Requirements
    ISE 9.2.04
    EDK 9.2.02
    EDK Tool Patches: http://www.xilinx.com/support/answers/29702.htm
    ML403 Board
    USB Platform Cable
    RS232 Cable

Reference
    Platform Studio Help
    SDK Help
    Embedded System Tools Reference Manual

Overview
The lab is divided into four main steps: creating the hardware platform, understanding what was created, using
SDK to compile a software application and testing the system on the FPGA. The test application will reside in Block
memory inside the FPGA. Below is a block diagram of the hardware platform. The GPIO core will be used for the
LEDs on the board.

                                                          PowerPC          PowerPC Interrupt


                                          PLB v46


                            BRAM        Timer        GPIO           UART      Interrupt
                                                                              Controlle
                                                                                  r


                                                Timer Interrupt


Lab Steps
    I. Create the Hardware Platform


                                                1
We will use Base System Builder to create the platform for the design. The Wizard can quickly create baseline
systems for current development boards or for custom boards. The system will include a timer, an Interrupt
Controller, a UART Lite, a GPIO controller for the LEDs, and internal Block RAM memory.

    1. Start Xilinx ISE Project Navigator and start a new project: File > New Project…
    2. Select a project name and location. There should be no spaces in the directory path. Click Next.
    3. Select Virtex-4, XC4VFX12, FF668, -10. For this lab, pick VHDL as the Preferred Language. Click
       Next.
    4. Select New Source… then select Embedded Processor. Type ppc_system for the File name. Click
       Next. Click Finish then OK.
    5. Click Next until the Project Summary window then Finish.
    6. A message will appear asking if you want to create a Base System using the BSB wizard, click Yes.
    7. In the Welcome window click Next to create a new design.
    8. Select the Xilinx Virtex-4 ML403 Evaluation Platform from the list of available Xilinx boards and select
       Revision 1. Click Next
    9. In the Select Processor window, PowerPC is selected. Click Next.
    10. Configure the processor:
        •   100MHz for all clocks, FPGA JTAG, no On-Chip memory (OCM). Click Next.
    11. Configure IO Interfaces:
        •   XPS UARTLITE (9600, no parity) for the RS232_Uart, XPS GPIO (4-bits) for the LEDs_4Bit,
            deselect all others. Click Next.
        •   Deselect all peripherals in the Configure IO Interfaces windows. Click Next.
    12. In the Add Internal Peripherals window, change the memory size to 64KB then click on Add
        Peripheral… Add an XPS TIMER:
        •   XPS TIMER (32-bit counter, 1 timer, use interrupt). The interrupt controller will be added
            automatically when the use interrupt option is selected. Click Next.


                                            2
13. In the Software Setup window, uncheck Memory Test then click Next.
    14. In the Configure Peripheral Test Application window, click Next.
    15. Click on the Generate button to generate the project. Click on Finish.


II. Understanding the System
The Base System Builder wizard created all the files needed to get started with an embedded PowerPC
system. The Xilinx Platform Studio IDE has all the information for the project. We will look at the interface and
the files created.

    1. Xilinx Platform Studio provides an integrated environment for creating the software and hardware of an
       embedded processor system. It also provides an editor and a project management interface to create
       and edit source code. The complete hardware and software flows can be completed within XPS.
       Platform Studio SDK provides a more powerful software environment and will be used for the software
       application during the tutorials.


    2. The System Assembly window shows each peripheral used and the connections between the
       peripherals when the Bus Interface button is selected. We will learn more about the System Assembly
       view as well as the IP Catalog tab in the next lab.


                                             3
3. The Project tab provides information on the project options used, gives access to the main Project files,
      and log files. The main Project Files are:
       •   MHS File. The Microprocessor Hardware Specification file contains the hardware specification of
           the entire system. The MHS file contains the bus architecture used, the peripherals used, the
           connectivity for the system, the interrupt request priorities, and the address space. The MHS file
           can also call out custom IP.

       •   MSS File. The Microprocessor Software Specification file defines the software drivers associated
           with peripherals, standard input/output devices, interrupt handler routines, RTOS and libraries
           used, and other related software features.
       •   UCF File. The User Constraints File contains the timing and placement constraints for the FPGA.
       •   iMPACT Command File. The download.cmd file contains JTAG chain information to download the
           design to the FPGA on the development board.
       •   Implementation Options File. The fast_runtime.opt file contains implementation options for all the
           phases of the FPGA hardware implementation. The options are used to run the standard ISE tools.
       •   Bitgen Options File. The bitgen.ut file provides options when generating the bit file for the FPGA.

   4. The Applications tab shows the software applications available for the processor. For this lab, SDK will
      be used to edit and compile the software.
   5. Right-click on the TestApp_Peripheral project and unselect Mark to Initialize BRAMs.
   6. Right-click on Default: ppc405_0_bootloop and select Mark to Initialize BRAMs.
   7. Click on the BLOCK DIAGRAM tab to view the block diagram for the project. The block shows the
      connections between the different busses and components in the system.
   8. A datasheet of the system can also be generated. Go to Project > Generate and View Design Report
      to view the design report.
   9. To view the general project options go to Project > Project Options… Click Cancel to close the
      window.
   10. Go to Software > Software Platform Settings… to view the software options. The software driver
       version information can be viewed by selecting Drivers on the left side. These options are used when
       compiling libraries and BSPs. Click Cancel to close the window.
   11. The UCF file needs to be added to the Project Navigator project in order to implement the FPGA
       design
   12. In ISE go to Project > Add Copy of Source… Browse to the ppc_systemdata directory and select
       ppc_system.ucf. Click Open then OK.
   13. Double-click on Update Bitstream with Processor Data to create the hardware bit file.


III. Compiling the Test Application Using SDK
   Platform Studio SDK is an Eclipse based software development environment to create and debug software
   applications. Features include project management, multiple build configurations, a feature-rich C/C++
   code editor, error navigation, a debugging and profiling environment, and source code version control.
   More time will be spent on the different features of the SDK in the next labs.
   1. Launch SDK. In XPS, go to Software > Launch Platform Studio SDK. Click OK.
   2. SDK will automatically generate the libraries and BSP for the project. A directory with the name of the
      processor instance will be created. Within each processor instance directory, C header files that are


                                           4
needed by the drivers, driver functions that the particular processor can access, and intermediate files
       and makefiles that are needed to compile the libraries and drivers are generated.
   3. Select Import XPS Application Projects then click on Next.
   4. Select the TestApp_Peripheral application then click Finish.
   5. The TestApp_Peripheral project was created by Base System Builder to test the project. It contains C
      source files to test each peripheral and a linker script. Expand the project to view the sources
      associated with the project. All the files are linked from their original directory.
   6. To view the project properties right-click on the TestApp_Peripheral project and select Properties.
      The C/C++ selection contains all the build options. Click OK to exit.
   7. Above the project, all the libraries and include files associated with the hardware project are available
      to browse. The include directory contains all the header files applicable for the current project.
   8. Double click on the TestApp_Peripheral.c file to view the application. The project was compiled when
      imported from XPS by default if the Build Automatically option is set. You can double-click on the
      include directives in the right side Outline window to view the source for the headers.
   9. Compile the project if not already compiled. Go to Project > Build Project.
   10. Initialize the internal BRAM with the application executable. Go to Device Configuration > Program
       Hardware Settings…
   11. Select the TestApp_Peripheral executable. Click Save.


   12. The system is ready to be downloaded to the board.


IV. Test the Generated System with the Sample Application
   1. Connect a serial cable to the RS232 port and connect the Platform USB cable.
   2. Power-up the board.
   3. Open Hyperterminal and connect at 9600, no parity.
   4. Download to the FPGA from SDK: Device Configuration > > Program Hardware.
   5. Verify that the different peripheral print statements appear on the Hyperterminal window and that the
      LEDs are blinking.
   6. Close SDK.


                                            5

Mais conteúdo relacionado

Mais procurados

Implementation of linux based uart device driver
Implementation of linux based uart device driverImplementation of linux based uart device driver
Implementation of linux based uart device drivereSAT Publishing House
 
Chapter 3 Charateristics and Quality Attributes of Embedded System
Chapter 3 Charateristics and Quality Attributes of Embedded SystemChapter 3 Charateristics and Quality Attributes of Embedded System
Chapter 3 Charateristics and Quality Attributes of Embedded SystemMoe Moe Myint
 
Chapter 4 Embedded System: Application and Domain Specific
Chapter 4 Embedded System: Application and Domain SpecificChapter 4 Embedded System: Application and Domain Specific
Chapter 4 Embedded System: Application and Domain SpecificMoe Moe Myint
 
Process Management - Part3
Process Management - Part3Process Management - Part3
Process Management - Part3Amir Payberah
 
Introduction to Embedded Systems I : Chapter 1
Introduction to Embedded Systems I : Chapter 1Introduction to Embedded Systems I : Chapter 1
Introduction to Embedded Systems I : Chapter 1Moe Moe Myint
 
Chapter16 and 17
Chapter16 and 17Chapter16 and 17
Chapter16 and 17Saurav
 
EMBEDDED WEB SERVER
EMBEDDED WEB SERVEREMBEDDED WEB SERVER
EMBEDDED WEB SERVERkavya Reddy
 
Introduction to Operating Systems - Part1
Introduction to Operating Systems - Part1Introduction to Operating Systems - Part1
Introduction to Operating Systems - Part1Amir Payberah
 
ARM 32-bit Microcontroller Cortex-M3 introduction
ARM 32-bit Microcontroller Cortex-M3 introductionARM 32-bit Microcontroller Cortex-M3 introduction
ARM 32-bit Microcontroller Cortex-M3 introductionanand hd
 
TYBSC IT SEM 6 PROJECT MANAGEMENT NOTES
TYBSC IT SEM 6 PROJECT MANAGEMENT NOTESTYBSC IT SEM 6 PROJECT MANAGEMENT NOTES
TYBSC IT SEM 6 PROJECT MANAGEMENT NOTESWE-IT TUTORIALS
 
Ch 1 introduction to Embedded Systems (AY:2018-2019--> First Semester)
Ch 1 introduction to Embedded Systems (AY:2018-2019--> First Semester)Ch 1 introduction to Embedded Systems (AY:2018-2019--> First Semester)
Ch 1 introduction to Embedded Systems (AY:2018-2019--> First Semester)Moe Moe Myint
 
Resume2_Roy Anderson_online version
Resume2_Roy Anderson_online versionResume2_Roy Anderson_online version
Resume2_Roy Anderson_online versionRoy Anderson
 

Mais procurados (20)

EC6703 unit-4
EC6703 unit-4EC6703 unit-4
EC6703 unit-4
 
Implementation of linux based uart device driver
Implementation of linux based uart device driverImplementation of linux based uart device driver
Implementation of linux based uart device driver
 
Chapter 3 Charateristics and Quality Attributes of Embedded System
Chapter 3 Charateristics and Quality Attributes of Embedded SystemChapter 3 Charateristics and Quality Attributes of Embedded System
Chapter 3 Charateristics and Quality Attributes of Embedded System
 
Chapter 4 Embedded System: Application and Domain Specific
Chapter 4 Embedded System: Application and Domain SpecificChapter 4 Embedded System: Application and Domain Specific
Chapter 4 Embedded System: Application and Domain Specific
 
Introduction to embedded systems
Introduction to embedded systemsIntroduction to embedded systems
Introduction to embedded systems
 
Embedded system
Embedded systemEmbedded system
Embedded system
 
Armwebserver
ArmwebserverArmwebserver
Armwebserver
 
CV_KaloutsakisStylianos
CV_KaloutsakisStylianosCV_KaloutsakisStylianos
CV_KaloutsakisStylianos
 
Process Management - Part3
Process Management - Part3Process Management - Part3
Process Management - Part3
 
Resume
ResumeResume
Resume
 
Introduction to Embedded Systems I : Chapter 1
Introduction to Embedded Systems I : Chapter 1Introduction to Embedded Systems I : Chapter 1
Introduction to Embedded Systems I : Chapter 1
 
Chapter16 and 17
Chapter16 and 17Chapter16 and 17
Chapter16 and 17
 
EMBEDDED WEB SERVER
EMBEDDED WEB SERVEREMBEDDED WEB SERVER
EMBEDDED WEB SERVER
 
Introduction to Operating Systems - Part1
Introduction to Operating Systems - Part1Introduction to Operating Systems - Part1
Introduction to Operating Systems - Part1
 
ARM 32-bit Microcontroller Cortex-M3 introduction
ARM 32-bit Microcontroller Cortex-M3 introductionARM 32-bit Microcontroller Cortex-M3 introduction
ARM 32-bit Microcontroller Cortex-M3 introduction
 
TYBSC IT SEM 6 PROJECT MANAGEMENT NOTES
TYBSC IT SEM 6 PROJECT MANAGEMENT NOTESTYBSC IT SEM 6 PROJECT MANAGEMENT NOTES
TYBSC IT SEM 6 PROJECT MANAGEMENT NOTES
 
Ch 1 introduction to Embedded Systems (AY:2018-2019--> First Semester)
Ch 1 introduction to Embedded Systems (AY:2018-2019--> First Semester)Ch 1 introduction to Embedded Systems (AY:2018-2019--> First Semester)
Ch 1 introduction to Embedded Systems (AY:2018-2019--> First Semester)
 
Embedded C - Day 1
Embedded C - Day 1Embedded C - Day 1
Embedded C - Day 1
 
Resume2_Roy Anderson_online version
Resume2_Roy Anderson_online versionResume2_Roy Anderson_online version
Resume2_Roy Anderson_online version
 
C with lab
C with labC with lab
C with lab
 

Semelhante a Creating an Embedded System Lab

Developing new zynq based instruments
Developing new zynq based instrumentsDeveloping new zynq based instruments
Developing new zynq based instrumentsGraham NAYLOR
 
verilog basics.ppt
verilog basics.pptverilog basics.ppt
verilog basics.ppt8885684828
 
ProjectVault[VivekKumar_CS-C_6Sem_MIT].pptx
ProjectVault[VivekKumar_CS-C_6Sem_MIT].pptxProjectVault[VivekKumar_CS-C_6Sem_MIT].pptx
ProjectVault[VivekKumar_CS-C_6Sem_MIT].pptxVivek Kumar
 
Best Practices and Performance Studies for High-Performance Computing Clusters
Best Practices and Performance Studies for High-Performance Computing ClustersBest Practices and Performance Studies for High-Performance Computing Clusters
Best Practices and Performance Studies for High-Performance Computing ClustersIntel® Software
 
Process control daemon
Process control daemonProcess control daemon
Process control daemonhaish
 
Larson and toubro
Larson and toubroLarson and toubro
Larson and toubroanoopc1998
 
Ceph Day Beijing - SPDK in Ceph
Ceph Day Beijing - SPDK in CephCeph Day Beijing - SPDK in Ceph
Ceph Day Beijing - SPDK in CephCeph Community
 
Ceph Day Beijing - SPDK for Ceph
Ceph Day Beijing - SPDK for CephCeph Day Beijing - SPDK for Ceph
Ceph Day Beijing - SPDK for CephDanielle Womboldt
 
Hp fortify source code analyzer(sca)
Hp fortify source code analyzer(sca)Hp fortify source code analyzer(sca)
Hp fortify source code analyzer(sca)Nagaraju Repala
 
Linux-Based Data Acquisition and Processing On Palmtop Computer
Linux-Based Data Acquisition and Processing On Palmtop ComputerLinux-Based Data Acquisition and Processing On Palmtop Computer
Linux-Based Data Acquisition and Processing On Palmtop ComputerIOSR Journals
 
Linux-Based Data Acquisition and Processing On Palmtop Computer
Linux-Based Data Acquisition and Processing On Palmtop ComputerLinux-Based Data Acquisition and Processing On Palmtop Computer
Linux-Based Data Acquisition and Processing On Palmtop ComputerIOSR Journals
 
Using the Cypress PSoC Processor
Using the Cypress PSoC ProcessorUsing the Cypress PSoC Processor
Using the Cypress PSoC ProcessorLloydMoore
 
Building Embedded Linux Full Tutorial for ARM
Building Embedded Linux Full Tutorial for ARMBuilding Embedded Linux Full Tutorial for ARM
Building Embedded Linux Full Tutorial for ARMSherif Mousa
 
05 project setup v1.00_en
05 project setup v1.00_en05 project setup v1.00_en
05 project setup v1.00_enconfidencial
 

Semelhante a Creating an Embedded System Lab (20)

Developing new zynq based instruments
Developing new zynq based instrumentsDeveloping new zynq based instruments
Developing new zynq based instruments
 
STM -32
STM -32STM -32
STM -32
 
learning STM -32
learning STM -32 learning STM -32
learning STM -32
 
verilog basics.ppt
verilog basics.pptverilog basics.ppt
verilog basics.ppt
 
ProjectVault[VivekKumar_CS-C_6Sem_MIT].pptx
ProjectVault[VivekKumar_CS-C_6Sem_MIT].pptxProjectVault[VivekKumar_CS-C_6Sem_MIT].pptx
ProjectVault[VivekKumar_CS-C_6Sem_MIT].pptx
 
Best Practices and Performance Studies for High-Performance Computing Clusters
Best Practices and Performance Studies for High-Performance Computing ClustersBest Practices and Performance Studies for High-Performance Computing Clusters
Best Practices and Performance Studies for High-Performance Computing Clusters
 
Process control daemon
Process control daemonProcess control daemon
Process control daemon
 
soc design for dsp applications
soc design for dsp applicationssoc design for dsp applications
soc design for dsp applications
 
Aci dp
Aci dpAci dp
Aci dp
 
Larson and toubro
Larson and toubroLarson and toubro
Larson and toubro
 
Choosing the right processor
Choosing the right processorChoosing the right processor
Choosing the right processor
 
14 284-291
14 284-29114 284-291
14 284-291
 
Ceph Day Beijing - SPDK in Ceph
Ceph Day Beijing - SPDK in CephCeph Day Beijing - SPDK in Ceph
Ceph Day Beijing - SPDK in Ceph
 
Ceph Day Beijing - SPDK for Ceph
Ceph Day Beijing - SPDK for CephCeph Day Beijing - SPDK for Ceph
Ceph Day Beijing - SPDK for Ceph
 
Hp fortify source code analyzer(sca)
Hp fortify source code analyzer(sca)Hp fortify source code analyzer(sca)
Hp fortify source code analyzer(sca)
 
Linux-Based Data Acquisition and Processing On Palmtop Computer
Linux-Based Data Acquisition and Processing On Palmtop ComputerLinux-Based Data Acquisition and Processing On Palmtop Computer
Linux-Based Data Acquisition and Processing On Palmtop Computer
 
Linux-Based Data Acquisition and Processing On Palmtop Computer
Linux-Based Data Acquisition and Processing On Palmtop ComputerLinux-Based Data Acquisition and Processing On Palmtop Computer
Linux-Based Data Acquisition and Processing On Palmtop Computer
 
Using the Cypress PSoC Processor
Using the Cypress PSoC ProcessorUsing the Cypress PSoC Processor
Using the Cypress PSoC Processor
 
Building Embedded Linux Full Tutorial for ARM
Building Embedded Linux Full Tutorial for ARMBuilding Embedded Linux Full Tutorial for ARM
Building Embedded Linux Full Tutorial for ARM
 
05 project setup v1.00_en
05 project setup v1.00_en05 project setup v1.00_en
05 project setup v1.00_en
 

Último

Python Notes for mca i year students osmania university.docx
Python Notes for mca i year students osmania university.docxPython Notes for mca i year students osmania university.docx
Python Notes for mca i year students osmania university.docxRamakrishna Reddy Bijjam
 
Key note speaker Neum_Admir Softic_ENG.pdf
Key note speaker Neum_Admir Softic_ENG.pdfKey note speaker Neum_Admir Softic_ENG.pdf
Key note speaker Neum_Admir Softic_ENG.pdfAdmir Softic
 
TỔNG ÔN TẬP THI VÀO LỚP 10 MÔN TIẾNG ANH NĂM HỌC 2023 - 2024 CÓ ĐÁP ÁN (NGỮ Â...
TỔNG ÔN TẬP THI VÀO LỚP 10 MÔN TIẾNG ANH NĂM HỌC 2023 - 2024 CÓ ĐÁP ÁN (NGỮ Â...TỔNG ÔN TẬP THI VÀO LỚP 10 MÔN TIẾNG ANH NĂM HỌC 2023 - 2024 CÓ ĐÁP ÁN (NGỮ Â...
TỔNG ÔN TẬP THI VÀO LỚP 10 MÔN TIẾNG ANH NĂM HỌC 2023 - 2024 CÓ ĐÁP ÁN (NGỮ Â...Nguyen Thanh Tu Collection
 
Beyond_Borders_Understanding_Anime_and_Manga_Fandom_A_Comprehensive_Audience_...
Beyond_Borders_Understanding_Anime_and_Manga_Fandom_A_Comprehensive_Audience_...Beyond_Borders_Understanding_Anime_and_Manga_Fandom_A_Comprehensive_Audience_...
Beyond_Borders_Understanding_Anime_and_Manga_Fandom_A_Comprehensive_Audience_...Pooja Bhuva
 
Salient Features of India constitution especially power and functions
Salient Features of India constitution especially power and functionsSalient Features of India constitution especially power and functions
Salient Features of India constitution especially power and functionsKarakKing
 
Holdier Curriculum Vitae (April 2024).pdf
Holdier Curriculum Vitae (April 2024).pdfHoldier Curriculum Vitae (April 2024).pdf
Holdier Curriculum Vitae (April 2024).pdfagholdier
 
Sociology 101 Demonstration of Learning Exhibit
Sociology 101 Demonstration of Learning ExhibitSociology 101 Demonstration of Learning Exhibit
Sociology 101 Demonstration of Learning Exhibitjbellavia9
 
Kodo Millet PPT made by Ghanshyam bairwa college of Agriculture kumher bhara...
Kodo Millet  PPT made by Ghanshyam bairwa college of Agriculture kumher bhara...Kodo Millet  PPT made by Ghanshyam bairwa college of Agriculture kumher bhara...
Kodo Millet PPT made by Ghanshyam bairwa college of Agriculture kumher bhara...pradhanghanshyam7136
 
SOC 101 Demonstration of Learning Presentation
SOC 101 Demonstration of Learning PresentationSOC 101 Demonstration of Learning Presentation
SOC 101 Demonstration of Learning Presentationcamerronhm
 
Google Gemini An AI Revolution in Education.pptx
Google Gemini An AI Revolution in Education.pptxGoogle Gemini An AI Revolution in Education.pptx
Google Gemini An AI Revolution in Education.pptxDr. Sarita Anand
 
Jamworks pilot and AI at Jisc (20/03/2024)
Jamworks pilot and AI at Jisc (20/03/2024)Jamworks pilot and AI at Jisc (20/03/2024)
Jamworks pilot and AI at Jisc (20/03/2024)Jisc
 
Unit 3 Emotional Intelligence and Spiritual Intelligence.pdf
Unit 3 Emotional Intelligence and Spiritual Intelligence.pdfUnit 3 Emotional Intelligence and Spiritual Intelligence.pdf
Unit 3 Emotional Intelligence and Spiritual Intelligence.pdfDr Vijay Vishwakarma
 
Sensory_Experience_and_Emotional_Resonance_in_Gabriel_Okaras_The_Piano_and_Th...
Sensory_Experience_and_Emotional_Resonance_in_Gabriel_Okaras_The_Piano_and_Th...Sensory_Experience_and_Emotional_Resonance_in_Gabriel_Okaras_The_Piano_and_Th...
Sensory_Experience_and_Emotional_Resonance_in_Gabriel_Okaras_The_Piano_and_Th...Pooja Bhuva
 
COMMUNICATING NEGATIVE NEWS - APPROACHES .pptx
COMMUNICATING NEGATIVE NEWS - APPROACHES .pptxCOMMUNICATING NEGATIVE NEWS - APPROACHES .pptx
COMMUNICATING NEGATIVE NEWS - APPROACHES .pptxannathomasp01
 
Exploring_the_Narrative_Style_of_Amitav_Ghoshs_Gun_Island.pptx
Exploring_the_Narrative_Style_of_Amitav_Ghoshs_Gun_Island.pptxExploring_the_Narrative_Style_of_Amitav_Ghoshs_Gun_Island.pptx
Exploring_the_Narrative_Style_of_Amitav_Ghoshs_Gun_Island.pptxPooja Bhuva
 
How to Create and Manage Wizard in Odoo 17
How to Create and Manage Wizard in Odoo 17How to Create and Manage Wizard in Odoo 17
How to Create and Manage Wizard in Odoo 17Celine George
 
Jual Obat Aborsi Hongkong ( Asli No.1 ) 085657271886 Obat Penggugur Kandungan...
Jual Obat Aborsi Hongkong ( Asli No.1 ) 085657271886 Obat Penggugur Kandungan...Jual Obat Aborsi Hongkong ( Asli No.1 ) 085657271886 Obat Penggugur Kandungan...
Jual Obat Aborsi Hongkong ( Asli No.1 ) 085657271886 Obat Penggugur Kandungan...ZurliaSoop
 
NO1 Top Black Magic Specialist In Lahore Black magic In Pakistan Kala Ilam Ex...
NO1 Top Black Magic Specialist In Lahore Black magic In Pakistan Kala Ilam Ex...NO1 Top Black Magic Specialist In Lahore Black magic In Pakistan Kala Ilam Ex...
NO1 Top Black Magic Specialist In Lahore Black magic In Pakistan Kala Ilam Ex...Amil baba
 
HMCS Vancouver Pre-Deployment Brief - May 2024 (Web Version).pptx
HMCS Vancouver Pre-Deployment Brief - May 2024 (Web Version).pptxHMCS Vancouver Pre-Deployment Brief - May 2024 (Web Version).pptx
HMCS Vancouver Pre-Deployment Brief - May 2024 (Web Version).pptxmarlenawright1
 

Último (20)

Python Notes for mca i year students osmania university.docx
Python Notes for mca i year students osmania university.docxPython Notes for mca i year students osmania university.docx
Python Notes for mca i year students osmania university.docx
 
Key note speaker Neum_Admir Softic_ENG.pdf
Key note speaker Neum_Admir Softic_ENG.pdfKey note speaker Neum_Admir Softic_ENG.pdf
Key note speaker Neum_Admir Softic_ENG.pdf
 
TỔNG ÔN TẬP THI VÀO LỚP 10 MÔN TIẾNG ANH NĂM HỌC 2023 - 2024 CÓ ĐÁP ÁN (NGỮ Â...
TỔNG ÔN TẬP THI VÀO LỚP 10 MÔN TIẾNG ANH NĂM HỌC 2023 - 2024 CÓ ĐÁP ÁN (NGỮ Â...TỔNG ÔN TẬP THI VÀO LỚP 10 MÔN TIẾNG ANH NĂM HỌC 2023 - 2024 CÓ ĐÁP ÁN (NGỮ Â...
TỔNG ÔN TẬP THI VÀO LỚP 10 MÔN TIẾNG ANH NĂM HỌC 2023 - 2024 CÓ ĐÁP ÁN (NGỮ Â...
 
Beyond_Borders_Understanding_Anime_and_Manga_Fandom_A_Comprehensive_Audience_...
Beyond_Borders_Understanding_Anime_and_Manga_Fandom_A_Comprehensive_Audience_...Beyond_Borders_Understanding_Anime_and_Manga_Fandom_A_Comprehensive_Audience_...
Beyond_Borders_Understanding_Anime_and_Manga_Fandom_A_Comprehensive_Audience_...
 
Mehran University Newsletter Vol-X, Issue-I, 2024
Mehran University Newsletter Vol-X, Issue-I, 2024Mehran University Newsletter Vol-X, Issue-I, 2024
Mehran University Newsletter Vol-X, Issue-I, 2024
 
Salient Features of India constitution especially power and functions
Salient Features of India constitution especially power and functionsSalient Features of India constitution especially power and functions
Salient Features of India constitution especially power and functions
 
Holdier Curriculum Vitae (April 2024).pdf
Holdier Curriculum Vitae (April 2024).pdfHoldier Curriculum Vitae (April 2024).pdf
Holdier Curriculum Vitae (April 2024).pdf
 
Sociology 101 Demonstration of Learning Exhibit
Sociology 101 Demonstration of Learning ExhibitSociology 101 Demonstration of Learning Exhibit
Sociology 101 Demonstration of Learning Exhibit
 
Kodo Millet PPT made by Ghanshyam bairwa college of Agriculture kumher bhara...
Kodo Millet  PPT made by Ghanshyam bairwa college of Agriculture kumher bhara...Kodo Millet  PPT made by Ghanshyam bairwa college of Agriculture kumher bhara...
Kodo Millet PPT made by Ghanshyam bairwa college of Agriculture kumher bhara...
 
SOC 101 Demonstration of Learning Presentation
SOC 101 Demonstration of Learning PresentationSOC 101 Demonstration of Learning Presentation
SOC 101 Demonstration of Learning Presentation
 
Google Gemini An AI Revolution in Education.pptx
Google Gemini An AI Revolution in Education.pptxGoogle Gemini An AI Revolution in Education.pptx
Google Gemini An AI Revolution in Education.pptx
 
Jamworks pilot and AI at Jisc (20/03/2024)
Jamworks pilot and AI at Jisc (20/03/2024)Jamworks pilot and AI at Jisc (20/03/2024)
Jamworks pilot and AI at Jisc (20/03/2024)
 
Unit 3 Emotional Intelligence and Spiritual Intelligence.pdf
Unit 3 Emotional Intelligence and Spiritual Intelligence.pdfUnit 3 Emotional Intelligence and Spiritual Intelligence.pdf
Unit 3 Emotional Intelligence and Spiritual Intelligence.pdf
 
Sensory_Experience_and_Emotional_Resonance_in_Gabriel_Okaras_The_Piano_and_Th...
Sensory_Experience_and_Emotional_Resonance_in_Gabriel_Okaras_The_Piano_and_Th...Sensory_Experience_and_Emotional_Resonance_in_Gabriel_Okaras_The_Piano_and_Th...
Sensory_Experience_and_Emotional_Resonance_in_Gabriel_Okaras_The_Piano_and_Th...
 
COMMUNICATING NEGATIVE NEWS - APPROACHES .pptx
COMMUNICATING NEGATIVE NEWS - APPROACHES .pptxCOMMUNICATING NEGATIVE NEWS - APPROACHES .pptx
COMMUNICATING NEGATIVE NEWS - APPROACHES .pptx
 
Exploring_the_Narrative_Style_of_Amitav_Ghoshs_Gun_Island.pptx
Exploring_the_Narrative_Style_of_Amitav_Ghoshs_Gun_Island.pptxExploring_the_Narrative_Style_of_Amitav_Ghoshs_Gun_Island.pptx
Exploring_the_Narrative_Style_of_Amitav_Ghoshs_Gun_Island.pptx
 
How to Create and Manage Wizard in Odoo 17
How to Create and Manage Wizard in Odoo 17How to Create and Manage Wizard in Odoo 17
How to Create and Manage Wizard in Odoo 17
 
Jual Obat Aborsi Hongkong ( Asli No.1 ) 085657271886 Obat Penggugur Kandungan...
Jual Obat Aborsi Hongkong ( Asli No.1 ) 085657271886 Obat Penggugur Kandungan...Jual Obat Aborsi Hongkong ( Asli No.1 ) 085657271886 Obat Penggugur Kandungan...
Jual Obat Aborsi Hongkong ( Asli No.1 ) 085657271886 Obat Penggugur Kandungan...
 
NO1 Top Black Magic Specialist In Lahore Black magic In Pakistan Kala Ilam Ex...
NO1 Top Black Magic Specialist In Lahore Black magic In Pakistan Kala Ilam Ex...NO1 Top Black Magic Specialist In Lahore Black magic In Pakistan Kala Ilam Ex...
NO1 Top Black Magic Specialist In Lahore Black magic In Pakistan Kala Ilam Ex...
 
HMCS Vancouver Pre-Deployment Brief - May 2024 (Web Version).pptx
HMCS Vancouver Pre-Deployment Brief - May 2024 (Web Version).pptxHMCS Vancouver Pre-Deployment Brief - May 2024 (Web Version).pptx
HMCS Vancouver Pre-Deployment Brief - May 2024 (Web Version).pptx
 

Creating an Embedded System Lab

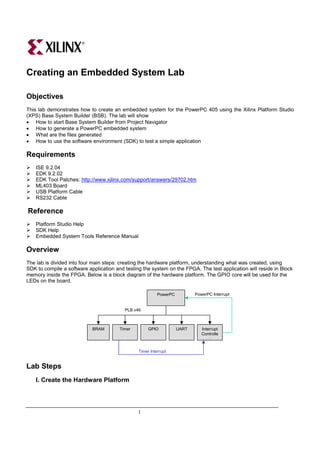
  • 1. Creating an Embedded System Lab Objectives This lab demonstrates how to create an embedded system for the PowerPC 405 using the Xilinx Platform Studio (XPS) Base System Builder (BSB). The lab will show • How to start Base System Builder from Project Navigator • How to generate a PowerPC embedded system • What are the files generated • How to use the software environment (SDK) to test a simple application Requirements ISE 9.2.04 EDK 9.2.02 EDK Tool Patches: http://www.xilinx.com/support/answers/29702.htm ML403 Board USB Platform Cable RS232 Cable Reference Platform Studio Help SDK Help Embedded System Tools Reference Manual Overview The lab is divided into four main steps: creating the hardware platform, understanding what was created, using SDK to compile a software application and testing the system on the FPGA. The test application will reside in Block memory inside the FPGA. Below is a block diagram of the hardware platform. The GPIO core will be used for the LEDs on the board. PowerPC PowerPC Interrupt PLB v46 BRAM Timer GPIO UART Interrupt Controlle r Timer Interrupt Lab Steps I. Create the Hardware Platform 1
  • 2. We will use Base System Builder to create the platform for the design. The Wizard can quickly create baseline systems for current development boards or for custom boards. The system will include a timer, an Interrupt Controller, a UART Lite, a GPIO controller for the LEDs, and internal Block RAM memory. 1. Start Xilinx ISE Project Navigator and start a new project: File > New Project… 2. Select a project name and location. There should be no spaces in the directory path. Click Next. 3. Select Virtex-4, XC4VFX12, FF668, -10. For this lab, pick VHDL as the Preferred Language. Click Next. 4. Select New Source… then select Embedded Processor. Type ppc_system for the File name. Click Next. Click Finish then OK. 5. Click Next until the Project Summary window then Finish. 6. A message will appear asking if you want to create a Base System using the BSB wizard, click Yes. 7. In the Welcome window click Next to create a new design. 8. Select the Xilinx Virtex-4 ML403 Evaluation Platform from the list of available Xilinx boards and select Revision 1. Click Next 9. In the Select Processor window, PowerPC is selected. Click Next. 10. Configure the processor: • 100MHz for all clocks, FPGA JTAG, no On-Chip memory (OCM). Click Next. 11. Configure IO Interfaces: • XPS UARTLITE (9600, no parity) for the RS232_Uart, XPS GPIO (4-bits) for the LEDs_4Bit, deselect all others. Click Next. • Deselect all peripherals in the Configure IO Interfaces windows. Click Next. 12. In the Add Internal Peripherals window, change the memory size to 64KB then click on Add Peripheral… Add an XPS TIMER: • XPS TIMER (32-bit counter, 1 timer, use interrupt). The interrupt controller will be added automatically when the use interrupt option is selected. Click Next. 2
  • 3. 13. In the Software Setup window, uncheck Memory Test then click Next. 14. In the Configure Peripheral Test Application window, click Next. 15. Click on the Generate button to generate the project. Click on Finish. II. Understanding the System The Base System Builder wizard created all the files needed to get started with an embedded PowerPC system. The Xilinx Platform Studio IDE has all the information for the project. We will look at the interface and the files created. 1. Xilinx Platform Studio provides an integrated environment for creating the software and hardware of an embedded processor system. It also provides an editor and a project management interface to create and edit source code. The complete hardware and software flows can be completed within XPS. Platform Studio SDK provides a more powerful software environment and will be used for the software application during the tutorials. 2. The System Assembly window shows each peripheral used and the connections between the peripherals when the Bus Interface button is selected. We will learn more about the System Assembly view as well as the IP Catalog tab in the next lab. 3
  • 4. 3. The Project tab provides information on the project options used, gives access to the main Project files, and log files. The main Project Files are: • MHS File. The Microprocessor Hardware Specification file contains the hardware specification of the entire system. The MHS file contains the bus architecture used, the peripherals used, the connectivity for the system, the interrupt request priorities, and the address space. The MHS file can also call out custom IP. • MSS File. The Microprocessor Software Specification file defines the software drivers associated with peripherals, standard input/output devices, interrupt handler routines, RTOS and libraries used, and other related software features. • UCF File. The User Constraints File contains the timing and placement constraints for the FPGA. • iMPACT Command File. The download.cmd file contains JTAG chain information to download the design to the FPGA on the development board. • Implementation Options File. The fast_runtime.opt file contains implementation options for all the phases of the FPGA hardware implementation. The options are used to run the standard ISE tools. • Bitgen Options File. The bitgen.ut file provides options when generating the bit file for the FPGA. 4. The Applications tab shows the software applications available for the processor. For this lab, SDK will be used to edit and compile the software. 5. Right-click on the TestApp_Peripheral project and unselect Mark to Initialize BRAMs. 6. Right-click on Default: ppc405_0_bootloop and select Mark to Initialize BRAMs. 7. Click on the BLOCK DIAGRAM tab to view the block diagram for the project. The block shows the connections between the different busses and components in the system. 8. A datasheet of the system can also be generated. Go to Project > Generate and View Design Report to view the design report. 9. To view the general project options go to Project > Project Options… Click Cancel to close the window. 10. Go to Software > Software Platform Settings… to view the software options. The software driver version information can be viewed by selecting Drivers on the left side. These options are used when compiling libraries and BSPs. Click Cancel to close the window. 11. The UCF file needs to be added to the Project Navigator project in order to implement the FPGA design 12. In ISE go to Project > Add Copy of Source… Browse to the ppc_systemdata directory and select ppc_system.ucf. Click Open then OK. 13. Double-click on Update Bitstream with Processor Data to create the hardware bit file. III. Compiling the Test Application Using SDK Platform Studio SDK is an Eclipse based software development environment to create and debug software applications. Features include project management, multiple build configurations, a feature-rich C/C++ code editor, error navigation, a debugging and profiling environment, and source code version control. More time will be spent on the different features of the SDK in the next labs. 1. Launch SDK. In XPS, go to Software > Launch Platform Studio SDK. Click OK. 2. SDK will automatically generate the libraries and BSP for the project. A directory with the name of the processor instance will be created. Within each processor instance directory, C header files that are 4
  • 5. needed by the drivers, driver functions that the particular processor can access, and intermediate files and makefiles that are needed to compile the libraries and drivers are generated. 3. Select Import XPS Application Projects then click on Next. 4. Select the TestApp_Peripheral application then click Finish. 5. The TestApp_Peripheral project was created by Base System Builder to test the project. It contains C source files to test each peripheral and a linker script. Expand the project to view the sources associated with the project. All the files are linked from their original directory. 6. To view the project properties right-click on the TestApp_Peripheral project and select Properties. The C/C++ selection contains all the build options. Click OK to exit. 7. Above the project, all the libraries and include files associated with the hardware project are available to browse. The include directory contains all the header files applicable for the current project. 8. Double click on the TestApp_Peripheral.c file to view the application. The project was compiled when imported from XPS by default if the Build Automatically option is set. You can double-click on the include directives in the right side Outline window to view the source for the headers. 9. Compile the project if not already compiled. Go to Project > Build Project. 10. Initialize the internal BRAM with the application executable. Go to Device Configuration > Program Hardware Settings… 11. Select the TestApp_Peripheral executable. Click Save. 12. The system is ready to be downloaded to the board. IV. Test the Generated System with the Sample Application 1. Connect a serial cable to the RS232 port and connect the Platform USB cable. 2. Power-up the board. 3. Open Hyperterminal and connect at 9600, no parity. 4. Download to the FPGA from SDK: Device Configuration > > Program Hardware. 5. Verify that the different peripheral print statements appear on the Hyperterminal window and that the LEDs are blinking. 6. Close SDK. 5