SlideShare uma empresa Scribd logo
1 de 164
Baixar para ler offline
MODULE 1: OVERVIEW
EXERCISE 1: IDENTIFYING THE CHARACTERISTICS OF CLUSTER-MODE COMPONENTS
In this exercise, identify Cluster-Mode concepts as physical or logical and as having a node Vserver,
administration Vserver, or cluster Vserver scope.
OBJECTIVES
By the end of this exercise, you should be able to:
 Identify Data ONTAP Cluster-Mode concepts as physical or logical
 Identify the scope of Data ONTAP Cluster-Mode concepts
TASK 1: IDENTIFY CLUSTER-MODE CONCEPTS AS PHYSICAL OR LOGICAL
STEP ACTION
1. Put a “P” or “L” beside each item in the following list of Data ONTAP cluster-mode concepts to
indicate whether it is physical or logical.
____ node
____ disk
____ aggregate
____ virtual server (Vserver)
____ cluster
____ network port
____ flexible volume
____ Snapshot copy
____ SnapMirror copy
____ host bus adapter (HBA)
____ LIF
TASK 2: IDENTIFY THE THE SCOPE OF CLUSTER-MODE CONCEPTS
STEP ACTION
1. Put an “N,” “A,” or “D” (or a combination of those letters) beside each item to indicate whether
it has a node Vserver, administration Vserver, or data Vserver scope.
____ disk
____ namespace
____ data LIF
____ network port
____ cluster management LIF
____ flexible volume
____ aggregate
____ Snapshot copy
____ host bus adapter (HBA)
____ LUN
END OF EXERCISE
MODULE 2: INSTALLATION AND CONFIGURATION
EXERCISE 2: CREATING A TWO-NODE CLUSTER
In this exercise, you create a cluster, configure the first node in the cluster, and then add a second node to the
cluster.
OBJECTIVES
By the end of this exercise, you should be able to:
 Create a cluster
 Add a second node to the cluster
TASK 1: CREATE A CLUSTER AND CONFIGURE THE FIRST NODE IN THE CLUSTER
STEP ACTION
1. From the Windows machine in your lab kit, use PuTTY to open a Secure Shell (SSH) session to
the first storage controller in your lab kit and verify that the preconfigured entry is correct.
It is preconfigured in PuTTY as cluster1_01. Your instructor will provide the IP address.
2. Log in as admin.
The password is provided by your instructor.
You are now logged in to the cluster shell.
STEP ACTION
3. Enter the cluster setup command to start the cluster setup wizard.
::> cluster setup
NOTE: If you make a mistake during cluster setup, press Ctrl-C to interrupt the wizard. Restart
the wizard by re-entering cluster setup at the cluster shell prompt.
4. At the prompt, enter create to create a new cluster.
Do you want to create a new cluster or join an existing cluster?
{create, join}:
create
5. When prompted about using the node as a single node cluster, reply no because this will be a
multi-node cluster.
Do you intend for this node to be used as a single node cluster? {yes,
no} [no]: no
6. Enter yes to accept the default values for cluster network configuration.
System Defaults:
Private cluster network ports [e0a,e0b].
Cluster port MTU values will be set to 1500.
Cluster interface IP addresses will be automatically generated.
Do you want to use these defaults? {yes, no} [yes]: yes
7. Name the cluster cluster1.
Enter the cluster name: cluster1
8. Enter the base license key that was provided by your instructor.
You can use lowercase letters for the license key.
Enter the cluster base license key: UJBGVLVQJHOJKBAAAAAAAAAAAAAA
Creating cluster cluster1
Starting cluster support services .....
Cluster cluster1 has been created.
9. Do not add additional license keys at this time but press Enter to continue.
Enter an additional license key []:
STEP ACTION
10. Configure the cluster management resources:
a. Type e0c as the port to host the cluster management interface.
b. Enter the IP address, netmask, and default gateway.
If the addresses are different in your lab environment, they will be provided by your instructor
Enter the cluster management interface port [e0c]: e0c
Enter the cluster management interface IP address: 192.168.0.101
Enter the cluster management interface netmask: 255.255.255.0
Enter the cluster management interface default gateway: 192.168.0.1
11. Enter the domain name and IP address of the DNS server.
Enter the DNS domain names: learn.netapp.local
Enter the name server IP addresses: 192.168.0.11
12. Configure node management:
a. Enter any controller location.
b. Type e0f as the port to host the node management interface.
c. Enter the IP address, netmask, and default gateway provided by your instructor.
d. Press Enter to leave AutoSupport enabled
Where is the controller located []: NetAppU
Enter the node management interface port [e0f]: e0f
Enter the node management interface IP address: 192.168.0.91
Enter the node management interface netmask: 255.255.255.0
Enter the node management interface default gateway: 192.168.0.1
Press enter to continue:
13. If the completion of the cluster setup wizard logs your management session off, log back in as
admin.
14. To check the status of your new cluster, enter the cluster show command at the console.
cluster1::> cluster show
Node Health Eligibility
--------------------- ------- ------------
cluster1_01 true true
TASK 2: ADD A SECOND NODE TO THE CLUSTER
STEP ACTION
1. From the Windows machine in your lab kit, use PuTTY to open an SSH session to the second
storage controller in your lab kit.
It is preconfigured in PuTTY as cluster1_02.
2. Log in as admin.
STEP ACTION
3. Enter the cluster setup command to start the cluster setup wizard.
::> cluster setup
Do you want to create a new cluster or join an existing cluster?
{create, join}: join
4. Accept the cluster network defaults by entering yes.
System Defaults:
Private cluster network ports [e0a,e0b].
Cluster port MTU values will be set to 1500.
Cluster interface IP addresses will be automatically generated.
Do you want to use these defaults? {yes, no} [yes]: yes
5. Enter cluster1 to join the existing cluster.
Enter the name of the cluster you would like to join [cluster1]:
cluster1
6. Configure node management:
a. Type e0f as the default port to host the node management interface.
b. Enter the IP address, netmask, and default gateway provided by your instructor.
c. Press Enter to leave AutoSupport enabled.
Enter the node management interface port [e0c]: e0f
Enter the node management interface IP address: 192.168.0.92
Enter the node management interface netmask: 255.255.255.0
Enter the node management interface default gateway: 192.168.0.1
Press enter to continue:
7. If the completion of the cluster setup wizard logs your management session off, log back in as
admin.
8. To check the status of your new cluster, enter the cluster show command at the console.
cluster1::> cluster show
Node Health Eligibility
--------------------- ------- ------------
cluster1_01 true true
cluster1_02 true true
2 entries were displayed.
9. Type network interface show and observe the cluster interfaces on both nodes and their
associated IPs, noticing that the IP addresses are in a private network range.
network interface show
TASK 3: PRESERVE FREE SPACE ON VOL0 VOLUMES
STEP ACTION
1. This step is necessary only when running a virtualized cluster. The virtual disks attached to each
node are small compared to real hard disks, resulting in unrealistic sizes for aggr0 and vol0.
2. Turn off snapshots on vol0 on both nodes.
system node run -node cluster1_01 vol options vol0 nosnap on
system node run -node cluster1_02 vol options vol0 nosnap on
3. Set snap reserve on vol0 to 0%..
cluster1::> system node run -node cluster1_01 snap reserve vol0 0
cluster1::> system node run -node cluster1_02 snap reserve vol0 0
4. From the command line, show the aggregates:
stor aggr show
You should see only two aggregates, an aggr0 owned by each of the two nodes in the cluster.
NOTE: The #Vols column shows that each aggregate contains one volume. Those are the vol0
volumes for each node. You cannot move them from their respective aggregates as you will be
able to move the volumes that you will create later.
5. Rename the aggr0 aggregates so that they are more easily identifiable.
aggr rename -aggregate aggr0 -newname aggr0_n1
aggr rename -aggregate aggr0_cluster1_02_0 -newname aggr0_n2
6. Verify the new names.
stor aggr show
The aggr0 aggregates have only one data disk each. The size of the data disk is 1GB.
7. Add 3 data disks to each aggr0 aggregate.
aggr add-disk -aggregate aggr0_n1 -diskcount 3
aggr add-disk -aggregate aggr0_n2 -diskcount 3
8. Increase the size of vol0 to 3GB.
system node run -node cluster1_01 vol size vol0 +2g
system node run -node cluster1_02 vol size vol0 +2g
9. Verify the vol0 settings.
volume show -vserver cluster1_01 -volume vol0
volume show -vserver cluster1_02 -volume vol0
END OF EXERCISE
MODULE 3: CLUSTER ADMINISTRATION BASICS
EXERCISE 3: CLUSTER ADMINISTRATION BASICS
In this exercise, you use the CLI and NetApp OnCommand System Manager to explore how to manage a
cluster. You also familiarize yourself with NetApp licensing.
OBJECTIVES
By the end of this exercise, you should be able to:
 Connect to the command shell and explore the command hierarchy
 Review command options
 Compare privilege levels
 Use partial commands and complete commands with the Tab key
 Install NetApp OnCommand System Manager
 Configure NetApp OnCommand System Manager for your cluster
 Manage feature licenses
TASK 1: CONNECT TO THE COMMAND SHELL AND EXPLORE THE COMMAND HIERARCHY
STEP ACTION
1. From one of your node management sessions, enter network interface show and find
the IP address of your cluster management interface.
cluster1::> network interface show
Logical Status Network Current Current Is
Vserver Interface Admin/Oper Address/Mask Node Port Home
----------- ---------- ---------- ------------------ ------------- ------- ----
cluster1
cluster_mgmt up/up 192.168.0.101/24 cluster1_01 e0c true
cluster1_01
clus1 up/up 169.254.206.242/16 cluster1_01 e0a true
clus2 up/up 169.254.52.182/16 cluster1_01 e0b true
mgmt up/up 192.168.0.91/24 cluster1_01 e0f true
cluster1_02
clus1 up/up 169.254.30.234/16 cluster1_02 e0a true
clus2 up/up 169.254.74.109/16 cluster1_02 e0b true
mgmt up/up 192.168.0.92/24 cluster1_02 e0f true
7 entries were displayed.
STEP ACTION
2. In PuTTY, configure a new Secure Shell (SSH) session for the cluster management interface
that you created in the previous exercise, and click Save to preserve the entry.
3. Using PuTTY, log in to the cluster management interface as admin, and compare the interface
and the output of some command shell commands on both the cluster management session and a
node management session.
Are there any differences?
4. Close any open node management sessions by typing exit then pressing Enter, but leave the
cluster management session open.
5. Type ? to review the commands and command directories at the top level of the command
hierarchy.
?
NOTE: You don’t need to press Enter after typing a question mark.
6. Review the objects in the storage command directory.
storage ?
7. From the command shell, review the top-level command directories.
?
NOTE: An entry that ends with a “right angle bracket” (>) symbol is a command directory
rather than a command. The structure resembles a UNIX or a DOS shell, in that you cannot
execute command directory names as you do commands, but you can navigate to them.
Command directories can contain subdirectories, commands, or both. Command directories
provide contextual and hierarchical grouping of commands, so the command structure is not flat.
STEP ACTION
8. Go into the cluster directory.
cluster
NOTE: The question mark can be used at any level of the command hierarchy to see what
commands and directories are available within that context. Notice that the command shell
prompt changes to indicate which context you’re in.
9. Look at the available commands and directories at this level.
?
10. Go into the statistics directory.
Statistics
You’re now in the cluster statistics context.
11. See what’s available at this level.
?
12. Go back (up) one level by typing two periods and then pressing the Enter key.
..
13. Notice that you’re back at the cluster level.
NOTE: From any level, you can enter top to go directly to the top of the entire command
hierarchy.
14. Examine the manual page for the cluster command directory.
man cluster
15. Enter q to exit the manual page.
16. Examine the manual page for the cluster modify directory and compare the output with the
output of the man cluster command in the previous step.
man cluster modify
TASK 2: REVIEW COMMAND OPTIONS
STEP ACTION
1. Go to the storage aggregate level within the command shell.
storage aggr
2. From the storage aggregate level, run this command:
modify ?
NOTE: Square brackets ([]) indicate optional command elements. The output of this command
shows the parameter –aggregate with brackets around the parameter name, but not around
the parameter value. This means that the parameter name is optional, but the value is required.
You can enter the aggregate name as a positional parameter rather than a named parameter, to
save keystrokes. All other parameters and values are optional, but brackets surround both
parameter and value because, if you provide one, you must provide the other (the value cannot
be specified based on positional).
In this case, the aggregate name is required to determine which aggregate will be modified.
Although the other parameters are technically optional, at least one of them should be specified
for this command to be meaningful (that is, to actually modify an attribute of this aggregate).
3. Review the options for the storage aggregate scrub command.
scrub ?
NOTE: As with the modify command, the aggregate name is required, but the parameter name
is optional. In addition, the action value is required, but the parameter name (–action) is
optional. Two possible forms of the command are:
 storage aggregate scrub –aggregate aggr0 –action start
 storage aggregate scrub aggr0 start
4. Review the possible keyword values for the –state parameter.
modify –state ?
TASK 3: COMPARE PRIVILEGE LEVELS
STEP ACTION
1. Look at the volume directory.
volume ?
The default privilege level is admin.
2. Note the commands that are available in this directory context at this privilege level.
3. Switch to the advanced privilege level.
set –privilege advanced
NOTE: Because –privilege is an optional positional parameter of the set command, you
can also specify the desired privilege level as a positional parameter: set advanced.
4. While you are in the advanced privilege level, look again at the volume directory.
volume ?
STEP ACTION
5. Notice the additional commands that are available.
Each command and directory that is available for non-admin privilege levels has an asterisk (*)
in front of its description.
6. Switch back to the admin privilege level.
set admin
TASK 4: USE PARTIAL COMMANDS AND COMPLETE COMMANDS WITH THE TAB KEY
STEP ACTION
1. Display the logical interfaces.
network interface show
2. Try the following command:
net int sho
The command fails because this form of the command is ambiguous. Multiple verbs in this
command hierarchy begin with the letters “sho.”
3. Retype the command using the full verb, show.
ne in show
4. Type the first two letters of the network command directory (ne) and press Tab.
If the substring that you type is unambiguous, when you press Tab, the command shell
completes the substring.
5. Continue the command by typing in and Tab and then sho and Tab.
The network and interface substrings are completed, but because sho is ambiguous within the
context, the command shell displays the options for sho.
6. This time, enter ne, Tab, in, Tab, show.
TASK 5: INSTALL NETAPP ONCOMMAND SYSTEM MANAGER
STEP ACTION
1. Open the CourseFiles directory on your Windows desktop.
2. Double-click sysmgr-setup-3-0X12-win.exe and, if a security warning appears, click Run.
The installation wizard appears.
3. Click Next to start the wizard.
4. Accept the default installation location and click Next.
STEP ACTION
5. Select Automatically select port number, and click Next.
6. After the installation is complete, click Finish.
TASK 6: CONFIGURE NETAPP ONCOMMAND SYSTEM MANAGER FOR YOUR CLUSTER
STEP ACTION
1. On your Windows Server 2008 desktop, double-click the NetApp On-Command System
Manager 3.0 icon.
NetApp System Manager opens to the Home tab.
2. In the Home tab toolbar, click Add.
STEP ACTION
3. Enter your cluster management IP address and click More.
4. Select Credentials, enter the administrator name and password, and click Add.
NetApp System Manager is now configured to manage your cluster.
STEP ACTION
5. Double-click your cluster name in the list to open a tab for the cluster.
6. Examine the NetApp System Manager interface layout and expand each option in the navigation
pane on the left, comparing the results with what you find in the CLI.
STEP ACTION
7. If at any point the Network Configuration Checker appears, select Don’t show this dialog again
and click OK.
TASK 7: EXPLORE PACKAGE LICENSING
STEP ACTION
1. Within the cluster1 tab, select Cluster > cluster1 > Configuration > System Tools >
Licenses.
2. Verify that the Base package is licensed.
3. Click Add to begin adding new licenses for the SnapVault feature.
STEP ACTION
4. Verify that the Add License Packages dialog appears.
5. To follow best practices, you should add feature keys for each node in the cluster, so type the
SnapVault key for each node.
QPLNOHHTVDDCMAOZFAAAAAAAAAAA, EXSBQNSVQFGEYAOZFAAAAAAAAAAA
6. Click Add.
7. Verify that the SnapVault package was correctly identified.
These codes are node locked within the cluster.
8. Click Close.
STEP ACTION
9. To verify that the new package is licensed in the list, click the package to see licensing details in
the lower pane.
10. Switch back to the cluster management SSH PuTTY session and, if necessary, authenticate as
admin.
11. Enter this command to view the cluster’s serial id:
cluster1::> cluster identity show
Cluster UUID: a270d4d1-cd8d-11e2-80c5-123478563412
Cluster Name: cluster1
Cluster Serial Number: 1-80-000099
Cluster Location:
Cluster Contact:
For this sample output, the serial number is 1-80-000099.
STEP ACTION
12. Identify the serial numbers for each system within the cluster.
cluster1::> system node show –fields node,serialnumber
Sample output:
node serialnumber
----------- ------------
cluster1_01 4044744-72-1
cluster1_02 4044744-72-2
2 entries were displayed.
13. Navigate to the license hierarchy.
cluster1::> license
cluster1::system license>
The prompt takes you to the system license command hierarchy.
14. List the available commands.
cluster1::system license> ?
Sample output:
add Add one or more licenses
clean-up Remove unnecessary licenses
delete Delete a license
show Display licenses
status> Display license status
STEP ACTION
15. View the currently licensed packages.
cluster1::system license> show
Serial Number: 1-80-000099
Owner: cluster1
Package Type Description Expiration
----------------- ------- --------------------- ----------------
Base license Cluster Base License -
Serial Number: 1-81-0000000000000004044744721
Owner: cluster1_01
Package Type Description Expiration
----------------- ------- --------------------- ----------------
SnapVault license SnapVault License -
Serial Number: 1-81-0000000000000004044744722
Owner: cluster1_02
Package Type Description Expiration
----------------- ------- --------------------- ----------------
SnapVault license SnapVault License -
3 entries were displayed.
STEP ACTION
16. List details about the available license packages.
cluster1::system license> status show
Sample output:
Package Licensed Method Expiration
----------------- --------------- --------------------
Base license -
NFS none -
CIFS none -
iSCSI none -
FCP none -
CDMI none -
SnapRestore none -
SnapMirror none -
FlexClone none -
SnapVault license -
SnapLock none -
SnapManagerSuite none -
SnapProtectApps none -
V_StorageAttach none -
SnapLock_Enterprise none -
Insight_Balance none -
16 entries were displayed.
17. Add a new demo license for SnapMirror.
cluster1::system license> add –license-code
QDHLRNFLWWPCPFAAAAAAAAAAAAAA
License for package "SnapMirror" installed successfully.
(1 of 1 added successfully)
STEP ACTION
18. Verify the demo license.
cluster1::system license> show
Serial Number: 1-80-000099
Owner: cluster1
Package Type Description Expiration
----------------- ------- --------------------- --------------------
Base license Cluster Base License -
SnapMirror demo SnapMirror License 6/2/2014 08:00:00
Serial Number: 1-81-0000000000000004044744721
Owner: cluster1_01
Package Type Description Expiration
----------------- ------- --------------------- --------------------
SnapVault license SnapVault License -
Serial Number: 1-81-0000000000000004044744722
Owner: cluster1_02
Package Type Description Expiration
----------------- ------- --------------------- --------------------
SnapVault license SnapVault License -
4 entries were displayed.
19. In System Manager, click Refresh and examine the SnapMirror demo license.
20. Delete the new SnapMirror license.
cluster1::system license> delete -serial-number 1-80-000099 -
package SnapMirror
Warning: The following license will be removed:
SnapMirror 1-80-000099
21. Confirm the deletion.
Do you want to continue? {y|n}: y
22. Add the CIFS licenses for both nodes.
cluster1::system license> add -license-code
KCBNKHHTVDDCMAOZFAAAAAAAAAAA, YJIBMNSVQFGEYAOZFAAAAAAAAAAA
License for package "CIFS" and serial number "1-81-
0000000000000004044744721" installed successfully.
License for package "CIFS" and serial number "1-81-
0000000000000004044744722" installed successfully.
(2 of 2 added successfully)
STEP ACTION
23. Verify the new CIFS license.
cluster1::system license> show
Serial Number: 1-80-000099
Owner: cluster1
Package Type Description Expiration
----------------- ------- --------------------- ----------------
Base license Cluster Base License -
Serial Number: 1-81-0000000000000004044744721
Owner: cluster1_01
Package Type Description Expiration
----------------- ------- --------------------- ----------------
CIFS license CIFS License -
SnapVault license SnapVault License -
Serial Number: 1-81-0000000000000004044744722
Owner: cluster1_02
Package Type Description Expiration
----------------- ------- --------------------- ----------------
CIFS license CIFS License -
SnapVault license SnapVault License -
5 entries were displayed.
24. Add the FC license for a node that is not currently in the cluster.
NOTE: You can add license codes for nodes that do not exist in the cluster. This is often done
to “preload” the license for nodes that are going to be added.
cluster1::system license> add –license-code
KOBYNDUCCLPKICAAAAAAAAAAAAAA
License for package "FCP" and serial number "1-81-
0000000000000000000333333" installed successfully.
(1 of 1 added successfully)
STEP ACTION
25. Verify the new FC license.
cluster1::system license> show
Serial Number: 1-80-000099
Owner: cluster1
Package Type Description Expiration
----------------- ------- --------------------- --------------------
Base license Cluster Base License -
Serial Number: 1-81-0000000000000000000333333
Owner: none
Package Type Description Expiration
----------------- ------- --------------------- --------------------
FCP license FCP License -
Serial Number: 1-81-0000000000000004044744721
Owner: cluster1_01
Package Type Description Expiration
----------------- ------- --------------------- --------------------
CIFS license CIFS License -
SnapVault license SnapVault License -
Serial Number: 1-81-0000000000000004044744722
Owner: cluster1_02
Package Type Description Expiration
----------------- ------- --------------------- --------------------
CIFS license CIFS License -
SnapVault license SnapVault License -
6 entries were displayed.
26. Type the following command and then press the Tab key:
cluster1::system license> clean-up -
-unused -expired -simulate
NOTE: You can select expired or unused licenses to be removed. An unused license is a license
that is associated with nodes that don’t belong to the cluster.
Tab
STEP ACTION
27. Verify what will be cleaned up with the unused command.
cluster1::system license> clean-up –unused -simulate
The following licenses will be cleaned up:
Serial number: 1-81-0000000000000000000333333
Owner: none
Package Reason
-------------------- -----------------------------------------------------
FCP Serial number is not used by any node in the cluster
28. Clean up the unused licenses.
cluster1::system license> clean-up -unused
1 unused license deleted.
29. Verify that the FCP license was removed.
cluster1::system license> show
30. Use System Manager or the command shell to enter the other licenses required on cluster1.
cluster1_01 NFS: YHDYJHHTVDDCMAOZFAAAAAAAAAAA
cluster1_02 NFS: MPKMLNSVQFGEYAOZFAAAAAAAAAAA
cluster1_01 iSCSI: WWYBLHHTVDDCMAOZFAAAAAAAAAAA
cluster1_02 iSCSI: KEGQMNSVQFGEYAOZFAAAAAAAAAAA
cluster1_01 FlexClone: EVNYNHHTVDDCMAOZFAAAAAAAAAAA
cluster1_02 FlexClone: SCVMPNSVQFGEYAOZFAAAAAAAAAAA
cluster1_01 SnapRestore: GGSUMHHTVDDCMAOZFAAAAAAAAAAA
cluster1_02 SnapRestore: UNZIONSVQFGEYAOZFAAAAAAAAAAA
cluster1_01 SnapMirror: SAQJNHHTVDDCMAOZFAAAAAAAAAAA
cluster1_02 SnapMirror: GIXXONSVQFGEYAOZFAAAAAAAAAAA
END OF EXERCISE
MODULE 4: ARCHITECTURE
EXERCISE 4: EXPLORING CLUSTERED DATA ONTAP ARCHITECTURE
In this exercise, you identify kernel and user-space processes, answer questions about replicated database
(RDB) and quorum concepts, and answer questions about vol0 volumes and limitations.
OBJECTIVES
By the end of this exercise, you should be able to:
 Identify kernel and user-space processes
 Explain RDB and quorum concepts
 Explain vol0 volumes uses and limitations
TASK 1: IDENTIFY KERNEL AND USER-SPACE PROCESSES
STEP ACTION
1. Using the following list of cluster components, show the path of a network-attached storage
(NAS) write request by labeling each component with a number, starting with 1 for the initiator
of a write request and proceeding in order to the destination of the request.
___Cluster session manager (CSM)
___D-blade
___Data network port
___NFS or CIFS client
___N-blade
___Disks
___Nonvolatile RAM (NVRAM)
TASK 2: EXPLAIN RDB AND QUORUM CONCEPTS
STEP ACTION
1. List the names of the RDB units.
2. Which RDB unit keeps track of the data that is used to operate the clustershell?
3. Which RDB unit keeps track of the volumes and aggregates and which volumes are on which
aggregates?
4. How many healthy nodes are needed in a 16-node cluster to maintain a quorum?
TASK 3: VOL0 AND VSERVER ROOT VOLUMES USES AND LIMITATIONS
STEP ACTION
1. What is the minimum number of vol0 volumes in a 20-node cluster? What is the maximum?
2. What is stored on a vol0 volume?
3. For the following characteristics, write vol0, vsroot, or both to match the volumes with their
characteristics.
a. Is a flexible volume _____
b. Can have Snapshot copies _____
c. Can have mirrors _____
d. Can be accessed by NFS or CIFS clients _____
e. Can be backed up to tape _____
f. Can be copied _____
g. Can be accessed by the systemshell _____
h. Can have junctions to other volumes _____
i. Cannot be moved to another aggregate _____
END OF EXERCISE
MODULE 5: PHYSICAL DATA STORAGE
EXERCISE 5: CREATING AND GROWING AN AGGREGATE
In this exercise, you use the CLI and NetApp OnCommand System Manager to create and add disks to an
aggregate.
OBJECTIVES
By the end of this exercise, you should be able to:
 Create an aggregate
 Add disks to an aggregate
 Create a flash pool
TASK 1: CREATE A NEW AGGREGATE
STEP ACTION
1. From the command line, show the aggregates:
stor aggr show
2. Show the volumes.
volume show
3. View the disks attached to each node, noticing the disks that belong to aggregates and the spare
disks that are available to create additional aggregates.
storage disk show –owner cluster1_01
storage disk show –owner cluster1_02
4. Display disks by type.
Storage disk show –type ?
storage disk show –type fcal –owner cluster1_01
storage disk show –type fcal –owner cluster1_02
storage disk show –type ssd –owner cluster1_01
storage disk show –type ssd –owner cluster1_02
5. Look at the usage information of the storage aggregate create command.
stor aggr create ?
NOTE: To help familiarize yourself with a command, you can type the command without
parameters, followed by a question mark (?).
6. Create an aggregate with the unique name n01_aggr1 (as an abbreviation of aggregate 1 on the
cluster1_01 node).
stor aggr create -aggr n01_aggr1 –node cluster1_01 –disktype
fcal -diskcount 5
NOTE: The aggregate will have the storage capacity of three disks. (Two of the disks are used
for parity for RAID-DP, which is the default RAID type.) This is only an example. In a
production environment, a RAID-DP aggregate of this size is a very inefficient use of disks.
Also, note that the –diskcount parameter cannot exceed the available number of spare disks.
STEP ACTION
7. Review the list of aggregates again.
stor aggr show
8. Review the details for the new aggregate, noticing that the new aggregate has an HA policy of
sfo.
stor aggr show –aggr n01_aggr1
TASK 2: ADD DISKS TO THE AGGREGATE
STEP ACTION
1. Add two disks to the aggregate.
aggr add-disks -aggr n01_aggr1 -diskcount 2
The aggregate now has two parity disks and five data disks.
2. Verify the number of disks in the aggregate and the expanded disk capacity.
aggr show -aggr n01_aggr1
TASK 3: USE SYSTEM MANAGER TO CREATE AN AGGREGATE
STEP ACTION
1. In NetApp System Manager, select Cluster > cluster1 > Storage > Aggregates.
You can see aggr0 for each of the nodes in your cluster, as well as the aggregate that you created
by using the CLI:
STEP ACTION
2. In the Aggregates toolbar, click Create.
The Create Aggregate Wizard appears.
3. Click Next.
4. On the Aggregate Details page, enter these aggregate properties:
a. Enter the Aggregate Name n02_aggr1 and the RAID Type RAID DP.
b. Ensure that the Enable Flash Pool checkbox is not selected.
5. Click Next.
STEP ACTION
6. Click Select Disks.
7. Create the aggregate:
a. Select cluster1_02 to host the aggregate, so that you have one non-root aggregate per node.
(Don’t use the SSDs yet.)
b. Use 10 capacity disks for the aggregate.
c. Click Save and Close.
d. Click Create.
STEP ACTION
8. Click Finish.
9. Navigate to Cluster > Storage > Aggregates and examine the new aggregate.
TASK 4: CREATE A FLASH POOL
In this task, you create a 10-disk aggregate of type “flex,” and then convert it to the HDD tier of a flash pool.
STEP ACTION
1. Type stor aggr create followed by a question mark (?).
stor aggr create ?
NOTE: There is no option to enable hybrids on the create command.
2. We create a standard aggregate of type flex first, then convert it to a Flash Pool. Create a new
10-disk aggregate on cluster1_01. This becomes the HDD tier of our Flash Pool:
stor aggr create –aggr n01_fp1 –node cluster1_01 –diskcount 10
-disktype fcal
3. Inspect the properties of the new aggregate.
stor aggr show –aggr n01_fp1
4. Enable flash pool by setting hybrid-enabled to true on n01_fp1.
stor aggr modify –aggr n01_fp1 –hybrid-enabled true
5. Check the status of your aggregate before adding the SSD tier, noticing the available size.
aggr show -aggr n01_fp1
6. Add SSDs to the aggregate and complete the flash pool.
stor aggr add-disk –aggr n01_fp1 –diskcount 5 –disktype SSD
NOTE: You can also specify a list of SSDs by using the –disklist option.
STEP ACTION
7. Explore the flash pool, noticing these properties:
 The number of disks
 The two RAID groups (in spite of the default RAID group size)
 The available size and the total hybrid cache size
stor aggr show –aggr n01_fp1
8. In System Manager, perform these actions:
a. Select your new flash pool.
b. Below the lower pane, click the Disk Layout tab.
c. Inspect the RAID groups that were created.
END OF EXERCISE
MODULE 6: LOGICAL DATA STORAGE
EXERCISE 6: CREATING A DATA VIRTUAL SERVER AND A FLEXIBLE VOLUME
In this exercise, you create a data virtual storage server (Vserver), create a flexible volume, and mount a
volume in a Vserver’s namespace. You also configure FlexCache and create an infinite volume.
OBJECTIVES
By the end of this exercise, you should be able to:
 Create a data Vserver
 Create a flexible volume
 Mount a volume in a Vserver’s namespace
 Configure FlexCache for a volume
 Create an infinite volume
TASK 1: CREATE A CLUSTER VSERVER
STEP ACTION
1. View the Vservers and volumes in your cluster.
vserver show
volume show
2. View the “node” Vservers and “admin” Vserver.
The node Vservers are the scope in which entities like the vol0 volumes exist, along with the
node management LIFs and cluster LIFs of each node. The administrative Vserver is the scope
in which the cluster management LIF exists.
3. Create a data Vserver named vs1 and provide the name of a root volume (which will be created
by this command).
vserver create -vserver vs1 -rootvolume vs1root -aggr
n01_aggr1 -ns-switch file -rootvolume-security-style unix
NOTE: This command creates the root volume of the Vserver, which means that it’s the root of
this namespace. You created the Vserver root volume on node cluster1_01, but that does not
mean that the Vserver is assigned to node cluster1_01. Vservers are independent of physical
nodes. The root of the Vserver namespace happens to reside there.
4. View the Vserver that you created and note that the new Vserver type is “data.”
vserver show
5. Get more details about the Vserver and notice that all protocols are allowed by default.
vserver show -vserver vs1
6. View the list of volumes.
volume show
The Vserver root volume that was just created is listed.
STEP ACTION
7. Notice the default volume size.
NOTE: You can’t specify a volume size with the vserver create command, but you can
use the volume modify command to change the size.
8. View all the attributes of this volume.
volume show -vserver vs1 -volume vs1root
9. Review the Junction Path value of this volume.
The slash (/) signifies that this is the root volume of this namespace. Giving this volume the
name “vs1root” is merely a convention to make it obvious that this is a Vserver root volume.
10. View the number of volumes on n01_aggr1.
stor aggr show
This reflects the new root volume and the size of it is reflected in (is subtracted from) the
Available field of the aggregate.
TASK 2: CREATE A FLEXIBLE VOLUME
STEP ACTION
1. In your Vserver, on the aggregate n01_aggr1, create a volume.
volume create -vserver vs1 -volume volume1 -aggr
n01_aggr1 -junction-path /vol1
Each volume is associated with one Vserver.
2. View the volumes.
vol show
3. View the details of the new volume.
vol show -vserver vs1 -volume volume1
4. View the assigned security style.
TASK 3: USE SYSTEM MANAGER TO CREATE A FLEXIBLE VOLUME
STEP ACTION
1. In System Manager, select Vservers > cluster1 > vs1 > Storage > Volumes.
Volume1 and the root volume for your Vserver appear.
STEP ACTION
2. In the Volumes toolbar, click the Create button.
3. Name the volume “volume2.”
4. To select a home aggregate for the new volume, click the Choose button and select n02_aggr1.
NOTE: To host a user volume, never choose a node’s aggr0 aggregate.
5. Under Storage Type, verify that NAS is selected.
Hint: What happens when protocols aren’t licensed for your cluster?
6. Set the Total Size to 400 MB.
7. Leave the Snapshot Reserve percentage at the default.
8. Select Thin Provisioned.
9. Click Create.
STEP ACTION
10. After the wizard is finished, verify the new volume in the volume list.
11. Select Vserver > cluster1 > vs1 > Storage > Namespace and verify where the new volume is
mounted in the namespace.
The UI shows that the volume is accessed by clients as /volume2.
NOTE: The junction-path option was not specified when you created the volume with System
Manager. System Manager automatically mounts new volumes at the Vserver root by using the
volume name as the junction name. The default Export Policy has been assigned to the volume.
12. To unmount volume2, click volume2 to select it and then, on the Namespace toolbar, click
Unmount.
NOTE: It is not necessary to force the unmount operation.
13. To begin a series of steps that will remount volume2 in the namespace as vol2 under volume1,
on the Namespace toolbar, click Mount.
The menu lists all unmounted volumes.
14. Select volume2.
15. Change the Junction Name to “vol2.”
STEP ACTION
16. To choose a point in the namespace to mount the volume, click Browse.
17. Expand the namespace and select /vol1 as the mountpoint.
18. To complete the operation, click OK and then click Mount.
STEP ACTION
19. Verify that volume2 is mounted at /vol1/vol2.
TASK 4: CONFIGURE FLEXCACHE FOR A VOLUME
STEP ACTION
1. From the command shell, check the FlexCache options.
volume flexcache ?
volume flexcache create ?
2. Enable FlexCache for volume2.
volume flexcache create -vserver vs1 -origin-volume volume2
3. Display active caches on the cluster.
volume flexcache show
4. Which aggregates were selected for FlexCache volumes?
On which nodes are they hosted?
5. Display all volumes associated with volume2.
volume show -vserver vs1 -volume volume2*
6. What does volume type DC represent?
volume show –type ?
7. How do the FlexCache volumes affect the namespace?
volume show -fields junction-path
TASK 5: CONFIGURE AN INFINITE VOLUME
STEP ACTION
1. From the CLI, create a Vserver to host an infinite volume.
vserver create -vserver vsinf -rootvolume vsinfroot -aggregate
n02_aggr1 -ns-switch file -nm-switch file -rootvolume-security-style
unix -language C -is-repository true
2. Set your session to advanced privilege mode, and enter y in response to the prompt.
You must be in advanced mode to specify aggregates to host your infinite volume.
set advanced
Warning: These advanced commands are potentially dangerous; use them
only when directed to do so by NetApp personnel.
Do you want to continue? {y|n}: y
3. Create a 6-GB infinite volume.
vol create -vserver vsinf -volume bigvolume -size 6gb -junction-path
/big -state online -policy repos_namespace_export_policy
-data-aggr-list n01_aggr1,n02_aggr1
4. Display the volumes.
vol show
vol show –vserver vsinf
5. Set your session to diag privilege mode, and enter y in response to the prompt:
set diag
Warning: These diagnostic commands are for use by NetApp personnel
only.
Do you want to continue? {y|n}: y
6. Display the list of volumes again.
vol show –vserver vsinf
vol show -vserver vsinf -fields is-constituent,constituent-role
7. Examine the aggregates hosting the constituents and the size of the constituents.
vol show -vserver vsinf -fields aggregate,size
8. Set your session back to administrative privilege mode.
set admin
END OF EXERCISE
MODULE 7: PHYSICAL NETWORKING
EXERCISE 7: WORKING WITH NETWORK PORTS
In this exercise, you identify port roles and create an interface group.
OBJECTIVES
By the end of this exercise, you should be able to:
 Identify port roles
 Create an interface group
 Create a virtual LAN (VLAN)
TASK 1: IDENTIFY PORT ROLES
STEP ACTION
1. View the network ports.
network port show
A list of the physical ports, grouped by node, appears. This is the default configuration for this
hardware platform and can be modified if necessary.
2. To determine which ports have physical connections, view the Link column.
3. Write down the roles that you see.
TASK 2: CREATE AN INTERFACE GROUP
You can aggregate ports that aren’t currently hosting logical interfaces. Inspect the Hosted Interfaces column.
In this case, e0d and e0e are available.
STEP ACTION
1. In System Manager, navigate to Nodes > cluster1 > cluster1_01 > Configuration >
Ports/Adapters.
2. To begin creating an interface group, click Create Interface Group.
3. Select the e0d and e0e checkboxes.
STEP ACTION
4. Keep the default Interface group name.
5. Choose Multiple for the Mode and IP based for the Load distribution.
6. Click Create.
7. Check the Ports list to verify the creation of the interface group.
TASK 3: CREATE A VLAN
STEP ACTION
1. In System Manager, navigate to Nodes > cluster1 > cluster1_02 > Configuration >
Ports/Adapters.
2. To begin creating a VLAN on node cluster1_02, click Create VLAN:
3. From the menu, choose port e0e on node cluster1_02 to host the VLAN.
4. Choose a list of VLAN tags to identify each VLAN hosted on this port:
a. Type 11, and then click Add.
b. Repeat with 22 and 33.
STEP ACTION
5. Click Create to create the VLAN.
6. Check the Ports list to verify the creation of the VLANs.
END OF EXERCISE
MODULE 8: LOGICAL NETWORKING
EXERCISE 8: WORKING WITH LOGICAL NETWORK INTERFACES FOR NAS PROTOCOLS
In this exercise, you create a NAS data LIF, explore routing groups, migrate a data LIF, send home a data
LIF, and fail over a data LIF.
OBJECTIVES
By the end of this exercise, you should be able to:
 Create a NAS data LIF
 Explore routing groups
 Migrate a data LIF
 Rehome a data LIF
 Fail over a data LIF
 Create a failover group
TASK 1: CREATE A NAS DATA LIF
STEP ACTION
1. Create a data LIF called “data1” for one of your data IP addresses, setting your interface group
from the previous exercise as the home port.
net int create -vserver vs1 -lif data1 -role data -home-node
cluster1_01 -home-port a0a –address 192.168.0.111 –netmask
255.255.255.0
NOTE: The combination of home node and home port is what determines which physical port
on which physical node will be the home of this LIF. The home concept exists because data
LIFs can migrate to other ports on the same node or to any other node in the cluster.
2. Review the LIFs.
net int show
Now that a LIF is associated with your virtual server (Vserver), the cluster Vserver appears in
the list. This view of the LIFs includes an Is Home field that indicates whether this LIF resides
on its home node and home port, which were chosen when the LIF was created.
3. View the details of the data LIF.
net int show -vserver vs1 -lif data1
This view shows all the attributes of the new LIF. In addition to the Home Node and Home Port
fields, Current Node and Current Port fields exist. If the LIF is migrated, one or both of these
Current fields might differ from the Home fields.
TASK 2: EXPLORE ROUTING GROUPS
STEP ACTION
1. View the routing groups that have been automatically created for you.
network routing-groups show
The ones with the “n” prefix are for the node-management LIFs.
The ones with the “c” prefix are for the cluster and cluster-management LIFs.
The ones with the “d” prefix are for the data LIFs.
2. View the static routes that were automatically created for you within their respective routing
groups.
network routing-groups route show
The cluster-management LIF on the administrative Vserver and the node-management LIFs on
each node Vserver have generic static routes that are set up for every destination (0.0.0.0/0) by
using the same default gateway.
3. Create a static route for the routing group that was automatically created when you created LIF
“data1”.
net routing-groups route create -vserver vs1 -routing-group
d192.168.0.0/24 -destination 0.0.0.0/0 -gateway 192.168.0.1
4. View the static routes again.
net rou rou show
TASK 3: MIGRATE A DATA LIF
STEP ACTION
1. Migrate your data LIF to the other node in your cluster.
net int migrate -vserver vs1 -lif data1 –dest-port e0c -dest-node
cluster1_02
NOTE: The node and port parameters of the net int migrate command are for the
destination node and port. You could have migrated to any other data port (on either node)
instead. Remember that data LIFs aren’t owned by nodes, but they do reside on a node at any
given time, transparent to any NFS and CIFS clients.
2. Review the LIFs.
net int show
In this summary view, your data LIF’s Current Node field is the other node, and its Is Home
field is false.
3. View the details.
net int show -vserver vs1 -lif data1
NOTE: Unlike storage failover (SFO), this LIF migration does not cause a reboot of the node
from which the LIF is moving. Also unlike SFO, LIFs can migrate to any node in the cluster, not
just the high-availability (HA) partner.
STEP ACTION
4. Revert the data LIF (send it “home”).
net int revert -vserver vs1 -lif data1
NOTE: You don’t have to specify the destination node and port. A LIF knows where its home
is.
5. View the LIFs to verify that this one went home.
TASK 4: REHOME A DATA LIF
STEP ACTION
1. Assign the LIF a new home port on port e0d on the opposite node.
net int modify -vserver vs1 –lif data1 -home-node cluster1_02 -home-
port e0d
2. Check the status of your data LIF again.
net int show
It has not yet moved to its home port, but because it is in a migrated state (because the current
port is no longer the home port), the Is Home status is false.
3. Revert the data LIF to send it to its new home.
net int revert -vserver vs1 -lif data1
4. Verify that your data LIF has moved to its new home port.
net int show
TASK 5: FAIL OVER A DATA LIF
STEP ACTION
1. View the failover group that was chosen by default.
net int show -vserver vs1 -lif data1
2. View the Failover Group values for the LIF.
It is set to system-defined.
3. Show the current LIF failover groups and view the targets defined for the data and management
LIFs.
net int failover show
Groups were automatically created for the data LIF.
4. To see how it fails over, reboot the node that hosts LIF data1.
system node reboot –node cluster1_02
5. Type Y to confirm.
STEP ACTION
6. If you are accessing the cluster via the node management interface on cluster1_02, sign in to the
cluster management interface or the node management interface on cluster1_01.
From there you can view all the LIFs by using net int show to see that the data LIF fails
over to the other node.
NOTE: Because the Auto Revert value of the LIF is set to false, the LIF does not revert to its
home port automatically. If the cluster-management LIF is on the node that booted, it also fails
over to the opposite node.
7. When the rebooted node is up and running again, revert the data LIF by issuing this command
from either node:
net int revert -vserver vs1 -lif data*
8. Look at the data LIF to see that it went home.
If the cluster management LIF did indeed fail over, there is no compelling reason to revert it.
TASK 6: DELETE THE VLANS AND THE INTERFACE GROUP
Because we need the port for future exercises, in this task, you delete the VLANs and the interface group that
you created in an earlier exercise.
STEP ACTION
1. Ensure that no LIFs are hosted by the either the interface group or the VLAN.
network interface show
network port show
net port vlan show
2. Delete all VLANs.
net port vlan delete -node cluster1_02 -vlan-name e0e-11
net port vlan delete -node cluster1_02 -vlan-name e0e-22
net port vlan delete -node cluster1_02 -vlan-name e0e-33
3. Take interface group a0a offline.
set advanced
Do you want to continue? {y|n}: y
net port modify -node cluster1_01 -port a0a -up-admin false
set admin
4. Delete the interface group.
net port ifgrp delete -node cluster1_01 -ifgrp a0a
TASK 7: CREATE A FAILOVER GROUP
STEP ACTION
1. Create a custom failover group that excludes data ports e0e on both nodes.
net int failover-groups create -failover-group newfogroup -node
cluster1_01 -port e0c
net int failover-groups show
net int failover-groups create -failover-group newfogroup -node
cluster1_01 -port e0d
net int failover-groups create -failover-group newfogroup -node
cluster1_02 -port e0d
net int failover-groups create -failover-group newfogroup -node
cluster1_02 -port e0c
2. Assign the cluster failover group to the LIF data1.
net int modify -vserver vs1 -lif data1 -failover-group newfogroup
3. Check the failover groups assigned to each LIF.
net int show -fields failover-group
4. Verify the failover targets for data1.
net int failover show -vserver vs1 -lif data1
5. Set your session to diagnostic privilege mode.
set diag
Warning: These diagnostic commands are for use by NetApp
personnel only.
Do you want to continue? {y|n}: y
6. Deactivate the port that hosts LIF data1.
net port modify -node cluster1_02 -port e0d -up-admin false
7. Verify that the port is down.
net port show
8. To which port did data1 migrate?
net int show
9. Reactivate the inactive port.
net port modify -node cluster1_02 -port e0d -up-admin true
net port show
STEP ACTION
10. Revert LIF data1 back to its home port.
net int revert -vserver vs1 -lif data1
net int show
11. Set your session back to administrative privilege mode.
set admin
END OF EXERCISE
MODULE 9: NAS PROTOCOLS
EXERCISE 9: ENABLING CIFS AND NFS CLIENT ACCESS
In this exercise, you create a Vserver, configure CIFS and NFS, and access the Vserver namespace with CIFS
and NFS clients.
OBJECTIVES
By the end of this exercise, you should be able to:
 Create a Vserver
 Use OnCommand System Manager to configure a Vserver and NAS protocols
 Create an export policy
 Create a CIFS share
 Access a CIFS share from a Windows client
 Access the namespace from an NFS client
TASK 1: CONFIGURE A VSERVER TO SERVE CIFS AND NFS
STEP ACTION
1. In the System Manager navigation frame, click Vservers.
2. In the Vservers toolbar, click Create to create a new Vserver.
3. Enter vs2 as the name for your new Vserver.
4. Select the aggregate n02_aggr1.
NOTE: Keep in mind that Vservers are independent of aggregates and nodes. Here you are
simply choosing an aggregate to host the new Vserver’s root volume. Best practices suggest that
you do not use a node root aggregate to host a Vserver root. If you do so, you receive a warning.
STEP ACTION
5. To complete the Vserver Details page of the wizard, take these actions:
a. Data protocols: CIFS and NFS
b. Language: C
c. Security style: UNIX
d. Root aggregate: n02_aggr1
e. DNS configuration: Leave defaults
f. Click Submit & Continue.
6. Select the Retain the CIFS data LIFs checkbox.
This option specifies that the data LIF supports both CIFS and NFS sessions.
STEP ACTION
7. On the Configure CIFS/NFS protocol page, take these actions:
a. IP Address: 192.168.0.121
b. Netmask: 255.255.255.0
c. Gateway: 192.168.0.1
d. Home Node: cluster1_02
e. Home Port: e0d
f. Click OK.
8. Type ntapvs2 as the name for your CIFS server, and enter your fully qualified domain name.
9. Enter the domain administrator name administrator and the password supplied by your
instructor, and then click Submit & Continue.
STEP ACTION
10. On the Vserver administration page, click Skip.
11. Review the configuration summary and click OK.
STEP ACTION
12. In System Manager, select Vservers > cluster1.
13. In the list of Vservers, select vs2 and, on the Vservers toolbar, click the Edit button.
14. Be sure that only the file checkboxes are selected, and clear any other checkboxes.
15. Click the Resource Allocation tab.
STEP ACTION
16. Select Delegate volume creation, and then choose aggregates that are available to host volumes
for this Vserver by clearing the checkboxes for the aggr0 aggregates and selecting the rest.
Best practices suggest that data volumes should never be stored on a node’s aggr0 aggregate.
17. Click Save and Close.
18. If the Configure Services warning appears, click OK.
TASK 2: CREATE A NAS DATA LIF
In the previous task, the Vserver setup wizard configured a data LIF. In this task, you create a second LIF on
the opposite node.
STEP ACTION
1. Select Vservers > cluster1 > vs2 > Configuration > Network Interfaces.
2. Click the Create button to begin creating a data LIF.
3. Click Next.
STEP ACTION
4. Name the LIF vs2_cifs_nfs_lif2 and select the Data role.
5. Click Next.
6. Choose NAS protocols CIFS and NFS and click Next.
STEP ACTION
7. Click Browse.
8. Select e0e on cluster1_01 and click OK.
STEP ACTION
9. Type IP address 192.168.0.122, netmask 255.255.255.0, and gateway
192.168.0.1, and then click Next.
STEP ACTION
10. Review your options and click Next, and then click Finish.
11. Verify creation of the data LIF.
TASK 3: CREATE AN EXPORT POLICY
STEP ACTION
1. Select Vserver > cluster1 > vs2 > Policies > Export Policies.
2. Click the Create Policy button.
3. Name the policy vs2def and click Add to add a rule.
STEP ACTION
4. Specify 0.0.0.0/0 for the client specification.
5. Select both CIFS and NFS for protocols.
6. Select Any for each access type and click OK.
7. Click Create.
TASK 4: CREATE AND EXPORT A VOLUME
STEP ACTION
1. Select Vserver > cluster1 > vs2 > Storage > Volumes.
The root volume for your Vserver is displayed.
2. In the Volumes toolbar, click the Create button to create a new volume.
3. Name the volume vs2_vol01.
4. Click the Choose button to select a home aggregate for the new volume.
5. Select n01_aggr1 and click OK.
6. In the Storage Type area, ensure that NAS is selected.
STEP ACTION
7. To complete the volume specifications, enter these values:
a. Set the Total Size to 400 MB.
b. Leave the Snapshot Reserve at the default.
c. Select the Thin Provisioned checkbox.
d. Click Create.
8. After the wizard completes the volume creation, verify the new volume in the volume list.
STEP ACTION
9. Perform these actions to modify permissions on the volume that was created at the beginning of
this task:
a. With vs2_vol01 selected, click Edit.
b. Select all of the Read, Write, and Execute checkboxes for Owner, Group, and Others.
c. Clear the Thin Provisioned checkbox.
d. Click Save and Close.
10. Repeat the previous step for the vs2 Vserver root volume.
11. Select Vserver > cluster1 > vs2 > Storage > Namespace and verify where the new volume has
been mounted in the namespace.
This page indicates that the volume is accessed by clients as /vs2_vol01 and that the default
export policy has been assigned to the volume.
STEP ACTION
12. To unmount the volume and remount it with a different junction name, select the volume on the
Namespace page, click Unmount and, leaving the “Force volume unmount operation”
checkbox unselected, click Unmount.
13. On the Namespace toolbar, click Mount.
14. Perform the following actions:
a. Select volume vs2_vol01.
b. Type junction name vs2vol1.
c. Click Browse and select the root directory as the junction path.
d. Click Mount.
NOTE: In this exercise, the junction name is slightly different from the volume name. It is not
necessary for the names to be the same. The volume name is used to reference the volume
within the cluster. The junction name is used to reference the root of the volume in the
namespace.
STEP ACTION
15. Verify that the junction path in the vs2 namespace is correct.
16. Select the volume vs2_root and click Change Export Policy.
17. Select export policy vs2def and click Change.
18. Repeat the process for vs2_vol01.
TASK 5: CREATE A CIFS SHARE
STEP ACTION
1. To create a CIFS share for the new volume, select Vserver > cluster1 > vs2 > Storage >
Shares, and click the Create Share button.
2. When the Create Share window appears, click the Browse button to select a folder to share.
NOTE: It is helpful to remember that you share folders, not volumes. You can share a
subdirectory within a volume or any junction path.
STEP ACTION
3. Expand the root directory to view the volume that was recently mounted in the namespace,
select the folder that represents the junction for the volume, and click OK.
4. Change the Share Name to vol1 and click Create.
STEP ACTION
5. Verify that the new CIFS share appears in the Shares list.
6. Create a second CIFS share, sharing the root directory as rootdir.
TASK 6: ACCESS YOUR CIFS SHARE FROM A WINDOWS CLIENT
STEP ACTION
1. From the Windows command line, access the CIFS share by entering the following command:
net view ntapvs2
You access the CIFS server by the name that you assigned when you used the cifs create
command to create the server.
2. If you encounter Error 53 “The Network Path was not found,” attempt to identify the problem
by performing one or more of the following actions:
 Verify that the export policy allows CIFS access.
 Verify that CIFS access is enabled for the Vserver.
 Review the data LIF setup to ensure that the LIF has the proper routing group and that you
can ping the IP address from the Windows client.
 Verify that can you ping the CIFS server by name.
 If you cannot ping the CIFS server by name (the DNS is not set up to resolve the CIFS
server), attempt to access the CIFS server with the IP address of a data LIF.
3. Map a drive letter to the CIFS shares.
net use * ntapvs2vol1
net use * ntapvs2rootdir
4. Verify successful access.
dir z:
dir y:
TASK 7: CONFIGURE CIFS HOME DIRECTORIES
STEP ACTION
1. In System Manager, select Vserver > cluster1 > vs2 > Storage > Shares, and click the Create
Home Directory button.
2. Enter the share name ~%w and the relative path name %w, and click Manage.
3. Click Browse.
NOTE: You can add one or more search paths for a directory name match.
STEP ACTION
4. Select /vs2vol1 and click OK.
5. Click Add.
6. Click Save & Close.
STEP ACTION
7. Click Create.
8. Notice that the home directory share is among your list of CIFS shares.
9. From your Windows desktop, open File Explorer.
STEP ACTION
10. Navigate to the vol1 share on your z: drive.
11. On the vol1 share, create a directory called administrator and, in that directory, create an empty
text file called adminfile.
12. Map a drive to the home-directory share and verify the contents.
net view ntapvs2
net use * ntapvs2~administrator
Drive X: is now connected to ntapvs2~administrator.
X:
dir
Volume in drive X is ~Administrator
Volume Serial Number is 8000-0405
Directory of X:
07/08/2011 01:26 PM <DIR> .
07/08/2011 01:26 PM <DIR> ..
07/08/2011 02:06 PM 13 adminfile.txt
1 File(s) 13 bytes
2 Dir(s) 199,090,176 bytes free
TASK 8: ACCESS YOUR DATA FROM AN NFS CLIENT
STEP ACTION
1. Verify the export policy that was created for your volume.
vserver export-policy rule show -vserver vs2
2. Log in to the Linux machine.
mkdir /mnt/vs2
mkdir /mnt/path01
3. Using the IP address of either data LIF within vs2, access vs2 exports through NFS.
mount -t nfs 192.168.0.121:/ /mnt/vs2
mount -t nfs 192.168.0.122:/vs2vol1 /mnt/path01
4. Explore both NFS mounts, which are mounted at different points in the vs2 namespace, and
locate the home directory that you created earlier in the exercise.
cd /mnt/vs2/vs2vol1/administrator/
ls
adminfile.txt
5. Copy some data into the vs2_vol01 volume, and compare the amount of space that was used
before the copy with the amount of space that is used after the copy:
a. From the cluster shell:
vol show -volume vs2_vol01 -fields used
b. Then from your Linux client:
cd /mnt/path01
cp /usr/include/* .
ls
c. Then from the cluster shell:
vol show -volume vs2_vol01 -fields used
The space consumed before the copy represents the Snapshot copy reserve space.
6. From your Linux client, navigate to the vs2_vol01 volume by using the other mount path.
cd /mnt/vs2/vs2vol1
ls
END OF EXERCISE
MODULE 10: SAN PROTOCOLS
EXERCISE 10: CONFIGURING SCALABLE SAN
In this exercise, you experiment with scalable SAN by configuring a Vserver as an iSCSI target and
connecting a LUN to a Windows host.
OBJECTIVES
By the end of this exercise, you should be able to:
 Use NetApp System Manager to create a Vserver for iSCSI
 Enable an aggregate as a resource for a Vserver
 Configure Windows for multipath I/O (MPIO)
 Install the Windows Host Utilities Kit (HUK)
 Configure the iSCSI software initiator in Windows
 Use NetApp System Manager to create an iSCSI-attached LUN
 Access the iSCSI-attached LUN on the initiator
TASK 1: USE NETAPP SYSTEM MANAGER TO CREATE A VSERVER FOR ISCSI
STEP ACTION
1. In the System Manager navigation frame, click Vservers.
2. On the System Manager Vservers page, click Create to create a Vserver for iSCSI.
STEP ACTION
3. On the Vserver Details page, enter and select the following, and then click Submit & Continue.
 Vserver Name: vsISCSI1
 Data Protocols: iSCSI
 Language: C-POSIX
 Security Style: UNIX
 Aggregate: n01_aggr1
STEP ACTION
4. On the iSCSI configuration page, enter and select the following, and then click Submit &
Continue.
 Target Alias: vsISCSI1_target
 LIFs Per Node: 2
 Starting IP Address: 192.168.0.131
 Netmask: 255.255.255.0
 Gateway: 192.168.0.1
 Review or Modify LIFs configuration checkbox: Select
 Number of portsets: 1
5. On the Vserver administration page, click Skip.
STEP ACTION
6. Review the summary and, click OK.
7. Select Vservers > cluster1 > vsISCSI1 > Configuration > Protocols > iSCSI to review your
iSCSI configuration.
TASK 2: ENABLE AN AGGREGATE AS A RESOURCE FOR A VSERVER
STEP ACTION
1. Select Vservers > cluster1, and then select vsISCSI1.
2. In the menu bar at the top of the page, click Edit.
3. When the Edit Vserver dialog box appears, click the Resource Allocation tab.
4. Select Delegate volume creation, n01_aggr1, and n02_aggr1.
Selecting these values enable this Vserver to provision volumes in these aggregates.
5. Click Save and Close to complete the process.
TASK 3: CONFIGURE WINDOWS FOR MPIO
NOTE: This exercise uses the Microsoft device-specific module (DSM) instead of the NetApp DSM.
STEP ACTION
1. On the Windows desktop, click the Server Manager icon.
Server Manager opens.
2. On the toolbar at the top right of the page, click Manage, and then select Add Roles and
Features.
STEP ACTION
3. Click Next twice, and then in the left pane of the Select destination server page, click Features.
4. On the Select features page, select Multipath I/O and click Next.
STEP ACTION
5. On the Confirm installation selections page, select the “Restart the destination server” checkbox,
reply Yes to the warning, and then click Install.
6. After the feature is installed and the Results window appears, confirm that the installation was
successful and click Close.
7. Close Server Manager.
TASK 4: INSTALL THE WINDOWS HOST UTILITIES
STEP ACTION
1. On the desktop of your Windows system, open the CourseFiles folder.
2. Double-click the NetApp Windows Host Utilities installation file.
3. If are prompted with a security warning, confirm that you want to continue.
4. On the title page of the installation wizard, click Next.
5. Confirm the license agreement and click Next.
6. On the Support for Multipathing page, select Yes, install support for Multipath I/O and click
Next.
7. Confirm the destination folder and click Next.
8. Click Install.
9. If an FC Configuration Tool warning appears, click OK.
10. After the installation is complete, click Yes to restart the Windows system.
STEP ACTION
11. Wait about two minutes before you attempt to reconnect to your Windows Server system.
TASK 5: CONFIGURE THE ISCSI SOFTWARE INITIATOR (IN WINDOWS)
In this task, you use the MPIO instead of Multiple Connections per Session (MCS) technique for
multipathing.
STEP ACTION
1. On your Windows desktop, open the Control Panel.
2. Select View by small icons and double-click iSCSI Initiator.
STEP ACTION
3. If an error message appears to indicate that the Microsoft iSCSI service is not running, click Yes
to start the service.
4. If a message asks if you want to unblock the Microsoft iSCSI service through the Windows
Firewall, click Yes.
5. When the iSCSI Initiator Properties dialog box appears, click the Configuration tab.
6. Record the Initiator Name (IQN): ___________________________________________
STEP ACTION
7. Click the Discovery tab.
8. Click Discover Portal, enter the IP address of one of ports within the vsISCSI1 port set, and
click OK.
STEP ACTION
9. Click the Targets tab.
10. Verify that the discovered target appears in the list and click Connect.
11. In the Connect To Target dialog box, select Enable multi-path and click Advanced.
STEP ACTION
12. In the Advanced Settings dialog box, from the Target portal IP list, select the lowest target
portal IP address, and click OK.
13. Click OK to close the Connect to Target dialog box and start a new iSCSI session between the
initiator and target.
STEP ACTION
14. In the iSCSI Initiator Properties dialog box, click Properties to begin creating additional
sessions with all of the iSCSI LIFs within the port set.
STEP ACTION
15. In the Properties dialog box, on the Sessions tab, ensure that there is only one current session.
16. Click the Portal Groups tab and review the other IPs that are currently available for sessions.
STEP ACTION
17. Click the Sessions tab again.
18. Click Add session.
19. In the Connect To Target dialog box, select Enable multi-path and click Advanced.
20. In the Advanced Settings dialog box, from the Target portal IP list, select the target portal IP
address of one of the iSCSI LIFs that you have not yet assigned.
21. Click OK.
22. In the Connect To Target dialog box, click OK.
STEP ACTION
23. In the Properties dialog box, on the Sessions tab, verify that a new session has been created.
24. Repeat Steps 18–23 to create two more sessions, for a total of four sessions, each with an iSCSI
LIF in the port set of the target.
STEP ACTION
25. Click OK to close the Properties window.
26. Click OK to close the iSCSI Initiator Properties window.
27. Close Control Panel.
TASK 6: USE NETAPP SYSTEM MANAGER TO CREATE AN ISCSI-ATTACHED LUN
STEP ACTION
1. In System Manager, select Vservers > cluster1 > vsISCSI1 > Storage > LUNs.
2. Click the Create button.
The Create LUN Wizard appears.
3. Click Next.
STEP ACTION
4. On the next page, enter and select the following:
 Name: lun_vsISCSI1_1
 LUN Type: Windows 2008
 LUN size: 100 MB
 Thin Provisioned checkbox: clear
5. Click Next.
6. On the LUN Container page, click Choose, select the n01_aggr1 aggregate, and click OK.
7. In the Volume Name text box, accept the default name and click Next.
8. On the Initiators Mapping page, click Add Initiator Group to begin creating an initiator group
(igroup).
STEP ACTION
9. In the Create Initiator Group dialog box, on the General tab, enter or select the following:
 Name: ig_myWin
 Operating System: Windows
 Type: iSCSI
10. In the Portset area, click Choose.
11. Select the port set that you created with the Vserver in task 1 and click OK.
12. Click the Initiators tab and click Add.
13. Enter the initiator IQN that you recorded earlier (Task 5, Step 5) and click OK.
14. Click Create.
STEP ACTION
15. Click OK.
16. Back on the Initiators Mapping page, verify that the new igroup has been added to the list; then
select the Map checkbox to the left of the igroup and click Next.
17. Review the LUN Summary page and click Next.
STEP ACTION
18. Review the Create LUN Wizard completion page and click Finish.
Creation of the iSCSI-attached LUN is now complete.
TASK 7: ACCESS THE ISCSI-ATTACHED LUN ON THE WINDOWS HOST
STEP ACTION
1. In Windows, open Server Manager.
2. On the toolbar at the top right of the page click Tools, and then select Computer Management.
STEP ACTION
3. In the navigation tree on the left, expand the Storage node and select Disk Management.
The LUN appears as a single disk object. All paths are merged into this object.
4. If you do not see the LUN disk in the bottom section of the center pane, right-click the Disk
Management node in the left pane and select Rescan Disks.
5. Right-click the disk header and, if the disk is offline, select online.
6. Right-click the disk header again and select Initialize Disk.
STEP ACTION
7. Review the Initialize Disk dialog box and click OK.
8. In the Disk Management pane, right-click the Unallocated partition and select New Simple
Volume.
9. On the introduction page of the New Simple Volume wizard, click Next.
10. On the Specify Volume Size page, click Next.
STEP ACTION
11. On the Assign Drive Letter or Path page, click Next.
12. On the Format Partition page, perform one of these two actions:
 Click Next to accept the default values.
 In the “Volume label” text box, enter a label (such as the one shown here), and then click
Next.
13. Review the Completing page and click Finish.
STEP ACTION
14. Verify that the new LUN is now provisioned and, when you are finished, close the Computer
Management window.
15. Click Yes to format the disk, and then click Start.
16. When the formatting is complete, click OK, and then close the format window.
17. Close Server Manager.
STEP ACTION
18. Navigate to the mount location of the LUN and verify that you can create a file in the LUN.
END OF EXERCISE
MODULE 11: STORAGE EFFICIENCY
EXERCISE 11: CONFIGURING ADVANCED VOLUME FEATURES
In this exercise, you create a volume so that you can learn about resizing, working with qtrees and quotas,
creating FlexClone volumes, and configuring storage efficiency.
OBJECTIVES
By the end of this exercise, you should be able to:
 Resize a volume
 Create a qtree and set user quotas
 Work with FlexClone volumes
 Enable deduplication and data compression
TASK 1: CREATE A VOLUME
STEP ACTION
1. In System Manager, select Vservers > cluster1 > vs2 > Storage > Volumes, and then click
Create.
2. In the Create Volume window, enter these volume attributes, and then click the Create button:
 Name: dataefficiency
 Aggregate: n02_aggr1
 20 MB size, with 0% Snapshot copy reserve, and thin-provisioned
STEP ACTION
3. Check the Namespace page to see where the volume was mounted.
Remember that System Manager automatically mounts new volumes at /<volname>.
4. Select the dataefficiency volume from the list, click Change Export Policy, and change the
export policy to vs2def.
5. Navigate to the Volumes page for vserver vs2, select the volume dataefficiency, and click Edit.
6. In the Edit Volume window, on the General tab, give the Group and Others read, write, and
execute permissions, and then click Save and Close.
STEP ACTION
7. From your NFS client, create a file in the dataefficiency volume.
cd /mnt/vs2/dataefficiency/
echo “This is the content of datafile in volume dataefficiency” >
datafile
ls
cat datafile
8. In System Manager, on the Shares page, click Create Share to create a CIFS share for the new
volume.
9. Click Browse to select a folder to share, select the dataefficiency junction, and click OK.
STEP ACTION
10. Name the share de and click Create.
11. In Windows, map the new share as the T: drive.
net use t: ntapvs2de
t:
dir
Volume in drive T is de
Volume Serial Number is 8000-0407
Directory of T:
10/03/2011 12:17 PM <DIR> .
10/03/2011 12:17 PM <DIR> ..
10/03/2011 12:18 PM 58 datafile
1 File(s) 58 bytes
2 Dir(s) 104,603,648 bytes free
TASK 2: RESIZE A VOLUME
STEP ACTION
1. In Windows File Explorer, navigate to your T: drive.
You should see the file called datafile that you created in the previous task.
2. From the CourseFiles directory on your desktop, copy the file called 30mfile to the
dataefficiency volume.
When the copy operation fails because there is not enough space on the volume, click Cancel.
3. In System Manager, on the Volumes page, select the dataefficiency volume and click the
Resize button to start the Volume Resize wizard.
4. When the wizard starts, click Next.
STEP ACTION
5. In the Resize Volume Settings window, change the Total capacity value to 100 MB without
changing the value in the Snapshot reserve field, and click Next.
6. On the Delete Snapshot Copies page, click Next.
STEP ACTION
7. On the Summary page, confirm the new capacity, and then click Next and Finish.
8. Copy the 30mfile into the volume.
TASK 3: CREATE A QTREE AND SET QUOTAS
STEP ACTION
1. In System Manager, select Vservers > cluster1 > vs2 > Storage > Qtrees.
2. On the Qtrees page, click Create.
STEP ACTION
3. In the Create Qtree window, on the Details tab, name the qtree qtdemo and ensure that it is in
the dataefficiency volume.
4. On the Quota tab, add a user quota of 5 MB, and then click Create.
5. Select Vservers > cluster1 > vs2 > Storage > Quotas.
STEP ACTION
6. On the Quotas page, on the Quota Status on Volumes tab, select the dataefficiency volume
and, if quota status is off, click Activate to turn it on.
Initialization can take several minutes.
7. Verify that the activation was successful.
You might need to click the Refresh button.
8. On your Windows desktop, from the CourseFiles folder, copy the file 10mfile into T:qtdemo.
9. Notice that the copy operation puts the qtree over quota and click Cancel.
STEP ACTION
10. In System Manager, click the User Defined Quotas, and then click the Edit Limits button.
11. In the Edit Limits window, click the Space Limit tab, change the Hard Limit to 15 MB, and
then click Save and Close.
12. Go back to the Quota Status on Volumes tab, select the dataeffeciency volume, and click
Refresh.
STEP ACTION
13. Copy the 10mfile to T:qtdemo again.
The operation should succeed this time.
TASK 4: USE FLEXCLONE VOLUMES
STEP ACTION
1. On the Volumes page, select the dataefficiency volume, click Clone, and then click Create and
Volume to create a FlexClone copy of the volume.
STEP ACTION
2. In the Create FlexClone Volume window, accept the default name, select Create new Snapshot
copy now, and then click Clone.
3. In the top-right corner of the Volume page, click the small blue icon at the edge to display a
selection list that enables you to add additional fields.
4. Select the Type and Clone checkboxes.
STEP ACTION
5. In System Manager, navigate to the Namespace page and notice that clone1 doesn’t appear in the
Namespace list.
6. Mount your clone volume under the path /vs2vol1 as clone1.
7. Determine where the clone is mounted in the namespace.
8. Check the export policy on the clone and set to vs2def.
9. In Windows File Explorer, from your vs2 root volume drive, navigate to /vs2vol1/clone1.
STEP ACTION
10. From your NFS client, append some text to datafile on clone1.
cd /mnt/vs2/vs2vol1/clone1
ls
30mfile datafile qtdemo
echo "Edited from a FlexClone..." >> datafile
cat datafile
This is the content of datafile in volume dataefficiency.
Edited from a FlexClone...
11. Check the contents of the file on the parent volume, and notice that, although the clone and
parent share common data blocks, they function as separate volumes.
cd /mnt/vs2/dataefficiency/
cat datafile
12. In System Manager, on the Volumes page, select the clone, and then select Clone > Split.
13. In the Clone Split window, select the OK to split the clone and delete all its Snapshot copies
checkbox, and then click Start Split.
The split takes some time to complete.
STEP ACTION
14. On the Volumes page, notice the status in the Clone column.
The clone no longer shares blocks with the parent and is now a separate volume.
15. (Optional) If you wish, you can rename the volume to reflect its new status.
TASK 5: ENABLE DEDUPLICATION AND DATA COMPRESSION
STEP ACTION
1. In System Manager, on the Volumes page, select the dataefficiency volume and click the
Storage Efficiency tab.
2. Select the Enable Storage Efficiency and Enable Compression checkboxes, select Automated
deduplication, and click Save and Close.
STEP ACTION
3. On the Volumes page, notice the dataefficiency volume’s status in the Storage Efficiency
column.
4. With the dataefficiency volume selected, click the Storage Efficiency tab at the bottom of the
Volumes page, and notice that the counters are set to zero.
5. From the CourseFiles directory, copy the 30mfile to the T: drive, which is mounted to the
dataefficiency volume.
STEP ACTION
6. When prompted, click Compare info from both files.
7. Select the checkboxes for both files and click Continue.
8. Monitor the statistics on the Storage Efficiency tab.
It can take several hours to see the result of the data efficiency features. You can start the process
manually with the volume efficiency command:
volume efficiency start -vserver vs2 -volume dataefficiency
END OF EXERCISE
MODULE 12: DATA PROTECTION: SNAPSHOT AND SNAPMIRROR COPIES
EXERCISE 12: WORKING WITH SNAPMIRROR
In this exercise, you create and initialize load sharing (LS) and data protection (DP) SnapMirror replications,
compare DP mirror replication times, add volumes and files to a replicated namespace, schedule periodic
SnapMirror replications, promote an LS mirror, set up Vserver and cluster peer relationships for intercluster
SnapMirror replications, use System Manager to configure a SnapMirror relationship, use the CLI to
configure a SnapMirror relationship, and update SnapMirror relationships.
OBJECTIVES
By the end of this exercise, you should be able to:
 Create and initialize LS and DP SnapMirror replications
 Compare DP mirror replication times
 Add volumes and files to a replicated namespace
 Schedule periodic SnapMirror replications
 Promote an LS mirror
 Set up Vserver and intercluster peer relationships
 Use System Manager to configure a SnapMirror relationship
 Use the CLI to configure a SnapMirror relationship
 Update SnapMirror relationships
TASK 1: CREATE AND INITIALIZE LS AND DP SNAPMIRROR REPLICATIONS
STEP ACTION
1. Create a mirror for the root volume of your virtual server (Vserver) on the same aggregate as the
root volume.
vol create –vserver vs2 –volume vs2_root_ls1 –aggr n01_aggr1 –type dp
NOTE: Although this is an LS mirror, it must be created as a DP mirror volume and then
changed.
2. Establish the mirror relationship between the source volume and the destination volume and
change the destination to an LS mirror.
snapmirror create -source-cluster cluster1 -source-vserver vs2 -source-
volume vs2_root -destination-cluster cluster1 -destination-vserver vs2
-destination-volume vs2_root_ls1 -type ls
3. Create another LS mirror of the same volume on the other node and establish the mirror
relationship with the same source.
vol create -vserver vs2 -vol vs2_root_ls2 -aggr n02_aggr1 -type dp
snapmirror create -source-path cluster1://vs2/vs2_root -destination-
path cluster1://vs2/vs2_root_ls2 -type ls
4. Use a summary view and then an instance (detailed) view to view the mirrors.
snapmirror show
snapmirror show -instance
The state of each mirror is “Uninitialized.” No data has been transferred to the mirrors.
STEP ACTION
5. Perform the initial (baseline) replication to the set of LS mirrors of this source volume.
snapmirror initialize-ls-set -source-path cluster1://vs2/vs2_root
snapmirror show
NOTE: Now that the first replication of the LS mirrors has occurred, all requests that are sent
through existing NFS mounts or CIFS shares to the Vserver root volume are transparently routed
to one of the LS mirrors of this Vserver root volume rather than to the read and write volume.
This includes write requests, which will fail, because mirrors are read-only.
6. Create two DP mirrors.
volume create –vserver vs2 -volume vs2_root_dp1 –aggr n01_aggr1 -type
dp
volume create –vserver vs2 -volume vs2_root_dp2 –aggr n02_aggr1 -type
dp
7. Establish the DP mirror relationships.
snapmirror create -source-path cluster1://vs2/vs2_root -destination-
path cluster1://vs2/vs2_root_dp1 -type dp
snapmirror create -source-path cluster1://vs2/vs2_root -destination-
path cluster1://vs2/vs2_root_dp2 -type dp
snapmirror show
8. Perform the initial (baseline) replication to one of the DP mirrors.
snapmirror initialize -source-path
cluster1://vs2/vs2_root -destination-path cluster1://vs2/vs2_root_dp1
9. View the volume Snapshot copies of the source volume.
volume snapshot show –vserver vs2 -volume vs2_root
NOTE: The Snapshot copies are named with a prefix of “snapmirror.” These Snapshot copies
are specifically for the mirrors and are kept so that future replications to the mirrors can
determine which data is new since the last replication. Two SnapMirror Snapshot copies of this
volume exist. One is for the set of two LS mirrors. The other is for the DP mirror.
10. Review the mirrors.
snapmirror show -inst
NOTE: The mirror root_dp1 has the state “Snapmirrored,” and the Mirror Timestamp field
shows the date and time of that replication. Because this is asynchronous mirroring, mirrors are
only as up to date as the manual replications or the scheduled replications keep them.
TASK 2: COMPARE DP MIRROR REPLICATION TIMES
STEP ACTION
1. Replicate the DP mirror that has not been replicated.
snapmirror initialize -source-path
cluster1://vs2/vs2_root -destination-path cluster1://vs2/vs2_root_dp2
2. Review the mirrors.
snapmirror show -inst
The two DP mirrors have different replication times.
3. View the volume Snapshot copies of the source volume.
volume snapshot show -vserver vs2 -volume vs2_root
NOTE: Three SnapMirror Snapshot copies of this volume exist. They enable SnapMirror
software to perform incremental transfers to the mirrors of this source volume. One of these
SnapMirror Snapshot copies is for the set of two LS mirrors. The other two are for the two
independent DP mirrors.
4. Replicate to both DP mirrors.
snapmirror update -source-path cluster1://vs2/vs2_root -destination-
path cluster1://vs2/vs2_root_dp1
snapmirror update -source-path cluster1://vs2/vs2_root -destination-
path cluster1://vs2/vs2_root_dp2
5. Review the mirrors.
snapmirror show -inst
6. Review the volume Snapshot copies of the source volume.
volume snapshot show -vserver vs2 -volume vs2_root
Three SnapMirror Snapshot copies of this volume still exist.
TASK 3: ADD VOLUMES AND FILES TO A REPLICATED NAMESPACE
STEP ACTION
1. In your Vserver on the aggregate vs2_aggr1, create a volume.
volume create -vserver vs2 -volume vs2_vol03 -aggr
n01_aggr1 -junction-path /vs2vol3 –policy vs2def
2. Access your Linux client machine.
STEP ACTION
3. Assuming that your data LIF is still mounted from that NFS client, view the root of your
namespace.
cd /mnt/vs2
ls
The new volume doesn’t appear in the file list. The new volume is in the namespace, but
because the requests for your Vserver root volume are routed to one of its LS mirrors, you still
see the contents of the root volume as of its last replication, which does not include the junction
for vs2_vol03.
4. From your cluster shell, perform an incremental replication to the set of LS mirrors of the
Vserver root volume.
snapmirror update-ls-set -source-path cluster1://vs2/vs2_root
5. After the mirror jobs are completed, from your NFS client, review the mirror of the root of your
namespace.
ls /mnt/vs2
The junction for vs2_vol03 appears.
6. In the root of the namespace, begin to create a file called “myfile.”
touch /mnt/vs2/myfile
Because the NFS client references one of the LS mirrors, which is read-only, the file creation
fails. No writes can be done to an LS mirror.
7. Using the special .admin path, mount (as “root”) your namespace.
mkdir /mnt/vs2rw
mount <host>:/.admin /mnt/vs2rw
The .admin path forces your mount to use the source volume, which is read and write, rather
than allowing automatic routing to LS mirrors.
8. In the read and write root of the namespace, create a file called “myfile.”
touch /mnt/vs2rw/myfile
ls /mnt/vs2rw/myfile
The new file should appear.
9. Using the “normal” path that is routed to the LS mirrors, view the Vserver root.
ls /mnt/vs2/myfile
Because the new file is on the read/write volume and the LS mirrors have not been re-replicated,
the “myfile” file is not visible.
10. From your cluster shell, perform an incremental replication to the set of LS mirrors of the
Vserver root volume.
snapmirror update-ls-set –source-path cluster1://vs2/vs2_root
STEP ACTION
11. From your NFS client, review the mirror of the root of your namespace.
ls /mnt/vs2/myfile
The file should appear.
TASK 4: SCHEDULE PERIODIC SNAPMIRROR REPLICATIONS
For this exercise, you use the 5min schedule for LS mirrors and the hourly schedule for a DP mirror.
NOTE: In a real-world situation, it might be sufficient to replicate to LS mirrors hourly and DP mirrors daily.
STEP ACTION
1. View the schedules that were created by default.
job schedule show
NOTE: The schedule that you use for replication depends on the data that is contained in each
volume and the requirements of the particular mirror. Some volumes might not need to be
replicated, while other volumes do; for example, the DP mirrors don’t have to be synchronized
as often as the LS mirrors. For this exercise, we’ll use the 5min schedule for LS mirrors and the
hourly schedule for a DP mirror. In the real world, it may be sufficient to replicate to LS mirrors
hourly and DP mirrors daily.
2. Modify one of the LS mirrors to use the 5min schedule.
snapmirror modify -destination-path
cluster1://vs2/vs2_root_ls1 -schedule 5min
3. View the details of the LS mirrors.
snapmirror show -destination-path cluster1://vs2/vs2_root_ls* -instance
snapmirror show -destination-path cluster1://vs2/vs2_root_ls* -fields
schedule
The SnapMirror schedule of each LS mirror is now set to 5min.
4. Modify one of the DP mirrors to use the hourly schedule.
snapmirror modify -destination-path
cluster1://vs2/vs2_root_dp1 -schedule hourly
5. View the details of the DP mirrors.
snapmirror show –fields schedule
NOTE: Only the schedule for the DP mirror that you explicitly modified is set to use this
schedule. Each DP mirror of a read and write volume is separate from the other DP mirrors,
except that they’re associated with the same read and write. They can each have separate
replication schedules, or one DP can have a schedule while another does not.
6. Check the time on a node.
system date show
STEP ACTION
7. While waiting for the scheduled mirror update to run, continue to run the system date
show command and watch for the system clock to reach a multiple of five, which triggers the
replication of all the LS mirrors of this volume.
NOTE: After the system clock reaches the five-minute mark, the mirror update occurs but is not
visible, which means that no job is created for it.
8. To determine which ones were replicated, view the summary of the mirrors.
snapmirror show –instance
snapmirror show -fields newest-snapshot-timestamp
TASK 5: PROMOTE AN LS MIRROR
STEP ACTION
1. Examine the read and write copy of the Vserver root volume and all its mirrors.
volume show -volume vs2_root*
The Type field shows the values RW, LS, and DP.
2. Promote one of the LS mirrors.
snapmirror promote -source-path
cluster1://vs2/vs2_root -destination-path cluster1://vs2/vs2_root_ls2
3. At the prompt to proceed, type y.
4. While the command runs in the foreground, wait for the command to complete.
5. Review this volume family.
volume show -volume vs2_root*
The old read and write volume (vs2_root) is gone and the volume vs2_root_ls2 has the type
RW. The name of the volume didn’t change, but it is the read and write volume now, and all the
mirrors replicate from that volume.
6. Review the SnapMirror relationships.
snapmirror show
Only one LS mirror (vs2_root_ls2) exists.
7. From the newly appointed read/write volume, replicate everything again.
snapmirror update-ls-set –source-path cluster1://vs2/vs2_root_ls2
TASK 6: SET UP AN INTERCLUSTER PEER RELATIONSHIP
STEP ACTION
1. Start a PuTTY session with node cluster2_01 in your lab kit.
2. Log in as admin.
STEP ACTION
3. Start the cluster setup wizard to create a new cluster.
cluster setup
4. Accept the defaults for all values except for the following, and use specific IP addresses and
netmasks provided by your instructor.
 Cluster name: cluster2
 Cluster base license: UJBGVLVQJHOJKBAAAAAAAAAAAAAA
 Additional license: AXRANTDYLHJGKBOZFAAAAAAAAAAA (NFS)
 Additional license: MRPPNTDYLHJGKBOZFAAAAAAAAAAA (CIFS)
 Additional license: IVGXPTDYLHJGKBOZFAAAAAAAAAAA (SnapRestore)
 Additional license: UPEMQTDYLHJGKBOZFAAAAAAAAAAA (SnapMirror)
 Additional license: SEAQRTDYLHJGKBOZFAAAAAAAAAAA (SnapVault)
 Additional license: OEZOOZOAHJMIWBOZFAAAAAAAAAAA (NFS)
 Additional license: AZWDPZOAHJMIWBOZFAAAAAAAAAAA (CIFS)
 Additional license: WCOLRZOAHJMIWBOZFAAAAAAAAAAA (SnapRestore)
 Additional license: IXLASZOAHJMIWBOZFAAAAAAAAAAA (SnapMirror))
 Additional license: GMHETZOAHJMIWBOZFAAAAAAAAAAA (SnapVault)
 Cluster management port: e0c
 Cluster management IP: 192.168.0.102
 Cluster management subnet mask: 255.255.255.0
 Cluster management gateway: 192.168.0.1
 DNS domain: learn.netapp.local
 Name server IP: 192.168.0.11
 Node management port: e0f
 Node management IP: 192.168.0.93
 Node management netmask: 255.255.255.0
 Node management gateway: 192.168.0.1
5. Start a PuTTY session with node cluster2_02 in your lab kit.
6. Log in as admin, run the cluster setup wizard, and join cluster2.
cluster setup
7. Accept the default for all values except for the following:
 Cluster to join: cluster2
 Node management port: e0f
 Node management IP: 192.168.0.94
 Node management subnet mask: 255.255.255.0
 Node management gateway: 192.168.0.1
8. Enter all license keys from the provided list of licenses.
9. Start System Manager and, on the Home page, click Add to add a cluster under the control of
System Manager.
STEP ACTION
10. Type the cluster management IP address, 192.168.0.102.
11. Click the More button and enter the admin user name and password to authenticate.
12. Click Add.
13. In the list of storage system names, double-click cluster2 to manage cluster2.
14. Notice that tabs in System Manager now represent both clusters.
15. From the cluster shell, create an aggregate on each node.
aggr create -aggr aggr1 -diskcount 6 -nodes cluster2_01
aggr create -aggr aggr2 -diskcount 6 -nodes cluster2_02
STEP ACTION
16. From the cluster2 tab in System Manager, access the Vservers window and click Create to start
the Vserver creation wizard.
17. Accept all defaults except for those that follow.
Your instructor provides specific IP addresses and netmasks.
 Vserver name: vs9
 Language: C
 Protocols: NFS
 Security style: UNIX
 Aggregate: aggr1
 Primary Domain: learn.netapp.local
 Name server: 192.168.0.11
 Data LIF home ports: cluster2_01:e0d
 Data LIF IP addresses: 192.168.0.191
 Data LIF netmask: 255.255.255.0
 Data LIF netmask: 192.168.0.1
18. On the Vserver Administration page, click Skip.
NOTE: Unless the destination Vserver has the same language type as the source Vserver,
SnapMirror software does not let you create an intercluster SnapMirror relationship.
19. Select Vservers > cluster2 > vs9 > Configuration > Network Interfaces, click Create, and
create a second data LIF, using the following values:
 Name: vs9_nfs_lif2
 Role: Data
 Home port: cluster2_02:e0d
 IP address: 192.168.0.192
 Netmask: 255.255.255.0
 Gateway: 192.168.0.1
20. Change the roles of both ports e0e to intercluster.
net port show
net port modify -node cluster2_01 -port e0e -role intercluster
net port modify -node cluster2_02 -port e0e -role intercluster
net port show
STEP ACTION
21. Create intercluster LIFs on cluster2.
net int create -vserver cluster2_01 -lif ic1 -role
intercluster -home-node cluster2_01 -home-port e0e -address
192.168.0.201 -netmask 255.255.255.0
net int create -vserver cluster2_02 -lif ic2 -role
intercluster -home-node cluster2_02 -home-port e0e -address
192.168.0.202 -netmask 255.255.255.0
net int show
NOTE: Intercluster LIFs are associated with node Vservers rather than cluster Vservers.
22. On both nodes in cluster1, create an intercluster LIF, using the IP addresses provided by your
instructor.
net int create -vserver cluster1_01 -lif ic1 -role intercluster -home-
node cluster1_01 -home-port e0e -address 192.168.0.211 -netmask
255.255.255.0
net int create -vserver cluster1_02 -lif ic2 -role intercluster -home-
node cluster1_02 -home-port e0e -address 192.168.0.212 -netmask
255.255.255.0
net int show.
NOTE: Cluster1 intercluster LIFs are hosted on data ports. Cluster2 intercluster LIFs are hosted
on intercluster ports. Both configurations are supported. Use intercluster ports to isolate
replication traffic from client data traffic.
23. Verify routing groups for the intercluster LIFs on both clusters.
network routing-groups show
24. To create a peer relationship between clusters, on the cluster1 tab in System Manager, select
Cluster > cluster1 > Configuration > Peers.
25. To start the peering wizard, click the Create button.
26. Review the intercluster interfaces for cluster1 in the left pane.
27. In the right pane, in the Remote interfaces field, select cluster2, and review the intercluster
interfaces for cluster2.
STEP ACTION
28. Click Create.
29. Select Cluster > cluster2 > Configuration > Peers, and verify the peer relation from cluster2.
30. From the cluster shell of cluster1 and cluster2, verify the peer relationship.
cluster peer show
cluster peer health show
31. Enter the following command to troubleshoot connectivity issues and long response times
between specific intercluster LIFs.
cluster peer ping
TASK 7: CONFIGURE A VSERVER PEER RELATIONSHIP
STEP ACTION
1. From your PuTTY session on cluster1, verify that the cluster peer relationship is currently
configured.
cluster peer show
2. Verify that the source Vserver has the language set to C.
vserver show -vserver vs2 -fields language
STEP ACTION
3. From your PuTTY session on cluster2, verify that the cluster peer relationship is currently
configured.
cluster peer show
4. Verify that the destination Vserver has the language set to C.
vserver show -vserver vs9 -fields language
5. From cluster1, create a new Vserver peer relationship between vs2 in cluster1 and vs9 in
cluster2.
vserver peer create -vserver vs2 -peer-vserver vs9
-applications snapmirror -peer-cluster cluster2
6. From cluster2, accept the peer request.
vserver peer accept –vserver vs9 –peer-vserver vs2
7. From both clusters, verify that the new Vserver peer relationship is successfully configured.
vserver peer show-all
TASK 8: USE SYSTEM MANAGER TO CONFIGURE A SNAPMIRROR RELATIONSHIP
STEP ACTION
1. In System Manager, click the cluster2 tab.
2. Open the Protection window for the vs9 Vserver, click Create, and then click Mirror.
STEP ACTION
3. Configure the mirror relationship as follows:
 Source Cluster: cluster1
 Source Vserver: vs2
 Source Volume: vs2_vol01
 Destination Vserver: vs9
 Destination Volume: vs9_vol01
 Aggregate: aggr1
 Mirror Schedule: hourly
 Initialize Relationship: Select
4. Click Create.
5. Change the name to vs9_vol01 and click Next.
6. In the summary window, click OK.
7. Verify successful initialization of the SnapMirror relationship.
The intercluster initialization might take a few minutes.
STEP ACTION
8. To view the relationship status from cluster1, select Vservers > cluster1 > Storage > Volumes,
select vs2_vol01 from the list, and click the Data Protection tab at the bottom of the page.
TASK 9: USE THE CLI TO CONFIGURE A SNAPMIRROR RELATIONSHIP
STEP ACTION
1. On cluster2, create a destination volume of type DP in aggregate aggr2.
vol create -vserver vs9 -volume vs2_vol03 -aggr aggr2 -size 25mb -type
dp
NOTE: The size of the destination volume must be equal to or greater than the source volume.
2. Create the SnapMirror relationship for vs2_vol03.
snapmirror create -source-path
cluster1://vs2/vs2_vol03 -destination-path cluster2://vs9/vs2_vol03
-type dp -schedule daily
NOTE: The source and destination volume names are not required to be the same. In this
exercise, you chose the names for clarity. This command can be issued from either cluster
without modification.
3. Initialize the SnapMirror relationship.
snapmirror initialize -destination-path cluster2://vs9/vs2_vol03
TASK 10: UPDATE SNAPMIRROR RELATIONSHIPS
STEP ACTION
1. From your CIFS client, copy 30mfile from the CourseFiles folder into the vol1 share.
net use
New connections will be remembered.
Status Local Remote
--------------------------------------------------------
T: ntapvs2de
X: ntapvs2~administrator
Y: ntapvs2rootdir
Z: ntapvs2vol1
The scheduled update occurs daily, but you can perform an on-demand transfer from the CLI or
from System Manager.
2. To perform an on-demand transfer in System Manager, from cluster 2, in the Protection pane,
select the relationship for vs2_vol01, click Operations to see the menu, and then click Update.
STEP ACTION
3. In the Details frame at the bottom of the SnapMirror window, view the status of each
SnapMirror relationship.
END OF EXERCISE
MODULE 13: DATA PROTECTION: BACKUPS AND DISASTER RECOVERY
EXERCISE 13: WORKING WITH SNAPVAULT
In this exercise, perform a SnapVault backup restore data from a SnapVault backup.
OBJECTIVES
By the end of this exercise, you should be able to:
 Configure SnapMirror replication
 Perform a SnapVault backup
 Restore data from a SnapVault backup
TASK 1: CONFIGURE A SNAPVAULT RELATIONSHIP
STEP ACTION
1. In System Manager, click the cluster2 tab and select Vservers > vs9 > Policies > Protection
Policies.
2. Click Create then Vault Policy.
3. Name the policy vs2-vs9-policy, and set the label to XDP and the retention count to 7.
STEP ACTION
4. Click + to add the rule to the policy, and then click Create.
5. Verify creation of the policy.
6. Select Cluster > cluster2 > Configuration > Schedules, and review the current schedules.
Student exercise guide_training_cmode_8.2

Mais conteúdo relacionado

Mais procurados

Installation of oracle 12c RAC on linux vm
Installation of oracle 12c RAC  on linux vmInstallation of oracle 12c RAC  on linux vm
Installation of oracle 12c RAC on linux vmRon Morgan
 
图文详解安装Net backup 6.5备份恢复oracle 10g rac 数据库
图文详解安装Net backup 6.5备份恢复oracle 10g rac 数据库图文详解安装Net backup 6.5备份恢复oracle 10g rac 数据库
图文详解安装Net backup 6.5备份恢复oracle 10g rac 数据库maclean liu
 
Linux con europe_2014_f
Linux con europe_2014_fLinux con europe_2014_f
Linux con europe_2014_fsprdd
 
Whitepaper MS SQL Server on Linux
Whitepaper MS SQL Server on LinuxWhitepaper MS SQL Server on Linux
Whitepaper MS SQL Server on LinuxRoger Eisentrager
 
제4회 한국IBM과 함께하는 난공불락 오픈소스 인프라 세미나-CRUI
제4회 한국IBM과 함께하는 난공불락 오픈소스 인프라 세미나-CRUI제4회 한국IBM과 함께하는 난공불락 오픈소스 인프라 세미나-CRUI
제4회 한국IBM과 함께하는 난공불락 오픈소스 인프라 세미나-CRUITommy Lee
 
Oracle 11g R2 RAC setup on rhel 5.0
Oracle 11g R2 RAC setup on rhel 5.0Oracle 11g R2 RAC setup on rhel 5.0
Oracle 11g R2 RAC setup on rhel 5.0Santosh Kangane
 
Upgrade 11gR2 to 12cR1 Clusterware
Upgrade 11gR2 to 12cR1 ClusterwareUpgrade 11gR2 to 12cR1 Clusterware
Upgrade 11gR2 to 12cR1 ClusterwareNikhil Kumar
 
Building High Availability Clusters with SUSE Linux Enterprise High Availabil...
Building High Availability Clusters with SUSE Linux Enterprise High Availabil...Building High Availability Clusters with SUSE Linux Enterprise High Availabil...
Building High Availability Clusters with SUSE Linux Enterprise High Availabil...Novell
 
RAC-Installing your First Cluster and Database
RAC-Installing your First Cluster and DatabaseRAC-Installing your First Cluster and Database
RAC-Installing your First Cluster and DatabaseNikhil Kumar
 
OpenStack Korea 2015 상반기스터디(devops) 스크립트로 오픈스택 설치하기 20150728
OpenStack Korea 2015 상반기스터디(devops) 스크립트로 오픈스택 설치하기 20150728OpenStack Korea 2015 상반기스터디(devops) 스크립트로 오픈스택 설치하기 20150728
OpenStack Korea 2015 상반기스터디(devops) 스크립트로 오픈스택 설치하기 20150728jieun kim
 
Installing tivoli system automation for high availability of db2 udb bcu on a...
Installing tivoli system automation for high availability of db2 udb bcu on a...Installing tivoli system automation for high availability of db2 udb bcu on a...
Installing tivoli system automation for high availability of db2 udb bcu on a...Banking at Ho Chi Minh city
 
Juniper Chassis Cluster Configuration with SRX-1500s
Juniper Chassis Cluster Configuration with SRX-1500sJuniper Chassis Cluster Configuration with SRX-1500s
Juniper Chassis Cluster Configuration with SRX-1500sAshutosh Patel
 
How to Install Gluster Storage Platform
How to Install Gluster Storage PlatformHow to Install Gluster Storage Platform
How to Install Gluster Storage PlatformGlusterFS
 
ProfessionalVMware BrownBag VCP5 Section3: Storage
ProfessionalVMware BrownBag VCP5 Section3: StorageProfessionalVMware BrownBag VCP5 Section3: Storage
ProfessionalVMware BrownBag VCP5 Section3: StorageProfessionalVMware
 

Mais procurados (19)

Setup guide nos-v3_5
Setup guide nos-v3_5Setup guide nos-v3_5
Setup guide nos-v3_5
 
Installation of oracle 12c RAC on linux vm
Installation of oracle 12c RAC  on linux vmInstallation of oracle 12c RAC  on linux vm
Installation of oracle 12c RAC on linux vm
 
图文详解安装Net backup 6.5备份恢复oracle 10g rac 数据库
图文详解安装Net backup 6.5备份恢复oracle 10g rac 数据库图文详解安装Net backup 6.5备份恢复oracle 10g rac 数据库
图文详解安装Net backup 6.5备份恢复oracle 10g rac 数据库
 
Linux con europe_2014_f
Linux con europe_2014_fLinux con europe_2014_f
Linux con europe_2014_f
 
Whitepaper MS SQL Server on Linux
Whitepaper MS SQL Server on LinuxWhitepaper MS SQL Server on Linux
Whitepaper MS SQL Server on Linux
 
11g r2 rac_guide
11g r2 rac_guide11g r2 rac_guide
11g r2 rac_guide
 
제4회 한국IBM과 함께하는 난공불락 오픈소스 인프라 세미나-CRUI
제4회 한국IBM과 함께하는 난공불락 오픈소스 인프라 세미나-CRUI제4회 한국IBM과 함께하는 난공불락 오픈소스 인프라 세미나-CRUI
제4회 한국IBM과 함께하는 난공불락 오픈소스 인프라 세미나-CRUI
 
Oracle 11g R2 RAC setup on rhel 5.0
Oracle 11g R2 RAC setup on rhel 5.0Oracle 11g R2 RAC setup on rhel 5.0
Oracle 11g R2 RAC setup on rhel 5.0
 
Command reference nos-v3_5
Command reference nos-v3_5Command reference nos-v3_5
Command reference nos-v3_5
 
Upgrade 11gR2 to 12cR1 Clusterware
Upgrade 11gR2 to 12cR1 ClusterwareUpgrade 11gR2 to 12cR1 Clusterware
Upgrade 11gR2 to 12cR1 Clusterware
 
Building High Availability Clusters with SUSE Linux Enterprise High Availabil...
Building High Availability Clusters with SUSE Linux Enterprise High Availabil...Building High Availability Clusters with SUSE Linux Enterprise High Availabil...
Building High Availability Clusters with SUSE Linux Enterprise High Availabil...
 
RAC-Installing your First Cluster and Database
RAC-Installing your First Cluster and DatabaseRAC-Installing your First Cluster and Database
RAC-Installing your First Cluster and Database
 
Wissbi osdc pdf
Wissbi osdc pdfWissbi osdc pdf
Wissbi osdc pdf
 
OpenStack Korea 2015 상반기스터디(devops) 스크립트로 오픈스택 설치하기 20150728
OpenStack Korea 2015 상반기스터디(devops) 스크립트로 오픈스택 설치하기 20150728OpenStack Korea 2015 상반기스터디(devops) 스크립트로 오픈스택 설치하기 20150728
OpenStack Korea 2015 상반기스터디(devops) 스크립트로 오픈스택 설치하기 20150728
 
Installing tivoli system automation for high availability of db2 udb bcu on a...
Installing tivoli system automation for high availability of db2 udb bcu on a...Installing tivoli system automation for high availability of db2 udb bcu on a...
Installing tivoli system automation for high availability of db2 udb bcu on a...
 
Install oracle11gr2 rhel5
Install oracle11gr2 rhel5Install oracle11gr2 rhel5
Install oracle11gr2 rhel5
 
Juniper Chassis Cluster Configuration with SRX-1500s
Juniper Chassis Cluster Configuration with SRX-1500sJuniper Chassis Cluster Configuration with SRX-1500s
Juniper Chassis Cluster Configuration with SRX-1500s
 
How to Install Gluster Storage Platform
How to Install Gluster Storage PlatformHow to Install Gluster Storage Platform
How to Install Gluster Storage Platform
 
ProfessionalVMware BrownBag VCP5 Section3: Storage
ProfessionalVMware BrownBag VCP5 Section3: StorageProfessionalVMware BrownBag VCP5 Section3: Storage
ProfessionalVMware BrownBag VCP5 Section3: Storage
 

Semelhante a Student exercise guide_training_cmode_8.2

Cloud Native ClickHouse at Scale--Using the Altinity Kubernetes Operator-2022...
Cloud Native ClickHouse at Scale--Using the Altinity Kubernetes Operator-2022...Cloud Native ClickHouse at Scale--Using the Altinity Kubernetes Operator-2022...
Cloud Native ClickHouse at Scale--Using the Altinity Kubernetes Operator-2022...Altinity Ltd
 
Advanced Percona XtraDB Cluster in a nutshell... la suite
Advanced Percona XtraDB Cluster in a nutshell... la suiteAdvanced Percona XtraDB Cluster in a nutshell... la suite
Advanced Percona XtraDB Cluster in a nutshell... la suiteKenny Gryp
 
AgileTW Feat. DevOpsTW: 維運 Kubernetes 的兩三事
AgileTW Feat. DevOpsTW: 維運 Kubernetes 的兩三事AgileTW Feat. DevOpsTW: 維運 Kubernetes 的兩三事
AgileTW Feat. DevOpsTW: 維運 Kubernetes 的兩三事smalltown
 
MySQL Galera 集群
MySQL Galera 集群MySQL Galera 集群
MySQL Galera 集群YUCHENG HU
 
Ceph Day Beijing: CeTune: A Framework of Profile and Tune Ceph Performance
Ceph Day Beijing: CeTune: A Framework of Profile and Tune Ceph Performance Ceph Day Beijing: CeTune: A Framework of Profile and Tune Ceph Performance
Ceph Day Beijing: CeTune: A Framework of Profile and Tune Ceph Performance Ceph Community
 
Docker Security Paradigm
Docker Security ParadigmDocker Security Paradigm
Docker Security ParadigmAnis LARGUEM
 
Nagios Conference 2014 - Troy Lea - Monitoring VMware Virtualization Using vMA
Nagios Conference 2014 - Troy Lea - Monitoring VMware Virtualization Using vMANagios Conference 2014 - Troy Lea - Monitoring VMware Virtualization Using vMA
Nagios Conference 2014 - Troy Lea - Monitoring VMware Virtualization Using vMANagios
 
Setting up your virtual infrastructure using FIWARE Lab Cloud
Setting up your virtual infrastructure using FIWARE Lab CloudSetting up your virtual infrastructure using FIWARE Lab Cloud
Setting up your virtual infrastructure using FIWARE Lab CloudFernando Lopez Aguilar
 
Advanced Ops Manager Topics
Advanced Ops Manager TopicsAdvanced Ops Manager Topics
Advanced Ops Manager TopicsMongoDB
 
Building an HPC Cluster in 10 Minutes
Building an HPC Cluster in 10 MinutesBuilding an HPC Cluster in 10 Minutes
Building an HPC Cluster in 10 MinutesMonica Rut Avellino
 
Intro to the FIWARE Lab
Intro to the FIWARE LabIntro to the FIWARE Lab
Intro to the FIWARE LabFIWARE
 
TrinityCore server install guide
TrinityCore server install guideTrinityCore server install guide
TrinityCore server install guideSeungmin Shin
 
[OpenStack 하반기 스터디] Interoperability with ML2: LinuxBridge, OVS and SDN
[OpenStack 하반기 스터디] Interoperability with ML2: LinuxBridge, OVS and SDN[OpenStack 하반기 스터디] Interoperability with ML2: LinuxBridge, OVS and SDN
[OpenStack 하반기 스터디] Interoperability with ML2: LinuxBridge, OVS and SDNOpenStack Korea Community
 
20151222_Interoperability with ML2: LinuxBridge, OVS and SDN
20151222_Interoperability with ML2: LinuxBridge, OVS and SDN20151222_Interoperability with ML2: LinuxBridge, OVS and SDN
20151222_Interoperability with ML2: LinuxBridge, OVS and SDNSungman Jang
 
Advanced percona xtra db cluster in a nutshell... la suite plsc2016
Advanced percona xtra db cluster in a nutshell... la suite plsc2016Advanced percona xtra db cluster in a nutshell... la suite plsc2016
Advanced percona xtra db cluster in a nutshell... la suite plsc2016Frederic Descamps
 
Ccna icnd1-labs - exercices
Ccna icnd1-labs - exercicesCcna icnd1-labs - exercices
Ccna icnd1-labs - exercicessaqrjareh
 
Interconnecting cisco networking devices part-1
Interconnecting cisco networking devices part-1Interconnecting cisco networking devices part-1
Interconnecting cisco networking devices part-1DAVID RAUDALES
 
Network Automation Tools
Network Automation ToolsNetwork Automation Tools
Network Automation ToolsEdwin Beekman
 
Setting up a kubernetes cluster on ubuntu 18.04- loves cloud
Setting up a kubernetes cluster on ubuntu 18.04- loves cloudSetting up a kubernetes cluster on ubuntu 18.04- loves cloud
Setting up a kubernetes cluster on ubuntu 18.04- loves cloudLoves Cloud
 

Semelhante a Student exercise guide_training_cmode_8.2 (20)

Cloud Native ClickHouse at Scale--Using the Altinity Kubernetes Operator-2022...
Cloud Native ClickHouse at Scale--Using the Altinity Kubernetes Operator-2022...Cloud Native ClickHouse at Scale--Using the Altinity Kubernetes Operator-2022...
Cloud Native ClickHouse at Scale--Using the Altinity Kubernetes Operator-2022...
 
Advanced Percona XtraDB Cluster in a nutshell... la suite
Advanced Percona XtraDB Cluster in a nutshell... la suiteAdvanced Percona XtraDB Cluster in a nutshell... la suite
Advanced Percona XtraDB Cluster in a nutshell... la suite
 
AgileTW Feat. DevOpsTW: 維運 Kubernetes 的兩三事
AgileTW Feat. DevOpsTW: 維運 Kubernetes 的兩三事AgileTW Feat. DevOpsTW: 維運 Kubernetes 的兩三事
AgileTW Feat. DevOpsTW: 維運 Kubernetes 的兩三事
 
MySQL Galera 集群
MySQL Galera 集群MySQL Galera 集群
MySQL Galera 集群
 
Ceph Day Beijing: CeTune: A Framework of Profile and Tune Ceph Performance
Ceph Day Beijing: CeTune: A Framework of Profile and Tune Ceph Performance Ceph Day Beijing: CeTune: A Framework of Profile and Tune Ceph Performance
Ceph Day Beijing: CeTune: A Framework of Profile and Tune Ceph Performance
 
Docker Security Paradigm
Docker Security ParadigmDocker Security Paradigm
Docker Security Paradigm
 
Nagios Conference 2014 - Troy Lea - Monitoring VMware Virtualization Using vMA
Nagios Conference 2014 - Troy Lea - Monitoring VMware Virtualization Using vMANagios Conference 2014 - Troy Lea - Monitoring VMware Virtualization Using vMA
Nagios Conference 2014 - Troy Lea - Monitoring VMware Virtualization Using vMA
 
Setting up your virtual infrastructure using FIWARE Lab Cloud
Setting up your virtual infrastructure using FIWARE Lab CloudSetting up your virtual infrastructure using FIWARE Lab Cloud
Setting up your virtual infrastructure using FIWARE Lab Cloud
 
Advanced Ops Manager Topics
Advanced Ops Manager TopicsAdvanced Ops Manager Topics
Advanced Ops Manager Topics
 
Building an HPC Cluster in 10 Minutes
Building an HPC Cluster in 10 MinutesBuilding an HPC Cluster in 10 Minutes
Building an HPC Cluster in 10 Minutes
 
Intro to the FIWARE Lab
Intro to the FIWARE LabIntro to the FIWARE Lab
Intro to the FIWARE Lab
 
TrinityCore server install guide
TrinityCore server install guideTrinityCore server install guide
TrinityCore server install guide
 
[OpenStack 하반기 스터디] Interoperability with ML2: LinuxBridge, OVS and SDN
[OpenStack 하반기 스터디] Interoperability with ML2: LinuxBridge, OVS and SDN[OpenStack 하반기 스터디] Interoperability with ML2: LinuxBridge, OVS and SDN
[OpenStack 하반기 스터디] Interoperability with ML2: LinuxBridge, OVS and SDN
 
20151222_Interoperability with ML2: LinuxBridge, OVS and SDN
20151222_Interoperability with ML2: LinuxBridge, OVS and SDN20151222_Interoperability with ML2: LinuxBridge, OVS and SDN
20151222_Interoperability with ML2: LinuxBridge, OVS and SDN
 
Advanced percona xtra db cluster in a nutshell... la suite plsc2016
Advanced percona xtra db cluster in a nutshell... la suite plsc2016Advanced percona xtra db cluster in a nutshell... la suite plsc2016
Advanced percona xtra db cluster in a nutshell... la suite plsc2016
 
Calico and ubuntu
Calico and ubuntuCalico and ubuntu
Calico and ubuntu
 
Ccna icnd1-labs - exercices
Ccna icnd1-labs - exercicesCcna icnd1-labs - exercices
Ccna icnd1-labs - exercices
 
Interconnecting cisco networking devices part-1
Interconnecting cisco networking devices part-1Interconnecting cisco networking devices part-1
Interconnecting cisco networking devices part-1
 
Network Automation Tools
Network Automation ToolsNetwork Automation Tools
Network Automation Tools
 
Setting up a kubernetes cluster on ubuntu 18.04- loves cloud
Setting up a kubernetes cluster on ubuntu 18.04- loves cloudSetting up a kubernetes cluster on ubuntu 18.04- loves cloud
Setting up a kubernetes cluster on ubuntu 18.04- loves cloud
 

Student exercise guide_training_cmode_8.2

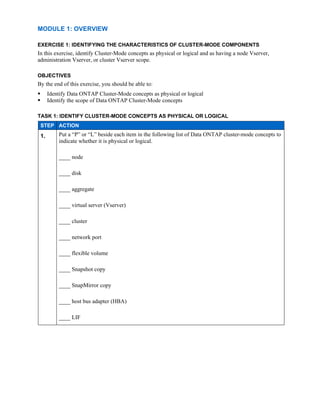
  • 1. MODULE 1: OVERVIEW EXERCISE 1: IDENTIFYING THE CHARACTERISTICS OF CLUSTER-MODE COMPONENTS In this exercise, identify Cluster-Mode concepts as physical or logical and as having a node Vserver, administration Vserver, or cluster Vserver scope. OBJECTIVES By the end of this exercise, you should be able to:  Identify Data ONTAP Cluster-Mode concepts as physical or logical  Identify the scope of Data ONTAP Cluster-Mode concepts TASK 1: IDENTIFY CLUSTER-MODE CONCEPTS AS PHYSICAL OR LOGICAL STEP ACTION 1. Put a “P” or “L” beside each item in the following list of Data ONTAP cluster-mode concepts to indicate whether it is physical or logical. ____ node ____ disk ____ aggregate ____ virtual server (Vserver) ____ cluster ____ network port ____ flexible volume ____ Snapshot copy ____ SnapMirror copy ____ host bus adapter (HBA) ____ LIF
  • 2. TASK 2: IDENTIFY THE THE SCOPE OF CLUSTER-MODE CONCEPTS STEP ACTION 1. Put an “N,” “A,” or “D” (or a combination of those letters) beside each item to indicate whether it has a node Vserver, administration Vserver, or data Vserver scope. ____ disk ____ namespace ____ data LIF ____ network port ____ cluster management LIF ____ flexible volume ____ aggregate ____ Snapshot copy ____ host bus adapter (HBA) ____ LUN END OF EXERCISE
  • 3. MODULE 2: INSTALLATION AND CONFIGURATION EXERCISE 2: CREATING A TWO-NODE CLUSTER In this exercise, you create a cluster, configure the first node in the cluster, and then add a second node to the cluster. OBJECTIVES By the end of this exercise, you should be able to:  Create a cluster  Add a second node to the cluster
  • 4. TASK 1: CREATE A CLUSTER AND CONFIGURE THE FIRST NODE IN THE CLUSTER STEP ACTION 1. From the Windows machine in your lab kit, use PuTTY to open a Secure Shell (SSH) session to the first storage controller in your lab kit and verify that the preconfigured entry is correct. It is preconfigured in PuTTY as cluster1_01. Your instructor will provide the IP address. 2. Log in as admin. The password is provided by your instructor. You are now logged in to the cluster shell.
  • 5. STEP ACTION 3. Enter the cluster setup command to start the cluster setup wizard. ::> cluster setup NOTE: If you make a mistake during cluster setup, press Ctrl-C to interrupt the wizard. Restart the wizard by re-entering cluster setup at the cluster shell prompt. 4. At the prompt, enter create to create a new cluster. Do you want to create a new cluster or join an existing cluster? {create, join}: create 5. When prompted about using the node as a single node cluster, reply no because this will be a multi-node cluster. Do you intend for this node to be used as a single node cluster? {yes, no} [no]: no 6. Enter yes to accept the default values for cluster network configuration. System Defaults: Private cluster network ports [e0a,e0b]. Cluster port MTU values will be set to 1500. Cluster interface IP addresses will be automatically generated. Do you want to use these defaults? {yes, no} [yes]: yes 7. Name the cluster cluster1. Enter the cluster name: cluster1 8. Enter the base license key that was provided by your instructor. You can use lowercase letters for the license key. Enter the cluster base license key: UJBGVLVQJHOJKBAAAAAAAAAAAAAA Creating cluster cluster1 Starting cluster support services ..... Cluster cluster1 has been created. 9. Do not add additional license keys at this time but press Enter to continue. Enter an additional license key []:
  • 6. STEP ACTION 10. Configure the cluster management resources: a. Type e0c as the port to host the cluster management interface. b. Enter the IP address, netmask, and default gateway. If the addresses are different in your lab environment, they will be provided by your instructor Enter the cluster management interface port [e0c]: e0c Enter the cluster management interface IP address: 192.168.0.101 Enter the cluster management interface netmask: 255.255.255.0 Enter the cluster management interface default gateway: 192.168.0.1 11. Enter the domain name and IP address of the DNS server. Enter the DNS domain names: learn.netapp.local Enter the name server IP addresses: 192.168.0.11 12. Configure node management: a. Enter any controller location. b. Type e0f as the port to host the node management interface. c. Enter the IP address, netmask, and default gateway provided by your instructor. d. Press Enter to leave AutoSupport enabled Where is the controller located []: NetAppU Enter the node management interface port [e0f]: e0f Enter the node management interface IP address: 192.168.0.91 Enter the node management interface netmask: 255.255.255.0 Enter the node management interface default gateway: 192.168.0.1 Press enter to continue: 13. If the completion of the cluster setup wizard logs your management session off, log back in as admin. 14. To check the status of your new cluster, enter the cluster show command at the console. cluster1::> cluster show Node Health Eligibility --------------------- ------- ------------ cluster1_01 true true TASK 2: ADD A SECOND NODE TO THE CLUSTER STEP ACTION 1. From the Windows machine in your lab kit, use PuTTY to open an SSH session to the second storage controller in your lab kit. It is preconfigured in PuTTY as cluster1_02. 2. Log in as admin.
  • 7. STEP ACTION 3. Enter the cluster setup command to start the cluster setup wizard. ::> cluster setup Do you want to create a new cluster or join an existing cluster? {create, join}: join 4. Accept the cluster network defaults by entering yes. System Defaults: Private cluster network ports [e0a,e0b]. Cluster port MTU values will be set to 1500. Cluster interface IP addresses will be automatically generated. Do you want to use these defaults? {yes, no} [yes]: yes 5. Enter cluster1 to join the existing cluster. Enter the name of the cluster you would like to join [cluster1]: cluster1 6. Configure node management: a. Type e0f as the default port to host the node management interface. b. Enter the IP address, netmask, and default gateway provided by your instructor. c. Press Enter to leave AutoSupport enabled. Enter the node management interface port [e0c]: e0f Enter the node management interface IP address: 192.168.0.92 Enter the node management interface netmask: 255.255.255.0 Enter the node management interface default gateway: 192.168.0.1 Press enter to continue: 7. If the completion of the cluster setup wizard logs your management session off, log back in as admin. 8. To check the status of your new cluster, enter the cluster show command at the console. cluster1::> cluster show Node Health Eligibility --------------------- ------- ------------ cluster1_01 true true cluster1_02 true true 2 entries were displayed. 9. Type network interface show and observe the cluster interfaces on both nodes and their associated IPs, noticing that the IP addresses are in a private network range. network interface show
  • 8. TASK 3: PRESERVE FREE SPACE ON VOL0 VOLUMES STEP ACTION 1. This step is necessary only when running a virtualized cluster. The virtual disks attached to each node are small compared to real hard disks, resulting in unrealistic sizes for aggr0 and vol0. 2. Turn off snapshots on vol0 on both nodes. system node run -node cluster1_01 vol options vol0 nosnap on system node run -node cluster1_02 vol options vol0 nosnap on 3. Set snap reserve on vol0 to 0%.. cluster1::> system node run -node cluster1_01 snap reserve vol0 0 cluster1::> system node run -node cluster1_02 snap reserve vol0 0 4. From the command line, show the aggregates: stor aggr show You should see only two aggregates, an aggr0 owned by each of the two nodes in the cluster. NOTE: The #Vols column shows that each aggregate contains one volume. Those are the vol0 volumes for each node. You cannot move them from their respective aggregates as you will be able to move the volumes that you will create later. 5. Rename the aggr0 aggregates so that they are more easily identifiable. aggr rename -aggregate aggr0 -newname aggr0_n1 aggr rename -aggregate aggr0_cluster1_02_0 -newname aggr0_n2 6. Verify the new names. stor aggr show The aggr0 aggregates have only one data disk each. The size of the data disk is 1GB. 7. Add 3 data disks to each aggr0 aggregate. aggr add-disk -aggregate aggr0_n1 -diskcount 3 aggr add-disk -aggregate aggr0_n2 -diskcount 3 8. Increase the size of vol0 to 3GB. system node run -node cluster1_01 vol size vol0 +2g system node run -node cluster1_02 vol size vol0 +2g 9. Verify the vol0 settings. volume show -vserver cluster1_01 -volume vol0 volume show -vserver cluster1_02 -volume vol0 END OF EXERCISE
  • 9. MODULE 3: CLUSTER ADMINISTRATION BASICS EXERCISE 3: CLUSTER ADMINISTRATION BASICS In this exercise, you use the CLI and NetApp OnCommand System Manager to explore how to manage a cluster. You also familiarize yourself with NetApp licensing. OBJECTIVES By the end of this exercise, you should be able to:  Connect to the command shell and explore the command hierarchy  Review command options  Compare privilege levels  Use partial commands and complete commands with the Tab key  Install NetApp OnCommand System Manager  Configure NetApp OnCommand System Manager for your cluster  Manage feature licenses
  • 10. TASK 1: CONNECT TO THE COMMAND SHELL AND EXPLORE THE COMMAND HIERARCHY STEP ACTION 1. From one of your node management sessions, enter network interface show and find the IP address of your cluster management interface. cluster1::> network interface show Logical Status Network Current Current Is Vserver Interface Admin/Oper Address/Mask Node Port Home ----------- ---------- ---------- ------------------ ------------- ------- ---- cluster1 cluster_mgmt up/up 192.168.0.101/24 cluster1_01 e0c true cluster1_01 clus1 up/up 169.254.206.242/16 cluster1_01 e0a true clus2 up/up 169.254.52.182/16 cluster1_01 e0b true mgmt up/up 192.168.0.91/24 cluster1_01 e0f true cluster1_02 clus1 up/up 169.254.30.234/16 cluster1_02 e0a true clus2 up/up 169.254.74.109/16 cluster1_02 e0b true mgmt up/up 192.168.0.92/24 cluster1_02 e0f true 7 entries were displayed.
  • 11. STEP ACTION 2. In PuTTY, configure a new Secure Shell (SSH) session for the cluster management interface that you created in the previous exercise, and click Save to preserve the entry. 3. Using PuTTY, log in to the cluster management interface as admin, and compare the interface and the output of some command shell commands on both the cluster management session and a node management session. Are there any differences? 4. Close any open node management sessions by typing exit then pressing Enter, but leave the cluster management session open. 5. Type ? to review the commands and command directories at the top level of the command hierarchy. ? NOTE: You don’t need to press Enter after typing a question mark. 6. Review the objects in the storage command directory. storage ? 7. From the command shell, review the top-level command directories. ? NOTE: An entry that ends with a “right angle bracket” (>) symbol is a command directory rather than a command. The structure resembles a UNIX or a DOS shell, in that you cannot execute command directory names as you do commands, but you can navigate to them. Command directories can contain subdirectories, commands, or both. Command directories provide contextual and hierarchical grouping of commands, so the command structure is not flat.
  • 12. STEP ACTION 8. Go into the cluster directory. cluster NOTE: The question mark can be used at any level of the command hierarchy to see what commands and directories are available within that context. Notice that the command shell prompt changes to indicate which context you’re in. 9. Look at the available commands and directories at this level. ? 10. Go into the statistics directory. Statistics You’re now in the cluster statistics context. 11. See what’s available at this level. ? 12. Go back (up) one level by typing two periods and then pressing the Enter key. .. 13. Notice that you’re back at the cluster level. NOTE: From any level, you can enter top to go directly to the top of the entire command hierarchy. 14. Examine the manual page for the cluster command directory. man cluster 15. Enter q to exit the manual page. 16. Examine the manual page for the cluster modify directory and compare the output with the output of the man cluster command in the previous step. man cluster modify
  • 13. TASK 2: REVIEW COMMAND OPTIONS STEP ACTION 1. Go to the storage aggregate level within the command shell. storage aggr 2. From the storage aggregate level, run this command: modify ? NOTE: Square brackets ([]) indicate optional command elements. The output of this command shows the parameter –aggregate with brackets around the parameter name, but not around the parameter value. This means that the parameter name is optional, but the value is required. You can enter the aggregate name as a positional parameter rather than a named parameter, to save keystrokes. All other parameters and values are optional, but brackets surround both parameter and value because, if you provide one, you must provide the other (the value cannot be specified based on positional). In this case, the aggregate name is required to determine which aggregate will be modified. Although the other parameters are technically optional, at least one of them should be specified for this command to be meaningful (that is, to actually modify an attribute of this aggregate). 3. Review the options for the storage aggregate scrub command. scrub ? NOTE: As with the modify command, the aggregate name is required, but the parameter name is optional. In addition, the action value is required, but the parameter name (–action) is optional. Two possible forms of the command are:  storage aggregate scrub –aggregate aggr0 –action start  storage aggregate scrub aggr0 start 4. Review the possible keyword values for the –state parameter. modify –state ? TASK 3: COMPARE PRIVILEGE LEVELS STEP ACTION 1. Look at the volume directory. volume ? The default privilege level is admin. 2. Note the commands that are available in this directory context at this privilege level. 3. Switch to the advanced privilege level. set –privilege advanced NOTE: Because –privilege is an optional positional parameter of the set command, you can also specify the desired privilege level as a positional parameter: set advanced. 4. While you are in the advanced privilege level, look again at the volume directory. volume ?
  • 14. STEP ACTION 5. Notice the additional commands that are available. Each command and directory that is available for non-admin privilege levels has an asterisk (*) in front of its description. 6. Switch back to the admin privilege level. set admin TASK 4: USE PARTIAL COMMANDS AND COMPLETE COMMANDS WITH THE TAB KEY STEP ACTION 1. Display the logical interfaces. network interface show 2. Try the following command: net int sho The command fails because this form of the command is ambiguous. Multiple verbs in this command hierarchy begin with the letters “sho.” 3. Retype the command using the full verb, show. ne in show 4. Type the first two letters of the network command directory (ne) and press Tab. If the substring that you type is unambiguous, when you press Tab, the command shell completes the substring. 5. Continue the command by typing in and Tab and then sho and Tab. The network and interface substrings are completed, but because sho is ambiguous within the context, the command shell displays the options for sho. 6. This time, enter ne, Tab, in, Tab, show.
  • 15. TASK 5: INSTALL NETAPP ONCOMMAND SYSTEM MANAGER STEP ACTION 1. Open the CourseFiles directory on your Windows desktop. 2. Double-click sysmgr-setup-3-0X12-win.exe and, if a security warning appears, click Run. The installation wizard appears. 3. Click Next to start the wizard. 4. Accept the default installation location and click Next.
  • 16. STEP ACTION 5. Select Automatically select port number, and click Next. 6. After the installation is complete, click Finish.
  • 17. TASK 6: CONFIGURE NETAPP ONCOMMAND SYSTEM MANAGER FOR YOUR CLUSTER STEP ACTION 1. On your Windows Server 2008 desktop, double-click the NetApp On-Command System Manager 3.0 icon. NetApp System Manager opens to the Home tab. 2. In the Home tab toolbar, click Add.
  • 18. STEP ACTION 3. Enter your cluster management IP address and click More. 4. Select Credentials, enter the administrator name and password, and click Add. NetApp System Manager is now configured to manage your cluster.
  • 19. STEP ACTION 5. Double-click your cluster name in the list to open a tab for the cluster. 6. Examine the NetApp System Manager interface layout and expand each option in the navigation pane on the left, comparing the results with what you find in the CLI.
  • 20. STEP ACTION 7. If at any point the Network Configuration Checker appears, select Don’t show this dialog again and click OK. TASK 7: EXPLORE PACKAGE LICENSING STEP ACTION 1. Within the cluster1 tab, select Cluster > cluster1 > Configuration > System Tools > Licenses. 2. Verify that the Base package is licensed. 3. Click Add to begin adding new licenses for the SnapVault feature.
  • 21. STEP ACTION 4. Verify that the Add License Packages dialog appears. 5. To follow best practices, you should add feature keys for each node in the cluster, so type the SnapVault key for each node. QPLNOHHTVDDCMAOZFAAAAAAAAAAA, EXSBQNSVQFGEYAOZFAAAAAAAAAAA 6. Click Add. 7. Verify that the SnapVault package was correctly identified. These codes are node locked within the cluster. 8. Click Close.
  • 22. STEP ACTION 9. To verify that the new package is licensed in the list, click the package to see licensing details in the lower pane. 10. Switch back to the cluster management SSH PuTTY session and, if necessary, authenticate as admin. 11. Enter this command to view the cluster’s serial id: cluster1::> cluster identity show Cluster UUID: a270d4d1-cd8d-11e2-80c5-123478563412 Cluster Name: cluster1 Cluster Serial Number: 1-80-000099 Cluster Location: Cluster Contact: For this sample output, the serial number is 1-80-000099.
  • 23. STEP ACTION 12. Identify the serial numbers for each system within the cluster. cluster1::> system node show –fields node,serialnumber Sample output: node serialnumber ----------- ------------ cluster1_01 4044744-72-1 cluster1_02 4044744-72-2 2 entries were displayed. 13. Navigate to the license hierarchy. cluster1::> license cluster1::system license> The prompt takes you to the system license command hierarchy. 14. List the available commands. cluster1::system license> ? Sample output: add Add one or more licenses clean-up Remove unnecessary licenses delete Delete a license show Display licenses status> Display license status
  • 24. STEP ACTION 15. View the currently licensed packages. cluster1::system license> show Serial Number: 1-80-000099 Owner: cluster1 Package Type Description Expiration ----------------- ------- --------------------- ---------------- Base license Cluster Base License - Serial Number: 1-81-0000000000000004044744721 Owner: cluster1_01 Package Type Description Expiration ----------------- ------- --------------------- ---------------- SnapVault license SnapVault License - Serial Number: 1-81-0000000000000004044744722 Owner: cluster1_02 Package Type Description Expiration ----------------- ------- --------------------- ---------------- SnapVault license SnapVault License - 3 entries were displayed.
  • 25. STEP ACTION 16. List details about the available license packages. cluster1::system license> status show Sample output: Package Licensed Method Expiration ----------------- --------------- -------------------- Base license - NFS none - CIFS none - iSCSI none - FCP none - CDMI none - SnapRestore none - SnapMirror none - FlexClone none - SnapVault license - SnapLock none - SnapManagerSuite none - SnapProtectApps none - V_StorageAttach none - SnapLock_Enterprise none - Insight_Balance none - 16 entries were displayed. 17. Add a new demo license for SnapMirror. cluster1::system license> add –license-code QDHLRNFLWWPCPFAAAAAAAAAAAAAA License for package "SnapMirror" installed successfully. (1 of 1 added successfully)
  • 26. STEP ACTION 18. Verify the demo license. cluster1::system license> show Serial Number: 1-80-000099 Owner: cluster1 Package Type Description Expiration ----------------- ------- --------------------- -------------------- Base license Cluster Base License - SnapMirror demo SnapMirror License 6/2/2014 08:00:00 Serial Number: 1-81-0000000000000004044744721 Owner: cluster1_01 Package Type Description Expiration ----------------- ------- --------------------- -------------------- SnapVault license SnapVault License - Serial Number: 1-81-0000000000000004044744722 Owner: cluster1_02 Package Type Description Expiration ----------------- ------- --------------------- -------------------- SnapVault license SnapVault License - 4 entries were displayed. 19. In System Manager, click Refresh and examine the SnapMirror demo license. 20. Delete the new SnapMirror license. cluster1::system license> delete -serial-number 1-80-000099 - package SnapMirror Warning: The following license will be removed: SnapMirror 1-80-000099 21. Confirm the deletion. Do you want to continue? {y|n}: y 22. Add the CIFS licenses for both nodes. cluster1::system license> add -license-code KCBNKHHTVDDCMAOZFAAAAAAAAAAA, YJIBMNSVQFGEYAOZFAAAAAAAAAAA License for package "CIFS" and serial number "1-81- 0000000000000004044744721" installed successfully. License for package "CIFS" and serial number "1-81- 0000000000000004044744722" installed successfully. (2 of 2 added successfully)
  • 27. STEP ACTION 23. Verify the new CIFS license. cluster1::system license> show Serial Number: 1-80-000099 Owner: cluster1 Package Type Description Expiration ----------------- ------- --------------------- ---------------- Base license Cluster Base License - Serial Number: 1-81-0000000000000004044744721 Owner: cluster1_01 Package Type Description Expiration ----------------- ------- --------------------- ---------------- CIFS license CIFS License - SnapVault license SnapVault License - Serial Number: 1-81-0000000000000004044744722 Owner: cluster1_02 Package Type Description Expiration ----------------- ------- --------------------- ---------------- CIFS license CIFS License - SnapVault license SnapVault License - 5 entries were displayed. 24. Add the FC license for a node that is not currently in the cluster. NOTE: You can add license codes for nodes that do not exist in the cluster. This is often done to “preload” the license for nodes that are going to be added. cluster1::system license> add –license-code KOBYNDUCCLPKICAAAAAAAAAAAAAA License for package "FCP" and serial number "1-81- 0000000000000000000333333" installed successfully. (1 of 1 added successfully)
  • 28. STEP ACTION 25. Verify the new FC license. cluster1::system license> show Serial Number: 1-80-000099 Owner: cluster1 Package Type Description Expiration ----------------- ------- --------------------- -------------------- Base license Cluster Base License - Serial Number: 1-81-0000000000000000000333333 Owner: none Package Type Description Expiration ----------------- ------- --------------------- -------------------- FCP license FCP License - Serial Number: 1-81-0000000000000004044744721 Owner: cluster1_01 Package Type Description Expiration ----------------- ------- --------------------- -------------------- CIFS license CIFS License - SnapVault license SnapVault License - Serial Number: 1-81-0000000000000004044744722 Owner: cluster1_02 Package Type Description Expiration ----------------- ------- --------------------- -------------------- CIFS license CIFS License - SnapVault license SnapVault License - 6 entries were displayed. 26. Type the following command and then press the Tab key: cluster1::system license> clean-up - -unused -expired -simulate NOTE: You can select expired or unused licenses to be removed. An unused license is a license that is associated with nodes that don’t belong to the cluster. Tab
  • 29. STEP ACTION 27. Verify what will be cleaned up with the unused command. cluster1::system license> clean-up –unused -simulate The following licenses will be cleaned up: Serial number: 1-81-0000000000000000000333333 Owner: none Package Reason -------------------- ----------------------------------------------------- FCP Serial number is not used by any node in the cluster 28. Clean up the unused licenses. cluster1::system license> clean-up -unused 1 unused license deleted. 29. Verify that the FCP license was removed. cluster1::system license> show 30. Use System Manager or the command shell to enter the other licenses required on cluster1. cluster1_01 NFS: YHDYJHHTVDDCMAOZFAAAAAAAAAAA cluster1_02 NFS: MPKMLNSVQFGEYAOZFAAAAAAAAAAA cluster1_01 iSCSI: WWYBLHHTVDDCMAOZFAAAAAAAAAAA cluster1_02 iSCSI: KEGQMNSVQFGEYAOZFAAAAAAAAAAA cluster1_01 FlexClone: EVNYNHHTVDDCMAOZFAAAAAAAAAAA cluster1_02 FlexClone: SCVMPNSVQFGEYAOZFAAAAAAAAAAA cluster1_01 SnapRestore: GGSUMHHTVDDCMAOZFAAAAAAAAAAA cluster1_02 SnapRestore: UNZIONSVQFGEYAOZFAAAAAAAAAAA cluster1_01 SnapMirror: SAQJNHHTVDDCMAOZFAAAAAAAAAAA cluster1_02 SnapMirror: GIXXONSVQFGEYAOZFAAAAAAAAAAA END OF EXERCISE
  • 30. MODULE 4: ARCHITECTURE EXERCISE 4: EXPLORING CLUSTERED DATA ONTAP ARCHITECTURE In this exercise, you identify kernel and user-space processes, answer questions about replicated database (RDB) and quorum concepts, and answer questions about vol0 volumes and limitations. OBJECTIVES By the end of this exercise, you should be able to:  Identify kernel and user-space processes  Explain RDB and quorum concepts  Explain vol0 volumes uses and limitations TASK 1: IDENTIFY KERNEL AND USER-SPACE PROCESSES STEP ACTION 1. Using the following list of cluster components, show the path of a network-attached storage (NAS) write request by labeling each component with a number, starting with 1 for the initiator of a write request and proceeding in order to the destination of the request. ___Cluster session manager (CSM) ___D-blade ___Data network port ___NFS or CIFS client ___N-blade ___Disks ___Nonvolatile RAM (NVRAM)
  • 31. TASK 2: EXPLAIN RDB AND QUORUM CONCEPTS STEP ACTION 1. List the names of the RDB units. 2. Which RDB unit keeps track of the data that is used to operate the clustershell? 3. Which RDB unit keeps track of the volumes and aggregates and which volumes are on which aggregates? 4. How many healthy nodes are needed in a 16-node cluster to maintain a quorum? TASK 3: VOL0 AND VSERVER ROOT VOLUMES USES AND LIMITATIONS STEP ACTION 1. What is the minimum number of vol0 volumes in a 20-node cluster? What is the maximum? 2. What is stored on a vol0 volume? 3. For the following characteristics, write vol0, vsroot, or both to match the volumes with their characteristics. a. Is a flexible volume _____ b. Can have Snapshot copies _____ c. Can have mirrors _____ d. Can be accessed by NFS or CIFS clients _____ e. Can be backed up to tape _____ f. Can be copied _____ g. Can be accessed by the systemshell _____ h. Can have junctions to other volumes _____ i. Cannot be moved to another aggregate _____ END OF EXERCISE
  • 32. MODULE 5: PHYSICAL DATA STORAGE EXERCISE 5: CREATING AND GROWING AN AGGREGATE In this exercise, you use the CLI and NetApp OnCommand System Manager to create and add disks to an aggregate. OBJECTIVES By the end of this exercise, you should be able to:  Create an aggregate  Add disks to an aggregate  Create a flash pool TASK 1: CREATE A NEW AGGREGATE STEP ACTION 1. From the command line, show the aggregates: stor aggr show 2. Show the volumes. volume show 3. View the disks attached to each node, noticing the disks that belong to aggregates and the spare disks that are available to create additional aggregates. storage disk show –owner cluster1_01 storage disk show –owner cluster1_02 4. Display disks by type. Storage disk show –type ? storage disk show –type fcal –owner cluster1_01 storage disk show –type fcal –owner cluster1_02 storage disk show –type ssd –owner cluster1_01 storage disk show –type ssd –owner cluster1_02 5. Look at the usage information of the storage aggregate create command. stor aggr create ? NOTE: To help familiarize yourself with a command, you can type the command without parameters, followed by a question mark (?). 6. Create an aggregate with the unique name n01_aggr1 (as an abbreviation of aggregate 1 on the cluster1_01 node). stor aggr create -aggr n01_aggr1 –node cluster1_01 –disktype fcal -diskcount 5 NOTE: The aggregate will have the storage capacity of three disks. (Two of the disks are used for parity for RAID-DP, which is the default RAID type.) This is only an example. In a production environment, a RAID-DP aggregate of this size is a very inefficient use of disks. Also, note that the –diskcount parameter cannot exceed the available number of spare disks.
  • 33. STEP ACTION 7. Review the list of aggregates again. stor aggr show 8. Review the details for the new aggregate, noticing that the new aggregate has an HA policy of sfo. stor aggr show –aggr n01_aggr1 TASK 2: ADD DISKS TO THE AGGREGATE STEP ACTION 1. Add two disks to the aggregate. aggr add-disks -aggr n01_aggr1 -diskcount 2 The aggregate now has two parity disks and five data disks. 2. Verify the number of disks in the aggregate and the expanded disk capacity. aggr show -aggr n01_aggr1 TASK 3: USE SYSTEM MANAGER TO CREATE AN AGGREGATE STEP ACTION 1. In NetApp System Manager, select Cluster > cluster1 > Storage > Aggregates. You can see aggr0 for each of the nodes in your cluster, as well as the aggregate that you created by using the CLI:
  • 34. STEP ACTION 2. In the Aggregates toolbar, click Create. The Create Aggregate Wizard appears. 3. Click Next. 4. On the Aggregate Details page, enter these aggregate properties: a. Enter the Aggregate Name n02_aggr1 and the RAID Type RAID DP. b. Ensure that the Enable Flash Pool checkbox is not selected. 5. Click Next.
  • 35. STEP ACTION 6. Click Select Disks. 7. Create the aggregate: a. Select cluster1_02 to host the aggregate, so that you have one non-root aggregate per node. (Don’t use the SSDs yet.) b. Use 10 capacity disks for the aggregate. c. Click Save and Close. d. Click Create.
  • 36. STEP ACTION 8. Click Finish. 9. Navigate to Cluster > Storage > Aggregates and examine the new aggregate. TASK 4: CREATE A FLASH POOL In this task, you create a 10-disk aggregate of type “flex,” and then convert it to the HDD tier of a flash pool. STEP ACTION 1. Type stor aggr create followed by a question mark (?). stor aggr create ? NOTE: There is no option to enable hybrids on the create command. 2. We create a standard aggregate of type flex first, then convert it to a Flash Pool. Create a new 10-disk aggregate on cluster1_01. This becomes the HDD tier of our Flash Pool: stor aggr create –aggr n01_fp1 –node cluster1_01 –diskcount 10 -disktype fcal 3. Inspect the properties of the new aggregate. stor aggr show –aggr n01_fp1 4. Enable flash pool by setting hybrid-enabled to true on n01_fp1. stor aggr modify –aggr n01_fp1 –hybrid-enabled true 5. Check the status of your aggregate before adding the SSD tier, noticing the available size. aggr show -aggr n01_fp1 6. Add SSDs to the aggregate and complete the flash pool. stor aggr add-disk –aggr n01_fp1 –diskcount 5 –disktype SSD NOTE: You can also specify a list of SSDs by using the –disklist option.
  • 37. STEP ACTION 7. Explore the flash pool, noticing these properties:  The number of disks  The two RAID groups (in spite of the default RAID group size)  The available size and the total hybrid cache size stor aggr show –aggr n01_fp1 8. In System Manager, perform these actions: a. Select your new flash pool. b. Below the lower pane, click the Disk Layout tab. c. Inspect the RAID groups that were created. END OF EXERCISE
  • 38. MODULE 6: LOGICAL DATA STORAGE EXERCISE 6: CREATING A DATA VIRTUAL SERVER AND A FLEXIBLE VOLUME In this exercise, you create a data virtual storage server (Vserver), create a flexible volume, and mount a volume in a Vserver’s namespace. You also configure FlexCache and create an infinite volume. OBJECTIVES By the end of this exercise, you should be able to:  Create a data Vserver  Create a flexible volume  Mount a volume in a Vserver’s namespace  Configure FlexCache for a volume  Create an infinite volume TASK 1: CREATE A CLUSTER VSERVER STEP ACTION 1. View the Vservers and volumes in your cluster. vserver show volume show 2. View the “node” Vservers and “admin” Vserver. The node Vservers are the scope in which entities like the vol0 volumes exist, along with the node management LIFs and cluster LIFs of each node. The administrative Vserver is the scope in which the cluster management LIF exists. 3. Create a data Vserver named vs1 and provide the name of a root volume (which will be created by this command). vserver create -vserver vs1 -rootvolume vs1root -aggr n01_aggr1 -ns-switch file -rootvolume-security-style unix NOTE: This command creates the root volume of the Vserver, which means that it’s the root of this namespace. You created the Vserver root volume on node cluster1_01, but that does not mean that the Vserver is assigned to node cluster1_01. Vservers are independent of physical nodes. The root of the Vserver namespace happens to reside there. 4. View the Vserver that you created and note that the new Vserver type is “data.” vserver show 5. Get more details about the Vserver and notice that all protocols are allowed by default. vserver show -vserver vs1 6. View the list of volumes. volume show The Vserver root volume that was just created is listed.
  • 39. STEP ACTION 7. Notice the default volume size. NOTE: You can’t specify a volume size with the vserver create command, but you can use the volume modify command to change the size. 8. View all the attributes of this volume. volume show -vserver vs1 -volume vs1root 9. Review the Junction Path value of this volume. The slash (/) signifies that this is the root volume of this namespace. Giving this volume the name “vs1root” is merely a convention to make it obvious that this is a Vserver root volume. 10. View the number of volumes on n01_aggr1. stor aggr show This reflects the new root volume and the size of it is reflected in (is subtracted from) the Available field of the aggregate. TASK 2: CREATE A FLEXIBLE VOLUME STEP ACTION 1. In your Vserver, on the aggregate n01_aggr1, create a volume. volume create -vserver vs1 -volume volume1 -aggr n01_aggr1 -junction-path /vol1 Each volume is associated with one Vserver. 2. View the volumes. vol show 3. View the details of the new volume. vol show -vserver vs1 -volume volume1 4. View the assigned security style. TASK 3: USE SYSTEM MANAGER TO CREATE A FLEXIBLE VOLUME STEP ACTION 1. In System Manager, select Vservers > cluster1 > vs1 > Storage > Volumes. Volume1 and the root volume for your Vserver appear.
  • 40. STEP ACTION 2. In the Volumes toolbar, click the Create button. 3. Name the volume “volume2.” 4. To select a home aggregate for the new volume, click the Choose button and select n02_aggr1. NOTE: To host a user volume, never choose a node’s aggr0 aggregate. 5. Under Storage Type, verify that NAS is selected. Hint: What happens when protocols aren’t licensed for your cluster? 6. Set the Total Size to 400 MB. 7. Leave the Snapshot Reserve percentage at the default. 8. Select Thin Provisioned. 9. Click Create.
  • 41. STEP ACTION 10. After the wizard is finished, verify the new volume in the volume list. 11. Select Vserver > cluster1 > vs1 > Storage > Namespace and verify where the new volume is mounted in the namespace. The UI shows that the volume is accessed by clients as /volume2. NOTE: The junction-path option was not specified when you created the volume with System Manager. System Manager automatically mounts new volumes at the Vserver root by using the volume name as the junction name. The default Export Policy has been assigned to the volume. 12. To unmount volume2, click volume2 to select it and then, on the Namespace toolbar, click Unmount. NOTE: It is not necessary to force the unmount operation. 13. To begin a series of steps that will remount volume2 in the namespace as vol2 under volume1, on the Namespace toolbar, click Mount. The menu lists all unmounted volumes. 14. Select volume2. 15. Change the Junction Name to “vol2.”
  • 42. STEP ACTION 16. To choose a point in the namespace to mount the volume, click Browse. 17. Expand the namespace and select /vol1 as the mountpoint. 18. To complete the operation, click OK and then click Mount.
  • 43. STEP ACTION 19. Verify that volume2 is mounted at /vol1/vol2. TASK 4: CONFIGURE FLEXCACHE FOR A VOLUME STEP ACTION 1. From the command shell, check the FlexCache options. volume flexcache ? volume flexcache create ? 2. Enable FlexCache for volume2. volume flexcache create -vserver vs1 -origin-volume volume2 3. Display active caches on the cluster. volume flexcache show 4. Which aggregates were selected for FlexCache volumes? On which nodes are they hosted? 5. Display all volumes associated with volume2. volume show -vserver vs1 -volume volume2* 6. What does volume type DC represent? volume show –type ? 7. How do the FlexCache volumes affect the namespace? volume show -fields junction-path
  • 44. TASK 5: CONFIGURE AN INFINITE VOLUME STEP ACTION 1. From the CLI, create a Vserver to host an infinite volume. vserver create -vserver vsinf -rootvolume vsinfroot -aggregate n02_aggr1 -ns-switch file -nm-switch file -rootvolume-security-style unix -language C -is-repository true 2. Set your session to advanced privilege mode, and enter y in response to the prompt. You must be in advanced mode to specify aggregates to host your infinite volume. set advanced Warning: These advanced commands are potentially dangerous; use them only when directed to do so by NetApp personnel. Do you want to continue? {y|n}: y 3. Create a 6-GB infinite volume. vol create -vserver vsinf -volume bigvolume -size 6gb -junction-path /big -state online -policy repos_namespace_export_policy -data-aggr-list n01_aggr1,n02_aggr1 4. Display the volumes. vol show vol show –vserver vsinf 5. Set your session to diag privilege mode, and enter y in response to the prompt: set diag Warning: These diagnostic commands are for use by NetApp personnel only. Do you want to continue? {y|n}: y 6. Display the list of volumes again. vol show –vserver vsinf vol show -vserver vsinf -fields is-constituent,constituent-role 7. Examine the aggregates hosting the constituents and the size of the constituents. vol show -vserver vsinf -fields aggregate,size 8. Set your session back to administrative privilege mode. set admin END OF EXERCISE
  • 45. MODULE 7: PHYSICAL NETWORKING EXERCISE 7: WORKING WITH NETWORK PORTS In this exercise, you identify port roles and create an interface group. OBJECTIVES By the end of this exercise, you should be able to:  Identify port roles  Create an interface group  Create a virtual LAN (VLAN) TASK 1: IDENTIFY PORT ROLES STEP ACTION 1. View the network ports. network port show A list of the physical ports, grouped by node, appears. This is the default configuration for this hardware platform and can be modified if necessary. 2. To determine which ports have physical connections, view the Link column. 3. Write down the roles that you see.
  • 46. TASK 2: CREATE AN INTERFACE GROUP You can aggregate ports that aren’t currently hosting logical interfaces. Inspect the Hosted Interfaces column. In this case, e0d and e0e are available. STEP ACTION 1. In System Manager, navigate to Nodes > cluster1 > cluster1_01 > Configuration > Ports/Adapters. 2. To begin creating an interface group, click Create Interface Group. 3. Select the e0d and e0e checkboxes.
  • 47. STEP ACTION 4. Keep the default Interface group name. 5. Choose Multiple for the Mode and IP based for the Load distribution. 6. Click Create. 7. Check the Ports list to verify the creation of the interface group.
  • 48. TASK 3: CREATE A VLAN STEP ACTION 1. In System Manager, navigate to Nodes > cluster1 > cluster1_02 > Configuration > Ports/Adapters. 2. To begin creating a VLAN on node cluster1_02, click Create VLAN: 3. From the menu, choose port e0e on node cluster1_02 to host the VLAN. 4. Choose a list of VLAN tags to identify each VLAN hosted on this port: a. Type 11, and then click Add. b. Repeat with 22 and 33.
  • 49. STEP ACTION 5. Click Create to create the VLAN. 6. Check the Ports list to verify the creation of the VLANs. END OF EXERCISE
  • 50. MODULE 8: LOGICAL NETWORKING EXERCISE 8: WORKING WITH LOGICAL NETWORK INTERFACES FOR NAS PROTOCOLS In this exercise, you create a NAS data LIF, explore routing groups, migrate a data LIF, send home a data LIF, and fail over a data LIF. OBJECTIVES By the end of this exercise, you should be able to:  Create a NAS data LIF  Explore routing groups  Migrate a data LIF  Rehome a data LIF  Fail over a data LIF  Create a failover group TASK 1: CREATE A NAS DATA LIF STEP ACTION 1. Create a data LIF called “data1” for one of your data IP addresses, setting your interface group from the previous exercise as the home port. net int create -vserver vs1 -lif data1 -role data -home-node cluster1_01 -home-port a0a –address 192.168.0.111 –netmask 255.255.255.0 NOTE: The combination of home node and home port is what determines which physical port on which physical node will be the home of this LIF. The home concept exists because data LIFs can migrate to other ports on the same node or to any other node in the cluster. 2. Review the LIFs. net int show Now that a LIF is associated with your virtual server (Vserver), the cluster Vserver appears in the list. This view of the LIFs includes an Is Home field that indicates whether this LIF resides on its home node and home port, which were chosen when the LIF was created. 3. View the details of the data LIF. net int show -vserver vs1 -lif data1 This view shows all the attributes of the new LIF. In addition to the Home Node and Home Port fields, Current Node and Current Port fields exist. If the LIF is migrated, one or both of these Current fields might differ from the Home fields.
  • 51. TASK 2: EXPLORE ROUTING GROUPS STEP ACTION 1. View the routing groups that have been automatically created for you. network routing-groups show The ones with the “n” prefix are for the node-management LIFs. The ones with the “c” prefix are for the cluster and cluster-management LIFs. The ones with the “d” prefix are for the data LIFs. 2. View the static routes that were automatically created for you within their respective routing groups. network routing-groups route show The cluster-management LIF on the administrative Vserver and the node-management LIFs on each node Vserver have generic static routes that are set up for every destination (0.0.0.0/0) by using the same default gateway. 3. Create a static route for the routing group that was automatically created when you created LIF “data1”. net routing-groups route create -vserver vs1 -routing-group d192.168.0.0/24 -destination 0.0.0.0/0 -gateway 192.168.0.1 4. View the static routes again. net rou rou show TASK 3: MIGRATE A DATA LIF STEP ACTION 1. Migrate your data LIF to the other node in your cluster. net int migrate -vserver vs1 -lif data1 –dest-port e0c -dest-node cluster1_02 NOTE: The node and port parameters of the net int migrate command are for the destination node and port. You could have migrated to any other data port (on either node) instead. Remember that data LIFs aren’t owned by nodes, but they do reside on a node at any given time, transparent to any NFS and CIFS clients. 2. Review the LIFs. net int show In this summary view, your data LIF’s Current Node field is the other node, and its Is Home field is false. 3. View the details. net int show -vserver vs1 -lif data1 NOTE: Unlike storage failover (SFO), this LIF migration does not cause a reboot of the node from which the LIF is moving. Also unlike SFO, LIFs can migrate to any node in the cluster, not just the high-availability (HA) partner.
  • 52. STEP ACTION 4. Revert the data LIF (send it “home”). net int revert -vserver vs1 -lif data1 NOTE: You don’t have to specify the destination node and port. A LIF knows where its home is. 5. View the LIFs to verify that this one went home. TASK 4: REHOME A DATA LIF STEP ACTION 1. Assign the LIF a new home port on port e0d on the opposite node. net int modify -vserver vs1 –lif data1 -home-node cluster1_02 -home- port e0d 2. Check the status of your data LIF again. net int show It has not yet moved to its home port, but because it is in a migrated state (because the current port is no longer the home port), the Is Home status is false. 3. Revert the data LIF to send it to its new home. net int revert -vserver vs1 -lif data1 4. Verify that your data LIF has moved to its new home port. net int show TASK 5: FAIL OVER A DATA LIF STEP ACTION 1. View the failover group that was chosen by default. net int show -vserver vs1 -lif data1 2. View the Failover Group values for the LIF. It is set to system-defined. 3. Show the current LIF failover groups and view the targets defined for the data and management LIFs. net int failover show Groups were automatically created for the data LIF. 4. To see how it fails over, reboot the node that hosts LIF data1. system node reboot –node cluster1_02 5. Type Y to confirm.
  • 53. STEP ACTION 6. If you are accessing the cluster via the node management interface on cluster1_02, sign in to the cluster management interface or the node management interface on cluster1_01. From there you can view all the LIFs by using net int show to see that the data LIF fails over to the other node. NOTE: Because the Auto Revert value of the LIF is set to false, the LIF does not revert to its home port automatically. If the cluster-management LIF is on the node that booted, it also fails over to the opposite node. 7. When the rebooted node is up and running again, revert the data LIF by issuing this command from either node: net int revert -vserver vs1 -lif data* 8. Look at the data LIF to see that it went home. If the cluster management LIF did indeed fail over, there is no compelling reason to revert it. TASK 6: DELETE THE VLANS AND THE INTERFACE GROUP Because we need the port for future exercises, in this task, you delete the VLANs and the interface group that you created in an earlier exercise. STEP ACTION 1. Ensure that no LIFs are hosted by the either the interface group or the VLAN. network interface show network port show net port vlan show 2. Delete all VLANs. net port vlan delete -node cluster1_02 -vlan-name e0e-11 net port vlan delete -node cluster1_02 -vlan-name e0e-22 net port vlan delete -node cluster1_02 -vlan-name e0e-33 3. Take interface group a0a offline. set advanced Do you want to continue? {y|n}: y net port modify -node cluster1_01 -port a0a -up-admin false set admin 4. Delete the interface group. net port ifgrp delete -node cluster1_01 -ifgrp a0a
  • 54. TASK 7: CREATE A FAILOVER GROUP STEP ACTION 1. Create a custom failover group that excludes data ports e0e on both nodes. net int failover-groups create -failover-group newfogroup -node cluster1_01 -port e0c net int failover-groups show net int failover-groups create -failover-group newfogroup -node cluster1_01 -port e0d net int failover-groups create -failover-group newfogroup -node cluster1_02 -port e0d net int failover-groups create -failover-group newfogroup -node cluster1_02 -port e0c 2. Assign the cluster failover group to the LIF data1. net int modify -vserver vs1 -lif data1 -failover-group newfogroup 3. Check the failover groups assigned to each LIF. net int show -fields failover-group 4. Verify the failover targets for data1. net int failover show -vserver vs1 -lif data1 5. Set your session to diagnostic privilege mode. set diag Warning: These diagnostic commands are for use by NetApp personnel only. Do you want to continue? {y|n}: y 6. Deactivate the port that hosts LIF data1. net port modify -node cluster1_02 -port e0d -up-admin false 7. Verify that the port is down. net port show 8. To which port did data1 migrate? net int show 9. Reactivate the inactive port. net port modify -node cluster1_02 -port e0d -up-admin true net port show
  • 55. STEP ACTION 10. Revert LIF data1 back to its home port. net int revert -vserver vs1 -lif data1 net int show 11. Set your session back to administrative privilege mode. set admin END OF EXERCISE
  • 56. MODULE 9: NAS PROTOCOLS EXERCISE 9: ENABLING CIFS AND NFS CLIENT ACCESS In this exercise, you create a Vserver, configure CIFS and NFS, and access the Vserver namespace with CIFS and NFS clients. OBJECTIVES By the end of this exercise, you should be able to:  Create a Vserver  Use OnCommand System Manager to configure a Vserver and NAS protocols  Create an export policy  Create a CIFS share  Access a CIFS share from a Windows client  Access the namespace from an NFS client TASK 1: CONFIGURE A VSERVER TO SERVE CIFS AND NFS STEP ACTION 1. In the System Manager navigation frame, click Vservers. 2. In the Vservers toolbar, click Create to create a new Vserver. 3. Enter vs2 as the name for your new Vserver. 4. Select the aggregate n02_aggr1. NOTE: Keep in mind that Vservers are independent of aggregates and nodes. Here you are simply choosing an aggregate to host the new Vserver’s root volume. Best practices suggest that you do not use a node root aggregate to host a Vserver root. If you do so, you receive a warning.
  • 57. STEP ACTION 5. To complete the Vserver Details page of the wizard, take these actions: a. Data protocols: CIFS and NFS b. Language: C c. Security style: UNIX d. Root aggregate: n02_aggr1 e. DNS configuration: Leave defaults f. Click Submit & Continue. 6. Select the Retain the CIFS data LIFs checkbox. This option specifies that the data LIF supports both CIFS and NFS sessions.
  • 58. STEP ACTION 7. On the Configure CIFS/NFS protocol page, take these actions: a. IP Address: 192.168.0.121 b. Netmask: 255.255.255.0 c. Gateway: 192.168.0.1 d. Home Node: cluster1_02 e. Home Port: e0d f. Click OK. 8. Type ntapvs2 as the name for your CIFS server, and enter your fully qualified domain name. 9. Enter the domain administrator name administrator and the password supplied by your instructor, and then click Submit & Continue.
  • 59. STEP ACTION 10. On the Vserver administration page, click Skip. 11. Review the configuration summary and click OK.
  • 60. STEP ACTION 12. In System Manager, select Vservers > cluster1. 13. In the list of Vservers, select vs2 and, on the Vservers toolbar, click the Edit button. 14. Be sure that only the file checkboxes are selected, and clear any other checkboxes. 15. Click the Resource Allocation tab.
  • 61. STEP ACTION 16. Select Delegate volume creation, and then choose aggregates that are available to host volumes for this Vserver by clearing the checkboxes for the aggr0 aggregates and selecting the rest. Best practices suggest that data volumes should never be stored on a node’s aggr0 aggregate. 17. Click Save and Close. 18. If the Configure Services warning appears, click OK.
  • 62. TASK 2: CREATE A NAS DATA LIF In the previous task, the Vserver setup wizard configured a data LIF. In this task, you create a second LIF on the opposite node. STEP ACTION 1. Select Vservers > cluster1 > vs2 > Configuration > Network Interfaces. 2. Click the Create button to begin creating a data LIF. 3. Click Next.
  • 63. STEP ACTION 4. Name the LIF vs2_cifs_nfs_lif2 and select the Data role. 5. Click Next. 6. Choose NAS protocols CIFS and NFS and click Next.
  • 64. STEP ACTION 7. Click Browse. 8. Select e0e on cluster1_01 and click OK.
  • 65. STEP ACTION 9. Type IP address 192.168.0.122, netmask 255.255.255.0, and gateway 192.168.0.1, and then click Next.
  • 66. STEP ACTION 10. Review your options and click Next, and then click Finish. 11. Verify creation of the data LIF.
  • 67. TASK 3: CREATE AN EXPORT POLICY STEP ACTION 1. Select Vserver > cluster1 > vs2 > Policies > Export Policies. 2. Click the Create Policy button. 3. Name the policy vs2def and click Add to add a rule.
  • 68. STEP ACTION 4. Specify 0.0.0.0/0 for the client specification. 5. Select both CIFS and NFS for protocols. 6. Select Any for each access type and click OK. 7. Click Create. TASK 4: CREATE AND EXPORT A VOLUME STEP ACTION 1. Select Vserver > cluster1 > vs2 > Storage > Volumes. The root volume for your Vserver is displayed. 2. In the Volumes toolbar, click the Create button to create a new volume. 3. Name the volume vs2_vol01. 4. Click the Choose button to select a home aggregate for the new volume. 5. Select n01_aggr1 and click OK. 6. In the Storage Type area, ensure that NAS is selected.
  • 69. STEP ACTION 7. To complete the volume specifications, enter these values: a. Set the Total Size to 400 MB. b. Leave the Snapshot Reserve at the default. c. Select the Thin Provisioned checkbox. d. Click Create. 8. After the wizard completes the volume creation, verify the new volume in the volume list.
  • 70. STEP ACTION 9. Perform these actions to modify permissions on the volume that was created at the beginning of this task: a. With vs2_vol01 selected, click Edit. b. Select all of the Read, Write, and Execute checkboxes for Owner, Group, and Others. c. Clear the Thin Provisioned checkbox. d. Click Save and Close. 10. Repeat the previous step for the vs2 Vserver root volume. 11. Select Vserver > cluster1 > vs2 > Storage > Namespace and verify where the new volume has been mounted in the namespace. This page indicates that the volume is accessed by clients as /vs2_vol01 and that the default export policy has been assigned to the volume.
  • 71. STEP ACTION 12. To unmount the volume and remount it with a different junction name, select the volume on the Namespace page, click Unmount and, leaving the “Force volume unmount operation” checkbox unselected, click Unmount. 13. On the Namespace toolbar, click Mount. 14. Perform the following actions: a. Select volume vs2_vol01. b. Type junction name vs2vol1. c. Click Browse and select the root directory as the junction path. d. Click Mount. NOTE: In this exercise, the junction name is slightly different from the volume name. It is not necessary for the names to be the same. The volume name is used to reference the volume within the cluster. The junction name is used to reference the root of the volume in the namespace.
  • 72. STEP ACTION 15. Verify that the junction path in the vs2 namespace is correct. 16. Select the volume vs2_root and click Change Export Policy. 17. Select export policy vs2def and click Change. 18. Repeat the process for vs2_vol01.
  • 73. TASK 5: CREATE A CIFS SHARE STEP ACTION 1. To create a CIFS share for the new volume, select Vserver > cluster1 > vs2 > Storage > Shares, and click the Create Share button. 2. When the Create Share window appears, click the Browse button to select a folder to share. NOTE: It is helpful to remember that you share folders, not volumes. You can share a subdirectory within a volume or any junction path.
  • 74. STEP ACTION 3. Expand the root directory to view the volume that was recently mounted in the namespace, select the folder that represents the junction for the volume, and click OK. 4. Change the Share Name to vol1 and click Create.
  • 75. STEP ACTION 5. Verify that the new CIFS share appears in the Shares list. 6. Create a second CIFS share, sharing the root directory as rootdir. TASK 6: ACCESS YOUR CIFS SHARE FROM A WINDOWS CLIENT STEP ACTION 1. From the Windows command line, access the CIFS share by entering the following command: net view ntapvs2 You access the CIFS server by the name that you assigned when you used the cifs create command to create the server. 2. If you encounter Error 53 “The Network Path was not found,” attempt to identify the problem by performing one or more of the following actions:  Verify that the export policy allows CIFS access.  Verify that CIFS access is enabled for the Vserver.  Review the data LIF setup to ensure that the LIF has the proper routing group and that you can ping the IP address from the Windows client.  Verify that can you ping the CIFS server by name.  If you cannot ping the CIFS server by name (the DNS is not set up to resolve the CIFS server), attempt to access the CIFS server with the IP address of a data LIF. 3. Map a drive letter to the CIFS shares. net use * ntapvs2vol1 net use * ntapvs2rootdir 4. Verify successful access. dir z: dir y:
  • 76. TASK 7: CONFIGURE CIFS HOME DIRECTORIES STEP ACTION 1. In System Manager, select Vserver > cluster1 > vs2 > Storage > Shares, and click the Create Home Directory button. 2. Enter the share name ~%w and the relative path name %w, and click Manage. 3. Click Browse. NOTE: You can add one or more search paths for a directory name match.
  • 77. STEP ACTION 4. Select /vs2vol1 and click OK. 5. Click Add. 6. Click Save & Close.
  • 78. STEP ACTION 7. Click Create. 8. Notice that the home directory share is among your list of CIFS shares. 9. From your Windows desktop, open File Explorer.
  • 79. STEP ACTION 10. Navigate to the vol1 share on your z: drive. 11. On the vol1 share, create a directory called administrator and, in that directory, create an empty text file called adminfile. 12. Map a drive to the home-directory share and verify the contents. net view ntapvs2 net use * ntapvs2~administrator Drive X: is now connected to ntapvs2~administrator. X: dir Volume in drive X is ~Administrator Volume Serial Number is 8000-0405 Directory of X: 07/08/2011 01:26 PM <DIR> . 07/08/2011 01:26 PM <DIR> .. 07/08/2011 02:06 PM 13 adminfile.txt 1 File(s) 13 bytes 2 Dir(s) 199,090,176 bytes free
  • 80. TASK 8: ACCESS YOUR DATA FROM AN NFS CLIENT STEP ACTION 1. Verify the export policy that was created for your volume. vserver export-policy rule show -vserver vs2 2. Log in to the Linux machine. mkdir /mnt/vs2 mkdir /mnt/path01 3. Using the IP address of either data LIF within vs2, access vs2 exports through NFS. mount -t nfs 192.168.0.121:/ /mnt/vs2 mount -t nfs 192.168.0.122:/vs2vol1 /mnt/path01 4. Explore both NFS mounts, which are mounted at different points in the vs2 namespace, and locate the home directory that you created earlier in the exercise. cd /mnt/vs2/vs2vol1/administrator/ ls adminfile.txt 5. Copy some data into the vs2_vol01 volume, and compare the amount of space that was used before the copy with the amount of space that is used after the copy: a. From the cluster shell: vol show -volume vs2_vol01 -fields used b. Then from your Linux client: cd /mnt/path01 cp /usr/include/* . ls c. Then from the cluster shell: vol show -volume vs2_vol01 -fields used The space consumed before the copy represents the Snapshot copy reserve space. 6. From your Linux client, navigate to the vs2_vol01 volume by using the other mount path. cd /mnt/vs2/vs2vol1 ls END OF EXERCISE
  • 81. MODULE 10: SAN PROTOCOLS EXERCISE 10: CONFIGURING SCALABLE SAN In this exercise, you experiment with scalable SAN by configuring a Vserver as an iSCSI target and connecting a LUN to a Windows host. OBJECTIVES By the end of this exercise, you should be able to:  Use NetApp System Manager to create a Vserver for iSCSI  Enable an aggregate as a resource for a Vserver  Configure Windows for multipath I/O (MPIO)  Install the Windows Host Utilities Kit (HUK)  Configure the iSCSI software initiator in Windows  Use NetApp System Manager to create an iSCSI-attached LUN  Access the iSCSI-attached LUN on the initiator TASK 1: USE NETAPP SYSTEM MANAGER TO CREATE A VSERVER FOR ISCSI STEP ACTION 1. In the System Manager navigation frame, click Vservers. 2. On the System Manager Vservers page, click Create to create a Vserver for iSCSI.
  • 82. STEP ACTION 3. On the Vserver Details page, enter and select the following, and then click Submit & Continue.  Vserver Name: vsISCSI1  Data Protocols: iSCSI  Language: C-POSIX  Security Style: UNIX  Aggregate: n01_aggr1
  • 83. STEP ACTION 4. On the iSCSI configuration page, enter and select the following, and then click Submit & Continue.  Target Alias: vsISCSI1_target  LIFs Per Node: 2  Starting IP Address: 192.168.0.131  Netmask: 255.255.255.0  Gateway: 192.168.0.1  Review or Modify LIFs configuration checkbox: Select  Number of portsets: 1 5. On the Vserver administration page, click Skip.
  • 84. STEP ACTION 6. Review the summary and, click OK. 7. Select Vservers > cluster1 > vsISCSI1 > Configuration > Protocols > iSCSI to review your iSCSI configuration.
  • 85. TASK 2: ENABLE AN AGGREGATE AS A RESOURCE FOR A VSERVER STEP ACTION 1. Select Vservers > cluster1, and then select vsISCSI1. 2. In the menu bar at the top of the page, click Edit. 3. When the Edit Vserver dialog box appears, click the Resource Allocation tab. 4. Select Delegate volume creation, n01_aggr1, and n02_aggr1. Selecting these values enable this Vserver to provision volumes in these aggregates. 5. Click Save and Close to complete the process.
  • 86. TASK 3: CONFIGURE WINDOWS FOR MPIO NOTE: This exercise uses the Microsoft device-specific module (DSM) instead of the NetApp DSM. STEP ACTION 1. On the Windows desktop, click the Server Manager icon. Server Manager opens. 2. On the toolbar at the top right of the page, click Manage, and then select Add Roles and Features.
  • 87. STEP ACTION 3. Click Next twice, and then in the left pane of the Select destination server page, click Features. 4. On the Select features page, select Multipath I/O and click Next.
  • 88. STEP ACTION 5. On the Confirm installation selections page, select the “Restart the destination server” checkbox, reply Yes to the warning, and then click Install. 6. After the feature is installed and the Results window appears, confirm that the installation was successful and click Close. 7. Close Server Manager. TASK 4: INSTALL THE WINDOWS HOST UTILITIES STEP ACTION 1. On the desktop of your Windows system, open the CourseFiles folder. 2. Double-click the NetApp Windows Host Utilities installation file. 3. If are prompted with a security warning, confirm that you want to continue. 4. On the title page of the installation wizard, click Next. 5. Confirm the license agreement and click Next. 6. On the Support for Multipathing page, select Yes, install support for Multipath I/O and click Next. 7. Confirm the destination folder and click Next. 8. Click Install. 9. If an FC Configuration Tool warning appears, click OK. 10. After the installation is complete, click Yes to restart the Windows system.
  • 89. STEP ACTION 11. Wait about two minutes before you attempt to reconnect to your Windows Server system. TASK 5: CONFIGURE THE ISCSI SOFTWARE INITIATOR (IN WINDOWS) In this task, you use the MPIO instead of Multiple Connections per Session (MCS) technique for multipathing. STEP ACTION 1. On your Windows desktop, open the Control Panel. 2. Select View by small icons and double-click iSCSI Initiator.
  • 90. STEP ACTION 3. If an error message appears to indicate that the Microsoft iSCSI service is not running, click Yes to start the service. 4. If a message asks if you want to unblock the Microsoft iSCSI service through the Windows Firewall, click Yes. 5. When the iSCSI Initiator Properties dialog box appears, click the Configuration tab. 6. Record the Initiator Name (IQN): ___________________________________________
  • 91. STEP ACTION 7. Click the Discovery tab. 8. Click Discover Portal, enter the IP address of one of ports within the vsISCSI1 port set, and click OK.
  • 92. STEP ACTION 9. Click the Targets tab. 10. Verify that the discovered target appears in the list and click Connect. 11. In the Connect To Target dialog box, select Enable multi-path and click Advanced.
  • 93. STEP ACTION 12. In the Advanced Settings dialog box, from the Target portal IP list, select the lowest target portal IP address, and click OK. 13. Click OK to close the Connect to Target dialog box and start a new iSCSI session between the initiator and target.
  • 94. STEP ACTION 14. In the iSCSI Initiator Properties dialog box, click Properties to begin creating additional sessions with all of the iSCSI LIFs within the port set.
  • 95. STEP ACTION 15. In the Properties dialog box, on the Sessions tab, ensure that there is only one current session. 16. Click the Portal Groups tab and review the other IPs that are currently available for sessions.
  • 96. STEP ACTION 17. Click the Sessions tab again. 18. Click Add session. 19. In the Connect To Target dialog box, select Enable multi-path and click Advanced. 20. In the Advanced Settings dialog box, from the Target portal IP list, select the target portal IP address of one of the iSCSI LIFs that you have not yet assigned. 21. Click OK. 22. In the Connect To Target dialog box, click OK.
  • 97. STEP ACTION 23. In the Properties dialog box, on the Sessions tab, verify that a new session has been created. 24. Repeat Steps 18–23 to create two more sessions, for a total of four sessions, each with an iSCSI LIF in the port set of the target.
  • 98. STEP ACTION 25. Click OK to close the Properties window. 26. Click OK to close the iSCSI Initiator Properties window. 27. Close Control Panel. TASK 6: USE NETAPP SYSTEM MANAGER TO CREATE AN ISCSI-ATTACHED LUN STEP ACTION 1. In System Manager, select Vservers > cluster1 > vsISCSI1 > Storage > LUNs. 2. Click the Create button. The Create LUN Wizard appears. 3. Click Next.
  • 99. STEP ACTION 4. On the next page, enter and select the following:  Name: lun_vsISCSI1_1  LUN Type: Windows 2008  LUN size: 100 MB  Thin Provisioned checkbox: clear 5. Click Next. 6. On the LUN Container page, click Choose, select the n01_aggr1 aggregate, and click OK. 7. In the Volume Name text box, accept the default name and click Next. 8. On the Initiators Mapping page, click Add Initiator Group to begin creating an initiator group (igroup).
  • 100. STEP ACTION 9. In the Create Initiator Group dialog box, on the General tab, enter or select the following:  Name: ig_myWin  Operating System: Windows  Type: iSCSI 10. In the Portset area, click Choose. 11. Select the port set that you created with the Vserver in task 1 and click OK. 12. Click the Initiators tab and click Add. 13. Enter the initiator IQN that you recorded earlier (Task 5, Step 5) and click OK. 14. Click Create.
  • 101. STEP ACTION 15. Click OK. 16. Back on the Initiators Mapping page, verify that the new igroup has been added to the list; then select the Map checkbox to the left of the igroup and click Next. 17. Review the LUN Summary page and click Next.
  • 102. STEP ACTION 18. Review the Create LUN Wizard completion page and click Finish. Creation of the iSCSI-attached LUN is now complete. TASK 7: ACCESS THE ISCSI-ATTACHED LUN ON THE WINDOWS HOST STEP ACTION 1. In Windows, open Server Manager. 2. On the toolbar at the top right of the page click Tools, and then select Computer Management.
  • 103. STEP ACTION 3. In the navigation tree on the left, expand the Storage node and select Disk Management. The LUN appears as a single disk object. All paths are merged into this object. 4. If you do not see the LUN disk in the bottom section of the center pane, right-click the Disk Management node in the left pane and select Rescan Disks. 5. Right-click the disk header and, if the disk is offline, select online. 6. Right-click the disk header again and select Initialize Disk.
  • 104. STEP ACTION 7. Review the Initialize Disk dialog box and click OK. 8. In the Disk Management pane, right-click the Unallocated partition and select New Simple Volume. 9. On the introduction page of the New Simple Volume wizard, click Next. 10. On the Specify Volume Size page, click Next.
  • 105. STEP ACTION 11. On the Assign Drive Letter or Path page, click Next. 12. On the Format Partition page, perform one of these two actions:  Click Next to accept the default values.  In the “Volume label” text box, enter a label (such as the one shown here), and then click Next. 13. Review the Completing page and click Finish.
  • 106. STEP ACTION 14. Verify that the new LUN is now provisioned and, when you are finished, close the Computer Management window. 15. Click Yes to format the disk, and then click Start. 16. When the formatting is complete, click OK, and then close the format window. 17. Close Server Manager.
  • 107. STEP ACTION 18. Navigate to the mount location of the LUN and verify that you can create a file in the LUN. END OF EXERCISE
  • 108. MODULE 11: STORAGE EFFICIENCY EXERCISE 11: CONFIGURING ADVANCED VOLUME FEATURES In this exercise, you create a volume so that you can learn about resizing, working with qtrees and quotas, creating FlexClone volumes, and configuring storage efficiency. OBJECTIVES By the end of this exercise, you should be able to:  Resize a volume  Create a qtree and set user quotas  Work with FlexClone volumes  Enable deduplication and data compression TASK 1: CREATE A VOLUME STEP ACTION 1. In System Manager, select Vservers > cluster1 > vs2 > Storage > Volumes, and then click Create. 2. In the Create Volume window, enter these volume attributes, and then click the Create button:  Name: dataefficiency  Aggregate: n02_aggr1  20 MB size, with 0% Snapshot copy reserve, and thin-provisioned
  • 109. STEP ACTION 3. Check the Namespace page to see where the volume was mounted. Remember that System Manager automatically mounts new volumes at /<volname>. 4. Select the dataefficiency volume from the list, click Change Export Policy, and change the export policy to vs2def. 5. Navigate to the Volumes page for vserver vs2, select the volume dataefficiency, and click Edit. 6. In the Edit Volume window, on the General tab, give the Group and Others read, write, and execute permissions, and then click Save and Close.
  • 110. STEP ACTION 7. From your NFS client, create a file in the dataefficiency volume. cd /mnt/vs2/dataefficiency/ echo “This is the content of datafile in volume dataefficiency” > datafile ls cat datafile 8. In System Manager, on the Shares page, click Create Share to create a CIFS share for the new volume. 9. Click Browse to select a folder to share, select the dataefficiency junction, and click OK.
  • 111. STEP ACTION 10. Name the share de and click Create. 11. In Windows, map the new share as the T: drive. net use t: ntapvs2de t: dir Volume in drive T is de Volume Serial Number is 8000-0407 Directory of T: 10/03/2011 12:17 PM <DIR> . 10/03/2011 12:17 PM <DIR> .. 10/03/2011 12:18 PM 58 datafile 1 File(s) 58 bytes 2 Dir(s) 104,603,648 bytes free
  • 112. TASK 2: RESIZE A VOLUME STEP ACTION 1. In Windows File Explorer, navigate to your T: drive. You should see the file called datafile that you created in the previous task. 2. From the CourseFiles directory on your desktop, copy the file called 30mfile to the dataefficiency volume. When the copy operation fails because there is not enough space on the volume, click Cancel. 3. In System Manager, on the Volumes page, select the dataefficiency volume and click the Resize button to start the Volume Resize wizard. 4. When the wizard starts, click Next.
  • 113. STEP ACTION 5. In the Resize Volume Settings window, change the Total capacity value to 100 MB without changing the value in the Snapshot reserve field, and click Next. 6. On the Delete Snapshot Copies page, click Next.
  • 114. STEP ACTION 7. On the Summary page, confirm the new capacity, and then click Next and Finish. 8. Copy the 30mfile into the volume. TASK 3: CREATE A QTREE AND SET QUOTAS STEP ACTION 1. In System Manager, select Vservers > cluster1 > vs2 > Storage > Qtrees. 2. On the Qtrees page, click Create.
  • 115. STEP ACTION 3. In the Create Qtree window, on the Details tab, name the qtree qtdemo and ensure that it is in the dataefficiency volume. 4. On the Quota tab, add a user quota of 5 MB, and then click Create. 5. Select Vservers > cluster1 > vs2 > Storage > Quotas.
  • 116. STEP ACTION 6. On the Quotas page, on the Quota Status on Volumes tab, select the dataefficiency volume and, if quota status is off, click Activate to turn it on. Initialization can take several minutes. 7. Verify that the activation was successful. You might need to click the Refresh button. 8. On your Windows desktop, from the CourseFiles folder, copy the file 10mfile into T:qtdemo. 9. Notice that the copy operation puts the qtree over quota and click Cancel.
  • 117. STEP ACTION 10. In System Manager, click the User Defined Quotas, and then click the Edit Limits button. 11. In the Edit Limits window, click the Space Limit tab, change the Hard Limit to 15 MB, and then click Save and Close. 12. Go back to the Quota Status on Volumes tab, select the dataeffeciency volume, and click Refresh.
  • 118. STEP ACTION 13. Copy the 10mfile to T:qtdemo again. The operation should succeed this time. TASK 4: USE FLEXCLONE VOLUMES STEP ACTION 1. On the Volumes page, select the dataefficiency volume, click Clone, and then click Create and Volume to create a FlexClone copy of the volume.
  • 119. STEP ACTION 2. In the Create FlexClone Volume window, accept the default name, select Create new Snapshot copy now, and then click Clone. 3. In the top-right corner of the Volume page, click the small blue icon at the edge to display a selection list that enables you to add additional fields. 4. Select the Type and Clone checkboxes.
  • 120. STEP ACTION 5. In System Manager, navigate to the Namespace page and notice that clone1 doesn’t appear in the Namespace list. 6. Mount your clone volume under the path /vs2vol1 as clone1. 7. Determine where the clone is mounted in the namespace. 8. Check the export policy on the clone and set to vs2def. 9. In Windows File Explorer, from your vs2 root volume drive, navigate to /vs2vol1/clone1.
  • 121. STEP ACTION 10. From your NFS client, append some text to datafile on clone1. cd /mnt/vs2/vs2vol1/clone1 ls 30mfile datafile qtdemo echo "Edited from a FlexClone..." >> datafile cat datafile This is the content of datafile in volume dataefficiency. Edited from a FlexClone... 11. Check the contents of the file on the parent volume, and notice that, although the clone and parent share common data blocks, they function as separate volumes. cd /mnt/vs2/dataefficiency/ cat datafile 12. In System Manager, on the Volumes page, select the clone, and then select Clone > Split. 13. In the Clone Split window, select the OK to split the clone and delete all its Snapshot copies checkbox, and then click Start Split. The split takes some time to complete.
  • 122. STEP ACTION 14. On the Volumes page, notice the status in the Clone column. The clone no longer shares blocks with the parent and is now a separate volume. 15. (Optional) If you wish, you can rename the volume to reflect its new status. TASK 5: ENABLE DEDUPLICATION AND DATA COMPRESSION STEP ACTION 1. In System Manager, on the Volumes page, select the dataefficiency volume and click the Storage Efficiency tab. 2. Select the Enable Storage Efficiency and Enable Compression checkboxes, select Automated deduplication, and click Save and Close.
  • 123. STEP ACTION 3. On the Volumes page, notice the dataefficiency volume’s status in the Storage Efficiency column. 4. With the dataefficiency volume selected, click the Storage Efficiency tab at the bottom of the Volumes page, and notice that the counters are set to zero. 5. From the CourseFiles directory, copy the 30mfile to the T: drive, which is mounted to the dataefficiency volume.
  • 124. STEP ACTION 6. When prompted, click Compare info from both files. 7. Select the checkboxes for both files and click Continue. 8. Monitor the statistics on the Storage Efficiency tab. It can take several hours to see the result of the data efficiency features. You can start the process manually with the volume efficiency command: volume efficiency start -vserver vs2 -volume dataefficiency END OF EXERCISE
  • 125. MODULE 12: DATA PROTECTION: SNAPSHOT AND SNAPMIRROR COPIES EXERCISE 12: WORKING WITH SNAPMIRROR In this exercise, you create and initialize load sharing (LS) and data protection (DP) SnapMirror replications, compare DP mirror replication times, add volumes and files to a replicated namespace, schedule periodic SnapMirror replications, promote an LS mirror, set up Vserver and cluster peer relationships for intercluster SnapMirror replications, use System Manager to configure a SnapMirror relationship, use the CLI to configure a SnapMirror relationship, and update SnapMirror relationships. OBJECTIVES By the end of this exercise, you should be able to:  Create and initialize LS and DP SnapMirror replications  Compare DP mirror replication times  Add volumes and files to a replicated namespace  Schedule periodic SnapMirror replications  Promote an LS mirror  Set up Vserver and intercluster peer relationships  Use System Manager to configure a SnapMirror relationship  Use the CLI to configure a SnapMirror relationship  Update SnapMirror relationships TASK 1: CREATE AND INITIALIZE LS AND DP SNAPMIRROR REPLICATIONS STEP ACTION 1. Create a mirror for the root volume of your virtual server (Vserver) on the same aggregate as the root volume. vol create –vserver vs2 –volume vs2_root_ls1 –aggr n01_aggr1 –type dp NOTE: Although this is an LS mirror, it must be created as a DP mirror volume and then changed. 2. Establish the mirror relationship between the source volume and the destination volume and change the destination to an LS mirror. snapmirror create -source-cluster cluster1 -source-vserver vs2 -source- volume vs2_root -destination-cluster cluster1 -destination-vserver vs2 -destination-volume vs2_root_ls1 -type ls 3. Create another LS mirror of the same volume on the other node and establish the mirror relationship with the same source. vol create -vserver vs2 -vol vs2_root_ls2 -aggr n02_aggr1 -type dp snapmirror create -source-path cluster1://vs2/vs2_root -destination- path cluster1://vs2/vs2_root_ls2 -type ls 4. Use a summary view and then an instance (detailed) view to view the mirrors. snapmirror show snapmirror show -instance The state of each mirror is “Uninitialized.” No data has been transferred to the mirrors.
  • 126. STEP ACTION 5. Perform the initial (baseline) replication to the set of LS mirrors of this source volume. snapmirror initialize-ls-set -source-path cluster1://vs2/vs2_root snapmirror show NOTE: Now that the first replication of the LS mirrors has occurred, all requests that are sent through existing NFS mounts or CIFS shares to the Vserver root volume are transparently routed to one of the LS mirrors of this Vserver root volume rather than to the read and write volume. This includes write requests, which will fail, because mirrors are read-only. 6. Create two DP mirrors. volume create –vserver vs2 -volume vs2_root_dp1 –aggr n01_aggr1 -type dp volume create –vserver vs2 -volume vs2_root_dp2 –aggr n02_aggr1 -type dp 7. Establish the DP mirror relationships. snapmirror create -source-path cluster1://vs2/vs2_root -destination- path cluster1://vs2/vs2_root_dp1 -type dp snapmirror create -source-path cluster1://vs2/vs2_root -destination- path cluster1://vs2/vs2_root_dp2 -type dp snapmirror show 8. Perform the initial (baseline) replication to one of the DP mirrors. snapmirror initialize -source-path cluster1://vs2/vs2_root -destination-path cluster1://vs2/vs2_root_dp1 9. View the volume Snapshot copies of the source volume. volume snapshot show –vserver vs2 -volume vs2_root NOTE: The Snapshot copies are named with a prefix of “snapmirror.” These Snapshot copies are specifically for the mirrors and are kept so that future replications to the mirrors can determine which data is new since the last replication. Two SnapMirror Snapshot copies of this volume exist. One is for the set of two LS mirrors. The other is for the DP mirror. 10. Review the mirrors. snapmirror show -inst NOTE: The mirror root_dp1 has the state “Snapmirrored,” and the Mirror Timestamp field shows the date and time of that replication. Because this is asynchronous mirroring, mirrors are only as up to date as the manual replications or the scheduled replications keep them.
  • 127. TASK 2: COMPARE DP MIRROR REPLICATION TIMES STEP ACTION 1. Replicate the DP mirror that has not been replicated. snapmirror initialize -source-path cluster1://vs2/vs2_root -destination-path cluster1://vs2/vs2_root_dp2 2. Review the mirrors. snapmirror show -inst The two DP mirrors have different replication times. 3. View the volume Snapshot copies of the source volume. volume snapshot show -vserver vs2 -volume vs2_root NOTE: Three SnapMirror Snapshot copies of this volume exist. They enable SnapMirror software to perform incremental transfers to the mirrors of this source volume. One of these SnapMirror Snapshot copies is for the set of two LS mirrors. The other two are for the two independent DP mirrors. 4. Replicate to both DP mirrors. snapmirror update -source-path cluster1://vs2/vs2_root -destination- path cluster1://vs2/vs2_root_dp1 snapmirror update -source-path cluster1://vs2/vs2_root -destination- path cluster1://vs2/vs2_root_dp2 5. Review the mirrors. snapmirror show -inst 6. Review the volume Snapshot copies of the source volume. volume snapshot show -vserver vs2 -volume vs2_root Three SnapMirror Snapshot copies of this volume still exist. TASK 3: ADD VOLUMES AND FILES TO A REPLICATED NAMESPACE STEP ACTION 1. In your Vserver on the aggregate vs2_aggr1, create a volume. volume create -vserver vs2 -volume vs2_vol03 -aggr n01_aggr1 -junction-path /vs2vol3 –policy vs2def 2. Access your Linux client machine.
  • 128. STEP ACTION 3. Assuming that your data LIF is still mounted from that NFS client, view the root of your namespace. cd /mnt/vs2 ls The new volume doesn’t appear in the file list. The new volume is in the namespace, but because the requests for your Vserver root volume are routed to one of its LS mirrors, you still see the contents of the root volume as of its last replication, which does not include the junction for vs2_vol03. 4. From your cluster shell, perform an incremental replication to the set of LS mirrors of the Vserver root volume. snapmirror update-ls-set -source-path cluster1://vs2/vs2_root 5. After the mirror jobs are completed, from your NFS client, review the mirror of the root of your namespace. ls /mnt/vs2 The junction for vs2_vol03 appears. 6. In the root of the namespace, begin to create a file called “myfile.” touch /mnt/vs2/myfile Because the NFS client references one of the LS mirrors, which is read-only, the file creation fails. No writes can be done to an LS mirror. 7. Using the special .admin path, mount (as “root”) your namespace. mkdir /mnt/vs2rw mount <host>:/.admin /mnt/vs2rw The .admin path forces your mount to use the source volume, which is read and write, rather than allowing automatic routing to LS mirrors. 8. In the read and write root of the namespace, create a file called “myfile.” touch /mnt/vs2rw/myfile ls /mnt/vs2rw/myfile The new file should appear. 9. Using the “normal” path that is routed to the LS mirrors, view the Vserver root. ls /mnt/vs2/myfile Because the new file is on the read/write volume and the LS mirrors have not been re-replicated, the “myfile” file is not visible. 10. From your cluster shell, perform an incremental replication to the set of LS mirrors of the Vserver root volume. snapmirror update-ls-set –source-path cluster1://vs2/vs2_root
  • 129. STEP ACTION 11. From your NFS client, review the mirror of the root of your namespace. ls /mnt/vs2/myfile The file should appear. TASK 4: SCHEDULE PERIODIC SNAPMIRROR REPLICATIONS For this exercise, you use the 5min schedule for LS mirrors and the hourly schedule for a DP mirror. NOTE: In a real-world situation, it might be sufficient to replicate to LS mirrors hourly and DP mirrors daily. STEP ACTION 1. View the schedules that were created by default. job schedule show NOTE: The schedule that you use for replication depends on the data that is contained in each volume and the requirements of the particular mirror. Some volumes might not need to be replicated, while other volumes do; for example, the DP mirrors don’t have to be synchronized as often as the LS mirrors. For this exercise, we’ll use the 5min schedule for LS mirrors and the hourly schedule for a DP mirror. In the real world, it may be sufficient to replicate to LS mirrors hourly and DP mirrors daily. 2. Modify one of the LS mirrors to use the 5min schedule. snapmirror modify -destination-path cluster1://vs2/vs2_root_ls1 -schedule 5min 3. View the details of the LS mirrors. snapmirror show -destination-path cluster1://vs2/vs2_root_ls* -instance snapmirror show -destination-path cluster1://vs2/vs2_root_ls* -fields schedule The SnapMirror schedule of each LS mirror is now set to 5min. 4. Modify one of the DP mirrors to use the hourly schedule. snapmirror modify -destination-path cluster1://vs2/vs2_root_dp1 -schedule hourly 5. View the details of the DP mirrors. snapmirror show –fields schedule NOTE: Only the schedule for the DP mirror that you explicitly modified is set to use this schedule. Each DP mirror of a read and write volume is separate from the other DP mirrors, except that they’re associated with the same read and write. They can each have separate replication schedules, or one DP can have a schedule while another does not. 6. Check the time on a node. system date show
  • 130. STEP ACTION 7. While waiting for the scheduled mirror update to run, continue to run the system date show command and watch for the system clock to reach a multiple of five, which triggers the replication of all the LS mirrors of this volume. NOTE: After the system clock reaches the five-minute mark, the mirror update occurs but is not visible, which means that no job is created for it. 8. To determine which ones were replicated, view the summary of the mirrors. snapmirror show –instance snapmirror show -fields newest-snapshot-timestamp TASK 5: PROMOTE AN LS MIRROR STEP ACTION 1. Examine the read and write copy of the Vserver root volume and all its mirrors. volume show -volume vs2_root* The Type field shows the values RW, LS, and DP. 2. Promote one of the LS mirrors. snapmirror promote -source-path cluster1://vs2/vs2_root -destination-path cluster1://vs2/vs2_root_ls2 3. At the prompt to proceed, type y. 4. While the command runs in the foreground, wait for the command to complete. 5. Review this volume family. volume show -volume vs2_root* The old read and write volume (vs2_root) is gone and the volume vs2_root_ls2 has the type RW. The name of the volume didn’t change, but it is the read and write volume now, and all the mirrors replicate from that volume. 6. Review the SnapMirror relationships. snapmirror show Only one LS mirror (vs2_root_ls2) exists. 7. From the newly appointed read/write volume, replicate everything again. snapmirror update-ls-set –source-path cluster1://vs2/vs2_root_ls2 TASK 6: SET UP AN INTERCLUSTER PEER RELATIONSHIP STEP ACTION 1. Start a PuTTY session with node cluster2_01 in your lab kit. 2. Log in as admin.
  • 131. STEP ACTION 3. Start the cluster setup wizard to create a new cluster. cluster setup 4. Accept the defaults for all values except for the following, and use specific IP addresses and netmasks provided by your instructor.  Cluster name: cluster2  Cluster base license: UJBGVLVQJHOJKBAAAAAAAAAAAAAA  Additional license: AXRANTDYLHJGKBOZFAAAAAAAAAAA (NFS)  Additional license: MRPPNTDYLHJGKBOZFAAAAAAAAAAA (CIFS)  Additional license: IVGXPTDYLHJGKBOZFAAAAAAAAAAA (SnapRestore)  Additional license: UPEMQTDYLHJGKBOZFAAAAAAAAAAA (SnapMirror)  Additional license: SEAQRTDYLHJGKBOZFAAAAAAAAAAA (SnapVault)  Additional license: OEZOOZOAHJMIWBOZFAAAAAAAAAAA (NFS)  Additional license: AZWDPZOAHJMIWBOZFAAAAAAAAAAA (CIFS)  Additional license: WCOLRZOAHJMIWBOZFAAAAAAAAAAA (SnapRestore)  Additional license: IXLASZOAHJMIWBOZFAAAAAAAAAAA (SnapMirror))  Additional license: GMHETZOAHJMIWBOZFAAAAAAAAAAA (SnapVault)  Cluster management port: e0c  Cluster management IP: 192.168.0.102  Cluster management subnet mask: 255.255.255.0  Cluster management gateway: 192.168.0.1  DNS domain: learn.netapp.local  Name server IP: 192.168.0.11  Node management port: e0f  Node management IP: 192.168.0.93  Node management netmask: 255.255.255.0  Node management gateway: 192.168.0.1 5. Start a PuTTY session with node cluster2_02 in your lab kit. 6. Log in as admin, run the cluster setup wizard, and join cluster2. cluster setup 7. Accept the default for all values except for the following:  Cluster to join: cluster2  Node management port: e0f  Node management IP: 192.168.0.94  Node management subnet mask: 255.255.255.0  Node management gateway: 192.168.0.1 8. Enter all license keys from the provided list of licenses. 9. Start System Manager and, on the Home page, click Add to add a cluster under the control of System Manager.
  • 132. STEP ACTION 10. Type the cluster management IP address, 192.168.0.102. 11. Click the More button and enter the admin user name and password to authenticate. 12. Click Add. 13. In the list of storage system names, double-click cluster2 to manage cluster2. 14. Notice that tabs in System Manager now represent both clusters. 15. From the cluster shell, create an aggregate on each node. aggr create -aggr aggr1 -diskcount 6 -nodes cluster2_01 aggr create -aggr aggr2 -diskcount 6 -nodes cluster2_02
  • 133. STEP ACTION 16. From the cluster2 tab in System Manager, access the Vservers window and click Create to start the Vserver creation wizard. 17. Accept all defaults except for those that follow. Your instructor provides specific IP addresses and netmasks.  Vserver name: vs9  Language: C  Protocols: NFS  Security style: UNIX  Aggregate: aggr1  Primary Domain: learn.netapp.local  Name server: 192.168.0.11  Data LIF home ports: cluster2_01:e0d  Data LIF IP addresses: 192.168.0.191  Data LIF netmask: 255.255.255.0  Data LIF netmask: 192.168.0.1 18. On the Vserver Administration page, click Skip. NOTE: Unless the destination Vserver has the same language type as the source Vserver, SnapMirror software does not let you create an intercluster SnapMirror relationship. 19. Select Vservers > cluster2 > vs9 > Configuration > Network Interfaces, click Create, and create a second data LIF, using the following values:  Name: vs9_nfs_lif2  Role: Data  Home port: cluster2_02:e0d  IP address: 192.168.0.192  Netmask: 255.255.255.0  Gateway: 192.168.0.1 20. Change the roles of both ports e0e to intercluster. net port show net port modify -node cluster2_01 -port e0e -role intercluster net port modify -node cluster2_02 -port e0e -role intercluster net port show
  • 134. STEP ACTION 21. Create intercluster LIFs on cluster2. net int create -vserver cluster2_01 -lif ic1 -role intercluster -home-node cluster2_01 -home-port e0e -address 192.168.0.201 -netmask 255.255.255.0 net int create -vserver cluster2_02 -lif ic2 -role intercluster -home-node cluster2_02 -home-port e0e -address 192.168.0.202 -netmask 255.255.255.0 net int show NOTE: Intercluster LIFs are associated with node Vservers rather than cluster Vservers. 22. On both nodes in cluster1, create an intercluster LIF, using the IP addresses provided by your instructor. net int create -vserver cluster1_01 -lif ic1 -role intercluster -home- node cluster1_01 -home-port e0e -address 192.168.0.211 -netmask 255.255.255.0 net int create -vserver cluster1_02 -lif ic2 -role intercluster -home- node cluster1_02 -home-port e0e -address 192.168.0.212 -netmask 255.255.255.0 net int show. NOTE: Cluster1 intercluster LIFs are hosted on data ports. Cluster2 intercluster LIFs are hosted on intercluster ports. Both configurations are supported. Use intercluster ports to isolate replication traffic from client data traffic. 23. Verify routing groups for the intercluster LIFs on both clusters. network routing-groups show 24. To create a peer relationship between clusters, on the cluster1 tab in System Manager, select Cluster > cluster1 > Configuration > Peers. 25. To start the peering wizard, click the Create button. 26. Review the intercluster interfaces for cluster1 in the left pane. 27. In the right pane, in the Remote interfaces field, select cluster2, and review the intercluster interfaces for cluster2.
  • 135. STEP ACTION 28. Click Create. 29. Select Cluster > cluster2 > Configuration > Peers, and verify the peer relation from cluster2. 30. From the cluster shell of cluster1 and cluster2, verify the peer relationship. cluster peer show cluster peer health show 31. Enter the following command to troubleshoot connectivity issues and long response times between specific intercluster LIFs. cluster peer ping TASK 7: CONFIGURE A VSERVER PEER RELATIONSHIP STEP ACTION 1. From your PuTTY session on cluster1, verify that the cluster peer relationship is currently configured. cluster peer show 2. Verify that the source Vserver has the language set to C. vserver show -vserver vs2 -fields language
  • 136. STEP ACTION 3. From your PuTTY session on cluster2, verify that the cluster peer relationship is currently configured. cluster peer show 4. Verify that the destination Vserver has the language set to C. vserver show -vserver vs9 -fields language 5. From cluster1, create a new Vserver peer relationship between vs2 in cluster1 and vs9 in cluster2. vserver peer create -vserver vs2 -peer-vserver vs9 -applications snapmirror -peer-cluster cluster2 6. From cluster2, accept the peer request. vserver peer accept –vserver vs9 –peer-vserver vs2 7. From both clusters, verify that the new Vserver peer relationship is successfully configured. vserver peer show-all TASK 8: USE SYSTEM MANAGER TO CONFIGURE A SNAPMIRROR RELATIONSHIP STEP ACTION 1. In System Manager, click the cluster2 tab. 2. Open the Protection window for the vs9 Vserver, click Create, and then click Mirror.
  • 137. STEP ACTION 3. Configure the mirror relationship as follows:  Source Cluster: cluster1  Source Vserver: vs2  Source Volume: vs2_vol01  Destination Vserver: vs9  Destination Volume: vs9_vol01  Aggregate: aggr1  Mirror Schedule: hourly  Initialize Relationship: Select 4. Click Create. 5. Change the name to vs9_vol01 and click Next. 6. In the summary window, click OK. 7. Verify successful initialization of the SnapMirror relationship. The intercluster initialization might take a few minutes.
  • 138. STEP ACTION 8. To view the relationship status from cluster1, select Vservers > cluster1 > Storage > Volumes, select vs2_vol01 from the list, and click the Data Protection tab at the bottom of the page. TASK 9: USE THE CLI TO CONFIGURE A SNAPMIRROR RELATIONSHIP STEP ACTION 1. On cluster2, create a destination volume of type DP in aggregate aggr2. vol create -vserver vs9 -volume vs2_vol03 -aggr aggr2 -size 25mb -type dp NOTE: The size of the destination volume must be equal to or greater than the source volume. 2. Create the SnapMirror relationship for vs2_vol03. snapmirror create -source-path cluster1://vs2/vs2_vol03 -destination-path cluster2://vs9/vs2_vol03 -type dp -schedule daily NOTE: The source and destination volume names are not required to be the same. In this exercise, you chose the names for clarity. This command can be issued from either cluster without modification. 3. Initialize the SnapMirror relationship. snapmirror initialize -destination-path cluster2://vs9/vs2_vol03
  • 139. TASK 10: UPDATE SNAPMIRROR RELATIONSHIPS STEP ACTION 1. From your CIFS client, copy 30mfile from the CourseFiles folder into the vol1 share. net use New connections will be remembered. Status Local Remote -------------------------------------------------------- T: ntapvs2de X: ntapvs2~administrator Y: ntapvs2rootdir Z: ntapvs2vol1 The scheduled update occurs daily, but you can perform an on-demand transfer from the CLI or from System Manager. 2. To perform an on-demand transfer in System Manager, from cluster 2, in the Protection pane, select the relationship for vs2_vol01, click Operations to see the menu, and then click Update.
  • 140. STEP ACTION 3. In the Details frame at the bottom of the SnapMirror window, view the status of each SnapMirror relationship. END OF EXERCISE
  • 141. MODULE 13: DATA PROTECTION: BACKUPS AND DISASTER RECOVERY EXERCISE 13: WORKING WITH SNAPVAULT In this exercise, perform a SnapVault backup restore data from a SnapVault backup. OBJECTIVES By the end of this exercise, you should be able to:  Configure SnapMirror replication  Perform a SnapVault backup  Restore data from a SnapVault backup TASK 1: CONFIGURE A SNAPVAULT RELATIONSHIP STEP ACTION 1. In System Manager, click the cluster2 tab and select Vservers > vs9 > Policies > Protection Policies. 2. Click Create then Vault Policy. 3. Name the policy vs2-vs9-policy, and set the label to XDP and the retention count to 7.
  • 142. STEP ACTION 4. Click + to add the rule to the policy, and then click Create. 5. Verify creation of the policy. 6. Select Cluster > cluster2 > Configuration > Schedules, and review the current schedules.