
Recomendados
Mais conteúdo relacionado
Mais de Lisa Liao
Mais de Lisa Liao (10)
Último
Último (20)
How to change dynamic volume cluster size
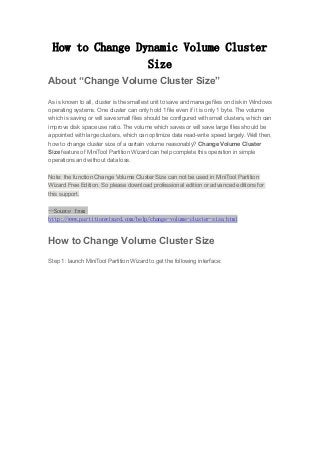
- 1. How to Change Dynamic Volume Cluster Size About “Change Volume Cluster Size” As is known to all, cluster is the smallest unit to save and manage files on disk in Windows operating systems. One cluster can only hold 1 file even if it is only 1 byte. The volume which is saving or will save small files should be configured with small clusters, which can improve disk space use ratio. The volume which saves or will save large files should be appointed with large clusters, which can optimize data read-write speed largely. Well then, how to change cluster size of a certain volume reasonably? Change Volume Cluster Size feature of MiniTool Partition Wizard can help complete this operation in simple operations and without data loss. Note: the function Change Volume Cluster Size can not be used in MiniTool Partition Wizard Free Edition. So please download professional edition or advanced editions for this support. --Source from http://www.partitionwizard.com/help/change-volume-cluster-size.html How to Change Volume Cluster Size Step 1: launch MiniTool Partition Wizard to get the following interface:
- 2. Step 2: select or right click the volume whose cluster size needs changing and choose “Change Volume Cluster Size” from the left panel or from right-click menu.
- 3. Step 3: choose a reasonable cluster size from the drop-down list and click “Yes” to confirm operation.
- 4. Step 4: click “Apply” button on the top to apply this change. Now MiniTool Partition Wizard article tutorial to change volume cluster size is completed, and users can try this partitioning tool when necessary.