1. How did you use media technologies in the
construction and research, planning and evaluation
stages?
BLOGGER
Blogger is the first media product that I used during each stage of my
documentary coursework. Blogger is a site that is clearly defined by its
name, it is where I blogged all my work from the start of my research and
construction of my documentary work to my final productions and also the
evaluating stages. Once I had created the blog, which I named ‘Lauren’s A2
Media Blog’, I began working through the construction, research and
planning stages from my documentary.
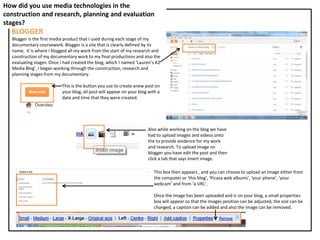
Also while working on the blog we have
had to upload images and videos onto
the to provide evidence for my work
and research. To upload image on
blogger you have edit the post and then
click a tab that says insert image.
This box then appears , and you can choose to upload an image either from
the computer or ‘this blog’, ‘Picasa web albums’, ‘your phone’, ‘your
webcam’ and from ‘a URL’.
Once the image has been uploaded and is on your blog, a small properties
box will appear so that the images position can be adjusted, the size can be
changed, a caption can be added and also the image can be removed.
This is the button you use to create anew post on
your blog, all post will appear on your blog with a
date and time that they were created.
2. As well as importing images to my blog, it was also important that videos where also imported. To do this from YouTube, I copied the embed code
which is found underneath the video, underneath the tabs ‘Share’ and then ‘Embed’.
Before copying the Embed code from YouTube, it is
important that in the tool you select the HTML,
option.
After this I would press ‘Ctrl’ and ‘F’ to search and
find where I want to upload my video, as it isn't
clear to see with all the HTML codes. This tool bar
then appears and allows you to search through your
HTML codes for key words, so that I know where to
post my video.
3. YOUTUBE
YouTube has been useful throughout several stages of the research,
planning and construction of the documentary. In the research stages, I
watched several documentary's using YouTube, to begin to get an
understanding of the codes and conventions of a documentary. It was also
used during the planning stages of my documentary, for researching
different achieve material that would be suitable for our documentary. I
then uploads this watched videos on to my blog using the Embed codes for
each.
As well as this YouTube has also been used throughout different parts of the
production of my documentary, to upload different videos such as recorded
questionnaires and audience feedback. The upload button can be found on
the toolbar at the top of the YouTube page.
Once you click the link on the tool bar this screen appears and you can begin
selecting files to upload from your computer.
By using YouTube on Firefox, you can also download the videos on
YouTube on to your computer.
There are several different types and qualities of video that you
can download the videos as, you can either upload as 3GP, MP4,
AAC, MP3 or M4A, all at different qualities. This tool was
particularly useful during the production of the documentary,
where we got most of our achieve material from here and also
the selected backing tracks for our documentary.
4. SCRIBD
Scribd has been useful throughout several stages of the
research, planning and construction of the documentary. In the
research stages, I used Scribd to up load all of my research word
documents. In the planning stages I used scribd to upload all of
the documentation we need to complete before filming. This
included risk assessment sheets and reece’s. After the
documents where uploaded I could then use the Embed codes
for each and post them onto my blog.
SLIDE SHARE
Slide Share, is very similar to Scribd how it is for
PowerPoint documents, it has been useful to me
throughout several stages of my documentary
coursework. In the research stages, I used Slide Share
to up load all of my research PowerPoint documents,
including my questionaire results. After the
powerpoint documents where uploaded, similar to
Scribd, I could then use the Embed codes for each and
post them onto my blog.
5. ADOBE PREMIERE I used Premiere to edit all footage that we record for our documentary, put it together in the right order and add
effects. It allows you to put it together how you want it and it is very easy to use one you get used to all the tools
available.
The first thing to do in premiere is to import all
files that are going to go into your documentary,
these will appear in your production bin, which is
in the top left of premiere. The project bin is
where I stored all the elements needed to create
the documentary. It can contain individual video
clips, audio clips, titles, photos and graphical
images. When you import new items they appear
automatically in the project bin, it is from here
that you can drag items onto your timeline.
The timeline panel is where your video takes shape. By dragging items from the project bin
and placing them in the desired order, this is where you create a sequence of clips and
events which play in the timeline from left to right. It is in the timeline, where most of my
editing for the documentary took place. In the time line you can do many things such as,
adjust certain points by making clips shorter, create multiple layers of video such as titles
and superimposed images, create multiple layers of audio, such as voiceovers and music
tracks, and also add transitions, filters and special effects.
6. There are several different tools that I used on premiere throughout the production of my documentary, all of which can be found in the tool bar but
there are also keyboard shortcuts for them all.
Tools Keyboard Shortcut Description
V (Selection Tool) This is the default tool that I used to select clips in the timeline, using this tool I could
move clips where ever I wanted to and add transitions and effects to the clips.
B (Ripple Edit Tool) I used a ripple edit when editing a point in the documentary cause there to be spaces
in my timeline. This tool move the rest of the timeline to compensate for the spaces.
N (Rolling Edit Tool) I used a rolling edit to move an edit point without affecting the rest of the timeline.
The first clip is made shorter while the second is made longer by the same amount.
C (Razor Tool) The razor tool was probably the tool which I used mostly during the production of the
documentary, I used it to cut clips into seperate clips and remove shots that weren’t as
good as others.
P (Pen Tool) I used the pen tool in Premiere to create and control certain points on the timeline.
H (Hand Tool) The hand tool was useful during the production of my documentary, it is very basic
and just used to move the timeline from left to left and right.
Z (Zoom Tool) The zoom tool is used to magnify the view of the timeline, during the production of
the documentary, I mainly used the ‘+’ and ‘-’ keys on they keyboard instead.
7. I used transition frequently in my construction of the documentary, a transition is the way one shot
changes to the next. To make more interesting transitions such as dissolves, wipes and effects, use
the transitions available in the Effects window. There are two types of transition: Video and audio, I
mainly used video transitions however, I did also use some for the audio too. To apply a transition I
simply drag the selected transition to the timeline at the point where the two clips join. It appears
on your time line like this:
I used several video effects using Premiere
in my construction process of the
documentary. A selection of video and
audio effects are available and can be added
to clips on my timeline. Effects allow you to
change the appearance of video or the
sound of audio in many ways, from simple
adjustments such to complex special effects.
On of the video effects I used was ‘Transform’, on an achieve image to make it zoom whilst it
was playing. To do this firstly, I dragged the transform effect to the effects window, onto my
timeline where I wanted it to appear.
After this, I then adjusted the transform in effect controls, where I adjusted the Scale Height
and Scale Width to make the image zoom. To do this I selected a beginning point and ending
point of the zoom and also the amount that I wanted to increase the size of the image.
8. Premiere allows you to
create several different
audio tracks, we used these
audio tracks so that we could
individually adjust the sound
of each interview, and
balance each sound
perfectly.
Once the several audio tracks were created, it was then easier to
view the sound levels for each individual track in the audio mixer.
The audio mixer in Adobe Premiere is designed to be a visual
representation of a real sound mixer. It features sliders for each
audio track, sub-mixes and a master fader. The audio mixer
provides a visual representation of the sound making it much
easier for me to equal the sound balance throughout the
documentary.
There were also
sections of our
documentary were still
too quite in these
places we use an audio
effect called ‘EQ’.
You can then adjust the ‘EQ’ effect in
effect controls using the volume
section.
9. ADOBE PHOTOSHOP
To create our title for our documentary, we used Adobe Photoshop. Using a
white background and a cut out of our title “produxions”, which we would
over lay on to our documentary over some of our video footage. We also
used this similar technique to create all our tittles using Photoshop.
Similarly to how we created our title for our documentary, we used a
similar style in creating the introductions to each of our interviewees.
Using a white background and a cut out of our their names, which we
would over lay on to our documentary over some of our video footage.
However, instead of using Photoshop, this time we used Adobe
Fireworks.
ADOBE FIREWORKS
10. AUDACITY
For the recording of our
voice over for the radio ad,
we used a programme called
audacity. In the radio studio,
which was quite, so that we
got the best quality of sound
for our voice over.
The easiest way to control Audacity playback and recording is with
Transport Toolbar. This offers buttons for Pause, Standard Speed
Play/Loop-Play, Stop, Skip to Start, Skip to End, Record/Append-Record.
To record, we needed to set the
recording level using the input
slider on the Mixer Toolbar
while watching the indications
in the recording level meter on
the Meter Toolbar. Every time
you click the Record button on
the Transport Toolbar Audacity
will create a new track and
begin recording on that track
from the current cursor
position.