SlideShare uma empresa Scribd logo
1 de 20
Baixar para ler offline
Kenny Lei 
Kevin Lasquete 
Kevin Segade 
Thuong Tran 
Yen Tu 
Group A4­6 
Final Report 
 
Section 1: System Description 
 
1A) Design Concept 
After much discussion, we decided to build our robot heavier and sturdier rather 
than lighter and faster in order to avoid getting disqualified by getting knocked over. We 
attempted to achieve this by concentrating most of the weight on the chassis. We used a 
particle board instead of the plywood provided in the fabrication lab due to larger sturdiness and 
weight. The form of the chassis started off with having a 13” diameter circle and only gets cut 
parts that are necessary to leave room for the wheels. The design also took into consideration 
the rotation of the front wheels and thus left more room at the nose of the chassis to avoid 
having them stick out of our allowed perimeter. We chose to have our back wheels permanently 
stationary and chose to 3­D­print L­brackets to attach the wheels, support columns, and the 
chassis at once.The holes on the side of the L­brackets were adjusted to lift the wheels high 
enough to leave some space underneath the chassis. Since the wheels in the back are 
stationary, only small pieces of the rod were necessary on each side to have the wheels 
attached to.  
To give room for the piston, we cut a rectangle at the tail of the chassis. This piston was 
mounted on a 3D­printed piece, which allowed for an appropriate angle (we had three mounts, 
one angled at 60° from the ground, another at 30°, and the last at 45°). These mounts were 
screwed into the base, and the end of the mount provided a hole just big enough for the shaft of 
the piston to fit through and allow the nut to tighten the piston and keep it in place. 
Lots of our focus of the design has 
been revolving around the steering design. 
Initially, we aimed to have an Ackerman 
steering design in order to prevent 
additional stress and friction on the wheels 
and motor. This was achieved by angling 
the steering arms inwards so that the 
linkage pivot points aimed towards the 
center of the axis on which the back wheels 
are located at. We chose to take advantage 
of the 3­D printing and constructed the 
steering arms and tie rods with it. The center of the tie rod is then connected via a bolt to 
another 3­D printed rod whose end is attached to the motor shaft. The motor is held in place 
mainly by another 3D­printed U­shaped mount with the ends bent so as to be able to attach it to 
a flat surface and screw the ends onto the base, with the motor positioned at the top of the 
upside­down U and the shaft going straight through it. The dimensions and placement of the 
mounting holes on the mount were adjusted towards the ones on the gearmotor. However, this 
steering design ended up to create too much leverage for the motor to be able to turn the 
wheels. 
Finally, we decided to move on and install parallel steering into our robot, as opposed to 
the Ackerman. With the parallel steering, we used a single long rod extending across the robot, 
similar to how the back wheels are attached. The rod is mainly held in place via nuts fastened 
about a wood block designed to both hold the rod, and hold the motor above it. In our design, 
this wood block is what allows the motor shaft, which is inserted into the block, to spin the axle 
about. The wood block is held in place by the same 3D­printed mount we attempted to use for 
the Ackerman steering, thus, tightly securing the motor and wood block without having to 
directly screw the block and therefore allowing it to rotate freely in place. The block of wood 
holding the axle and motor shaft also had a small hole drilled near the top where the shaft was 
inserted and a set screw was used to secure the motor shaft and keep it all together.  
We had initial troubles with this design as well, namely that the wood block used to allow 
rotation of the axle was too tall and thin, causing us to have to raise the 3D mount as well, and 
resulting in a lot of stress on the mount, causing it to bend upwards slightly, and allowing the 
wood block to move out of position. This was easily fixed using a shorter, more rectangular 
piece of wood, otherwise identical, in its place. This piece of wood was much more sturdy; it 
would not move out of place, nor cause bending, and still allow free rotation of the front wheels. 
In our testing of the different steering methods, we did notice that the parallel steering 
was much more sensitive, whereas the Ackerman steering had been more sturdy and stable. 
Our new steering design was susceptible to noticeable changes in direction when our robot 
moved over cracks or other indentations on the ground. The effect seemed small enough to be 
able to accept, considering how far we were into the quarter at this point, and we left the 
steering as is. Once controlled via code, these changes in direction were less noticeable. 
Although not in our initial design, we decided to build a middle platform on our robot 
where most of the electronics would be mounted. The shape of this middle platform closely 
resembled that of the base, with minor differences. Namely, the platform was smaller in 
diameter, and had a small few indents cut into it: two on the sides, and one on the front. These 
cuts were made along the support columns as well so as to be able to insert the platform and 
allow it to be held in between the columns. We drilled two holes into the middle base: one for 
the rod that extends from this platform to the top of our robot, holding the tire in place, and the 
other to allow wires to extend from the motor and piston on the lower base up through the hole 
and into the arduino. This allowed us not only to better secure the wires, but also minimize the 
total length of wires used.  
On this middle platform, we mounted the arduino circuit board with the shield, the 
battery, and the solenoid. These electronics were all secured onto the platform via wood blocks 
that were screwed in. Although they fit snugly in between the wood mounts that we attached to 
this middle base, the electronics were not actually fastened onto the board, but just kept from 
sliding off. This allowed us to be able to easily take out a piece if it happened to be 
malfunctioning or if we needed to test a piece alone. 
Above this platform, we attached a third and final platform. This third one topped off the 
robot, held in place by the support columns underneath with screws and by the center rod as 
well. This third platform was designed to have the tire sit right on top, and a cut was made into 
the platform specifically for the valve of the tire, to keep the hose from extending outside the 
maximum diameter of the robot and allow it to go directly down within the robot. 


1B) CAD model of final robot design 
 
Dimetric view: 
 
Front View:
 
 
Side View:: 


Close­Up of Steering: 


Close­Up of Second Base: 


1C) Electronic Circuit Diagram 


1D) Documented Software Code: 
//­­­­­­­­­­­­­­­­­­­­­­­­­­­­­­­­­­­­­­­­­­­­­­­­­­­­­­­­­­­­­­­­­­­­­­­­­­­ 
//­­­­­­­­­­­­­­­­­­­­­­Initialize variable names­­­­­­­­­­­­­­­­­­­­­­­­­­­­ 
//­­­­­­­­­­­­­­­­­­­­­­­­­­­­­­­­­­­­­­­­­­­­­­­­­­­­­­­­­­­­­­­­­­­­­­­­­­­ 
// If using interrupts, it only works with motor 2 (unless the motor driver is remapped). 
const int D2 = 4;  // D2 pin, disables the motors if low 
const int M2DIR = 8;  // Motor 2 direction  
const int M2PWM = 10;  // Motor 2 input (PWM) 
const int M2EN  = 12;  // Motor 2 Diag 
const int M2FB  = 15;  // (Analog1 pin)  Motor 2 current sense 
const float CPR = 465.0;  // Encoder counts per revolution 
// const float CPR = 1200.0; 
 
// Encoder/interrupt pins 
const int encoderApin = 2; 
const int encoderBpin = 3;  
 
// Reed Switch pin 
const int switchPin = 5; 
 
// Encoder status 
volatile int encoderA; 
volatile int encoderB; 
 
// Time variables 
float currentMicros;  // time in microseconds 
float oldMicros = 0;  // previous measurement of time in microseconds 
int printcounter = 0; // how many samples since the last print to screen 
 
// Position variables 
const int origPos = 0;  // Original position 
volatile long rawPos;  // Actual position 
float Pos; 
float oldPos;  // Old position value 
float desPos;  // Desired position 
float olddesPos; // Old desired position 
 
// Velocity variables 
float Vel; 
float desVel; 
 
// Controller variables 
double u[2]; 
float motorAmps; 
float ampsError; 
 
const int ledPin =  9;      // the number of the LED pin 
 
// Reed Switch variables 
int Revos = 0; 
int degrees = 0; 
int OldDeg; 
int RotCheck; 
int prevRotCheck; 
 
// Variables will change: 
int ledState = LOW;             // ledState used to set the LED 
long previousMillis = 0;        // will store last time LED was updated 
 
// the follow variables is a long because the time, measured in miliseconds, 
// will quickly become a bigger number than can be stored in an int. 
long interval = 400;  
 
//­­­­­­­­­­­­­­­­­­­­­­­­­­­­­­­­­­­­­­­­­­­­­­­­­­­­­­­­­­­­­­­­­­­­­­­­­­­ 
//­­­­­­­­­­­­­­­Setup() runs one time when the Arduino turns on­­­­­­­­­­­­­­­­ 
//­­­­­­­­­­­­­­­­­­­­­­­­­­­­­­­­­­­­­­­­­­­­­­­­­­­­­­­­­­­­­­­­­­­­­­­­­­­ 
 
void setup() { 
   
  // Enable motors 
  pinMode(ledPin, OUTPUT);   
  pinMode(4, OUTPUT); 
  digitalWrite(4, HIGH); 
  pinMode(7,OUTPUT); 
  digitalWrite(7,LOW); 
   
  // Enable motor direction pin 
  pinMode(M2DIR, OUTPUT); 
   
  // Enable current sense 
  pinMode(M2FB, INPUT); 
   
  pinMode(ledPin, OUTPUT); 
   
  // Enable another analog sensor input 
  pinMode(A2, INPUT);  // A2 is defined in the environment to correspond to the # that specifies 
Analog Input 2 
  pinMode(A3, OUTPUT); // We can use analog output 3 to power our sensor if we set it as an 
output 
  digitalWrite(A3,HIGH); // This sets analog pint 3 to provide 5 volts 
   
  // Enable encoder 
  pinMode(encoderApin, INPUT); 
  pinMode(encoderBpin, INPUT); 
   
  // Read encoder status 
  encoderA = digitalRead(encoderApin); 
  encoderB = digitalRead(encoderBpin); 
   
  // Attach interrupt service routines for each possible interrupt 
  attachInterrupt(0, encoderAchange, CHANGE); 
  attachInterrupt(1, encoderBchange, CHANGE); 
   
  //  Reed Switch Setup 
  pinMode(switchPin, INPUT);        // switchPin is an input 
  digitalWrite(switchPin, HIGH);    // Activate internal pullup resistor 
  OldDeg = degrees; 
  prevRotCheck = 1; 
   
  currentMicros = (float)micros(); 
  oldMicros = currentMicros; 
   
  rawPos = origPos;  // Set raw position   
  Pos = 2.0*PI*((float)rawPos)/CPR;  // Set position 
  oldPos = Pos;  // Set old position 
  desPos = 2*PI*((float)origPos)/CPR; // Set inital value for the desried position 
  olddesPos = desPos; 
 
  Vel = 0; 
  desVel = 0; 
   
  u[0] = 0.0; 
  u[1] = 0.0; 
   
  ampsError = 0; 
   
  Serial.begin(115200); // Open serial port 
} 
//­­­­­­­­­­­­­­­­­­­­­­­­­­­­­­­­­­­­­­­­­­­­­­­­­­­­­­­­­­­­­­­­­­­­­­­­­­­ 
//­­­­­­After setup runs, this loop runs over and over forever­­­­­­­­­­­­­­­ 
//­­­­­­­­­­­­­­­­­­­­­­­­­­­­­­­­­­­­­­­­­­­­­­­­­­­­­­­­­­­­­­­­­­­­­­­­­­­ 
 
void loop() { 
   
  currentMicros = (float)millis(); // Current time in microseconds, obtained from Ardunio clock via 
function micros() 
  // Compute Pos/Vel and desired Pos/Ve 
   
  unsigned long currentMillis = millis(); 
  
  if(currentMillis ­ previousMillis > interval)  
    { 
    // save the last time you blinked the LED  
    previousMillis = currentMillis;   
 
    // if the LED is off turn it on and vice­versa: 
   
   
    if ((ledState == LOW) && (currentMillis < 60000)) 
      ledState = HIGH; 
    else 
      ledState = LOW; 
   
    if (currentMillis >= 60000) 
      ledState = HIGH; 
 
    // set the LED with the ledState of the variable: 
    digitalWrite(ledPin, ledState); 
  } 
   
  desPos = desiredPosition(currentMicros/1000.0); 
  Pos = 2.0*PI*((float)rawPos)/CPR;  // calibrate encoder reading 
  if (currentMicros != oldMicros) { 
    Vel = 1000.0*(Pos ­ oldPos)/(currentMicros ­ oldMicros); 
    desVel = 1000.0*(desPos ­ olddesPos)/(currentMicros ­ oldMicros); 
  } 
   
  // Use the controller (and filter if needed) 
  u[0] = controller(Pos, Vel, desPos, desVel);; 
  u[0] = 0.5*u[0] + 0.5*u[1]; 
  u[1] = u[0]; 
   
  motorAmps = 0.035*analogRead(M2FB); 
   
  // Overcurrent protection 
  //overCurrent(u, motorAmps, ampsError); 
   
  // Run the motor 
  runMotor(u[0]); 
   
  // Reed Switch portion of code 
   OldDeg = degrees; 
   Revos = degrees/360; 
   
   if (digitalRead(switchPin) == 1) 
      RotCheck = 1; 
      else{ 
        RotCheck = 0; 
      } 
   
   if (RotCheck == prevRotCheck) 
      degrees = OldDeg; 
      else{ 
        degrees = (45 + OldDeg); 
        prevRotCheck = RotCheck; 
      } 
 
  // Update values 
  oldPos = Pos; 
  olddesPos = desPos; 
  oldMicros = currentMicros; 
   
  // Print on screen 
  printcounter++;  
  if (printcounter == 1000) // set this number to 1000 if you want it to print to screen only every 
1000 samples 
  { 
    printcounter = 0; 
    Serial.flush(); 
    Serial.print("Time:"); 
    Serial.print("t"); 
    Serial.print((float)(currentMicros/1000000.0), 3); 
    Serial.print("t"); 
    Serial.print("Pos:"); 
    Serial.print("t"); 
    Serial.print(Pos); 
    Serial.print("t"); 
    Serial.print("desPos:"); 
    Serial.print("t"); 
    Serial.print(desPos); 
    Serial.print("t"); 
    Serial.print("Vel:"); 
    Serial.print("t"); 
    Serial.print(Vel); 
    Serial.print("t"); 
    Serial.print("desVel:"); 
    Serial.print("t"); 
    Serial.print(desVel); 
    Serial.print("t"); 
    Serial.print("u:"); 
    Serial.print("t"); 
    Serial.print(u[0]); 
    Serial.print("t"); 
    Serial.print("amps:"); 
    Serial.print("t"); 
    Serial.println(motorAmps); 
    Serial.println(""); 
    /* 
    Serial.print("Degrees:"); 
    Serial.print("t"); 
    Serial.print(degrees); 
    Serial.print("t"); 
    Serial.print("Revolutions:"); 
    Serial.print("t"); 
    Serial.println(Revos); 
    */ 
  } 
} 
 
//­­­­­­­­­­­­­­­­­­­­­­­­­­­­­­­­­­­­­­­­­­­­­­­­­­­­­­­­­­­­­­­­­­­­­­­­­­­ 
//­­­­­­­Encoder Functions that run when Interupt Detected (i.e. ISRs)­­­­­­­ 
//­­­­­­­­­­­­­­­­­­­­­­­­­­­­­­­­­­­­­­­­­­­­­­­­­­­­­­­­­­­­­­­­­­­­­­­­­­­ 
void encoderAchange() { 
  // Runs if there is a change in the A line of the endcoder 
  // Apply encoder logic based on quadrature encoding to update position 
  if ((encoderB == LOW) && (encoderA == LOW)) {rawPos++;} 
  else if ((encoderB == LOW) && (encoderA == HIGH)) {rawPos­­;} 
  else if ((encoderB == HIGH) && (encoderA == LOW)) {rawPos­­;} 
  else if ((encoderB == HIGH) && (encoderA == HIGH)) {rawPos++;} 
   
  encoderA = !encoderA;  // Save the updated encoderA value! 
 
} 
 
void encoderBchange() { 
  // Runs if there is a change in the B line of the encoder 
  // Apply encoder logic based on quadrature encoding to update position  
  if ((encoderA == LOW) && (encoderB == LOW)) {rawPos­­;} 
  else if ((encoderA == LOW) && (encoderB == HIGH)) {rawPos++;} 
  else if ((encoderA == HIGH) && (encoderB == LOW)) {rawPos++;} 
  else if ((encoderA == HIGH) && (encoderB == HIGH)) {rawPos­­;} 
   
  encoderB = !encoderB;  // Save the updated encoderB value! 
 
} 
 
 
//­­­­­­­­­­­­­­­­­­­­­­­­­­­­­­­­­­­­­­­­­­­­­­­­­­­­­­­­­­­­­­­­­­­­­­­­­­­ 
//­­­­­­­­­­­Function that sends the command 'u' to the Motor­­­­­­­­­­­­­­­­ 
//­­­­­­­­­­­­­­­­­­­­­­­­­­­­­­­­­­­­­­­­­­­­­­­­­­­­­­­­­­­­­­­­­­­­­­­­­­­ 
 
void runMotor(double u) { 
  boolean forward = (u > 0.0); 
   
  // we use Pulse­Width­Modulation to talk to the motor 
  if (forward) { 
    digitalWrite(M2DIR, LOW); 
    if (u > 255.0) {analogWrite(M2PWM, 255);} 
    else {analogWrite(M2PWM, (int)u);} 
  } 
  else { 
    digitalWrite(M2DIR, HIGH); 
    if (u < ­255.0) {analogWrite(M2PWM, 255);} 
    else {analogWrite(M2PWM, ­(int)u);}  
  } 
} 
 
 
//­­­­­­­­­­­­­­­­­­­­­­­­­­­­­­­­­­­­­­­­­­­­­­­­­­­­­­­­­­­­­­­­­­­­­­­­­­­ 
//­­­­­­­­­­­­­Function that defines PD Controller­­­­­­­­­­­­­­­­­­­­­­­­­­­ 
//­­­­­­­­­­­­­­­­­­­­­­­­­­­­­­­­­­­­­­­­­­­­­­­­­­­­­­­­­­­­­­­­­­­­­­­­­­­ 
 
double controller(float Pos, float Vel, float desPos, float desVel) { 
  double errorPos; 
  double errorVel; 
  double Kp; 
  double Kd; 
  double u; 
   
  errorPos = (double)(Pos ­ desPos); 
  errorVel = (double)(Vel ­ desVel); 
   
  Kp = 200.0; // position control gain 
  Kd = 0.1; // velocity control gain 
   
  u = ­ Kp*errorPos ­ Kd*errorVel;  // PD position control 
   
  return u; 
} 
 
 
//­­­­­­­­­­­­­­­­­­­­­­­­­­­­­­­­­­­­­­­­­­­­­­­­­­­­­­­­­­­­­­­­­­­­­­­­­­­ 
//­­­­­­­­­­­­­­­­Function Generator/Set desired position­­­­­­­­­­­­­­­­­­­­ 
//­­­­­­­­­­­­­­­­­­­­­­­­­­­­­­­­­­­­­­­­­­­­­­­­­­­­­­­­­­­­­­­­­­­­­­­­­­­ 
 
float desiredPosition(float t) { 
  float desPos; 
  // this function is currently set up to specify a desired position that is a square wave 
  // you can modify the next line to specify a ramp or sine wave or whatever you want 
  // desPos = PI/3*(float)(sign(sin(2*PI*.5*t))); // the amplitude of the square wave is PI/3 radians 
= 60 degrees; the frequency f = .5 Hz 
  desPos = 0; 
  
  /* 
  For steering, robot would travel a certain distance based on number of revolutions, and then 
would turn in a given direction and continue traveling from there. 
   
  Negative desPos == turn right 
  Positive desPos == turn left 
  */ 
   
  if ((Revos >= 0) && (Revos < 5))      //go straight for 5 counts 
    desPos = 0; 
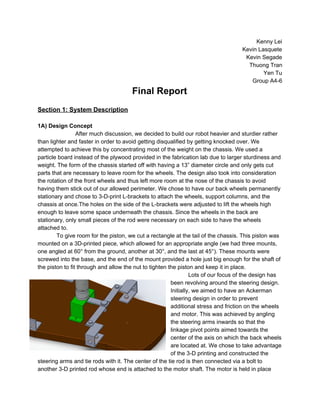
   
  if ((Revos >= 3) && (Revos < 5))      //bot steers left for 2 counts 
    desPos = 1.1; 
   
  if (Revos > 5)                        //bot straightens out and goes straight continously (­0.1 is just to 
make sure the robot straightens out) 
    desPos = ­0.1; 
 
  return desPos; 
} 
 
// sign returns 1 if 'value' is positive, ­1 if negative, 0 if zero 
int sign(float value) { 
  if (value > 0.0) { 
    return 1; 
  } else if (value < 0.0){ 
    return ­1; 
  } else { 
    return 0; 
  } 
} 


1E) 3D Printing: 
I (Yen) joined the group approximately the 4th week into the quarter thus making me 
responsible for the 3D printing for our group. The group initially did not plan to involve 3D 
printing into their design but they decided to utilize it to incorporate me into the group and to 
ease the fabrication for few of the components. The components of our robot that was printed 
involves the piston support, motor mount, tie rod, steering plate, the front and and rear wheel 
support. The initial design incorporated all the mentioned components but after  a few 
modifications we removed the tie rod and steering plate and replaced our initial steering system. 
We consistently ran into complications with the piston support during assembly, testing, 
experimenting, and during the competition; it was one of many aspects that hindered us from 
competitively challenging the other robots from our lab. When the piston support was first 
printed, the specifications were  20% infill with a 60​° incline from flat ground. During the first few 
test runs, we concluded that since our chassis was so low to the ground, the piston propelled 
our robot more vertically than horizontally thus “cradling” the robot. I returned to RapidTech, the 
3D printing lab, to produce another piston support with the same infill but 30° incline. After 
reassembling the robot and a few runs, we then noticed that the robot did not propel itself even 
though it had the required voltage and pressure. This was because the new angle of incline was 
such that the piston did not quite reach the floor. The following day we purchased various 
rubber stoppers to apply to the end of the piston. This worked successfully for less than a 
handful of attempts before the piston support broke again. I printed yet another piston support 
but at an increased value for both the infill (30) and angle (45). This worked decently without 
re­applying on the rubber stopper. Once we did so, it broke the piston support. Finally we 
decided to return back to our original piston support but we reassembled where it was elevated 
higher to reduce the amount of vertical force it was act on the ground. Ultimately, all of the 
piston supports broke. This is due to the material that we decided to create our piston support 
from. Fortunately for us, we were able to capture footage of our robot properly being propelled 
and steer. 


Section 2: Testing & Development: 
 
 
This plot is a function of the distance travelled by the robot as a function of delay 
between piston actuations. The distance was measured simply by the circumference of 
the wheels multiplied by the number of revolutions. 


These next plots show the distance traveled vs. the number of counts of 
revolutions from the encoder. The robot was set to stop after 10 revolutions and the 
distance was measured after the robot had stopped. Two magnets were mounted 180 
degrees apart on the left rear wheel. The likely causes that the actual distance was less 
than the expected distance were due to an unsteady velocity and also the shifting of the 
magnets (they may have moved around while the robot was moving). 
 
Section 3: Group Contributions 
 
Yen Tu (3D Printing): 
● Major contributor for obtaining robot components such as the pistons support and the 
motor mount. 
● Responsible for exporting files from solidworks as .stl files to import into 3D modeling 
program to print desired piston support, motor mount, front and rear wheel supports. 
Transferred the re­written code in .x3g file into the 3D printer to model the components. 
● Assisted in testing of the robot, mostly the functionality with less emphasis on 
connectivity. 
● Assisted fabrication by mounting the frame for the solenoid, arduino/shield, and battery 
onto the robot. 
● Assisted the assembly of the robot, particularly the piston support. 
 
Kevin Lasquete (Controls): 
● Responsible for implementing main code for robot to function 
● Designed function in code to steer robot as a function of distance travelled (revolutions 
of a particular wheel) 
● Assisted with connectivity of the Arduino and wiring 
● Connected reed switch to Arduino 
● Tested movement and motor control 
 
Kevin Segade (Fabrication): 
● Signed up for the fabrication lab and obtained skills and materials necessary for the 
building of the robot (plywood, particle board, metal, screws, etc.) 
● Picked up and bought spare parts and tools where needed for work on our robot outside 
of fabrication lab 
● Built the robot from scratch; cut wood down to appropriate measurements, drilled holes 
where necessary 
● Assisted in testing of robot, mainly in steering control and stability; made adjustments 
where necessary 
● Assisted in overall design and assembly of robot 
 
Thuong Tran (CAD): 
● Designed the mechanical aspect of the robot 
● Prepared design on Solidworks 
● Responsible in calculating dimensions to fit in the allowed perimeter 
● Prepared parts on Solidworks for 3­D printing purposes 
● Assisted in finding components in hardware stores 
● Assisted in assembly, connectivity of the Arduino, and testing of the robot. 
● Assisted in some parts of fabrications of the steering components 
 
 
Kenny Lei (Connectivity and Sensors): 
● Responsible for the connection and mounting of the arduino 
● Designed and connected all electrical components as shown on the circuits diagram 
● Responsible for making sure that air from the tire to the solenoid to the piston with 
minimal air loss. 
● Helped updating the code and troubleshooting problems that arise   
● Assisted fabrications in the assembly of the robot frame and the testing of the robot 

Mais conteúdo relacionado

Semelhante a MAE106FinalReport

HPV Construction_reduced
HPV Construction_reducedHPV Construction_reduced
HPV Construction_reducedMatt Sullivan
 
Design Project - Front-rowing mechanism - MECH 292
Design Project - Front-rowing mechanism - MECH 292Design Project - Front-rowing mechanism - MECH 292
Design Project - Front-rowing mechanism - MECH 292Stasik Nemirovsky
 
Team254_TechnicalBinder_2015_Final
Team254_TechnicalBinder_2015_FinalTeam254_TechnicalBinder_2015_Final
Team254_TechnicalBinder_2015_FinalAndrew Torrance
 
Mousetrap cars
Mousetrap carsMousetrap cars
Mousetrap carsBill Kuhl
 
Capstone Design Final Report
Capstone Design Final ReportCapstone Design Final Report
Capstone Design Final ReportMatt Bartholomew
 
VEX Robotics - Technical Journal
VEX Robotics - Technical JournalVEX Robotics - Technical Journal
VEX Robotics - Technical JournalJoseph Han
 
2.00gokart final
2.00gokart final2.00gokart final
2.00gokart finalJames Handy
 
Handcar project report
Handcar project reportHandcar project report
Handcar project reportMoutaz Yahya
 
ICYCLE TN05 Presentation
ICYCLE TN05 PresentationICYCLE TN05 Presentation
ICYCLE TN05 PresentationDaniel Ebere
 
Wheel Design & Analysis
Wheel Design & AnalysisWheel Design & Analysis
Wheel Design & AnalysisMartin Dirker
 
Ts 17 halfshafts-and-tripods
Ts 17 halfshafts-and-tripodsTs 17 halfshafts-and-tripods
Ts 17 halfshafts-and-tripodsStefan Radulovic
 
Design book[1]
Design book[1]Design book[1]
Design book[1]nzende
 
AnimatedCharacterPPT
AnimatedCharacterPPTAnimatedCharacterPPT
AnimatedCharacterPPTTyler Totten
 
Baja sae india suspension design
Baja sae india suspension designBaja sae india suspension design
Baja sae india suspension designUpender Rawat
 
article FFE 350 experimental motorcycle
article FFE 350 experimental motorcycle article FFE 350 experimental motorcycle
article FFE 350 experimental motorcycle julianfarnam
 

Semelhante a MAE106FinalReport (20)

HPV Construction_reduced
HPV Construction_reducedHPV Construction_reduced
HPV Construction_reduced
 
Design Project - Front-rowing mechanism - MECH 292
Design Project - Front-rowing mechanism - MECH 292Design Project - Front-rowing mechanism - MECH 292
Design Project - Front-rowing mechanism - MECH 292
 
Team254_TechnicalBinder_2015_Final
Team254_TechnicalBinder_2015_FinalTeam254_TechnicalBinder_2015_Final
Team254_TechnicalBinder_2015_Final
 
Mousetrap cars
Mousetrap carsMousetrap cars
Mousetrap cars
 
Capstone Design Final Report
Capstone Design Final ReportCapstone Design Final Report
Capstone Design Final Report
 
VEX Robotics - Technical Journal
VEX Robotics - Technical JournalVEX Robotics - Technical Journal
VEX Robotics - Technical Journal
 
2.00gokart final
2.00gokart final2.00gokart final
2.00gokart final
 
Handcar project report
Handcar project reportHandcar project report
Handcar project report
 
ICYCLE TN05 Presentation
ICYCLE TN05 PresentationICYCLE TN05 Presentation
ICYCLE TN05 Presentation
 
Wheel Design & Analysis
Wheel Design & AnalysisWheel Design & Analysis
Wheel Design & Analysis
 
Ts 17 halfshafts-and-tripods
Ts 17 halfshafts-and-tripodsTs 17 halfshafts-and-tripods
Ts 17 halfshafts-and-tripods
 
Final project report 2014 new
Final project report 2014 newFinal project report 2014 new
Final project report 2014 new
 
MKYoumans.Portfolio
MKYoumans.PortfolioMKYoumans.Portfolio
MKYoumans.Portfolio
 
Design book[1]
Design book[1]Design book[1]
Design book[1]
 
AnimatedCharacterPPT
AnimatedCharacterPPTAnimatedCharacterPPT
AnimatedCharacterPPT
 
Baja sae india suspension design
Baja sae india suspension designBaja sae india suspension design
Baja sae india suspension design
 
Design Report - ESI 2017
Design Report - ESI 2017Design Report - ESI 2017
Design Report - ESI 2017
 
Final Paper
Final PaperFinal Paper
Final Paper
 
article FFE 350 experimental motorcycle
article FFE 350 experimental motorcycle article FFE 350 experimental motorcycle
article FFE 350 experimental motorcycle
 
Treadmill Bicycle
Treadmill BicycleTreadmill Bicycle
Treadmill Bicycle
 

MAE106FinalReport