
Recomendados
Mais conteúdo relacionado
Mais procurados
Mais procurados (20)
Destaque
Destaque (20)
Semelhante a Advert editing screen print diary
Semelhante a Advert editing screen print diary (20)
Mais de JChorlton15
Mais de JChorlton15 (17)
Advert editing screen print diary
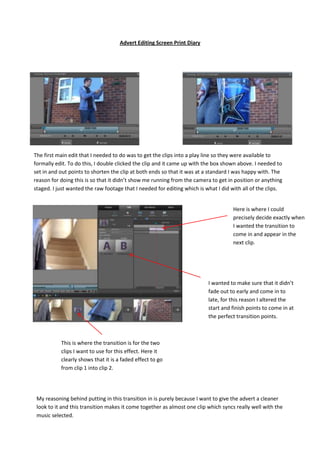
- 1. Advert Editing Screen Print Diary The first main edit that I needed to do was to get the clips into a play line so they were available to formally edit. To do this, I double clicked the clip and it came up with the box shown above. I needed to set in and out points to shorten the clip at both ends so that it was at a standard I was happy with. The reason for doing this is so that it didn’t show me running from the camera to get in position or anything staged. I just wanted the raw footage that I needed for editing which is what I did with all of the clips. Here is where I could precisely decide exactly when I wanted the transition to come in and appear in the next clip. I wanted to make sure that it didn’t fade out to early and come in to late, for this reason I altered the start and finish points to come in at the perfect transition points. This is where the transition is for the two clips I want to use for this effect. Here it clearly shows that it is a faded effect to go from clip 1 into clip 2. My reasoning behind putting in this transition in is purely because I want to give the advert a cleaner look to it and this transition makes it come together as almost one clip which syncs really well with the music selected.
- 2. Similarly to the previous clip transition, I used an inset effect to go to the third clip which worked well. I wanted to find an effect which showed the transition in a clean way because of the sudden change of environment from the second to the third clip. That way it didn’t look to cheesy and sudden as it switched, I wanted a gradual slip from clip to clip which is what I believe I have achieved. My overall objective for my clips was to maintain a clean and original look as if it was a film sliding from clip to clip. I needed to get the song I wanted for use from my folders, so I went to the “Get Media from” option in file and imported if after downloading it from an mp3 converter through the internet. I then proceeded to put it into the advert so that I could further edit it to be in sync with the clips. I have chosen this song because in the start it sounds quite sad and depressing which fits in well with the atmosphere and the aims of my clips, but then the music drops into a beat with a tune when I drink the can so it syncs in well with what I am trying to get across with the advert. I want it combined with the earthquake effect to make it look like the drink is making you into a creature of some sort.
- 3. My next plan was to remove the audio from the last clip as I only wanted the earthquake effect and the music to be playing. To do this, I right clicked on the audio part of the specific clip and selected the option “delete audio”. My reasoning behind this was so that when the advert was playing you can only hear the music drop to get rid of the reality of me dancing but rather the drink taking over you. The earthquake was the main effect I wanted to insert into the last clip to put everything together. A change from the sad walking and slightly mourning start to the song into a screen shaking tune drop to finish the advert off. The earthquake was done by selecting it from the list of video effects. Once selected, I altered and played around with the magnitude and opacity to make sure if was the right amount and it lasted for the right amount of time. If you notice, I have cut the clip into two sections; the reason for this is so that I could easily stop the earthquake effect in the part where the can is shown to the camera, this way the viewer can read the can without the screen going everywhere.
- 4. In order for the music to sync in nicely with the clips and so that the drop comes in at the correct time, I needed to move the clip forward to an exact point of 5 seconds so that the real bass and tune comes in when my earthquake effect and me drinking the can do as well. I did this so that it fits in nicely and the song transitions from the mellow and slightly sad tune at the beginning, to a sudden change when I drink the can to create an animalistic effect. This is fairly straight forward; I just wanted to add a fade in effect to the song. The reason behind this was that because I had moved the song forward 5 seconds, I didn’t want it to seem to sudden and abrupt as the song enters the advert, so fading it allows it to gradually rise in volume so it fits in nicely as the clips transition. Similarly to the above screen shot, I just wanted to fade out this time at the end of the advert so it didn’t end suddenly, I wanted to keep the clean effect to it and maintain the smooth fades throughout the audio.
- 5. Finally, I wanted to stop the earthquake effect at the end where the can is shown to the camera, this is so that the viewer can see the can clearly without the screen shaking everywhere. However, I have kept the song on and playing so that it keeps the upbeat rhythm to it even without the quake. This is where you can switch between the clips you have imported and the editing section where you can edit the clips by shortening, adding effects or adding colour correction etc. Here is just an example clip from my slide of imported clips. Here is where all imports will be, whether it is sound or video, they will be here for you to further edit and put into the software. This is the time slide panel for the selected clip, showing time intervals where edits have been put in and how long the clip is specifically. Here is a transition put into the slot between two clips, this particular one is an inset which I thought fit well with the clips and the way they formed into one another. This is just a highlight over one of the clips, when double clicked; it enhances it and shows the clip in the larger view box above, this is how it shows the specific time slide panel. This is the soundtrack location, for this advert I used a track called “Close” by Drumsound and Bassline Smith, an upbeat drum and bass song which fits nicely with the transition of the clips and the drop/dancing at the end.
- 6. Now that the editing is completed, I need to render the video and make it compatible for YouTube so that it can be uploaded successfully in an MOV format. I have done the rendering and the file saving is complete; I just renamed it to the name of my advert which is “No Remorse Energy Drink” and saved it for the next step. Once I had clicked save, it began converting it into a video format so that I could further upload it to my desired platform, YouTube through the internet.