1. Bead Weaving on a Loom
Objective: students will be able to describe the process of weaving
and demonstrate how Native Americans and others wove beads on
a loom to create long, narrow bands such as hair ties and bracelets.
They will produce a patterned beaded band influenced by their
visual study of Native American geometric patterns in their Web
and print resources. They can discuss how the use of color, shape,
and value in Native American beading has changed through the
years because of the influence of other cultures.
Grade Levels: Grades 5-7th
Time Required: Several class periods (or use of free time)
Materials:
Purchased bead looms or
To make a loom (see instructions below):
Cardboard cut to loom pattern, craft knife, wood glue, pins
2 wide round-headed ½"screws
Beading supplies;
Scissors
Seed or pony beads (larger beads for younger students)
Linen or nylon thread
Needle
Bead patterns
(Graph paper or online interactive bead pattern makers)
Motivation:
Beads have been used by many cultures, including Native American, for thousands of
years. A defining moment in Native American cultures came upon their exposure to
European glass beads in the seventeenth century they were ready to use, rich in color,
hard and durable, and could be traded for with pelts. Native Americans became very
interested in obtaining glass beads. They used the beads to decorate clothing, vessels,
tools, and weapons. Seed beads adorned bags, moccasins, hair ties, and other garments.
When tourist trade increased after 1900, Native Americans created beaded items
especially for this market. Patterns reflected the styles of the time as well as traditional
designs. Beading has enjoyed a revival in the crafts in recent years. There are ample
selections of beads and other supplies available in local craft stores at moderate prices.
Online resources will give students background information and activities with which to
learn about Native American beadwork.
Web Resources: http://www.museum.state.il.us/muslink/nat_amer
http://www.museum.state.il.us/muslink/nat_amer/post/htmls/te_trade.html
NativeTech Bead Work information and interactive bead pattern maker
http://www.nativetech.org/beadwork/beadgraph/index.html
2. http://www.nativetech.org/beadwork/
Print Resources:
Barth, Georg and Holm, Bill (1993). Native American Beadwork: Traditional Beading
Techniques for Modern-Day Beadweavers. Schneider Publications.
Dean, David (2002). Beading in the Native American Tradition. Interweave Press.
Goodhue, Horace (1989). Indian Beadweaving Patterns. Bead Craft.
Orchard, William (2002). Native American Beadwork. Dover.
Procedure:
Constructing a bead loom (optional):
The diagram shows a piece of heavy corrugated cardboard that has been cut into a cross-
shape with the dimensions labeled. The dotted lines represent scoring lines made with a
craft knife half-way through the cardboard so that the flaps can fold upward to form the
sides and ends of the loom. Apply wood glue (stronger than white glue) to the ends of the
sides. Press the ends of the loom over the glued edges. Thrust a sewing pin through the
each edge of the loom ends so that it plunges through the glue and into the loom side.
This will prevent it popping apart. Use the craft knife to cut 1/8” deep (and 3/16” evenly
spaced) slits across the top of the loom ends for the beading thread to be placed. Poke a
hole about 1 ¼” below the center of the slits and screw in the half-inch screw to serve as
the anchor on each end for the beading thread (leaving about 1/8” of the screw shank
showing).
Designing a Pattern: After looking at examples of Native American geometric bead
designs in books and online, students can use graph paper or an online interactive to draw
or color their bead pattern. It should measure about a 1-1 ½” wide and about 8” or less
(measure the write) long. A patch could be made instead of a bracelet and be square in
shape. (Project size may be determined by student capabilities, time constraints, and
costs.)
Threading the loom: unroll two or three yards of beading thread from the spool. Wrap
one end of the thread around one of the screws on the loom a couple of times. While
holding it tight, slide the long end of the thread through a center slit, wind it around the
opposite screw, return it through the opposite center slit, etc., (keeping the tension even)
3. until the thread has gone through all the slits needed (one more than the number of beads
wide your design is). Cut and tie off the thread on the nearest screw.
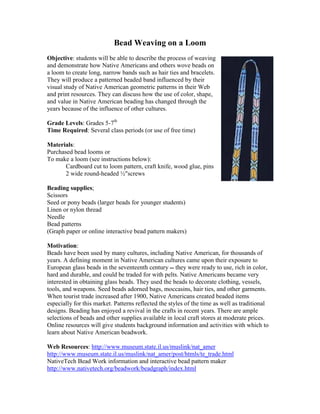
Bead Weaving (also see online diagrams for
instructions):
Cut off a one-yard length of beading thread.
Thread one end through the eye of your
needle. Pull the thread through until the
length is almost halved (you will adjust as
you bead). Tie the long end of your thread to
the outside warp thread on the loom (which
side depends on whether you are left- or
right-handed), leaving at least an inch or two
of the end hanging (you will tuck it through
the first row of beads later).
Commercial Loom with Seed Beads
Home-made Loom with Pony Beads
Use your needle to pick up the first row of
beads from your containers of beads (use a
muffin tin or water color pan to separate
colors). Follow the color sequence of your
pattern. When the beads are all on the
needle, slip them down the thread to the
bottom, snug against the beading threads.
Pass the need UNDER all the warp threads.
Hold the beads while you slip each one into
lace between successive warp threads. Then
pass the needle through the beads from the
opposite direction but this time ABOVE all
the warp threads. This will lock the beads
into place for Row One.
Repeat this sequence for each row. As you near the end of your thread, run it through the
bead row an extra (3rd) time and cut it off. Start the next thread by threading it through
the same row (4th time) to anchor it, then continue as before. To tie off, leave enough of
the warp thread to be able to tie them into a fringe or tuck them into the columns of
beads. They could also be folded back and hidden inside a felt backing cut to size and
glued or sewed on.
Assessment:
Weaving Techniques: bead pattern should be like the drawn or colored pattern source;
beads rows should be even and straight
History: Students will relate how they made their object using the tools, how their design
is Native American-inspired, and how Native Americans would have used their object.
4. Illinois State Board of Education Goals and Standards Addressed:
Visual Arts: 25.B.2 Understand how elements and principles combine within an art form
to express ideas.
26.A.2f Understand the artistic processes of printmaking, weaving, photography and
sculpture
26.A.3e Describe how the choices of tools/technologies and processes are used to create
specific effects in the arts.
27.B.2 Identify and describe how the arts communicate the similarities and differences
among various people, places and times.
27.B.3 Know and describe how artists and their works shape culture and increase
understanding of societies, past and present.
Social Science:
18.C.2 Describe how changes in production (e.g., hunting and gathering, agricultural,
industrial) and population caused changes in social systems.