VIP Model Call Girls Shikrapur ( Pune ) Call ON 8005736733 Starting From 5K t...
Aec manual2017 imp
1. Analog Electronics Laboratory 2017-18
Department of ECE, CIT, Gubbi Page no. 1
VDC
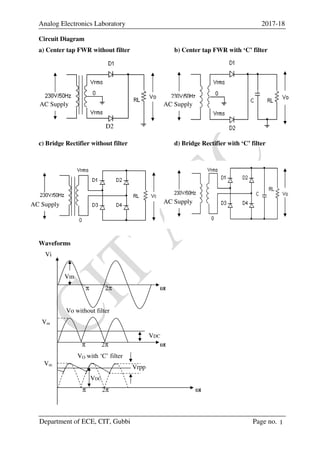
Circuit Diagram
a) Center tap FWR without filter b) Center tap FWR with ‘C’ filter
c) Bridge Rectifier without filter d) Bridge Rectifier with ‘C’ filter
Waveforms
Vi
Vm
π 2π ωt
Vo without filter
Vm
π 2π ωt
VO with ‘C’ filter
Vrpp
VDC
π 2π ωt
Vm
D2
AC Supply AC Supply
AC Supply AC Supply
2. Analog Electronics Laboratory 2017-18
Department of ECE, CIT, Gubbi Page no. 2
Experiment No: 1 Date:
Rectifiers with and without Filters
Aim: To design and verify the performance of center tap full wave rectifier and bridge
rectifier with and without ‘C’ filter’
Apparatus Required :
Sl.
No.
Particulars Range Quantity
1. Transformer As per design 01
2. Diode (BC 547) - 04
3. Resistors & Capacitors As per design -
4. Multimeter - 01
5. CRO Probes - 2 Set
6. Spring board and connecting wires - -
Theory:
Rectifier is a circuit which converts AC to pulsating DC. Rectifiers are used in
construction of DC power supplies. There are three types of rectifiers namely Half wave
rectifier, Center tap full wave rectifier and bridge rectifier.
In half wave rectification, either the positive or negative half of the AC wave is
passed, while the other half is blocked. Because only one half of the input waveform reaches
the output, it is very inefficient if used for power transfer.
A full-wave rectifier converts the whole of the input waveform to one of constant
polarity (positive or negative) at its output. Full-wave rectification converts both polarities of
the input waveform to DC (direct current), and is more efficient. Full wave rectification can
be obtained either by using center tap transformer or by using bridge rectifier.
The output of a rectifier is not a smooth DC it consists of ac ripples therefore to
convert this pulsating DC in to smooth DC we use a circuit called filter. There are many types
of filters like C filter, L filter, LC filter, multiple LC filter, π filter etc., of which C filter is the
most fundamental filter.
Applications:
1. Rectifier converts incoming AC to pulsating DC voltage which should be filtered and
regulated to get pure DC voltage. All electronic devices require DC, so rectifiers are
used inside the power supplies of all electronic equipments like television, laptops,
refrigerators, etc.,
2. Used for detection of amplitude modulated radio signals.
3. Analog Electronics Laboratory 2017-18
Department of ECE, CIT, Gubbi Page no. 3
Note: Do not measure the input and output through two channels of CRO simultaneously for
a bridge rectifier.
Design:
Center Tap Full Wave Rectifier / Bridge Rectifier Without filter
VDC = 2Vm / π for FWR (both center tap and bridge rectifier)
For the given VDC calculate Vm and Vrms = Vm / √ 2
Choose the transformer of rating Vrms – 0 – Vrms ≥ IDC for Center tap full wave rectifier and
0 – Vrms ≥ IDC for Bridge rectifier
The value of load resistance, RL = VDC / IDC, PRL = VDC
2
/ RL
Full Wave Rectifier with ‘C’ filter
VDC = Vm – (IDC / 4fC)
γ = 1 / (4√ 3 fCRL ) ( f = 50 Hz )
For the given value of VDC and IDC Calculate RL = VDC / IDC, PRL = VDC
2
/ RL
For the given γ Calculate the value of capacitor ‘C’
For the given value of VDC and IDC, Calculate Vm and Vrms = 2Vm
Choose the transformer of rating,
Vrms – 0 – Vrms ≥ IDC for Center tap full wave rectifier and 0 – Vrms ≥ IDC for Bridge rectifier
Choose the capacitor of value C ≥ Vm
Example - 1: Design an FWR for an output DC voltage of 10 V and load current of
10 mA. (Bridge and Center tap rectifier)
VDC = 10 V
Vm = (VDC X π) / 2 = 15.7 V
Vrms = Vm / √ 2 = 11.1 V ≈ 12 V
Choose a transformer of rating 12V – 0 – 12V / ≥ 10 mA for Center tap full wave rectifier
Choose a transformer of rating 0 – 12V / ≥ 10 mA for Bridge rectifier
RL = VDC / IDC = 1 kΩ
PRL = VDC
2
/ RL = 0.1 W
Choose RL = 1 kΩ / 0.1 W
4. Analog Electronics Laboratory 2017-18
Department of ECE, CIT, Gubbi Page no. 4
Procedure:
1. Components / Equipment are tested for their good working condition
2. Connections are made as shown in the circuit diagram
3. Observe different waveforms on CRO
4. Measure VDC using multimeter in dc mode and Vm on CRO
5. Calculate output Vrms from Vm using formula Vrms = Vm / 2 for Half wave rectifier
Vrms = Vm / √2 for full wave rectifier
6. Calculate the efficiency, ripple factor and regulation. Compare the results with the
theoretical values.
5. Analog Electronics Laboratory 2017-18
Department of ECE, CIT, Gubbi Page no. 5
Example – 2: Design a full wave rectifier for VDC = 16 V, IDC = 16mA, γγγγ = 0.006 (Bridge
and center tap full wave rectifier)
RL = VDC / IDC = 1 kΩ, PRL = VDC
2
/ RL = 0256 W
From γ = 1 / (4√ 3 fCRL), C = 481 µf, (≈ 470µf) (f = 50 Hz )
From VDC = Vm – (IDC / 4fC), Vm = 16.17 V, Vrms = 11.43 V, (≈ 12 V)
Choose transformer of rating 12V - 0 – 12V / ≥ 16mA for center tap full wave rectifier and
0 – 12V / ≥ 16mA for bridge rectifier
Choose RL = 1 kΩ / 0.256 W, C = 470 µf / ≥ 16.17V
Tabular Column:
Without filter
Circuit VDC Vm Vrms ηηηη=VDC
2
/ Vrms
2
γγγγ = √√√√ (Vrms
2
/ VDC
2
)-1
Center tap full
wave rectifier
Bridge
Rectifier
Note : Vrms = Vm / 2 for Half wave rectifier Vrms = Vm / √√√√2 for full wave rectifier
With filter:
Circuit
VDC
full load
Vrpp Vrrms
VDC
no load
%
Regulation
γγγγ = Vrrms / VDC
Center tap full
wave rectifier
Bridge
Rectifier
Note: Vrrms = Vrpp / 2√√√√3
% Regulation = (VDC no load – VDC full load) / VDC full load
6. Analog Electronics Laboratory 2017-18
Department of ECE, CIT, Gubbi Page no. 6
Result:
Without filter:
Type of rectifier γγγγ - theoretical γγγγ - practical ηηηη - theoretical ηηηη - practical
Center tap full
wave rectifier
0.48 81.2 %
Bridge
Rectifier
0.48 81.2 %
With filter:
Type of rectifier γγγγ theoretical γγγγ practical % Regulation
Center tap full
wave rectifier
0.006
Bridge
Rectifier
0.006
7. Analog Electronics Laboratory 2017-18
Department of ECE, CIT, Gubbi Page no. 7
Circuit Diagram: Clipping circuits
1. To remove positive peak above Vγ level
Vi
Vγ Vm
π 2π ωt
VO
Vγ
π 2π ωt
2. To remove positive peak above some reference level (VR +Vγ)
Vi
VR+Vγ Vm
π 2π ωt
VO
VR+Vγ
π 2π ωt
A K
Vi
VO
Vγ
Vi
VO
VR+ Vγ
10 V p-p
1 kHz
10 V p-p
1 kHz
8. Analog Electronics Laboratory 2017-18
Department of ECE, CIT, Gubbi Page no. 8
Experiment No: 2 Date:
Clipping and Clamping Circuits
Part A: Clipping circuits
Aim: To design and study the clipping circuits using diodes.
Apparatus Required:
Sl.
No.
Particulars Range Quantity
1. Diode ( 1N4007 / BC547 ) - 02
2. Resistor As per design -
3. Multimeter - 01
4. CRO Probes - 3 set
5. Spring Board and Connecting wires - -
Theory:
A clipper is a circuit that removes either positive or negative portion of a waveform.
This kind of processing is useful for signal shaping, circuit protection and communications.
The clippers are usually constructed by using diodes and resistors and sometimes to adjust the
clipping level DC power supplies are also used. There are two types of clippers namely series
clippers and shunt clippers. If the clipping element (diode) is in series with the source then
we call it as series clippers and if the clipping device is in parallel with the source then we
call such circuit as shunt clippers. Further based on the portion of a waveform clipped the
clippers can be classified as positive clippers, negative clippers and two level clippers
(combination clippers).
Procedure:
1. Components / Equipment are tested for their good working condition.
2. Connections are made as shown in the circuit diagram
3. Apply a sine wave of amplitude greater than the designed clipping level with
frequency 500 Hz. Observe the output wave form on the CRO
4. Observe the transfer characteristic curve on CRO by applying input waveform to
channel – X and output waveform to channel – Y.
5. Measure the clipped voltage and compare with the designed value.
9. Analog Electronics Laboratory 2017-18
Department of ECE, CIT, Gubbi Page no. 9
-Vγ
-VR-Vγ
3. To remove negative peak above -Vγ level
Vi
Vm
-Vγ π 2π ωt
VO
-Vγ π 2π ωt
4. To remove negative peak above some reference level (-VR-Vγ)
Vi
Vm
π 2π ωt
-VR-Vγ
VO
π 2π ωt
-VR-Vγ
Vi
VO
10 V p-p
1 kHz
Vi
VO
10 V p-p
1 kHz
10. Analog Electronics Laboratory 2017-18
Department of ECE, CIT, Gubbi Page no. 10
Applications:
1. Series clippers are employed as noise limiters in FM transmitters by clipping
excessive noise peaks above a specified level.
2. Used in television receivers and transmitters.
3. Diode clipper can be used for the protection of different types of circuit against
transients which may cause considerable damage.
4. They are employed for different wave generation such as trapezoidal, square or
rectangular waves.
11. Analog Electronics Laboratory 2017-18
Department of ECE, CIT, Gubbi Page no. 11
VR1+Vγ
-VR2-Vγ
5. To remove positive peak above some reference level (VR1+Vγ) and negative peak above
some reference level (-VR2-Vγ)
Vi
VR1+Vγ Vm
π 2π ωt
-VR2-Vγ
Vo
VR1+Vγ
ωt
π 2π
-VR2-Vγ
Vi
VO
Vo
10 V p-p
1 kHz
13. Analog Electronics Laboratory 2017-18
Department of ECE, CIT, Gubbi Page no. 13
Design:
Example – 1: Design a clipping circuit to pass the positive peak above the reference level
2V (Circuit 2)
VR + Vγ = 2V Assume the diode to be silicon make then Vγ = 0.6 V
Then VR = 2 – 0.6 = 1.4 V
Assume Rr = 100 KΩ and Rf = 10 Ω
Then R = √ Rr Rf = 1 KΩ
Example – 2: Design a clipping circuit to remove positive peak above + 3 V negative
peak above – 4 V (Circuit 5)
VR1+Vγ = + 3 V Assume the diode to be silicon make then Vγ = 0.6 V
VR1 = 3 – 0.6 = 2.4 V
-VR2-Vγ = - 4 V
-VR2 = - 4 + 0.6 = - 3.4 V
VR2 = 3.4 V
Assume Rr = 100 KΩ and Rf = 10 Ω
Then R = √ Rr Rf = 1 KΩ
Similarly assume clipping level and design other circuits.
14. Analog Electronics Laboratory 2017-18
Department of ECE, CIT, Gubbi Page no. 14
Result:
Sl.
No.
Circuit
Designed
Clipping level
Observed
Clipping level
1. To remove positive peak above Vγ level Vγ =
2.
To remove positive peak above some
reference level (VR +Vγ)
VR +Vγ =
3. To remove negative peak above -Vγ level -Vγ =
4.
To remove negative peak above some
reference level (-VR-Vγ)
-VR-Vγ =
5.
To remove positive peak above some
reference level (VR1+Vγ) and negative
peak above some reference level (-VR2-Vγ)
VR1+Vγ =
-VR2-Vγ =
15. Analog Electronics Laboratory 2017-18
Department of ECE, CIT, Gubbi Page no. 15
Vi
VO
t
V
t
V
Vi
VO
t
V
t
V
Vi
VO
t
V
t
V
-Vγ
VR-Vγ
-VR-Vγ
Circuit Diagram: Clamping Circuits
Positive Clampers:
1. Negative peak clamped to -Vγ level
2. Negative peak clamped to positive reference level (VR-Vγ)
3. Negative peak clamped to negative reference level (-VR-Vγ)
16. Analog Electronics Laboratory 2017-18
Department of ECE, CIT, Gubbi Page no. 16
Part B: Clamping Circuits
Aim: To design a clamping circuit for the given specification.
Apparatus Required:
Sl.
No.
Particulars Range Quantity
1. Diode ( 1N4007 / BC547 ) - 01
2. Resistors & Capacitors As per design -
3. CRO Probes - 3 set
4. Spring board and connecting wires
Theory:
Clamper is a circuit which adds DC level to an AC waveform. There are two types of
clampers namely positive clampers and negative clampers. In positive clampers positive DC
level will be added to the AC waveform or the negative peak will be clamped to some other
level. In Negative peak clampers negative DC level will be added to the AC waveform or the
positive peak will be clamped to some other level.
Clampers are very much used in communication systems for example clampers are
used in analog television receivers for the purpose of restoring the dc component of the video
signal prior to its being fed to the picture tube.
Procedure:
1. Components / Equipment are tested for their good working condition.
2. Connections are made as shown in the circuit diagram
3. Apply a square wave / triangular wave / sine wave input of amplitude 10 V peak to
peak and frequency of 1 kHz
4. Observe the input and output waveform keeping CRO in DC position
5. Measure the clamping level and compare with the designed value
Applications:
1. Clamping circuits are often used in television receivers as dc restorers.
2. Clamping can be used to adapt an input signal to a device that cannot make use of or
may be damaged by the signal range of the original input.
17. Analog Electronics Laboratory 2017-18
Department of ECE, CIT, Gubbi Page no. 17
Vi
VO
t
t
V
V
Vi
VO
t
V
t
V
Vi
VO
t
V
t
V
Vγ
VR+Vγ
-VR+Vγ-VR+Vγ
Negative Clampers:
4. Positive peak clamped to Vγ level
5. Positive peak clamped to positive reference level (VR+Vγ)
6. Positive peak clamped to negative reference level (-VR+Vγ)
19. Analog Electronics Laboratory 2017-18
Department of ECE, CIT, Gubbi Page no. 19
Design:
Example – 1: Design a clamping circuit to clamp the negative peak to +3V ( Circuit 2 )
VR - Vγ = 3 V Let the diode be silicon make then Vγ = 0.6 V
Then VR = 3 + 0.6 = 3.6 V
For a clamper RC >> T let RC = 10 T
Assume f = 1 kHz, hence T = 1 ms, choose C = 1 µ f
Then R = 10 KΩ
Example – 2: Design a clamping circuit to clamp the positive peak to -2V ( Circuit 6 )
-VR+Vγ = - 2VLet the diode be silicon make then Vγ = 0.6 V
-VR = - 2 – 0.6
-VR = - 2.6 V
VR = 2.6 V
For a clamper RC >> T, let RC = 10 T
Assume f = 1 kHz, hence T = 1 ms, choose C = 1 µ f
Then R = 10 kΩ
Similarly design for other circuits.
20. Analog Electronics Laboratory 2017-18
Department of ECE, CIT, Gubbi Page no. 20
Result:
A. Positive Clampers
Sl.
No.
Circuit
Designed
Clamping level
Observed
Clamping level
1. Negative peak clamped to -Vγ level - Vγ =
2.
Negative peak clamped to positive
reference level (VR-Vγ)
VR-Vγ =
3.
Negative peak clamped to negative
reference level (-VR-Vγ)
-VR-Vγ =
B. Negative Clampers
4. Positive peak clamped to Vγ level Vγ =
5.
Positive peak clamped to positive
reference level (VR+Vγ)
VR+Vγ =
6.
Positive peak clamped to negative
reference level (-VR+Vγ)
-VR+Vγ =
21. Analog Electronics Laboratory 2017-18
Department of ECE, CIT, Gubbi Page no. 21
Circuit Diagram: Zener Voltage Regulator
Ideal Graph
Line Regulation
Load Regulation
Vo (volts)
IL (mA)500 mA
VFL
VNL
10 V
Vo (volts)
Vi (volts)
∆Vi
∆Vo
22. Analog Electronics Laboratory 2017-18
Department of ECE, CIT, Gubbi Page no. 22
Experiment No: 3 Date:
Zener Voltage Regulator
Aim: To plot line and load regulation characteristics using Zener diode and find percentage
regulation.
Apparatus required:
SL NO Particulars Range Quantity
1 Zener diode - 1
2 Resistor 100Ω,800 Ω 2
3 Ammeter 0-20/200mA 1
4 Digital multimeter - 1
5 Power supply 0-30V 1
Theory:
The Zener diode is like a general-purpose signal diode. When biased in the forward
direction it behaves just like a normal signal diode, but when a reverse voltage is applied to it,
the voltage remains constant for a wide range of currents. The function of a regulator is to
provide a constant output voltage to a load connected in parallel with it in spite of the ripples
in the supply voltage or the variation in the load current and the zener diode will continue to
regulate the voltage until the diodes current falls below the minimum IZ(min) value in the
reverse breakdown region. It permits current to flow in the forward direction as normal, but
will also allow it to flow in the reverse direction when the voltage is above a certain value -
the breakdown voltage known as the Zener voltage. The Zener diode specially made to have a
reverse voltage breakdown at a specific voltage. Its characteristics are otherwise very similar
to common diodes. The purpose of a voltage regulator is to maintain a constant voltage across
a load regardless of variations in the applied input voltage and variations in the load current.
The main application Zener diodes are as voltage regulator. Overvoltage protection is
done by using Zener diodes because there is current flowing through the diode after the
reverse bias voltage exceeds a certain value.
23. Analog Electronics Laboratory 2017-18
Department of ECE, CIT, Gubbi Page no. 23
Tabular column
Line Regulation Load Regulation
RL=________Ω Vin=________V
Design
Maximum Ranges: VCB=100V, VCE=60V, VBE=7V, IC max=15A, P=115W
Nominal Ratings: VCE=4V, IC=4A, hFE=20 to 70.
Selection of Zener diode:
We know that Vo =8.5V, Vz=Vo+0.6V=9.1V.
Select (SZ9.1) zener diode.
Design of Load resistance:
RL=Vo/IL=8.5V/500mA=17Ω
The power rating of resistor=I2
RL= (0.5)2
17=4.25W
Use 17 Ω, 5W resistor or 800 Ω, 1A rheostat (DRB).
IB= IL/20=500mA/20=25mA.
Current through the series resistor RB=IZ+IB=35mA since the current through the zener diode
IZ to keep it in the breakdown region is 10mA.
Design of RB:
RB should be selected considering Vi max and Vi min
RB max= (Vimax-VZ) / (IZ+IB) =311 Ω
RB min= (Vimin-VZ) / (IZ+IB) =26Ω, Select RB=100 Ω, Vi max=20V and Vi min=10V.
Sl.No Vi (volts) Vo (volts) Sl. No IL(mA) Vo (volts)
24. Analog Electronics Laboratory 2017-18
Department of ECE, CIT, Gubbi Page no. 24
Procedure:
1. Connections are made as shown in the circuit diagram
To find Line Regulation:
2. RL is kept constant and the unregulated input is varied in steps and at each step, the
corresponding regulated output is measured. All the readings are tabulated and the
graph Vin versus Vout is plotted to obtain the line Regulation. Percentage line
regulation=( (∆V0/ ∆Vin) * 100)
To find Load regulation:
3. Vin kept constant (at a value adequately more than the designed value of Vout) and the load
resistance RL is varied (decreased)in steps and at each step, the regulated output Vout is
measured against the load current IL.
4. All the readings are tabulated and graph of IL versus Vout is plotted to obtain the load
regulation characteristics.
5. Measure no load voltage VNL by removing load resistor.
6. Measure full load voltage VFL by connecting load resistor and calculate % Load
regulation using formula VR= ((VNL-VFL)/VNL) 100%.
Result:
Percentage load regulation=__________________%.
Percentage line regulation=__________________%.
25. Analog Electronics Laboratory 2017-18
Department of ECE, CIT, Gubbi Page no. 25
Circuit Diagram: Without boot strapping
Design:
Given VCC = 5 V, IE2 = 3mA, β1 = β2 = 60
Assume VCE = 50% VCC =5 / 2 = 2.5V
VE = IE RE = VCC - VCE = 2.5V
RE = 2.5 / IE, RE = 833ohms,
Choose RE = 1 kΩ
IB2 = IE2 / ( 1 + β2 ) = 49 µA
IB1 = IE1 / ( 1 + β1 ) = IB2 / ( 1 + β1 ) = 0.8 µA
RB = ( Vcc - VBE1 - VBE2 - VE ) / IB1
RB = 1.62 MΩ , Choose RB = 1.6 MΩ
Assume CC1 = CC2 = 0.1 µF
B
E
C
C
2N3055
26. Analog Electronics Laboratory 2017-18
Department of ECE, CIT, Gubbi Page no. 26
Experiment No: 4 Date:
Darlington Emitter Follower
Aim: To conduct an experiment to plot the frequency response of a Darlington emitter
follower amplifier with and without bootstrapping and to find the input impedance, output
impedance and the voltage gain.
Apparatus Required:
Sl.
No.
Particulars Range Quantity
1. Transistor SL 100 and 2N3055 - 1 each
2. Resistors & Capacitors As per design -
3. Multi meter - 01
4. CRO probes - 3 set
5. DRB - 01
6. Spring board and connecting wires - -
Theory:
When high input impedance and low output impedance requirements are to be met the
natural choice is common collector configuration the common collector configuration of
transistor has high input impedance, low output impedance and high current gain although no
phase inversion. The common collector transistor amplifies is termed as emitter follower for
the simple reason that the o/p voltage follows the input voltage ( AV ≈ 1 ). The important
application of emitter follower is as buffer amplifier for impedance matching. A single stage
emitter follower provides an input impedance of 500 kΩ. But for the requirement of i/p
impedance beyond 500 kΩ we employ Darlington emitter follower. The voltage gain of
Darlington Emitter Follower is less than but very nearly equal to unity. The coupling of the
two stages of emitter follower amplifier, this cascaded connection of two emitter follower is
called Darlington connections. In this connection, since two stages of transistor are connected
it improves the current gain and input resistance of the circuit. In Darlington connections of
two transistor emitter of the first transistor is directly connected to the base of the second
transistor. The leakage current of the first transistor is amplified by the second transistor and
overall leakage current may be high which is not desired. For further high i/p impedance
requirement bootstrapping can be employed. Bootstrap circuit is an arrangement of
components used to boost the input impedance of a circuit by using a small amount of
positive feedback, usually over two stages.
27. Analog Electronics Laboratory 2017-18
Department of ECE, CIT, Gubbi Page no. 27
Circuit Diagram: With boot strapping
Circuit to find input impedance ( Zi ) :
Circuit to find output impedance ( Zo ) :
28. Analog Electronics Laboratory 2017-18
Department of ECE, CIT, Gubbi Page no. 28
Procedure: (With and without bootstrapping)
1. Check all the components and equipments for their good working condition.
2. Connections are made as shown in the circuit diagram.
3. By keeping the voltage knobs in minimum position and current knob in maximum
position switch on the power supply.
4. By disconnecting the AC source measure the quiescent point
(VEC2 and IE2 = VRE / RE)
To find frequency response:
1. Connect the AC source. Keeping the frequency of the Ac source in mid band region
(say 10 kHz) adjust the amplitude to get the distortion less output. Note down the
amplitude of the input signal.
2. Keeping the input amplitude constant, Vary the frequency in suitable steps and note
down the corresponding output amplitude.
3. Calculate AV and gain in decibels. Plot a graph of frequency Vs gain in dB. From the
graph calculate f L, f H and band width.
4. Calculate figure of merit.
To find the input impedance ( Zi ) :
1. Connections are made as shown in the diagram.
2. Keeping the DRB in its minimum position, apply input signal at mid band frequency
(say 10 kHz) and adjust the amplitude of the input signal to get distortion less output.
Note down the output amplitude.
3. Vary the DRB until the output amplitude becomes half of its previous value. The
corresponding DRB value gives the input impedance.
To find the output impedance ( Zo ) :
1. Connections are made as shown in the diagram.
2. Keeping the DRB in its maximum position, apply input signal at mid band frequency
(say 10 kHz) and adjust the amplitude of the input signal to get distortion less output.
Note down the output amplitude.
3. Vary the DRB until the output amplitude becomes half of its previous value. The
corresponding DRB value gives the output impedance.
29. Analog Electronics Laboratory 2017-18
Department of ECE, CIT, Gubbi Page no. 29
Tabular Column: Vi = ___________ V
F in Hz Vo in Volt AV = Vo / Vi Gain in dB = 20*log AV
Ideal Graph:
Gain in dB fL fH f in Hz
3dB
Band Width
f L = Lower cutoff frequency f H = Higher cutoff frequency
30. Analog Electronics Laboratory 2017-18
Department of ECE, CIT, Gubbi Page no. 30
Applications:
1. Impedance matching.
2. LED and Display drivers: Darlington transistor arrays contained within IC packages
are widely used for driving loads from standard logic families.
3. Audio power output stages: Sometimes audio amplifier power output stages may
require significant levels of current gain to enable them to drive low impedance
speakers.
4. The Darlington circuit configuration is ideal for use in linear power regulators.
5. End applications for Darlington transistor devices include inverter circuits, AC motor
control, DC motor control circuits and emergency power supplies, etc.,
Result:
Without bootstrapping
1. Quiescent point : VEC2 = ____ V, IE = _____ mA.
2. Voltage Gain ( AV ) = __________ ( in mid band region )
3. Bandwidth (BW) = ___________ HZ
4. figure of merit ( FM = AV * BW ) = ____________ Hz
5. Input impedance (Zi) = ____________Ω, Output Impedance (Zo) = __________Ω
With bootstrapping
1. Input impedance (Zi) = ____________Ω
31. Analog Electronics Laboratory 2017-18
Department of ECE, CIT, Gubbi Page no. 31
Circuit Diagram: RC coupled Single stage BJT amplifier without feedback
Design:
Given, VCE = 2.5 V and IC = 1 mA Assume ββββ = 100
VCC = 2VCE = 2 X 2.5 = 5 V
Let VRE = 10% VCC =0.5 V
RE = VRE / ( IC + IB )
IB = IC / β = 1 mA / 100 = 10 µA
RE = 0.5 / ( 1 m + 10 µ ) = 495 Ω
Choose RE = 470 ΩΩΩΩ
Apply KVL to collector loop
VCC – IC RC – VCE – VE = 0
RC = ( VCC – VCE – VE ) / IC = ( 5 – 2.5 – 0.5) / 1 m
RC = 2 kΩ Choose RC = 1.8 kΩΩΩΩ
Let IR1 = 10 IB = 10 X 10 µA = 100 µA
VR2 = VBE + VE = 0.6 + 0.5 = 1.1 V ( Since transistor is silicon make VBE = 0.6 V )
R2 = VR2 / ( IR1 – IB ) = 1.1 / ( 100 µA - 10 µA )
R2 = 12.2 kΩ Choose R2 = 13 kΩΩΩΩ
R1 = ( VCC – VR2 ) / IR1 = ( 5 – 1.1 ) / 100 µA
R1 = 39 KΩ Choose R1 = 38 kΩΩΩΩ
XCE < < RE ; XCE = RE / 10
C
B
E
SL100
or
CL100
32. Analog Electronics Laboratory 2017-18
Department of ECE, CIT, Gubbi Page no. 32
Experiment No: 5 Date :
RC Coupled Single Stage BJT Amplifier
Aim : To conduct an experiment to plot the frequency response of an RC coupled amplifier
and to find the input impedance, output impedance and the voltage gain.
Apparatus Required:
Sl.
No.
Particulars Range Quantity
1. Transistor SL 100 - 01
2. Resistors & Capacitors As per design -
3. CRO Probes - 3 Set
4. Multi meter - 01
5. DRB - 01
6. Spring board and connecting wires - -
Theory:
An amplifier is a circuit which increases the voltage, current or power level of i/p
signal where the frequency is maintained constant from o/p to i/p signal. The common emitter
amplifier is basically a current amplifier ( IC = β IB ) where IB is input current and IC is output
current and β is a non unity value, in turn it provides voltage amplification. The ratio of
collector current to base current is noted as the current amplification factor and is denoted as
‘β’i.e.[β = IC/IB], β is very large.
In RC coupled CE amplifier R1, R2 and RC are selected in such a way that transistor
operates in active region and the operating point will be in the middle of active region. RE is
used for stabilization of operating point. Coupling capacitors CC1 and CC2 are used to block
dc current flow through load and the source. The emitter by-pass capacitor CE is connected to
avoid negative feedback. Input signal increases base current and the collector current
increases by a factor β. [i.e., Ic = βIb]. Hence output voltage is large compared to input
voltage which is known as amplification. An amplifier in which resistance-capacitance
coupling is employed between stages and at the input and an output point of the circuit is
known as RC coupled amplifier. A capacitor provides a path for signal currents between
stages, with resistors connected from each side of the capacitor to the power supply or to
ground.
Applications:
1. Common-emitter amplifiers are used in radio frequency circuits, for example to
amplify faint signals received by an antenna.
33. Analog Electronics Laboratory 2017-18
Department of ECE, CIT, Gubbi Page no. 33
1 / ( 2 π f CE ) = 470 / 10 Let f = 100 Hz
CE = 33 µF Choose CE = 47 µµµµF
Choose CC1 = CC2 = 0.1 µµµµF
Tabular Column: Vi = ___________ V
F in Hz
Without Feedback With Feedback
Vo
in Volt
AV = Vo / Vi
Gain in dB
= 20*log AV
Vo
in Volt
AVf = Vo / Vi
Gain in dB
= 20*log AVf
34. Analog Electronics Laboratory 2017-18
Department of ECE, CIT, Gubbi Page no. 34
Procedure:
1. Components / Equipment are tested for their good working condition.
2. Connections are made as shown in the circuit diagram.
3. By keeping the voltage knobs in minimum position and current knob in maximum
position switch on the power supply.
4. By disconnecting the AC source measure the quiescent point (VCE and IC = VRC / RC)
To find frequency response:
1. Connect the AC source. Keeping the frequency of the AC source in mid band region
(say 10 kHz) adjust the amplitude to get the distortion less output. Note down the
amplitude of the input signal.
2. Keeping the input amplitude constant, vary the frequency in suitable steps and note
down the corresponding output amplitude.
3. Calculate AV and gain in decibels. Plot a graph of frequency Vs gain in dB. From the
graph calculate f L, f H and band width.
4. Calculate figure of merit (gain-bandwidth product).
35. Analog Electronics Laboratory 2017-18
Department of ECE, CIT, Gubbi Page no. 35
Ideal Graph
Gain dB
3dB
Band width
f in Hz
f L f H
f L = Lower cutoff frequency f H = Higher cutoff frequency
36. Analog Electronics Laboratory 2017-18
Department of ECE, CIT, Gubbi Page no. 36
Result:
1. Quiescent point : VCE = ____ V, IC = _____ mA
2. Voltage Gain ( AV ) = __________ ( in mid band region )
3. Bandwidth (BW) = ___________ Hz
4. Figure of merit ( FM = AV * BW ) = ____________ Hz
37. Analog Electronics Laboratory 2017-18
Department of ECE, CIT, Gubbi Page no. 37
∆ID
∆VGS
VDS (V)
VGS1
VGS2
∆ID
∆VDS
VDS1
VDS2
Circuit Diagram: Drain and Transfer Characteristics of JFET
Ideal Graph
Transfer characteristics Drain Characteristics
ID(mA)
VT VGS (V)
VGS2 > VGS1
VDS2 > VDS1
Constant resistance
region
38. Analog Electronics Laboratory 2017-18
Department of ECE, CIT, Gubbi Page no. 38
Experiment No: 6 Date :
Drain and Transfer Characteristics of JFET
Aim: To plot drain and Transfer characteristics of JFET
Apparatus required:
Sl no Particulars Range Quantity
1 JFET BFW10 1
2 Ammeter 0-20/200
mA
1
3 Resistor 1KΩ 2
4 Power supply 0-30V 2
5 Digital
multimeter
- 1
Theory:
The junction gate field-effect transistor (JFET or JUGFET) is the simplest type
of field-effect transistor. They are three-terminal semiconductor devices that can be used
as electronically-controlled switches, amplifiers, or voltage-controlled resistors.
Unlike bipolar transistors, JFETs are exclusively voltage-controlled in that they do not
need a biasing current. Electric charge flows through a semiconducting channel
between source and drain terminals. By applying a reverse bias voltage to a gate terminal,
the channel is "pinched", so that the electric current is impeded or switched off completely. A
JFET is usually on when there is no potential difference between its gate and source
terminals. If a potential difference of the proper polarity is applied between its gate and
source terminals, the JFET will be more resistive to current flow, which means less current
would flow in the channel between the source and drain terminals. Thus, JFETs are
sometimes referred to as depletion-mode devices.
JFETs can have an n-type or p-type channel. In the n-type, if the voltage applied to
the gate is less than that applied to the source, the current will be reduced (similarly in the p-
type, if the voltage applied to the gate is greater than that applied to the source). A JFET has
a large input impedance (sometimes on the order of 1010
ohms), which means that it has a
negligible effect on external components or circuits connected to its gate.
39. Analog Electronics Laboratory 2017-18
Department of ECE, CIT, Gubbi Page no. 39
Tabular Column
Procedure:
Drain Characteristics Transfer Characteristics
At VGS =___V At VGS = ___V At VDS =___V At VDS = ___V
VDS (V) ID (mA) VDS (V) ID (mA) VGS (V) ID (mA) VGS (V) ID (mA)
40. Analog Electronics Laboratory 2017-18
Department of ECE, CIT, Gubbi Page no. 40
1. Check the components for their working condition.
2. Connect the components as shown in the circuit diagram.
To plot drain characteristics:
3. Keep the voltage VGS at constant value (say 0 V) by varying VDS supply.
4. Vary the voltage VGS by varying VDS in steps of 0.5 V and note down ID.
5. Repeat the same procedure for different values of VGS.
6. Plot the graph VDS v/s ID.
To plot Transfer characteristics:
1. Keep the voltage VDS at constant value (say 2 V) by varying VDD supply.
2. Vary the voltage VGS in increments of 1 V and note down ID.
3. Repeat the same procedure for different values of VDS.
4. Plot the graph VGS v/s ID.
Calculations:
1. Transconductance gm = ∆ID / ∆VGS = ____________ mho
2. Drain Resistance rd = ∆VDS / ∆ID = _____________ Ω
3. Amplification factor µ=gm×rd=_____________.
Results:
1. The transconductance gm = ______________ mho
2. The drain resistance rd = _______________ Ω
3. The amplification factor µ=_____________.
41. Analog Electronics Laboratory 2017-18
Department of ECE, CIT, Gubbi Page no. 41
Circuit Diagram: RC Coupled Single Stage FET Amplifier
Design
Given VDD = 10 V, VGS(off) = -4 V IDSS (max) = 12 mA RG = 2 MΩ
Formulae
ID = IDSS.(1 – VGS / VGS (off))2
-------------------------------------(1)
When VG = 0, Then VS = -VGS
But VS = ID . RS
When VG = 0, ID = IDSS
VS = IDSS.RS
IDSS.RS = -VGS (off)
RS = -(-4) / 12mA = 333 Ω
Choose RS = 330 ΩΩΩΩ
From (1)
ID = IDSS.(1 – ID.RS / VGS (off))2
ID = IDSS.(1 + ID
2
.RS
2
/ 16 - ID.RS /2)
ID = 12 x 10-3
x (1 + ID
2
.3302
/ 16 - ID.330 /2)
81.675ID
2
- 2.98ID +12 x 10-3
= 0
ID = 4.6 mA or ID = 31.9 mA
Since ID cannot be greater than IDSS, Choose ID = 4.6 mA
Assume VDS = 50 % VDD ---- VDS = 5V
Applying KVL to output circuit
VDD = ID . RD + VDS + ID .RS
G
D
S
BFW 10
Substrate
42. Analog Electronics Laboratory 2017-18
Department of ECE, CIT, Gubbi Page no. 42
Experiment No: 7 Date:
RC Coupled Single Stage FET Amplifier
Aim: To conduct an experiment to plot the frequency response of an RC coupled amplifier
and to find the input impedance, output impedance and the voltage gain.
Apparatus Required:
Sl.
No.
Particulars Range Quantity
1. FET BFW 10 - 01
2. Resistors & Capacitors As per design -
3. CRO Probes - 3 Set
4. Multi meter - 01
5. DRB - 01
6. Spring board and connecting wires - -
Theory:
An amplifier is a circuit which increases the voltage, current or power level of i/p
signal where the frequency is maintained constant from o/p to i/p signal. In FET amplifier the
output current ( ID ) is a function of input voltage VGS. That is as VGS varies the drain current
varies. VGS varies as input signal varies in turn the drain current varies hence amplification
takes place. In RC coupled FET amplifier RD and RS are selected in such a way that FET
operates in active region and the operating point will be in the middle of active region.
Coupling capacitors CC1 and CC2 are used to block dc current flow through load and the
source. The source by-pass capacitor CS is connected to avoid negative feedback.
An amplifier in which resistance-capacitance coupling is employed between stages
and at the input and output point of the circuit is known as RC coupled amplifier. A capacitor
provides a path for signal currents between stages, with resistors connected from each side of
the capacitor to the power supply or to ground.
Procedure:
1. Components / Equipment are tested for their good working condition.
2. Connections are made as shown in the circuit diagram.
3. By keeping the voltage knobs in minimum position and current knob in maximum
position switch on the power supply.
4. By disconnecting the AC source measure the quiescent point (VDS and ID = VRD / RD)
Applications:
1. FET amplifiers are low noise amplifiers used for front-end applications.
2. They are used in Oscillators.
3. These are faster and are less noisy compared to BJT amplifiers.
43. Analog Electronics Laboratory 2017-18
Department of ECE, CIT, Gubbi Page no. 43
RD = (10 – 5 – 4.6 x 10-3
x 330) / 4.6 x 10⁻³
RD = 756 Ω
Choose RD = 820 ΩΩΩΩ
XCS < < RS
XCS = RS / 10
1 / ( 2 π f CS ) = 470 / 10 Let f = 100 Hz
CS = 33 µF Choose CS = 47 µµµµF
Choose CC1 = CC2 = 0.1 µF
Tabular Column : Vi = ___________ V
f in Hz Vo in Volt AV = Vo / Vi Gain in dB = 20*log AV
44. Analog Electronics Laboratory 2017-18
Department of ECE, CIT, Gubbi Page no. 44
To find frequency response:
5. Connect the AC source. Keeping the frequency of the AC source in mid band region
(say 10 kHz) adjust the amplitude to get the distortion less output. Note down the
amplitude of the input signal.
6. Keeping the input amplitude constant, Vary the frequency in suitable steps and note
down the corresponding output amplitude.
7. Calculate AV and gain in decibels. Plot a graph of frequency Vs gain in dB. From the
graph calculate f L, f H and band width.
8. Calculate figure of merit.
45. Analog Electronics Laboratory 2017-18
Department of ECE, CIT, Gubbi Page no. 45
Ideal Graph
Gain dB
3dB
Band width
f in Hz
f L f H
f L = Lower cutoff frequency f H = Higher cutoff frequency
46. Analog Electronics Laboratory 2017-18
Department of ECE, CIT, Gubbi Page no. 46
Result:
1. Quiescent point : VDS = ____ V, ID = _____ mA, VGS = ____________ V
2. Voltage Gain ( AV ) = __________ ( in mid band region )
3. Bandwidth (BW) = ___________ Hz
4. Figure of merit ( FM = AV * BW ) = ____________ Hz
47. Analog Electronics Laboratory 2017-18
Department of ECE, CIT, Gubbi Page no. 47
∆ID
∆VGS
ID(mA)
VDS (V)
VGS1
VGS2
∆ID
∆VDS
VDS1
VDS2
Circuit diagram: Drain and Transfer Characteristics of MOSFET
Ideal Graph:
Transfer Characteristics: Drain Characteristics
ID(mA)
VT VGS (V)
VGS2 > VGS1
VDS2 > VDS1
Constant resistance
region
Constant current region
48. Analog Electronics Laboratory 2017-18
Department of ECE, CIT, Gubbi Page no. 48
Experiment No: 8 Date:
Drain and Transfer Characteristics of MOSFET
Aim :
To conduct an experiment to study and plot the transfer characteristics, drain characteristics
of a MOSFET, and to find the transconductance and drain resistance.
Apparatus Required:
Sl.
No.
Particulars Range Quantity
1. MOSFET (IRF 540) - 1
2. Milliammeter 0-20/200mA 1
3. Multimeter - 1
Theory:
The metal–oxide–semiconductor field-effect transistor (MOSFET, MOS-FET,
or MOS FET) is a type of transistor used for amplifying or switching electronic signals.
Although the MOSFET is a four-terminal device with source (S), gate (G), drain (D), and
body (B) terminals,[1]
the body (or substrate) of the MOSFET is often connected to the source
terminal, making it a three-terminal device like other field-effect transistors. Because these
two terminals are normally connected to each other (short-circuited) internally, only three
terminals appear in electrical diagrams. The MOSFET is by far the most common transistor
in both digital and analog circuits, though the bipolar junction transistor was at one time
much more common.
The main advantage of a MOSFET over a regular transistor is that it requires very
little current to turn on (less than 1mA), while delivering a much higher current to a load (10
to 50A or more).
Procedure:
Transfer Characteristics:
1. Check the components / Equipment for their working condition.
2. Connections are made as shown in the circuit diagram-5.
3. Initially both RPS-1 and RPS-2 are kept at zero output position.
4. By varying the RPS-2, set VDS around 3V
5. Now increase VGS by varying the RPS-1 gradually and note down the corresponding
drain current.
6. Repeat the steps 4 and 5 for some other VDS value
7. Draw the graph between VGS and ID
49. Analog Electronics Laboratory 2017-18
Department of ECE, CIT, Gubbi Page no. 49
Tabular Column:
Transfer Characteristics
VDS1 = _____________ V
VGS in Volt ID in mA
Output/Drain Characteristics:
VGS1 = _____________ V VGS2 = _____________ V
VDS (V) ID (mA) VDS (V) ID (mA)
VDS2 = ______________ V
VGS in Volt ID in mA
50. Analog Electronics Laboratory 2017-18
Department of ECE, CIT, Gubbi Page no. 50
Output Characteristics:
1. Check the components / Equipment for their working condition.
2. Connections are made as shown in the circuit diagram-5.
3. Both RPS-1 and RPS-2 should be in zero output position and supply switch is ON
4. By varying RPS-1, set VGS to some value (slightly greater than the Threshold voltage
determined from the transfer characteristics)
5. Now increase the VDS by varying the RPS-2 gradually and note down the
corresponding drain current.
6. Repeat the steps 4 and 5 for some other VGS value.
7. Graph between VDS Vs ID is plotted
Calculations:
1. Trans conductance gm = ∆ID / ∆VGS = ____________ mho
2. Drain Resistance rd = ∆VDS / ∆ID = _____________ Ω
3. Amplification factor µ=gm×rd=_____________.
Results:
The transconductance gm = ______________ mho
The drain resistance rd = _______________ Ω
The amplification factor µ=gm×rd =_____________.
51. Analog Electronics Laboratory 2017-18
Department of ECE, CIT, Gubbi Page no. 51
Circuit Diagram: Class B Push Pull Power Amplifier
Vo
t
Cross over distortion
Tabular Column:
Vi = ____________ V, VCC = ________ V
Sl.
No.
RL in ΩΩΩΩ Ic in mA Vo in Volt Pdc = VCC. IC Pac=Vo
2
/ 8RL % ηηηη=Pac / PDC
B
E
C
C
2N3055 / OC26
0.1 µF
TR1
TR2
OC26
52. Analog Electronics Laboratory 2017-18
Department of ECE, CIT, Gubbi Page no. 52
Experiment No: 9 Date:
Class B Push Pull Power Amplifier
Aim: To determine the efficiency of class B push pull amplifier and to find the optimum
load.
Apparatus Required:
Sl.
No.
Particulars Range Quantity
1. Transistor AD149 and 2N3055 - 1 each
2. Resistors as per design - -
3. Milli ammeter 0-20 mA 01
4. Multimeter - 01
5. CRO Probes - 3 Set
6. Spring Board and Connecting wires - -
Theory:
To improve the full power efficiency of the Class A type amplifier it is possible to
design the amplifier circuit with two transistors in its output stage producing a "push-pull"
type amplifier configuration. Push-pull operation uses two "complementary" transistors, one
an NPN-type and the other a PNP-type with both power transistors receiving the same input
signal together that is equal in magnitude, but in opposite phase to each other. This results in
one transistor only amplifying one half or 1800
of the input waveform while the other
transistor amplifies the other half or remaining 1800
of the waveform with the resulting "two-
halves" being put back together at the output terminal. This pushing and pulling of the
alternating half cycles by the transistors gives this type of circuit its name but they are more
commonly known as Class B Amplifiers.
The transistor base inputs are in "anti-phase" to each other as shown in circuit
diagram, thus if TR1 base goes positive driving the transistor into heavy conduction, its
collector current will increase but at the same time the base current of TR2 will go negative
further into cut-off and the collector current of this transistor decreases by an equal amount
and vice versa. Hence negative halves are amplified by one transistor and positive halves by
the other transistor giving this push-pull effect. Unlike the DC condition, these AC currents
are ADDITIVE resulting in the two output half-cycles being combined to reform the sine-
wave which then appears across the load. Class B Amplifiers have the advantage over Class
A amplifier so that no current flows through the transistors when they are in their quiescent
state (ie, with no input signal), therefore no power is dissipated in the output transistors when
there is no signal present, unlike Class A amplifier stages that require significant ---
53. Analog Electronics Laboratory 2017-18
Department of ECE, CIT, Gubbi Page no. 53
Ideal Graph
--- base bias thereby dissipating lots of heat - even with no input signal. So the overall
conversion efficiency ( η ) of the amplifier is greater than that of the equivalent Class A with
efficiencies reaching as high as 75% possible resulting in nearly all modern types of push-
pull amplifiers operated in this Class B mode.
While Class B amplifiers have a much high gain than the Class A types, one of the
main disadvantages of class B type push-pull amplifiers is that they suffer from an effect
known commonly as Crossover Distortion. This occurs during the transition when the
transistors are switching over from one to the other as each transistor does not stop or start
conducting exactly at the zero crossover point even if they are specially matched pairs. This
is because the output transistors require a base-emitter voltage greater than 0.7v for the
bipolar transistor to start conducting which results in both transistors being "OFF" at the same
time. One way to eliminate this crossover distortion effect would be to bias both the
transistors at a point slightly above their cut-off point. This is commonly called as Class AB
Amplifier circuit.
% η
RL in Ω
η max
Optimum load
54. Analog Electronics Laboratory 2017-18
Department of ECE, CIT, Gubbi Page no. 54
Procedure:
1. Connections are made as shown in circuit diagram
2. Keep RL = 1KΩ, and adjust the amplitude of input signal for distortion less output
waveform.
3. RL is varied in convenient steps and corresponding Vo and IC are recorded.
4. Calculate PDC and Pac and calculate efficiency
5. Plot a graph of %η versus RL and obtain the optimum load.
Applications:
1. Class B operated amplifier is used extensively for audio amplifiers that require high
power outputs.
2. It is also used as the driver and power amplifier stages of transmitters.
Result:
Maximum efficiency = ___________ %, Optimum load, RL opt = __________ Ω
55. Analog Electronics Laboratory 2017-18
Department of ECE, CIT, Gubbi Page no. 55
Circuit Diagram: RC Phase Shift Oscillator
Design
Given VDD = 10 V, VGS(off) = -4 V IDSS (max) = 12 mA RG = 2 MΩ
Formulae
ID = IDSS.(1 – VGS / VGS (off))2
-------------------------------------(1)
When VG = 0, Then VS = -VGS
But VS = ID . RS
When VG = 0, ID = IDSS
VS = IDSS.RS
IDSS.RS = -VGS (off)
RS = -(-4) / 12mA = 333 Ω
Choose RS = 330 ΩΩΩΩ
From (1)
ID = IDSS.(1 – ID.RS / VGS (off))2
ID = IDSS.(1 + ID
2
.RS
2
/ 16 - ID.RS /2)
ID = 12 x 10-3
x (1 + ID
2
.3302
/ 16 - ID.330 /2)
81.675ID
2
- 2.98ID +12 x 10-3
= 0
ID = 4.6 mA or ID = 31.9 mA
Since ID cannot be greater than IDSS, Choose ID = 4.6 mA
Assume VDS = 50 % VDD ---- VDS = 5V
Applying KVL to output circuit
VDD = ID . RD + VDS + ID .RS
t
Vo
T
56. Analog Electronics Laboratory 2017-18
Department of ECE, CIT, Gubbi Page no. 56
Experiment No: 10 Date:
RC Phase Shift Oscillator
Aim: To design and test an RC phase shift oscillator for the given frequency of oscillations
using FET.
Apparatus Required:
Sl.
No.
Particulars Range Quantity
1. FET BFW10 - 01
2. Resistors & Capacitors As per design -
3. CRO Probes - 3 Set
4. Multi meter - 01
5. DRB - 01
6. Spring board and connecting wires - -
Theory:
An oscillator is an electronic circuit that produces a repetitive electronic signal, often
a sine wave or a square wave. RC-phase shift oscillator is used generally at low frequencies
(Audio frequency). It consists of a CE amplifier as basic amplifier circuit and three identical
RC networks for feedback, each section of RC network introduces a phase shift of 60° and
the total phase shift by feedback network is 180°. The CE amplifier introduces 180° phase
shift hence the overall phase shift is 360°. The feedback factor for an RC phase shift
oscillator is 1/29, hence the gain of amplifier (A) should be ≥ 29 to satisfy Barkhausen
criteria. The Barkhausen criteria states that in a positive feedback amplifier to obtain
sustained oscillations, the overall loop gain must be unity (1) and the overall phase shift must
be 0° or 360°. When the power supply is switched on, due to random motion of electrons in
passive components like resistor, capacitor a noise voltage of different frequencies will be
developed at the collector terminal of transistor, out of these the designed frequency signal is
fed back to the amplifier by the feedback network and the process repeats to give suitable
oscillation at output terminal
Applications:
1. Mostly used at audio frequencies, used in equipments that emits beeps. e.g., GPS units.
2. Used in electronic organs like voice synthesizers and electronic musical instruments like
pianos.
57. Analog Electronics Laboratory 2017-18
Department of ECE, CIT, Gubbi Page no. 57
RD = (10 – 5 – 4.6 x 10-3
x 330) / 4.6 x 10⁻³
RD = 756 Ω
Choose RD = 820 ΩΩΩΩ
XCS < < RS
XCS = RS / 10
1 / ( 2 π f CS ) = 470 / 10 Let f = 100 Hz
CS = 33 µF Choose CS = 47 µµµµF
Choose CC1 = CC2 = 0.1 µF
Tank Circuit :
Assume fo = 1 kHz
fo = 1/[(2 x π x √6 x R x C]
Choosing R = 10 k Ω
C =1/[2 x π x fo x R x √6 ]
C = 6.5 nF
58. Analog Electronics Laboratory 2017-18
Department of ECE, CIT, Gubbi Page no. 58
Procedure:
1. Components / equipment are tested for their good working condition.
2. Connections are made as shown in the diagram
3. The quiescent point of the amplifier is verified for the designed value.
4. Observe the output wave form on CRO and measure the frequency.
5. Verify the frequency with the designed value.
Result:
Q Point: VDS = _____ V, ID = ______ mA
fo Theoretical = _____________ Hz
fo Practical = _______________ Hz
59. Analog Electronics Laboratory 2017-18
Department of ECE, CIT, Gubbi Page no. 59
Circuit Diagram: Hartley Oscillator
Circuit Diagram: Colpits Oscillator
Design:
Given, VCE = 2.5 V and IC = 1 mA Assume ββββ = 100
VCC = 2VCE = 2 X 2.5 = 5 V
Let VRE = 10% VCC =0.5 V
RE = VRE / ( IC + IB )
IB = IC / β = 1 mA / 100 = 10 µA
Vo
t
T
fo = 1 / T Hz
C
B
E
SL100
or
CL100
60. Analog Electronics Laboratory 2017-18
Department of ECE, CIT, Gubbi Page no. 60
Experiment No: 11 Date :
Hartley and Colpitt’s Oscillator
Aim: To design and test Hartley and Colpitt’s oscillator for the given frequency of
oscillations crystal oscillator using BJT.
Apparatus Required:
Sl.
No.
Particulars Range Quantity
1. Transistor SL 100 - 01
2. Resistors & Capacitors As per design -
3. CRO Probes - 3 Set
4. Multi meter - 01
5. DCB, DIB - 2 each
6. Spring board and connecting wires - -
Theory:
An oscillator is an electronic circuit that produces a repetitive electronic signal, often
a sine wave or a square wave. The Hartley oscillator is an LC electronic oscillator that
derives its feedback from a tapped coil in parallel with a capacitor (the tank circuit). A
Hartley oscillator is essentially any configuration that uses a pair of series-connected coils
and a single capacitor. It was invented by Ralph Hartley.
A Colpitt’s oscillator, named after its inventor Edwin H. Colpitt’s, is one of a
number of designs for electronic oscillator circuits using the combination of an inductance
(L) with a capacitor (C) for frequency determination, thus also called LC oscillator. One of
the key features of this type of oscillator is its simplicity (needs only a single inductor) and
robustness. A Colpitt’s oscillator is the electrical dual of a Hartley oscillator. Fig. 1 shows the
basic Colpitt’s circuit, where two capacitors and one inductor determine the frequency of
oscillation. The feedback needed for oscillation is taken from a voltage divider made by the
two capacitors, where in the Hartley oscillator the feedback is taken from a voltage divider
made by two inductors (or a tapped single inductor).
The basic CE amplifier provides 180° phase shift and the feedback network provides
the remaining 180° phase shift so that the overall phase shift is 360° to satisfy the Barkhausen
criteria. The Barkhausen criteria states that in a positive feedback amplifier to obtain
sustained oscillations, the overall loop gain must be unity ( 1 ) and the overall phase shift
must be 0° or 360°.
61. Analog Electronics Laboratory 2017-18
Department of ECE, CIT, Gubbi Page no. 61
RE = 0.5 / ( 1 m + 10 µ ) = 495 Ω
Choose RE = 470 ΩΩΩΩ
Apply KVL to collector loop
VCC – IC RC – VCE – VE = 0
RC = ( VCC – VCE – VE ) / IC = ( 5 – 2.5 – 0.5) / 1 m
RC = 2 kΩ Choose RC = 1.8 kΩΩΩΩ
Let IR1 = 10 IB = 10 X 10 µA = 100 µA
VR2 = VBE + VE = 0.6 + 0.5 = 1.1 V ( Since transistor is silicon make VBE = 0.6 V )
R2 = VR2 / ( IR1 – IB ) = 1.1 / ( 100 µA - 10 µA )
R2 = 12.2 kΩ Choose R2 = 13 kΩΩΩΩ
R1 = ( VCC – VR2 ) / IR1 = ( 5 – 1.1 ) / 100 µA
R1 = 39 KΩ Choose R1 = 38 kΩΩΩΩ
XCE < < RE ; XCE = RE / 10 => 1 / ( 2 π f CE ) =470 / 10 Let f = 100 Hz
CE = 33 µF Choose CE = 47 µµµµF Choose CC1 = CC2 = 0.1
Hartley oscillator: Design of tank circuit: Assume fo = 100 kHz
Formula f o = 1 / 2π √ (LT . C)
Where LT = L1 + L2
Barkhausen’s criterion is A.β = 1
Therefore β = 1/A = L1/ L2
For this circuit, A = 75 because gain of the amplifier is 75
L2 = 75 . L1
Assume L1 = 100 µH , therefore L2 = 7 mH, then C = 0.4 nF
Colpitt’s oscillator: Design of tank circuit: Assume fo = 100 kHz
Formula f o = 1 / 2π √ (CT . L)
Where CT = C1 . C2 / (C1 + C2)
Barkhausen’s criterion is A.β = 1
Therefore β = 1/A = C2/ C1
For this circuit, A = 75 because gain of the amplifier is 75
C1 = 75 · C2
Assume C2 = 100pf, therefore C1 = 7.5 nF, then L = 25.6 mH
62. Analog Electronics Laboratory 2017-18
Department of ECE, CIT, Gubbi Page no. 62
When the power supply is switched on, due to random motion of electrons in passive
components like resistor, capacitor a noise voltage of different frequencies will be developed
at the collector terminal of transistor, out of these the designed frequency signal is fed back to
the amplifier by the feedback network and the process repeats to give suitable oscillation at
output terminal
Procedure:
1. Components / equipment are tested for their good working condition.
2. Connections are made as shown in the diagram
3. The quiescent point of the amplifier is verified for the designed value.
4. Observe the output wave form on CRO and measure the frequency.
5. Verify the frequency with the crystal frequency.
Applications:
1. The Hartley/ Colpitt’s oscillators are extensively used on all broadcast bands
including the FM 88-108 MHz band.
Result:
Hartley Oscillator:
Q Point: VCE = _____ V, IC = ______ mA, Gain (A) =___________
fo Theoretical = __________ Hz, fo Practical = ____________ Hz
Colpitt’s Oscillator:
Q Point: VCE = _____ V, IC = ______ mA, Gain (A) =___________
fo Theoretical = __________ Hz, fo Practical = ____________ Hz
63. Analog Electronics Laboratory 2017-18
Department of ECE, CIT, Gubbi Page no. 63
Circuit Diagram: Crystal Oscillator
Design:
Given, VCE = 2.5 V and IC = 1 mA Assume ββββ = 100
VCC = 2VCE = 2 X 2.5 = 5 V
Let VRE = 10% VCC =0.5 V
RE = VRE / ( IC + IB )
IB = IC / β = 1 mA / 100 = 10 µA
RE = 0.5 / ( 1 m + 10 µ ) = 495 Ω
Choose RE = 470 ΩΩΩΩ
Apply KVL to collector loop
VCC – IC RC – VCE – VE = 0
RC = ( VCC – VCE – VE ) / IC = ( 5 – 2.5 – 0.5) / 1 m
RC = 2 kΩ Choose RC = 1.8 kΩΩΩΩ
Let IR1 = 10 IB = 10 X 10 µA = 100 µA
VR2 = VBE + VE = 0.6 + 0.5 = 1.1 V
R2 = VR2 / ( IR1 – IB ) = 1.1 / ( 100 µA - 10 µA )
R2 = 12.2 kΩ Choose R2 = 13 kΩΩΩΩ
R1 = ( VCC – VR2 ) / IR1 = ( 5 – 1.1 ) / 100 µA
R1 = 39 KΩ Choose R1 = 38 kΩΩΩΩ
XCE < < RE ; XCE = RE / 10 => 1 / ( 2 π f CE ) =470 / 10 Let f = 100 Hz
CE = 33 µF Choose CE = 47 µµµµF Choose CC1 = CC2 = 0.1 µµµµF
Vo
t
T
fo = 1 / T Hz
C
B
E
SL100
or
CL100
64. Analog Electronics Laboratory 2017-18
Department of ECE, CIT, Gubbi Page no. 64
Experiment No: 12 Date:
Crystal Oscillator
Aim: To design and test a crystal oscillator.
Apparatus Required:
Sl.
No.
Particulars Range Quantity
1. Transistor SL 100, Crystal - 1 each
2. Resistors & Capacitors As per design -
3. CRO Probes - 3 Set
4. Multi meter - 01
5. DCB - 02
6. Spring board and connecting wires - -
Theory:
An oscillator is an electronic circuit that produces a repetitive electronic signal, often
a sine wave or a square wave. A crystal oscillator is an electronic circuit that uses the
mechanical resonance of a vibrating crystal of piezoelectric material to create an electrical
signal with a very precise frequency. This frequency is commonly used to keep track of time
(as in quartz wristwatches), to provide a stable clock signal for digital integrated circuits, and
to stabilize frequencies for radio transmitters and receivers. The most common type of
piezoelectric resonator used is the quartz crystal, so oscillator circuits designed around them
were called "crystal oscillators".
Procedure:
1. Components / equipment are tested for their good working condition.
2. Connections are made as shown in the diagram
3. The quiescent point of the amplifier is verified for the designed value.
4. Observe the output wave form on CRO and measure the frequency.
5. Verify the frequency with the crystal frequency.
Applications:
• Quartz wristwatches – keep track of time
• Digital integrated circuits- to provide a stable clock signal
• Radio transmitters and receivers- stabilize frequencies
• Signal generators, Mobile phones and Oscilloscopes, microphones
Result:
Q Point: VCE = _____ V, IC = ______ mA
fo Crystal = _____________ Hz
fo Practical = _______________ Hz
65. Analog Electronics Laboratory 2017-18
Department of ECE, CIT, Gubbi Page no. 65
I/p Gnd O/p
Additional Experiments
Additional Experiment No 1:
Design of ±5V Regulated DC Power Supply
Aim: To design a ±5V/ ≥500 mA regulated DC Power Supply.
Circuit Diagram:
Design:
Given, Output Voltage (Vo) = 5V and Output Current (Io) = 500 mA
Since Vo = 5V and Io = 500 mA, Three terminal IC regulator 7805 is used which can
withstand up to 1A output current.
For 7805 regulator I/p Voltage ≥ Vo + 2V
Therefore, I/p Voltage = 5 V + 2 V = 7V.
Let us design Center tap rectifier circuit with C filter
The filter capacitor charges up to Vm and assuming the capacitor discharge current is
small. Therefore, Vm = 7 V
Vrms = Vm / √2 = 4.95 V ≅ 6 V
Choose a transformer of rating 6V – 0 – 6 V with current rating greater than 500 mA (Io)
Hence Vm = 6 √2 = 8.48 V.
Choose, 1N4007 silicon diodes
7805
66. Analog Electronics Laboratory 2017-18
Department of ECE, CIT, Gubbi Page no. 66
An Electrolytic capacitor of value 1000 µF / 8.48 V is chosen .
Let Co = 0.1 µF ( To improve stability and transient response ). Since the regulator is
located nearer to power Supply filter, the input capacitor at the regulator I/p terminal is
not required.
R = ( Vo – Vf ) / Imax
For an LED Vf = 1.5 V, I max = 20 mA
Therefore R = ( 5- 1.5 ) / 20 mA = 175 Ω ≅ 220 Ω
PR = V2
/ R = ( 5 – 1.5 )2
/ 220 = 0.055 W
Therefore Choose R = 220Ω / 0.25 W
67. Analog Electronics Laboratory 2017-18
Department of ECE, CIT, Gubbi Page no. 67
Circuit Diagram: Without feedback
Circuit Diagram: With feedback
68. Analog Electronics Laboratory 2017-18
Department of ECE, CIT, Gubbi Page no. 68
Additional Experiment No: 2 Date:
Two Stage Voltage Series Feedback Amplifier
Aim: To conduct an experiment to plot the frequency response of an two stage amplifier
with and without feedback and to find the input impedance, output impedance and the voltage
gain.
Apparatus Required:
Sl.
No.
Particulars Range Quantity
1. BJT - 02
2. Resistors & Capacitors As per design -
3. CRO Probes - 3 Set
4. Multi meter - 01
5. DRB - 01
6. Spring board and connecting wires - -
Theory:
Feedback is the process of combining a portion of output signal with input signal.
There are two types of feedback namely positive feedback and negative feedback. If the
signal fed back is in phase with the input signal we call it as positive feedback and if the fed
back signal is out of phase with the input signal we call it as negative feedback.
Positive feedback is used in oscillators to develop oscillations, where as negative
feedback is used in amplifiers to improve the characteristics of amplifiers. There are four
types of feedback concepts name voltage series feedback, current series feedback, voltage
shunt feedback and current shunt feedback. In this experiment we discuss voltage series
feedback. In voltage series feedback the input impedance will increase, output impedance
will decrease, bandwidth increases and distortion decreases which are all advantages but the
voltage gain decreases which is a disadvantage which can be improved by cascading with
other amplifier.
Design:
69. Analog Electronics Laboratory 2017-18
Department of ECE, CIT, Gubbi Page no. 69
Given, VCE = 2.5 V and IC = 1 mA Assume ββββ = 100
VCC = 2VCE = 2 X 2.5 = 5 V
Let VRE = 10% VCC =0.5 V
RE = VRE / ( IC + IB )
IB = IC / β = 1 mA / 100 = 10 µA
RE = 0.5 / ( 1 m + 10 µ ) = 495 Ω
Choose RE = 470 ΩΩΩΩ
Apply KVL to collector loop
VCC – IC RC – VCE – VE = 0
RC = ( VCC – VCE – VE ) / IC = ( 5 – 2.5 – 0.5) / 1 m
RC = 2 kΩ Choose RC = 2.2 kΩΩΩΩ
Let IR1 = 10 IB = 10 X 10 µA = 100 µA
VR2 = VBE + VE = 0.6 + 0.5 = 1.1 V ( Since transistor is silicon make VBE = 0.6 V )
R2 = VR2 / ( IR1 – IB ) = 1.1 / ( 100 µA - 10 µA )
R2 = 12.2 kΩ Choose R2 = 13 kΩΩΩΩ
R1 = ( VCC – VR2 ) / IR1 = ( 5 – 1.1 ) / 100 µA
R1 = 39 KΩ Choose R1 = 38 kΩΩΩΩ
XCE < < RE ; XCE = RE / 10
1 / ( 2 π f CE ) = 470 / 10 Let f = 100 Hz
CE = 33 µF Choose CE = 47 µµµµF
Choose CC1 = CC2 = 0.1 µµµµF
Feedback Design:
Feedback factor β = 1/80
Feedback factor β = RB /(RA + RB)
Assume RB = 100 Ω , β = 1/80
Then RA = 8.3kΩ
70. Analog Electronics Laboratory 2017-18
Department of ECE, CIT, Gubbi Page no. 70
Procedure: (Without Feedback)
1. Components / Equipment are tested for their good working condition.
2. Connections are made as shown in the circuit diagram.
3. By keeping the voltage knobs in minimum position and current knob in maximum
position switch on the power supply.
4. By disconnecting the AC source measure the quiescent point (VCE and IC)
To find frequency response:
1. Connect the AC source. Keeping the frequency of the AC source in mid band region
(say 10 kHz) adjust the amplitude to get the distortion less output. Note down the
amplitude of the input signal.
2. Keeping the input amplitude constant, Vary the frequency in suitable steps and note
down the corresponding output amplitude.
3. Calculate AV and gain in decibels. Plot a graph of frequency Vs gain in dB. From the
graph calculate fL, fH and bandwidth.
4. Calculate figure of merit.
To find the input impedance (Zi ) :
1. Connections are made as shown in the diagram.
2. Keeping the DRB in its minimum position, apply input signal at mid band frequency
(say 10 kHz) and adjust the amplitude of the input signal to get distortion less output.
Note down the output amplitude.
3. Vary the DRB until the output amplitude becomes half of its previous value. The
corresponding DRB value gives the input impedance.
To find the output impedance (Zo) :
1. Connections are made as shown in the diagram.
2. Keeping the DRB in its maximum position, apply input signal at mid band frequency
(say 10 kHz) and adjust the amplitude of the input signal to get distortion less output.
Note down the output amplitude.
3. Vary the DRB until the output amplitude becomes half of its previous value. The
corresponding DRB value gives the output impedance.
71. Analog Electronics Laboratory 2017-18
Department of ECE, CIT, Gubbi Page no. 71
Tabular Column: Vi = ___________ V
f in Hz
Without Feedback With Feedback
Vo
in Volt
AV = Vo / Vi
Gain in dB
= 20*log AV
Vo
in Volt
AVf = Vo / Vi
Gain in dB
= 20*log AVf
72. Analog Electronics Laboratory 2017-18
Department of ECE, CIT, Gubbi Page no. 72
Result:
With Feedback
1. Quiescent point : VCE = ____ V, IC = _____ mA
2. Voltage Gain ( AV ) = __________ ( in mid band region )
3. Bandwidth (BW) = ___________ Hz
4. figure of merit ( FM = AV * BW ) = ____________ Hz
5. Input impedance (Zi) = ____________Ω, Output Impedance (Zo) = __________Ω
Without Feedback
1. Voltage Gain ( AV ) = __________ ( in mid band region )
2. Bandwidth (BW) = ___________ Hz
3. figure of merit ( FM = AV * BW ) = ____________ Hz
4. Input impedance (Zi) = ____________Ω, Output Impedance (Zo) = __________Ω
73. Analog Electronics Laboratory 2017-18
Department of ECE, CIT, Gubbi Page no. 73
Circuit Diagram: RC Phase Shift Oscillator using BJT
Design:
Given, VCE = 2.5 V and IC = 1 mA Assume ββββ = 100
VCC = 2VCE = 2 X 2.5 = 5 V
Let VRE = 10% VCC =0.5 V
RE = VRE / ( IC + IB )
IB = IC / β = 1 mA / 100 = 10 µA
RE = 0.5 / ( 1 m + 10 µ ) = 495 Ω
Choose RE = 470 ΩΩΩΩ
Apply KVL to collector loop
VCC – IC RC – VCE – VE = 0
RC = ( VCC – VCE – VE ) / IC = ( 5 – 2.5 – 0.5) / 1 m
RC = 2 kΩ Choose RC = 1.8 kΩΩΩΩ
Let IR1 = 10 IB = 10 X 10 µA = 100 µA
VR2 = VBE + VE = 0.6 + 0.5 = 1.1 V ( Since transistor is silicon make VBE = 0.6 V )
R2 = VR2 / ( IR1 – IB ) = 1.1 / ( 100 µA - 10 µA )
R2 = 12.2 kΩ Choose R2 = 13 kΩΩΩΩ
R1 = ( VCC – VR2 ) / IR1 = ( 5 – 1.1 ) / 100 µA
R1 = 39 KΩ Choose R1 = 38 kΩΩΩΩ
t
Vo
T
C
B
E
SL100
or
CL100
74. Analog Electronics Laboratory 2017-18
Department of ECE, CIT, Gubbi Page no. 74
Additional Experiment No: 3 Date:
RC Phase Shift Oscillator using BJT
Aim: To design and test an RC phase shift oscillator for the given frequency of oscillations
using BJT.
Apparatus Required:
Sl.
No.
Particulars Range Quantity
1. Transistor SL 100 - 01
2. Resistors & Capacitors As per design -
3. CRO Probes - 3 Set
4. Multi meter - 01
5. DRB - 01
6. Spring board and connecting wires - -
Theory:
An oscillator is an electronic circuit that produces a repetitive electronic signal, often
a sine wave or a square wave. RC-phase shift oscillator is used generally at low frequencies
(Audio frequency). It consists of a CE amplifier as basic amplifier circuit and three identical
RC networks for feed back, each section of RC network introduces a phase shift of 60° and
the total phase shift by feedback network is 180°. The CE amplifier introduces 180° phase
shift hence the overall phase shift is 360°. The feed back factor for an RC phase shift
oscillator is 1/29, hence the gain of amplifier (A) should be ≥ 29 to satisfy Barkhausen
criteria. The Barkhausen criteria states that in a positive feedback amplifier to obtain
sustained oscillations, the overall loop gain must be unity ( 1 ) and the overall phase shift
must be 0° or 360°. When the power supply is switched on, due to random motion of
electrons in passive components like resistor, capacitor a noise voltage of different
frequencies will be developed at the collector terminal of transistor, out of these the designed
frequency signal is fed back to the amplifier by the feed back network and the process repeats
to give suitable oscillation at output terminal
Applications:
3. Mostly used at audio frequencies, used in equipments that emits beeps. e.g., GPS units.
4. Used in electronic organs like voice synthesizers and electronic musical instruments like
pianos.
75. Analog Electronics Laboratory 2017-18
Department of ECE, CIT, Gubbi Page no. 75
XCE < < RE
XCE = RE / 10
1 / ( 2 π f CE ) = 470 / 10 Let f = 100 Hz
CE = 33 µF Choose CE = 47 µµµµF
Choose CC1 = CC2 = 0.1 µµµµF
Tank Circuit :
Assume fo = 1 kHz
fo = 1/[(2 x π x R x C (6+4k)0.5
]
where k = Rc / R, and Ri = R1 || R2 || hie
4k+23+29/k ≤ hfe
Assume hfe = β = 100
Therefore 4k+23+29/k = 100
4k2
+23k+29 = 100
4k2
– 77k + 29 = 0
k = 18.865 or 0.385
if k = 18.865 , Rc / R = 18.865
R is very small. Therefore proper oscillations are not obtained
Choosing k = 0.385
Rc = 1.8 k Ω
R = 4.675 k Ω
Choose R = 4.7 k Ω
C =1/[2 x π x fo x R (6+4 x 0.385)0.5
]
C = 0.012 µF
Choose C = 0.01 µF
Ri = 38 k || 13 k || 2.6 k
Ri = 2 k Ω
R3 = R – Ri
R3 = 2.7 k Ω
76. Analog Electronics Laboratory 2017-18
Department of ECE, CIT, Gubbi Page no. 76
Procedure:
6. Components / equipment are tested for their good working condition.
7. Connections are made as shown in the diagram
8. The quiescent point of the amplifier is verified for the designed value.
9. Observe the output wave form on CRO and measure the frequency.
10. Verify the frequency with the designed value.
Result:
Q Point: VCE = _____ V, Ic = ______ mA
fo Theoretical = _____________ Hz
fo Practical = _______________ Hz
77. Analog Electronics Laboratory 2017-18
Department of ECE, CIT, Gubbi Page no. 77
Viva Questions
Rectifiers and Filters
1. Define rectifier.
2. Compare different type of rectifiers.
3. What is PIV of a diode?
4. What are the different types of filters?
Clipping circuits:
1. List the types of clipping circuits?
2. What are the uses of clipping circuits?
3. What is transfer function?
4. Why the shapes of the transfer are function and dynamic characteristics of a diode
circuit same?
5. What is the piecewise linear diode model? What is its significance?
6. Explain the equivalent circuits of an ideal diode and practical diode.
7. What determines the slope in any part of the transfer function?
Clamping circuits:
1. What are clamping circuits? What are its uses?
2. What are the different types of clamping circuits?
RC Coupled amplifier:
1. Define gain of the amplifier
2. What are the functions of the three resistances R1 , R2 , RE?
3. What are the functions of the capacitances CE and CC ?
4. explain the Thevenin’s model of the voltage divider bias network
5. How can a transistor be operated as a switch?
6. Which configuration of a transistor is preferred when a transistor is used as a switch
and why?
7. What is quiescent point?
8. What is load line?
9. Why is the Q – point always at the centre of the load line?
10. Why are the coupling capacitors used?
11. Why are there 2 circuits namely the biasing circuit and amplifier circuit?
78. Analog Electronics Laboratory 2017-18
Department of ECE, CIT, Gubbi Page no. 78
12. Explain why the frequency response is as it is shown?
13. Explain why only a 3dB bandwidth is chosen?
14. What is early effect?
15. Compare FET with BJT.
Darlington emitter follower:
1. Why the Darlington emitter follower is called so?
2. What are the advantages of the Darlington emitter follower?
3. Where is the Darlington emitter follower used?
4. Why is the emitter follower said to be in the common collector configuration?
5. What are the features of the emitter follower
6. What are the functions of RE?
7. Explain the advantage bootstrapping.
RC phase shift oscillator:
1. Explain the function of the tank circuit.
2. What is the magnitude of the phase change due to the tank circuit?
3. What is Barkhausen’s criterion and how is it satisfied?
4. How can the frequency of oscillations be altered?
Hartley and Colpitts oscillator
1. What is a FET?
2. How the FET is a voltage controlled device?
3. Why the FET is called so?
4. What is Gate - Source Cutoff voltage?
5. What are the types of FET?
6. Which type of FET is BFW 10?
7. What are the advantages of FET over BJT?
8. What is pinch off voltage?
9. Explain how oscillations are obtained by the tank circuit.
10. Explain how barkhausen’s criterion is satisfied.
79. Analog Electronics Laboratory 2017-18
Department of ECE, CIT, Gubbi Page no. 79
Class B Push Pull Amplifier
1. Define different types of amplifiers based on selection of operating point.
2. What are the advantages and disadvantages of Class B push pull amplifier?
Feedback amplifier:
1. What are the different types of feedback amplifiers?
2. What are the advantages of feedback?
3. What type of amplifier is used in voltage series feedback amplifier?
4. What are the different types of feedback?
5. How is the gain affected when feedback is used?
6. How is the stability of a system affected when used with feedback?
7. What is desensitivity factor?
8. Why is there an increase in the immunity to noise and sensitivity of the amplifier
when feedback is used?
80. Analog Electronics Laboratory 2017-18
Department of ECE, CIT, Gubbi Page no. 80
15ECL37 Analog Electronics Laboratory
Class: III Semester E & C IA Marks: 20
Duration of Exam: 3 Hrs Max. Exam Marks: 80
Question Bank
1. Design a RC coupled single stage BJT amplifier and determine the Gain-frequency
response, input and output impedances.
2. Design a RC coupled single stage FET amplifier and determine the Gain-frequency
response, input and output impedances.
3. Design a BJT Darlington Emitter follower with and without bootstrapping and
determine the gain, input and output impedances.
4. Design and test the performance of FET-RC phase shift oscillator for fo = 1 kHz.
5. Design and test the performance of a BJT Crystal oscillator.
6. Design and test a Hartley oscillator using BJT for fo = 100 kHz.
7. Design and test a Colpitts oscillator using BJT for fo = 100 kHz.
8. Design the clipping circuits, which have the following transfer characteristics.
Vo Vo
VR
VR2 Vi
Vi VR1
9. Design the clipping circuits to obtain the following output waveform.
Vo Vo
VR1
t t
VR
VR2
10. Design and test clamping circuits to clamp positive peak to ________ reference level
11. Design and test clamping circuits to clamp negative peak to ________ reference level
81. Analog Electronics Laboratory 2017-18
Department of ECE, CIT, Gubbi Page no. 81
Vi
t
Vo
t
12. Design a clamping circuit to obtain the following waveform.
V
13. Design and test the series voltage regulator circuit using zener diode. Determine line
regulation and load regulation.
14. Rig up and test a class B push pull amplifier and determine its conversion efficiency.
15. Rig up and test Center tap full wave rectifier circuit with and without ‘C’ filter and
determine ripple factor, efficiency and regulation.
18. Rig up and test Bridge rectifier circuit with and without ‘C’ filter and determine
ripple factor, efficiency and regulation.
19. Rig up and test characteristics of JFET. Plot Drain and Transfer characteristics.
Determine drain resistance, mutual conductance and amplification factor.
20. Rig up and test characteristics of n-channel MOSFET. Plot Drain and Transfer
characteristics. Determine drain resistance, mutual conductance and amplification
factor.
21 Design an FWR for an output DC voltage of 10 V and load current of 10 mA.
(Bridge and Center tap rectifier)
Circuit V
82. Analog Electronics Laboratory 2017-18
Department of ECE, CIT, Gubbi Page no. 82
REFERENCES
1. “Functional Electronics” by K. V. Ramanan, Tata McGraw Hill Publications.
2. “Electronic Devices and Circuits” by David A. Bell, PHI India Publications, New
Delhi 4th
edition 2004.
3. “Electronic Devices and Circuit Theory” by Robert L. Boylestad and Louis
Nashelsky, PHI India Publications, New Delhi 8th
edition 2009.
4. “Integrated Electronics” by Jacob Millman and Christos C. Halkias, Tata McGraw
Hill Publications,1991 edition.
5. “Modern Physics” by Kenneth S. Krane, John Wiley and Sons Publications, 2nd
Edition 1998.