Setting up an Email in Thunderbird
•Transferir como ODT, PDF•
0 gostou•400 visualizações

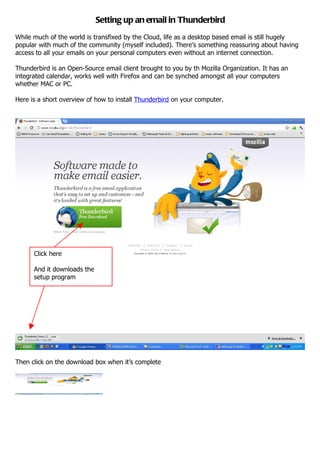
Thunderbird is an Open-Source email client brought to you by the Mozilla Organization. It has an integrated calendar, works well with Firefox and can be synched amongst all your computers whether MAC or PC. Here is a short overview of how to install Thunderbird on your computer.

Recomendados
Recomendados
Mais conteúdo relacionado
Último
Último (20)
Destaque
Destaque (20)
Setting up an Email in Thunderbird
- 1. Setting up an email in Thunderbird While much of the world is transfixed by the Cloud, life as a desktop based email is still hugely popular with much of the community (myself included). There’s something reassuring about having access to all your emails on your personal computers even without an internet connection. Thunderbird is an Open-Source email client brought to you by th Mozilla Organization. It has an integrated calendar, works well with Firefox and can be synched amongst all your computers whether MAC or PC. Here is a short overview of how to install Thunderbird on your computer. Click here And it downloads the setup program Then click on the download box when it’s complete
- 2. You get this window. Click Run You get this Then this Click Next
- 3. Then click Install And you get this
- 4. then this Click Finish The setup programme will now run Thunderbird on your computer for the first time, and will offer a few options to begin with: This window lets you import your contact lists from Outlook. If you want to transfer this into Thunderbird then just click Next, or click on the ‘don’t import anything’ if you don’t want this. I’ve been using Outlook so I’ll import the information (ie just click Next).
- 5. Then Thunderbird opens: To access your mail just click Get Mail. If you have a password-protected email then it might ask you for this at this point, or simply download your mail into the Inbox.
- 6. If you haven’t imported addresses from Outlook, then you’ll need to set up your emails to download from the server. To do this, select Account settings from the Tools menu: Then select Account Actions -> Add Mail Account
- 7. Fill in the relevant details that you will have from your Email host (usually your web host). If you’re unsure, call your host for the correct details. It will automatically try and find your email settings, which is pretty cool. If it can’t find yours then click Manual Config and have your web host information ready (or call them). I like to have the added security of entering my password whenever I check the mail. If you don’t care, leave the Remember password box ticked. If all seems right, then click Create Account. And (all going well) you can then click Get Mail to download all your emails from the server. And that’s it. You can set up email folders to file your mail in the same way as you would any folder system (ie right-click -> new folder) and you can even set mail to automatically file itself depending on what it contains... But that’s a story for another article... This tutorial was brought to you by the team at Explainafide, a creative web design agency based in Australia. Keep your eyes open for more tuts over the coming weeks.