SlideShare uma empresa Scribd logo
1 de 3
Baixar para ler offline
EVannex®	—	Tesla	Aftermarket	Accessories	
3413	SW	14th	Street	••	Deerfield	Beach,	FL	33442	••	www.evannex.com	
Disclaimer:	Evannex	is	not	responsible	for	any	vehicle	damage	caused	during	the	installation	or	use	of	this	product.	
Any	costs	associated	with	any	vehicle	damage	are	the	sole	reponsibility	of	the	purchaser.	
	
Chrome	Trunk	Molding	for	Model	3		
Installation	Instructions	
Please read this document in its entirety before you begin the installation of the Model 3 Chrome
Trunk Molding
The EVANNEX
®
Model 3 Chrome Trunk Molding has been designed for those Model 3 owners who would
like to add a chrome accent to the trunk hatch of Model 3. Although we provide detailed instructions for the
installation of the Model 3 Chrome Trunk Molding, some Model 3 owners may prefer to get help. If you feel
uncomfortable with this installation for any reason, we strongly recommend that you engage a
professional installer to do the work for you.
IMPORTANT: Please be certain that you’re completely satisfied with the look and style of the Model
3 Trunk Trim piece BEFORE you remove the red adhesive backing from the piece. Once the red
adhesive backing has been removed from the trim piece, the product cannot be returned for a refund
or credit.
Installation Video: A installation video is available at evannex.com
GENERIC INSTALLATION COMMENTS
1. Be certain to properly clean the rear hatch surface of your Model 3 before you install the Model
3 Chrome Trunk Molding. See Installation Step 1.
2. It is very important to properly align the Model 3 Chrome Trunk Molding before pressing it
into place. The adhesive used for the Model 3 Chrome Trunk Molding is extremely strong and it
will be very difficult to remove the accent piece once it adheres.
3. In order to avoid problems, we advise installing each The Model 3 Chrome Trunk Molding
“incrementally.” By this, we mean that you should remove only a small portion of the red adhesive
backing material (exposing only a small part of the adhesive surface), then align one edge of the
piece (see detailed instalation steps that follow), checking alignment of the bottom edge and side
edges. Work slowly to affix the material along its edge while pulling the red backing off.
The following Figure described key terms and application dimensions:
Figure 1. Terms and Application Dimensions
EVannex®	—	Tesla	Aftermarket	Accessories	
3413	SW	14th	Street	••	Deerfield	Beach,	FL	33442	••	www.evannex.com	
Disclaimer:	Evannex	is	not	responsible	for	any	vehicle	damage	caused	during	the	installation	or	use	of	this	product.	
Any	costs	associated	with	any	vehicle	damage	are	the	sole	reponsibility	of	the	purchaser.	
INSTALLATION INSTRUCTIONS
IMPORTANT: It is very important to properly align the Model 3 Chrome Trunk Molding before
pressing it into place. The adhesive used for the product is extremely strong and it will be very
difficult to remove the the trim piece once it adheres. In general, one edge should be lightly adhered
to allow alignment to be checked before the piece is pressed into place.
Tools required: none. Materials required: a spray bottle contained a mixture of isopropyl alcohol and
distilled water (available at any large pharmacy) in a 30% alcohol, 70% water mixture, and a clean cloth.
Step 1a. Wash you car before the installation, being sure that all dirt, dust and grease have been
removed from the rear trunk hatch area.
Step 1b. Once Step 1a is complete, spray the rear trunk area with a mixture of isopropyl alcohol and
distilled water (available at any large pharmacy) in a 30% alcohol, 70% water mixture, and wipe dry with
a lint free cloth or paper towel. Be sure the surface is completely dry before proceeding.
Step 2. Test fit the Model 3 Chrome Trunk Molding but DO NOT remove the red adhesive backing.
Referring to Figure 1 and Photos 1 and 2 , place the Trunk Trim piece along the “ridge line” that runs from
the bottom of the driver side lighting assembly to the bottom of the passenger-side lighting assembly. The
“ridge line” is about 20 mm above the trunk hatch indent that is above the license plate. The bottom edge of
the Chrome Trunk Molding should sit just above the radius at the ridge line and the sides should be offset
from each lighting assembly by approximately 1mm. The top edge of the Chrome Trunk Molding should be
approximately 4 mm from the lower tip of the Tesla “T”
Photo 1. Photo 2
Test fit before you remove the red adhesive backing to plan your installation approach and familiarize
yourself with the shapes and curves involved.
Step 3. Remove the adhesive backing from about 2 inches of the left side of the Chrome Trunk
Molding and afix the edge only approximately 1 mm from the lighting assembly and along the ridge
line (Photo 1). Check to be sure that: (1) the bottom of the Trunk Trim piece is aligned with the ridge line,
(2) the center of the“S” in Tesla is aligned with the tip of the Tesla T (Photo 2) and (3) that the entire Chrome
Trunk Molding is level and will run along the ridge line from the driver-side lighting assembly to the
passenger side lighting assembly.
Step 4. Remove the red adhesive backing, and using your fingers as a guide along the edge of the
ridge line, afix the edge of the Chrome Trunk Molding along the ridge line. If misalignment occurs, it’s
relatively easy to remove the edge of the trim pieces and re-apply. DO NOT yet press the back of the trim
piece onto the rear hatch surface.
Step 5. Step back and check alignment from a distance. The look should be similar to Photo 3. Adjust
position, if required.
EVannex®	—	Tesla	Aftermarket	Accessories	
3413	SW	14th	Street	••	Deerfield	Beach,	FL	33442	••	www.evannex.com	
Disclaimer:	Evannex	is	not	responsible	for	any	vehicle	damage	caused	during	the	installation	or	use	of	this	product.	
Any	costs	associated	with	any	vehicle	damage	are	the	sole	reponsibility	of	the	purchaser.	
Photo 3. General placement and alignment of Chrome Trunk Molding
Step 6. Working from left to right and using a soft lint free cloth, press the Model 3 Chrome Trunk
Molding into place being sure not to trap any air bubbles under the adhesive. Take another pass over the
Chrome Trunk Molding to ensure solid adhesion.
Your Model 3 Trunk Trim piece and now installed.
REMOVAL OF THE MODEL 3 CHROME TRUNK MOLDING
The Model 3 Chrome Trunk Molding has been designed for permanent adhesion, so it’s not easy to remove
(that's the whole idea). But it can be done. Starting at a corner, use thin nylon fishing line or a plastic putty
knife or professional auto panel removal tool (i.e., a sharp plastic edge) and pry up the corner. You can heat
the trim piece with a hair drier -- NOT a heat gun -- and this will help by making the material slightly more
pliable. Then, working methodically, use the sharp plastic edge and work across the Chrome Trunk Molding,
pulling the material up as you go. DO NOT use a metal edge of any kind!
It’s important to note a few things:
1) Some of the adhesive will be left on the surface. This can be removed by rolling it up with the sharp
plastic edge or even your fingernail; the original surface can then be cleaned with acetone to remove
any final adhesive smudges.
2) It's unlikely that you'll damage the automotive surface beneath the Chrome Trunk Molding, but it can
happen if you scratch the surface while removing the adhesive. Be careful!
3) A trim piece that is removed will be stretched or damages, so you should only remove it if you no
longer want the look. It cannot be re-applied.

Mais conteúdo relacionado

Mais de EVANNEX Aftermarket Tesla Accessories

Electric Vehicle University - MS 312 Tips for Model S Owners, Charging
Electric Vehicle University - MS 312 Tips for Model S Owners, ChargingElectric Vehicle University - MS 312 Tips for Model S Owners, Charging
Electric Vehicle University - MS 312 Tips for Model S Owners, ChargingEVANNEX Aftermarket Tesla Accessories
 

Mais de EVANNEX Aftermarket Tesla Accessories (20)

EVANNEX - Kangaroo Pocket Installation for Tesla Model S
EVANNEX - Kangaroo Pocket Installation for Tesla Model SEVANNEX - Kangaroo Pocket Installation for Tesla Model S
EVANNEX - Kangaroo Pocket Installation for Tesla Model S
 
JB Straubel Keynote
JB Straubel KeynoteJB Straubel Keynote
JB Straubel Keynote
 
Getting Ready for Model 3 by Roger Pressman - Table of Contents
Getting Ready for Model 3 by Roger Pressman - Table of ContentsGetting Ready for Model 3 by Roger Pressman - Table of Contents
Getting Ready for Model 3 by Roger Pressman - Table of Contents
 
EVANNEX LED Lighting Upgrade Kit for Tesla Model X
EVANNEX LED Lighting Upgrade Kit for Tesla Model XEVANNEX LED Lighting Upgrade Kit for Tesla Model X
EVANNEX LED Lighting Upgrade Kit for Tesla Model X
 
EVANNEX License Plate Frame Bracket for Tesla Model X
EVANNEX License Plate Frame Bracket for Tesla Model XEVANNEX License Plate Frame Bracket for Tesla Model X
EVANNEX License Plate Frame Bracket for Tesla Model X
 
EVANNEX Cubby Compartment Instructions for Tesla Model S and X
EVANNEX Cubby Compartment Instructions for Tesla Model S and XEVANNEX Cubby Compartment Instructions for Tesla Model S and X
EVANNEX Cubby Compartment Instructions for Tesla Model S and X
 
EVANNEX Cubby Compartment Instructions for Tesla Model S and X
EVANNEX Cubby Compartment Instructions for Tesla Model S and XEVANNEX Cubby Compartment Instructions for Tesla Model S and X
EVANNEX Cubby Compartment Instructions for Tesla Model S and X
 
EVANNEX EcoHitch for Tesla Model S Install Guide Final
EVANNEX EcoHitch for Tesla Model S Install Guide FinalEVANNEX EcoHitch for Tesla Model S Install Guide Final
EVANNEX EcoHitch for Tesla Model S Install Guide Final
 
EVANNEX EcoHitch for Tesla Model S Install Guide
EVANNEX EcoHitch for Tesla Model S Install GuideEVANNEX EcoHitch for Tesla Model S Install Guide
EVANNEX EcoHitch for Tesla Model S Install Guide
 
EVANNEX Rear Center Console for Tesla Model S Instructions
EVANNEX Rear Center Console for Tesla Model S InstructionsEVANNEX Rear Center Console for Tesla Model S Instructions
EVANNEX Rear Center Console for Tesla Model S Instructions
 
Rear Center Console Insert Installation Guide
Rear Center Console Insert Installation GuideRear Center Console Insert Installation Guide
Rear Center Console Insert Installation Guide
 
EVANNEX - Lighted Emblem Installation Guide for Tesla Model S
EVANNEX - Lighted Emblem Installation Guide for Tesla Model SEVANNEX - Lighted Emblem Installation Guide for Tesla Model S
EVANNEX - Lighted Emblem Installation Guide for Tesla Model S
 
Rear Lighted T Installation Guide
Rear Lighted T Installation GuideRear Lighted T Installation Guide
Rear Lighted T Installation Guide
 
Front lighted T Installation Insructions
Front lighted T Installation InsructionsFront lighted T Installation Insructions
Front lighted T Installation Insructions
 
Electric Vehicle University - MS 312 Tips for Model S Owners, Charging
Electric Vehicle University - MS 312 Tips for Model S Owners, ChargingElectric Vehicle University - MS 312 Tips for Model S Owners, Charging
Electric Vehicle University - MS 312 Tips for Model S Owners, Charging
 
Electric Vehicle University - 220b ECONOMICS OF EV OWNERSHIP
Electric Vehicle University - 220b ECONOMICS OF EV OWNERSHIPElectric Vehicle University - 220b ECONOMICS OF EV OWNERSHIP
Electric Vehicle University - 220b ECONOMICS OF EV OWNERSHIP
 
Electric Vehicle University - 220a ECONOMICS OF EV OWNERSHIP
Electric Vehicle University - 220a ECONOMICS OF EV OWNERSHIPElectric Vehicle University - 220a ECONOMICS OF EV OWNERSHIP
Electric Vehicle University - 220a ECONOMICS OF EV OWNERSHIP
 
Electric Vehicle University - 210b EV BATTERY TECHNOLOGY
Electric Vehicle University - 210b EV BATTERY TECHNOLOGYElectric Vehicle University - 210b EV BATTERY TECHNOLOGY
Electric Vehicle University - 210b EV BATTERY TECHNOLOGY
 
Electric Vehicle University - 210c EV BATTERY TECHNOLOGY
Electric Vehicle University - 210c EV BATTERY TECHNOLOGYElectric Vehicle University - 210c EV BATTERY TECHNOLOGY
Electric Vehicle University - 210c EV BATTERY TECHNOLOGY
 
Electric Vehicle University - 210a EV BATTERY TECHNOLOGY
Electric Vehicle University - 210a EV BATTERY TECHNOLOGYElectric Vehicle University - 210a EV BATTERY TECHNOLOGY
Electric Vehicle University - 210a EV BATTERY TECHNOLOGY
 

Último

(办理学位证)墨尔本大学毕业证(Unimelb毕业证书)成绩单留信学历认证原版一模一样
(办理学位证)墨尔本大学毕业证(Unimelb毕业证书)成绩单留信学历认证原版一模一样(办理学位证)墨尔本大学毕业证(Unimelb毕业证书)成绩单留信学历认证原版一模一样
(办理学位证)墨尔本大学毕业证(Unimelb毕业证书)成绩单留信学历认证原版一模一样whjjkkk
 
suspensionretardersystem-220726153321-060937ae.pptx
suspensionretardersystem-220726153321-060937ae.pptxsuspensionretardersystem-220726153321-060937ae.pptx
suspensionretardersystem-220726153321-060937ae.pptxbasant11731
 
What Could Cause A VW Tiguan's Radiator Fan To Stop Working
What Could Cause A VW Tiguan's Radiator Fan To Stop WorkingWhat Could Cause A VW Tiguan's Radiator Fan To Stop Working
What Could Cause A VW Tiguan's Radiator Fan To Stop WorkingEscondido German Auto
 
原版1:1定制中央昆士兰大学毕业证(CQU毕业证)#文凭成绩单#真实留信学历认证永久存档
原版1:1定制中央昆士兰大学毕业证(CQU毕业证)#文凭成绩单#真实留信学历认证永久存档原版1:1定制中央昆士兰大学毕业证(CQU毕业证)#文凭成绩单#真实留信学历认证永久存档
原版1:1定制中央昆士兰大学毕业证(CQU毕业证)#文凭成绩单#真实留信学历认证永久存档208367051
 
UNIT-V-ELECTRIC AND HYBRID VEHICLES.pptx
UNIT-V-ELECTRIC AND HYBRID VEHICLES.pptxUNIT-V-ELECTRIC AND HYBRID VEHICLES.pptx
UNIT-V-ELECTRIC AND HYBRID VEHICLES.pptxDineshKumar4165
 
Equity & Freight Electrification by Jose Miguel Acosta Cordova
Equity & Freight Electrification by Jose Miguel Acosta CordovaEquity & Freight Electrification by Jose Miguel Acosta Cordova
Equity & Freight Electrification by Jose Miguel Acosta CordovaForth
 
办理阳光海岸大学毕业证成绩单原版一比一
办理阳光海岸大学毕业证成绩单原版一比一办理阳光海岸大学毕业证成绩单原版一比一
办理阳光海岸大学毕业证成绩单原版一比一F La
 
办理萨省大学毕业证成绩单|购买加拿大USASK文凭证书
办理萨省大学毕业证成绩单|购买加拿大USASK文凭证书办理萨省大学毕业证成绩单|购买加拿大USASK文凭证书
办理萨省大学毕业证成绩单|购买加拿大USASK文凭证书zdzoqco
 
Dubai Call Girls Services Call 09900000000
Dubai Call Girls Services Call 09900000000Dubai Call Girls Services Call 09900000000
Dubai Call Girls Services Call 09900000000Komal Khan
 
办理克莱姆森大学毕业证成绩单|购买美国文凭证书
办理克莱姆森大学毕业证成绩单|购买美国文凭证书办理克莱姆森大学毕业证成绩单|购买美国文凭证书
办理克莱姆森大学毕业证成绩单|购买美国文凭证书zdzoqco
 
Call Girls in Karachi | +923081633338 | Karachi Call Girls
Call Girls in Karachi  | +923081633338 | Karachi Call GirlsCall Girls in Karachi  | +923081633338 | Karachi Call Girls
Call Girls in Karachi | +923081633338 | Karachi Call GirlsAyesha Khan
 
2.2 CLSS hydraulic Pumps on komatsu pc200 series
2.2 CLSS hydraulic Pumps on komatsu pc200 series2.2 CLSS hydraulic Pumps on komatsu pc200 series
2.2 CLSS hydraulic Pumps on komatsu pc200 seriesdatazaky
 
UNIT-IV-STEERING, BRAKES AND SUSPENSION SYSTEMS.pptx
UNIT-IV-STEERING, BRAKES AND SUSPENSION SYSTEMS.pptxUNIT-IV-STEERING, BRAKES AND SUSPENSION SYSTEMS.pptx
UNIT-IV-STEERING, BRAKES AND SUSPENSION SYSTEMS.pptxDineshKumar4165
 
(办理原版一样)Flinders毕业证弗林德斯大学毕业证学位证留信学历认证成绩单补办
(办理原版一样)Flinders毕业证弗林德斯大学毕业证学位证留信学历认证成绩单补办(办理原版一样)Flinders毕业证弗林德斯大学毕业证学位证留信学历认证成绩单补办
(办理原版一样)Flinders毕业证弗林德斯大学毕业证学位证留信学历认证成绩单补办fqiuho152
 
(Griffith毕业证)格里菲斯大学毕业证毕业证成绩单修改留信学历认证原版一比一
(Griffith毕业证)格里菲斯大学毕业证毕业证成绩单修改留信学历认证原版一比一(Griffith毕业证)格里菲斯大学毕业证毕业证成绩单修改留信学历认证原版一比一
(Griffith毕业证)格里菲斯大学毕业证毕业证成绩单修改留信学历认证原版一比一ejgeojhg
 
call girls in Jama Masjid (DELHI) 🔝 >༒9953330565🔝 genuine Escort Service 🔝✔️✔️
call girls in Jama Masjid (DELHI) 🔝 >༒9953330565🔝 genuine Escort Service 🔝✔️✔️call girls in Jama Masjid (DELHI) 🔝 >༒9953330565🔝 genuine Escort Service 🔝✔️✔️
call girls in Jama Masjid (DELHI) 🔝 >༒9953330565🔝 genuine Escort Service 🔝✔️✔️9953056974 Low Rate Call Girls In Saket, Delhi NCR
 
2024 TOP 10 most fuel-efficient vehicles according to the US agency
2024 TOP 10 most fuel-efficient vehicles according to the US agency2024 TOP 10 most fuel-efficient vehicles according to the US agency
2024 TOP 10 most fuel-efficient vehicles according to the US agencyHyundai Motor Group
 
UNIT-1-VEHICLE STRUCTURE AND ENGINES.ppt
UNIT-1-VEHICLE STRUCTURE AND ENGINES.pptUNIT-1-VEHICLE STRUCTURE AND ENGINES.ppt
UNIT-1-VEHICLE STRUCTURE AND ENGINES.pptDineshKumar4165
 
UNIT-III-TRANSMISSION SYSTEMS REAR AXLES
UNIT-III-TRANSMISSION SYSTEMS REAR AXLESUNIT-III-TRANSMISSION SYSTEMS REAR AXLES
UNIT-III-TRANSMISSION SYSTEMS REAR AXLESDineshKumar4165
 

Último (20)

(办理学位证)墨尔本大学毕业证(Unimelb毕业证书)成绩单留信学历认证原版一模一样
(办理学位证)墨尔本大学毕业证(Unimelb毕业证书)成绩单留信学历认证原版一模一样(办理学位证)墨尔本大学毕业证(Unimelb毕业证书)成绩单留信学历认证原版一模一样
(办理学位证)墨尔本大学毕业证(Unimelb毕业证书)成绩单留信学历认证原版一模一样
 
suspensionretardersystem-220726153321-060937ae.pptx
suspensionretardersystem-220726153321-060937ae.pptxsuspensionretardersystem-220726153321-060937ae.pptx
suspensionretardersystem-220726153321-060937ae.pptx
 
What Could Cause A VW Tiguan's Radiator Fan To Stop Working
What Could Cause A VW Tiguan's Radiator Fan To Stop WorkingWhat Could Cause A VW Tiguan's Radiator Fan To Stop Working
What Could Cause A VW Tiguan's Radiator Fan To Stop Working
 
原版1:1定制中央昆士兰大学毕业证(CQU毕业证)#文凭成绩单#真实留信学历认证永久存档
原版1:1定制中央昆士兰大学毕业证(CQU毕业证)#文凭成绩单#真实留信学历认证永久存档原版1:1定制中央昆士兰大学毕业证(CQU毕业证)#文凭成绩单#真实留信学历认证永久存档
原版1:1定制中央昆士兰大学毕业证(CQU毕业证)#文凭成绩单#真实留信学历认证永久存档
 
UNIT-V-ELECTRIC AND HYBRID VEHICLES.pptx
UNIT-V-ELECTRIC AND HYBRID VEHICLES.pptxUNIT-V-ELECTRIC AND HYBRID VEHICLES.pptx
UNIT-V-ELECTRIC AND HYBRID VEHICLES.pptx
 
Equity & Freight Electrification by Jose Miguel Acosta Cordova
Equity & Freight Electrification by Jose Miguel Acosta CordovaEquity & Freight Electrification by Jose Miguel Acosta Cordova
Equity & Freight Electrification by Jose Miguel Acosta Cordova
 
办理阳光海岸大学毕业证成绩单原版一比一
办理阳光海岸大学毕业证成绩单原版一比一办理阳光海岸大学毕业证成绩单原版一比一
办理阳光海岸大学毕业证成绩单原版一比一
 
办理萨省大学毕业证成绩单|购买加拿大USASK文凭证书
办理萨省大学毕业证成绩单|购买加拿大USASK文凭证书办理萨省大学毕业证成绩单|购买加拿大USASK文凭证书
办理萨省大学毕业证成绩单|购买加拿大USASK文凭证书
 
Dubai Call Girls Services Call 09900000000
Dubai Call Girls Services Call 09900000000Dubai Call Girls Services Call 09900000000
Dubai Call Girls Services Call 09900000000
 
办理克莱姆森大学毕业证成绩单|购买美国文凭证书
办理克莱姆森大学毕业证成绩单|购买美国文凭证书办理克莱姆森大学毕业证成绩单|购买美国文凭证书
办理克莱姆森大学毕业证成绩单|购买美国文凭证书
 
Call Girls in Karachi | +923081633338 | Karachi Call Girls
Call Girls in Karachi  | +923081633338 | Karachi Call GirlsCall Girls in Karachi  | +923081633338 | Karachi Call Girls
Call Girls in Karachi | +923081633338 | Karachi Call Girls
 
2.2 CLSS hydraulic Pumps on komatsu pc200 series
2.2 CLSS hydraulic Pumps on komatsu pc200 series2.2 CLSS hydraulic Pumps on komatsu pc200 series
2.2 CLSS hydraulic Pumps on komatsu pc200 series
 
UNIT-IV-STEERING, BRAKES AND SUSPENSION SYSTEMS.pptx
UNIT-IV-STEERING, BRAKES AND SUSPENSION SYSTEMS.pptxUNIT-IV-STEERING, BRAKES AND SUSPENSION SYSTEMS.pptx
UNIT-IV-STEERING, BRAKES AND SUSPENSION SYSTEMS.pptx
 
(办理原版一样)Flinders毕业证弗林德斯大学毕业证学位证留信学历认证成绩单补办
(办理原版一样)Flinders毕业证弗林德斯大学毕业证学位证留信学历认证成绩单补办(办理原版一样)Flinders毕业证弗林德斯大学毕业证学位证留信学历认证成绩单补办
(办理原版一样)Flinders毕业证弗林德斯大学毕业证学位证留信学历认证成绩单补办
 
(Griffith毕业证)格里菲斯大学毕业证毕业证成绩单修改留信学历认证原版一比一
(Griffith毕业证)格里菲斯大学毕业证毕业证成绩单修改留信学历认证原版一比一(Griffith毕业证)格里菲斯大学毕业证毕业证成绩单修改留信学历认证原版一比一
(Griffith毕业证)格里菲斯大学毕业证毕业证成绩单修改留信学历认证原版一比一
 
call girls in Jama Masjid (DELHI) 🔝 >༒9953330565🔝 genuine Escort Service 🔝✔️✔️
call girls in Jama Masjid (DELHI) 🔝 >༒9953330565🔝 genuine Escort Service 🔝✔️✔️call girls in Jama Masjid (DELHI) 🔝 >༒9953330565🔝 genuine Escort Service 🔝✔️✔️
call girls in Jama Masjid (DELHI) 🔝 >༒9953330565🔝 genuine Escort Service 🔝✔️✔️
 
Indian Downtown Call Girls # 00971528903066 # Indian Call Girls In Downtown D...
Indian Downtown Call Girls # 00971528903066 # Indian Call Girls In Downtown D...Indian Downtown Call Girls # 00971528903066 # Indian Call Girls In Downtown D...
Indian Downtown Call Girls # 00971528903066 # Indian Call Girls In Downtown D...
 
2024 TOP 10 most fuel-efficient vehicles according to the US agency
2024 TOP 10 most fuel-efficient vehicles according to the US agency2024 TOP 10 most fuel-efficient vehicles according to the US agency
2024 TOP 10 most fuel-efficient vehicles according to the US agency
 
UNIT-1-VEHICLE STRUCTURE AND ENGINES.ppt
UNIT-1-VEHICLE STRUCTURE AND ENGINES.pptUNIT-1-VEHICLE STRUCTURE AND ENGINES.ppt
UNIT-1-VEHICLE STRUCTURE AND ENGINES.ppt
 
UNIT-III-TRANSMISSION SYSTEMS REAR AXLES
UNIT-III-TRANSMISSION SYSTEMS REAR AXLESUNIT-III-TRANSMISSION SYSTEMS REAR AXLES
UNIT-III-TRANSMISSION SYSTEMS REAR AXLES
 

Installation Instructions: EVANNEX Chrome Trunk Molding for Tesla Model 3

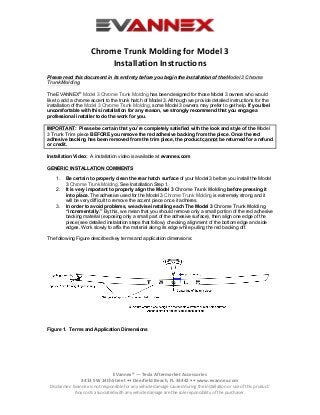
  • 1. EVannex® — Tesla Aftermarket Accessories 3413 SW 14th Street •• Deerfield Beach, FL 33442 •• www.evannex.com Disclaimer: Evannex is not responsible for any vehicle damage caused during the installation or use of this product. Any costs associated with any vehicle damage are the sole reponsibility of the purchaser. Chrome Trunk Molding for Model 3 Installation Instructions Please read this document in its entirety before you begin the installation of the Model 3 Chrome Trunk Molding The EVANNEX ® Model 3 Chrome Trunk Molding has been designed for those Model 3 owners who would like to add a chrome accent to the trunk hatch of Model 3. Although we provide detailed instructions for the installation of the Model 3 Chrome Trunk Molding, some Model 3 owners may prefer to get help. If you feel uncomfortable with this installation for any reason, we strongly recommend that you engage a professional installer to do the work for you. IMPORTANT: Please be certain that you’re completely satisfied with the look and style of the Model 3 Trunk Trim piece BEFORE you remove the red adhesive backing from the piece. Once the red adhesive backing has been removed from the trim piece, the product cannot be returned for a refund or credit. Installation Video: A installation video is available at evannex.com GENERIC INSTALLATION COMMENTS 1. Be certain to properly clean the rear hatch surface of your Model 3 before you install the Model 3 Chrome Trunk Molding. See Installation Step 1. 2. It is very important to properly align the Model 3 Chrome Trunk Molding before pressing it into place. The adhesive used for the Model 3 Chrome Trunk Molding is extremely strong and it will be very difficult to remove the accent piece once it adheres. 3. In order to avoid problems, we advise installing each The Model 3 Chrome Trunk Molding “incrementally.” By this, we mean that you should remove only a small portion of the red adhesive backing material (exposing only a small part of the adhesive surface), then align one edge of the piece (see detailed instalation steps that follow), checking alignment of the bottom edge and side edges. Work slowly to affix the material along its edge while pulling the red backing off. The following Figure described key terms and application dimensions: Figure 1. Terms and Application Dimensions
  • 2. EVannex® — Tesla Aftermarket Accessories 3413 SW 14th Street •• Deerfield Beach, FL 33442 •• www.evannex.com Disclaimer: Evannex is not responsible for any vehicle damage caused during the installation or use of this product. Any costs associated with any vehicle damage are the sole reponsibility of the purchaser. INSTALLATION INSTRUCTIONS IMPORTANT: It is very important to properly align the Model 3 Chrome Trunk Molding before pressing it into place. The adhesive used for the product is extremely strong and it will be very difficult to remove the the trim piece once it adheres. In general, one edge should be lightly adhered to allow alignment to be checked before the piece is pressed into place. Tools required: none. Materials required: a spray bottle contained a mixture of isopropyl alcohol and distilled water (available at any large pharmacy) in a 30% alcohol, 70% water mixture, and a clean cloth. Step 1a. Wash you car before the installation, being sure that all dirt, dust and grease have been removed from the rear trunk hatch area. Step 1b. Once Step 1a is complete, spray the rear trunk area with a mixture of isopropyl alcohol and distilled water (available at any large pharmacy) in a 30% alcohol, 70% water mixture, and wipe dry with a lint free cloth or paper towel. Be sure the surface is completely dry before proceeding. Step 2. Test fit the Model 3 Chrome Trunk Molding but DO NOT remove the red adhesive backing. Referring to Figure 1 and Photos 1 and 2 , place the Trunk Trim piece along the “ridge line” that runs from the bottom of the driver side lighting assembly to the bottom of the passenger-side lighting assembly. The “ridge line” is about 20 mm above the trunk hatch indent that is above the license plate. The bottom edge of the Chrome Trunk Molding should sit just above the radius at the ridge line and the sides should be offset from each lighting assembly by approximately 1mm. The top edge of the Chrome Trunk Molding should be approximately 4 mm from the lower tip of the Tesla “T” Photo 1. Photo 2 Test fit before you remove the red adhesive backing to plan your installation approach and familiarize yourself with the shapes and curves involved. Step 3. Remove the adhesive backing from about 2 inches of the left side of the Chrome Trunk Molding and afix the edge only approximately 1 mm from the lighting assembly and along the ridge line (Photo 1). Check to be sure that: (1) the bottom of the Trunk Trim piece is aligned with the ridge line, (2) the center of the“S” in Tesla is aligned with the tip of the Tesla T (Photo 2) and (3) that the entire Chrome Trunk Molding is level and will run along the ridge line from the driver-side lighting assembly to the passenger side lighting assembly. Step 4. Remove the red adhesive backing, and using your fingers as a guide along the edge of the ridge line, afix the edge of the Chrome Trunk Molding along the ridge line. If misalignment occurs, it’s relatively easy to remove the edge of the trim pieces and re-apply. DO NOT yet press the back of the trim piece onto the rear hatch surface. Step 5. Step back and check alignment from a distance. The look should be similar to Photo 3. Adjust position, if required.
  • 3. EVannex® — Tesla Aftermarket Accessories 3413 SW 14th Street •• Deerfield Beach, FL 33442 •• www.evannex.com Disclaimer: Evannex is not responsible for any vehicle damage caused during the installation or use of this product. Any costs associated with any vehicle damage are the sole reponsibility of the purchaser. Photo 3. General placement and alignment of Chrome Trunk Molding Step 6. Working from left to right and using a soft lint free cloth, press the Model 3 Chrome Trunk Molding into place being sure not to trap any air bubbles under the adhesive. Take another pass over the Chrome Trunk Molding to ensure solid adhesion. Your Model 3 Trunk Trim piece and now installed. REMOVAL OF THE MODEL 3 CHROME TRUNK MOLDING The Model 3 Chrome Trunk Molding has been designed for permanent adhesion, so it’s not easy to remove (that's the whole idea). But it can be done. Starting at a corner, use thin nylon fishing line or a plastic putty knife or professional auto panel removal tool (i.e., a sharp plastic edge) and pry up the corner. You can heat the trim piece with a hair drier -- NOT a heat gun -- and this will help by making the material slightly more pliable. Then, working methodically, use the sharp plastic edge and work across the Chrome Trunk Molding, pulling the material up as you go. DO NOT use a metal edge of any kind! It’s important to note a few things: 1) Some of the adhesive will be left on the surface. This can be removed by rolling it up with the sharp plastic edge or even your fingernail; the original surface can then be cleaned with acetone to remove any final adhesive smudges. 2) It's unlikely that you'll damage the automotive surface beneath the Chrome Trunk Molding, but it can happen if you scratch the surface while removing the adhesive. Be careful! 3) A trim piece that is removed will be stretched or damages, so you should only remove it if you no longer want the look. It cannot be re-applied.