SlideShare uma empresa Scribd logo
1 de 5
Baixar para ler offline
Lower Exterior Carbon Fiber Accent Package—Installation Instructions
*EVannex is not responsible for any damage that occurs as a consequence
of Carbon Fiber Accent Package installation.
Accent-E
Lower Exterior Accent Package
Installation Instructions*
Please read this document in its entirety before you begin any installation of Accent E.
The carbon fiber accent package is designed for those Model S owners who would like to add easily
installed exterior customization for the Model S. Although we provide detailed instructions for the installation
of this Accent-E package, some Model S owners may prefer to get help. If you feel uncomfortable with this
installation for any reason, we strongly recommend that you engage a professional installer to do the work
for you.
IMPORTANT: Please be certain that you’re satisfied with the look and style of each the Accent-E
piece BEFORE you remove the red adhesive backing from the piece. Once the red adhesive backing
has been removed from any piece, this Accent-E package cannot be returned for a refund or
replacement.
The lower exterior carbon fiber accent package includes:
• Front Lower Air Dam Accent
• Lower Side Molding Accent (driver and passenger sides)
• Rear Diffuser Accent
• Door sills (driver and passenger sides, front and rear)
IMPORTANT: It is very important to properly align each piece before pressing it into place. The
adhesive used for Accent-E is extremely strong and it will be very difficult to remove the accent
piece once it adheres. In general, one edge of a piece should be lightly adhered to allow alignment
to be checked before the piece is pressed into place.
Tools required: ruler with millimeter (mm) measure
Materials required: masking tape, a spray bottle contained a mixture of alcohol and distilled water
(available at any large pharmacy) in a 30% alcohol, 70% water mixture, and a clean, soft cloth.
Lower Exterior Carbon Fiber Accent Package—Installation Instructions
*EVannex is not responsible for any damage that occurs as a consequence
of Carbon Fiber Accent Package installation.
GENERIC INSTALLATION COMMENTS
1. It is very important to properly align each Accent-E piece before pressing it into place. The
adhesive used for Accent-E is extremely strong and it will be very difficult to remove the accent
piece once it adheres.
2. You can use blue painter’s tape or masking tape to provide temporary support for the piece as
you work on alignment and installation, removing it as you apply step 3.
3. In order to avoid problems, we advise installing each Accent-E piece “incrementally.” By
this, we mean that you should remove only a small portion of the red adhesive backing material
(exposing only a small part of the adhesive surface), then align one edge of each piece, again
checking alignment of the edge and adjacent edges. Work slowly to affix the material in steps while
pulling the red backing off. Use a soft clean cloth the press the part into place. You can use a spray
bottle with distilled water, spraying it on the adhesive surface to reduce stickiness a bit until it
evaporates, but it isn't necessary if you work carefuly.
LOWER SIDE MOLDING ACCENTS
Step 1. Clean each lower side molding using soap and water to remove road debris. Dry with a cloth. Then,
clean again using the alcohol-water mixture. Allow to dry.
Step 2. The lower side molding comes in three pieces for both the driver and passenger sides of the Model
S. Layout the side moldings to be sure that you have them properly oriented for the side on which they will
be installed. See photo.
Step 3a. Begin with the rear side molding piece. The upper edge of the side molding piece abuts the upper
edge of the black side molding and then runs along the chrome below the doors. Adhere the top edge first
and then once you're satisfied with fit, press down with a soft cloth to finalize the adhesion.
Step 3b.Butt the center piece against the rear side molding you just installed and against the chrome
molding below the doors. Incrementally remove the red adhesive backing being sure that the top of the
piece abuts the chrome edge below the doors. Once you're satisfied with fit, press down with a soft close to
finalize the adhesion.
Step 3c. Place the small front piece into place, abutting it to the center piece. Note that the top edge of the
front piece nearest the front door opening line has a slightly larger radius than the front edge of the piece.
REAR DIFFUSER ACCENT
Step 4. Clean each lower side molding using soap and water to remove road debris. Dry with a cloth. Clean
the black rear diffuser area using an alcohol-water mix. Allow to dry.
The rear diffuser accent is composed of a Carbon Fiber insert and a ‘chrome’ frame. The accents are
Lower Exterior Carbon Fiber Accent Package—Installation Instructions
*EVannex is not responsible for any damage that occurs as a consequence
of Carbon Fiber Accent Package installation.
centered between the two Model S rear reflectors. The curvature on the right and left sides of the accent is
parallel to the inside curve of right and left reflectors.
Step 5. Measure ~10 mm from the top of the curve on the existing model S bumper (the black part).
Step 5. Used two small pieces of masking tape to mark the 10 mm line (see photo below). Run a long
piece of masking tape along the line between the two small pieces of tape so that the bottom of the masking
tape is 18 mm from the top of the bumper curve. Check to ensure that the masking tape line is parallel to the
original equipment rear chrome accent below and is centered between the reflectors.
Step 6. Remove the red adhesive backing incrementally from the Carbon fiber insert. You can use blue
painter’s tape or masking tape to help align and center the accent.
Step 7. Align the top of the insert along the bottom of the masking tape line that you created in step 5. The
left and right edges of the Carbon fiber insert should be approximately 10 mm from the curve near the red
reflectors as shown in the photo below. Remove the red adhesive backing incrementally and press only on
the top edge of the insert so that if you have to adjust or re-center it you'll be able to remove and readjust.
Lower Exterior Carbon Fiber Accent Package—Installation Instructions
*EVannex is not responsible for any damage that occurs as a consequence
of Carbon Fiber Accent Package installation.
Step 8. Once inserted and properly aligned in place, press down to finalize the adhesion.
Step 9. Remove the red adhesive backing from the chrome frame incrementally moving left to right and
then carefully fit the chrome frame around the carbon fiber insert beginning the left side at the top and
moving slowly toward the right checking alignment and spacing as you go. The ‘chrome’ frame should butt
up directly against the frame.
Step 10. When you’re happy with alignment of the chrome frame, press down firmly to finalize adhesion.
FRONT AND REAR DOOR SILL ACCENTS
The front and rear door sill accents are placed on the door sill. The front door sill accent is placed
approximately 4 inches from the existing seam in the door sill nearest the B pillar. However, placement can
be varied depending on your own aesthetic. The rear door sills are placed in the flat spot of the rear door sill.
Again, placement can vary depending on your personal aesthetic. We recommend placing each of the sill
pieces on the sill before you remove the red adhesive backing to determine where they look best to you.
FRONT AIR DAM (SPLITTER) ACCENT
The front air dam (splitter) accent covers the entire top of the black insert at the bottom of the air dam.
Lower Exterior Carbon Fiber Accent Package—Installation Instructions
*EVannex is not responsible for any damage that occurs as a consequence
of Carbon Fiber Accent Package installation.
Step 11. Use soap and water to clean the nosecone removing any road debris. Then, re-clean the entire
nose cone using the alcohol-water mixture and a soft cloth. Allow to dry.
Step 12. Before you remove the red adhesive backing, use masking to to position the splitter accent to be
sure it’s properly centered on the splitter. You can use a water soluble market to place a small mark at each
end of the accent piece for final positioning.
Step 13. Remove the red adhesive backing from the back of the splitter insert in an incremental manner.
Carefully align the splitter insert on the black insert, being sure it is properly centered, and press into place.
Uses soft cloth to finalize the installation.
REMOVAL OF THE CF ACCENTS
Accent-E pieces are designed for permanent adhesion, so they're not easy to remove (that's the whole
idea). But it can be done. Starting at a corner, use a plastic putty knife or professional auto panel removal
tool (i.e., a sharp plastic edge) and pry up the corner. You can heat the CF surface with a hair drier -- NOT a
heat gun -- and this will help by making the material slightly more pliable. Then, working methodically, use
the sharp plastic edge and work inward, pulling the material up as you go. DO NOT use a metal edge!
It’s important to note a few things:
1) Some of the adhesive will be left on the surface. This can be removed by rolling it up with the sharp
plastic edge or even your fingernail; the original surface can then be cleaned with acetone to remove
any final adhesive smudges.
2) It's unlikely that you'll damage the automotive surface beneath the CF piece, but it can happen if you
scratch the surface while removing the adhesive. Be careful! Also, if you adhere the pieces to a
porous or soft surface, damage will occur during removal.
3) A CF piece that is removed will likely be stretched or damaged to some extent, so you should only
remove it if you no longer want the look.

Mais conteúdo relacionado

Mais de EVANNEX Aftermarket Tesla Accessories

Mais de EVANNEX Aftermarket Tesla Accessories (20)

EVANNEX Glove Box Bumper Installation for Model S and X
EVANNEX Glove Box Bumper Installation for Model S and XEVANNEX Glove Box Bumper Installation for Model S and X
EVANNEX Glove Box Bumper Installation for Model S and X
 
EVANNEX Glove Box Bumper Installation
EVANNEX Glove Box Bumper InstallationEVANNEX Glove Box Bumper Installation
EVANNEX Glove Box Bumper Installation
 
EVANNEX - Kangaroo Pocket Installation for Tesla Model S
EVANNEX - Kangaroo Pocket Installation for Tesla Model SEVANNEX - Kangaroo Pocket Installation for Tesla Model S
EVANNEX - Kangaroo Pocket Installation for Tesla Model S
 
JB Straubel Keynote
JB Straubel KeynoteJB Straubel Keynote
JB Straubel Keynote
 
Getting Ready for Model 3 by Roger Pressman - Table of Contents
Getting Ready for Model 3 by Roger Pressman - Table of ContentsGetting Ready for Model 3 by Roger Pressman - Table of Contents
Getting Ready for Model 3 by Roger Pressman - Table of Contents
 
EVANNEX LED Lighting Upgrade Kit for Tesla Model X
EVANNEX LED Lighting Upgrade Kit for Tesla Model XEVANNEX LED Lighting Upgrade Kit for Tesla Model X
EVANNEX LED Lighting Upgrade Kit for Tesla Model X
 
EVANNEX License Plate Frame Bracket for Tesla Model X
EVANNEX License Plate Frame Bracket for Tesla Model XEVANNEX License Plate Frame Bracket for Tesla Model X
EVANNEX License Plate Frame Bracket for Tesla Model X
 
EVANNEX Cubby Compartment Instructions for Tesla Model S and X
EVANNEX Cubby Compartment Instructions for Tesla Model S and XEVANNEX Cubby Compartment Instructions for Tesla Model S and X
EVANNEX Cubby Compartment Instructions for Tesla Model S and X
 
EVANNEX Cubby Compartment Instructions for Tesla Model S and X
EVANNEX Cubby Compartment Instructions for Tesla Model S and XEVANNEX Cubby Compartment Instructions for Tesla Model S and X
EVANNEX Cubby Compartment Instructions for Tesla Model S and X
 
EVANNEX EcoHitch for Tesla Model S Install Guide Final
EVANNEX EcoHitch for Tesla Model S Install Guide FinalEVANNEX EcoHitch for Tesla Model S Install Guide Final
EVANNEX EcoHitch for Tesla Model S Install Guide Final
 
EVANNEX EcoHitch for Tesla Model S Install Guide
EVANNEX EcoHitch for Tesla Model S Install GuideEVANNEX EcoHitch for Tesla Model S Install Guide
EVANNEX EcoHitch for Tesla Model S Install Guide
 
EVANNEX Rear Center Console for Tesla Model S Instructions
EVANNEX Rear Center Console for Tesla Model S InstructionsEVANNEX Rear Center Console for Tesla Model S Instructions
EVANNEX Rear Center Console for Tesla Model S Instructions
 
Rear Center Console Insert Installation Guide
Rear Center Console Insert Installation GuideRear Center Console Insert Installation Guide
Rear Center Console Insert Installation Guide
 
EVANNEX - Lighted Emblem Installation Guide for Tesla Model S
EVANNEX - Lighted Emblem Installation Guide for Tesla Model SEVANNEX - Lighted Emblem Installation Guide for Tesla Model S
EVANNEX - Lighted Emblem Installation Guide for Tesla Model S
 
Electric Vehicle University - MS 312 Tips for Model S Owners, Charging
Electric Vehicle University - MS 312 Tips for Model S Owners, ChargingElectric Vehicle University - MS 312 Tips for Model S Owners, Charging
Electric Vehicle University - MS 312 Tips for Model S Owners, Charging
 
Electric Vehicle University - 220b ECONOMICS OF EV OWNERSHIP
Electric Vehicle University - 220b ECONOMICS OF EV OWNERSHIPElectric Vehicle University - 220b ECONOMICS OF EV OWNERSHIP
Electric Vehicle University - 220b ECONOMICS OF EV OWNERSHIP
 
Electric Vehicle University - 220a ECONOMICS OF EV OWNERSHIP
Electric Vehicle University - 220a ECONOMICS OF EV OWNERSHIPElectric Vehicle University - 220a ECONOMICS OF EV OWNERSHIP
Electric Vehicle University - 220a ECONOMICS OF EV OWNERSHIP
 
Electric Vehicle University - 210b EV BATTERY TECHNOLOGY
Electric Vehicle University - 210b EV BATTERY TECHNOLOGYElectric Vehicle University - 210b EV BATTERY TECHNOLOGY
Electric Vehicle University - 210b EV BATTERY TECHNOLOGY
 
Electric Vehicle University - 210c EV BATTERY TECHNOLOGY
Electric Vehicle University - 210c EV BATTERY TECHNOLOGYElectric Vehicle University - 210c EV BATTERY TECHNOLOGY
Electric Vehicle University - 210c EV BATTERY TECHNOLOGY
 
Electric Vehicle University - 210a EV BATTERY TECHNOLOGY
Electric Vehicle University - 210a EV BATTERY TECHNOLOGYElectric Vehicle University - 210a EV BATTERY TECHNOLOGY
Electric Vehicle University - 210a EV BATTERY TECHNOLOGY
 

Último

Delhi Call Girls Vikaspuri 9711199171 ☎✔👌✔ Whatsapp Hard And Sexy Vip Call
Delhi Call Girls Vikaspuri 9711199171 ☎✔👌✔ Whatsapp Hard And Sexy Vip CallDelhi Call Girls Vikaspuri 9711199171 ☎✔👌✔ Whatsapp Hard And Sexy Vip Call
Delhi Call Girls Vikaspuri 9711199171 ☎✔👌✔ Whatsapp Hard And Sexy Vip Call
shivangimorya083
 
Call Girls in Shri Niwas Puri Delhi 💯Call Us 🔝9953056974🔝
Call Girls in  Shri Niwas Puri  Delhi 💯Call Us 🔝9953056974🔝Call Girls in  Shri Niwas Puri  Delhi 💯Call Us 🔝9953056974🔝
Call Girls in Shri Niwas Puri Delhi 💯Call Us 🔝9953056974🔝
9953056974 Low Rate Call Girls In Saket, Delhi NCR
 
Greenery-Palette Pitch Deck by Slidesgo.pptx
Greenery-Palette Pitch Deck by Slidesgo.pptxGreenery-Palette Pitch Deck by Slidesgo.pptx
Greenery-Palette Pitch Deck by Slidesgo.pptx
zohiiimughal286
 
如何办理女王大学毕业证(QU毕业证书)成绩单原版一比一
如何办理女王大学毕业证(QU毕业证书)成绩单原版一比一如何办理女王大学毕业证(QU毕业证书)成绩单原版一比一
如何办理女王大学毕业证(QU毕业证书)成绩单原版一比一
opyff
 
Vip Mumbai Call Girls Mira Road Call On 9920725232 With Body to body massage ...
Vip Mumbai Call Girls Mira Road Call On 9920725232 With Body to body massage ...Vip Mumbai Call Girls Mira Road Call On 9920725232 With Body to body massage ...
Vip Mumbai Call Girls Mira Road Call On 9920725232 With Body to body massage ...
amitlee9823
 
Rekha Agarkar Escorts Service Kollam ❣️ 7014168258 ❣️ High Cost Unlimited Har...
Rekha Agarkar Escorts Service Kollam ❣️ 7014168258 ❣️ High Cost Unlimited Har...Rekha Agarkar Escorts Service Kollam ❣️ 7014168258 ❣️ High Cost Unlimited Har...
Rekha Agarkar Escorts Service Kollam ❣️ 7014168258 ❣️ High Cost Unlimited Har...
nirzagarg
 
Vip Hot Call Girls 🫤 Mahipalpur ➡️ 9711199171 ➡️ Delhi 🫦 Whatsapp Number
Vip Hot Call Girls 🫤 Mahipalpur ➡️ 9711199171 ➡️ Delhi 🫦 Whatsapp NumberVip Hot Call Girls 🫤 Mahipalpur ➡️ 9711199171 ➡️ Delhi 🫦 Whatsapp Number
Vip Hot Call Girls 🫤 Mahipalpur ➡️ 9711199171 ➡️ Delhi 🫦 Whatsapp Number
kumarajju5765
 
一比一原版(UdeM学位证书)蒙特利尔大学毕业证学历认证怎样办
一比一原版(UdeM学位证书)蒙特利尔大学毕业证学历认证怎样办一比一原版(UdeM学位证书)蒙特利尔大学毕业证学历认证怎样办
一比一原版(UdeM学位证书)蒙特利尔大学毕业证学历认证怎样办
ezgenuh
 
Sales & Marketing Alignment_ How to Synergize for Success.pptx.pdf
Sales & Marketing Alignment_ How to Synergize for Success.pptx.pdfSales & Marketing Alignment_ How to Synergize for Success.pptx.pdf
Sales & Marketing Alignment_ How to Synergize for Success.pptx.pdf
Aggregage
 
Delhi Call Girls Mayur Vihar 9711199171 ☎✔👌✔ Whatsapp Hard And Sexy Vip Call
Delhi Call Girls Mayur Vihar 9711199171 ☎✔👌✔ Whatsapp Hard And Sexy Vip CallDelhi Call Girls Mayur Vihar 9711199171 ☎✔👌✔ Whatsapp Hard And Sexy Vip Call
Delhi Call Girls Mayur Vihar 9711199171 ☎✔👌✔ Whatsapp Hard And Sexy Vip Call
shivangimorya083
 
Vip Mumbai Call Girls Mumbai Call On 9920725232 With Body to body massage wit...
Vip Mumbai Call Girls Mumbai Call On 9920725232 With Body to body massage wit...Vip Mumbai Call Girls Mumbai Call On 9920725232 With Body to body massage wit...
Vip Mumbai Call Girls Mumbai Call On 9920725232 With Body to body massage wit...
amitlee9823
 
一比一原版(UVic学位证书)维多利亚大学毕业证学历认证买留学回国
一比一原版(UVic学位证书)维多利亚大学毕业证学历认证买留学回国一比一原版(UVic学位证书)维多利亚大学毕业证学历认证买留学回国
一比一原版(UVic学位证书)维多利亚大学毕业证学历认证买留学回国
ezgenuh
 
Call Girls Bangalore Just Call 👗 7737669865 👗 Top Class Call Girl Service Ban...
Call Girls Bangalore Just Call 👗 7737669865 👗 Top Class Call Girl Service Ban...Call Girls Bangalore Just Call 👗 7737669865 👗 Top Class Call Girl Service Ban...
Call Girls Bangalore Just Call 👗 7737669865 👗 Top Class Call Girl Service Ban...
amitlee9823
 

Último (20)

ENJOY Call Girls In Okhla Vihar Delhi Call 9654467111
ENJOY Call Girls In Okhla Vihar Delhi Call 9654467111ENJOY Call Girls In Okhla Vihar Delhi Call 9654467111
ENJOY Call Girls In Okhla Vihar Delhi Call 9654467111
 
Delhi Call Girls Vikaspuri 9711199171 ☎✔👌✔ Whatsapp Hard And Sexy Vip Call
Delhi Call Girls Vikaspuri 9711199171 ☎✔👌✔ Whatsapp Hard And Sexy Vip CallDelhi Call Girls Vikaspuri 9711199171 ☎✔👌✔ Whatsapp Hard And Sexy Vip Call
Delhi Call Girls Vikaspuri 9711199171 ☎✔👌✔ Whatsapp Hard And Sexy Vip Call
 
Call Girls in Shri Niwas Puri Delhi 💯Call Us 🔝9953056974🔝
Call Girls in  Shri Niwas Puri  Delhi 💯Call Us 🔝9953056974🔝Call Girls in  Shri Niwas Puri  Delhi 💯Call Us 🔝9953056974🔝
Call Girls in Shri Niwas Puri Delhi 💯Call Us 🔝9953056974🔝
 
How To Troubleshoot Mercedes Blind Spot Assist Inoperative Error
How To Troubleshoot Mercedes Blind Spot Assist Inoperative ErrorHow To Troubleshoot Mercedes Blind Spot Assist Inoperative Error
How To Troubleshoot Mercedes Blind Spot Assist Inoperative Error
 
John Deere 335 375 385 435 Service Repair Manual
John Deere 335 375 385 435 Service Repair ManualJohn Deere 335 375 385 435 Service Repair Manual
John Deere 335 375 385 435 Service Repair Manual
 
Greenery-Palette Pitch Deck by Slidesgo.pptx
Greenery-Palette Pitch Deck by Slidesgo.pptxGreenery-Palette Pitch Deck by Slidesgo.pptx
Greenery-Palette Pitch Deck by Slidesgo.pptx
 
如何办理女王大学毕业证(QU毕业证书)成绩单原版一比一
如何办理女王大学毕业证(QU毕业证书)成绩单原版一比一如何办理女王大学毕业证(QU毕业证书)成绩单原版一比一
如何办理女王大学毕业证(QU毕业证书)成绩单原版一比一
 
Vip Mumbai Call Girls Mira Road Call On 9920725232 With Body to body massage ...
Vip Mumbai Call Girls Mira Road Call On 9920725232 With Body to body massage ...Vip Mumbai Call Girls Mira Road Call On 9920725232 With Body to body massage ...
Vip Mumbai Call Girls Mira Road Call On 9920725232 With Body to body massage ...
 
Rekha Agarkar Escorts Service Kollam ❣️ 7014168258 ❣️ High Cost Unlimited Har...
Rekha Agarkar Escorts Service Kollam ❣️ 7014168258 ❣️ High Cost Unlimited Har...Rekha Agarkar Escorts Service Kollam ❣️ 7014168258 ❣️ High Cost Unlimited Har...
Rekha Agarkar Escorts Service Kollam ❣️ 7014168258 ❣️ High Cost Unlimited Har...
 
What Causes BMW Chassis Stabilization Malfunction Warning To Appear
What Causes BMW Chassis Stabilization Malfunction Warning To AppearWhat Causes BMW Chassis Stabilization Malfunction Warning To Appear
What Causes BMW Chassis Stabilization Malfunction Warning To Appear
 
Vip Hot Call Girls 🫤 Mahipalpur ➡️ 9711199171 ➡️ Delhi 🫦 Whatsapp Number
Vip Hot Call Girls 🫤 Mahipalpur ➡️ 9711199171 ➡️ Delhi 🫦 Whatsapp NumberVip Hot Call Girls 🫤 Mahipalpur ➡️ 9711199171 ➡️ Delhi 🫦 Whatsapp Number
Vip Hot Call Girls 🫤 Mahipalpur ➡️ 9711199171 ➡️ Delhi 🫦 Whatsapp Number
 
一比一原版(UdeM学位证书)蒙特利尔大学毕业证学历认证怎样办
一比一原版(UdeM学位证书)蒙特利尔大学毕业证学历认证怎样办一比一原版(UdeM学位证书)蒙特利尔大学毕业证学历认证怎样办
一比一原版(UdeM学位证书)蒙特利尔大学毕业证学历认证怎样办
 
design a four cylinder internal combustion engine
design a four cylinder internal combustion enginedesign a four cylinder internal combustion engine
design a four cylinder internal combustion engine
 
Sales & Marketing Alignment_ How to Synergize for Success.pptx.pdf
Sales & Marketing Alignment_ How to Synergize for Success.pptx.pdfSales & Marketing Alignment_ How to Synergize for Success.pptx.pdf
Sales & Marketing Alignment_ How to Synergize for Success.pptx.pdf
 
(ISHITA) Call Girls Service Jammu Call Now 8617697112 Jammu Escorts 24x7
(ISHITA) Call Girls Service Jammu Call Now 8617697112 Jammu Escorts 24x7(ISHITA) Call Girls Service Jammu Call Now 8617697112 Jammu Escorts 24x7
(ISHITA) Call Girls Service Jammu Call Now 8617697112 Jammu Escorts 24x7
 
Stay Cool and Compliant: Know Your Window Tint Laws Before You Tint
Stay Cool and Compliant: Know Your Window Tint Laws Before You TintStay Cool and Compliant: Know Your Window Tint Laws Before You Tint
Stay Cool and Compliant: Know Your Window Tint Laws Before You Tint
 
Delhi Call Girls Mayur Vihar 9711199171 ☎✔👌✔ Whatsapp Hard And Sexy Vip Call
Delhi Call Girls Mayur Vihar 9711199171 ☎✔👌✔ Whatsapp Hard And Sexy Vip CallDelhi Call Girls Mayur Vihar 9711199171 ☎✔👌✔ Whatsapp Hard And Sexy Vip Call
Delhi Call Girls Mayur Vihar 9711199171 ☎✔👌✔ Whatsapp Hard And Sexy Vip Call
 
Vip Mumbai Call Girls Mumbai Call On 9920725232 With Body to body massage wit...
Vip Mumbai Call Girls Mumbai Call On 9920725232 With Body to body massage wit...Vip Mumbai Call Girls Mumbai Call On 9920725232 With Body to body massage wit...
Vip Mumbai Call Girls Mumbai Call On 9920725232 With Body to body massage wit...
 
一比一原版(UVic学位证书)维多利亚大学毕业证学历认证买留学回国
一比一原版(UVic学位证书)维多利亚大学毕业证学历认证买留学回国一比一原版(UVic学位证书)维多利亚大学毕业证学历认证买留学回国
一比一原版(UVic学位证书)维多利亚大学毕业证学历认证买留学回国
 
Call Girls Bangalore Just Call 👗 7737669865 👗 Top Class Call Girl Service Ban...
Call Girls Bangalore Just Call 👗 7737669865 👗 Top Class Call Girl Service Ban...Call Girls Bangalore Just Call 👗 7737669865 👗 Top Class Call Girl Service Ban...
Call Girls Bangalore Just Call 👗 7737669865 👗 Top Class Call Girl Service Ban...
 

EVANNEX Tesla Model S Accent-E Lower Installation

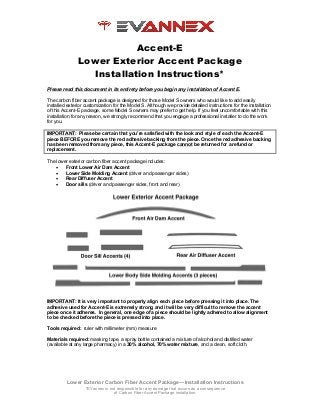
  • 1. Lower Exterior Carbon Fiber Accent Package—Installation Instructions *EVannex is not responsible for any damage that occurs as a consequence of Carbon Fiber Accent Package installation. Accent-E Lower Exterior Accent Package Installation Instructions* Please read this document in its entirety before you begin any installation of Accent E. The carbon fiber accent package is designed for those Model S owners who would like to add easily installed exterior customization for the Model S. Although we provide detailed instructions for the installation of this Accent-E package, some Model S owners may prefer to get help. If you feel uncomfortable with this installation for any reason, we strongly recommend that you engage a professional installer to do the work for you. IMPORTANT: Please be certain that you’re satisfied with the look and style of each the Accent-E piece BEFORE you remove the red adhesive backing from the piece. Once the red adhesive backing has been removed from any piece, this Accent-E package cannot be returned for a refund or replacement. The lower exterior carbon fiber accent package includes: • Front Lower Air Dam Accent • Lower Side Molding Accent (driver and passenger sides) • Rear Diffuser Accent • Door sills (driver and passenger sides, front and rear) IMPORTANT: It is very important to properly align each piece before pressing it into place. The adhesive used for Accent-E is extremely strong and it will be very difficult to remove the accent piece once it adheres. In general, one edge of a piece should be lightly adhered to allow alignment to be checked before the piece is pressed into place. Tools required: ruler with millimeter (mm) measure Materials required: masking tape, a spray bottle contained a mixture of alcohol and distilled water (available at any large pharmacy) in a 30% alcohol, 70% water mixture, and a clean, soft cloth.
  • 2. Lower Exterior Carbon Fiber Accent Package—Installation Instructions *EVannex is not responsible for any damage that occurs as a consequence of Carbon Fiber Accent Package installation. GENERIC INSTALLATION COMMENTS 1. It is very important to properly align each Accent-E piece before pressing it into place. The adhesive used for Accent-E is extremely strong and it will be very difficult to remove the accent piece once it adheres. 2. You can use blue painter’s tape or masking tape to provide temporary support for the piece as you work on alignment and installation, removing it as you apply step 3. 3. In order to avoid problems, we advise installing each Accent-E piece “incrementally.” By this, we mean that you should remove only a small portion of the red adhesive backing material (exposing only a small part of the adhesive surface), then align one edge of each piece, again checking alignment of the edge and adjacent edges. Work slowly to affix the material in steps while pulling the red backing off. Use a soft clean cloth the press the part into place. You can use a spray bottle with distilled water, spraying it on the adhesive surface to reduce stickiness a bit until it evaporates, but it isn't necessary if you work carefuly. LOWER SIDE MOLDING ACCENTS Step 1. Clean each lower side molding using soap and water to remove road debris. Dry with a cloth. Then, clean again using the alcohol-water mixture. Allow to dry. Step 2. The lower side molding comes in three pieces for both the driver and passenger sides of the Model S. Layout the side moldings to be sure that you have them properly oriented for the side on which they will be installed. See photo. Step 3a. Begin with the rear side molding piece. The upper edge of the side molding piece abuts the upper edge of the black side molding and then runs along the chrome below the doors. Adhere the top edge first and then once you're satisfied with fit, press down with a soft cloth to finalize the adhesion. Step 3b.Butt the center piece against the rear side molding you just installed and against the chrome molding below the doors. Incrementally remove the red adhesive backing being sure that the top of the piece abuts the chrome edge below the doors. Once you're satisfied with fit, press down with a soft close to finalize the adhesion. Step 3c. Place the small front piece into place, abutting it to the center piece. Note that the top edge of the front piece nearest the front door opening line has a slightly larger radius than the front edge of the piece. REAR DIFFUSER ACCENT Step 4. Clean each lower side molding using soap and water to remove road debris. Dry with a cloth. Clean the black rear diffuser area using an alcohol-water mix. Allow to dry. The rear diffuser accent is composed of a Carbon Fiber insert and a ‘chrome’ frame. The accents are
  • 3. Lower Exterior Carbon Fiber Accent Package—Installation Instructions *EVannex is not responsible for any damage that occurs as a consequence of Carbon Fiber Accent Package installation. centered between the two Model S rear reflectors. The curvature on the right and left sides of the accent is parallel to the inside curve of right and left reflectors. Step 5. Measure ~10 mm from the top of the curve on the existing model S bumper (the black part). Step 5. Used two small pieces of masking tape to mark the 10 mm line (see photo below). Run a long piece of masking tape along the line between the two small pieces of tape so that the bottom of the masking tape is 18 mm from the top of the bumper curve. Check to ensure that the masking tape line is parallel to the original equipment rear chrome accent below and is centered between the reflectors. Step 6. Remove the red adhesive backing incrementally from the Carbon fiber insert. You can use blue painter’s tape or masking tape to help align and center the accent. Step 7. Align the top of the insert along the bottom of the masking tape line that you created in step 5. The left and right edges of the Carbon fiber insert should be approximately 10 mm from the curve near the red reflectors as shown in the photo below. Remove the red adhesive backing incrementally and press only on the top edge of the insert so that if you have to adjust or re-center it you'll be able to remove and readjust.
  • 4. Lower Exterior Carbon Fiber Accent Package—Installation Instructions *EVannex is not responsible for any damage that occurs as a consequence of Carbon Fiber Accent Package installation. Step 8. Once inserted and properly aligned in place, press down to finalize the adhesion. Step 9. Remove the red adhesive backing from the chrome frame incrementally moving left to right and then carefully fit the chrome frame around the carbon fiber insert beginning the left side at the top and moving slowly toward the right checking alignment and spacing as you go. The ‘chrome’ frame should butt up directly against the frame. Step 10. When you’re happy with alignment of the chrome frame, press down firmly to finalize adhesion. FRONT AND REAR DOOR SILL ACCENTS The front and rear door sill accents are placed on the door sill. The front door sill accent is placed approximately 4 inches from the existing seam in the door sill nearest the B pillar. However, placement can be varied depending on your own aesthetic. The rear door sills are placed in the flat spot of the rear door sill. Again, placement can vary depending on your personal aesthetic. We recommend placing each of the sill pieces on the sill before you remove the red adhesive backing to determine where they look best to you. FRONT AIR DAM (SPLITTER) ACCENT The front air dam (splitter) accent covers the entire top of the black insert at the bottom of the air dam.
  • 5. Lower Exterior Carbon Fiber Accent Package—Installation Instructions *EVannex is not responsible for any damage that occurs as a consequence of Carbon Fiber Accent Package installation. Step 11. Use soap and water to clean the nosecone removing any road debris. Then, re-clean the entire nose cone using the alcohol-water mixture and a soft cloth. Allow to dry. Step 12. Before you remove the red adhesive backing, use masking to to position the splitter accent to be sure it’s properly centered on the splitter. You can use a water soluble market to place a small mark at each end of the accent piece for final positioning. Step 13. Remove the red adhesive backing from the back of the splitter insert in an incremental manner. Carefully align the splitter insert on the black insert, being sure it is properly centered, and press into place. Uses soft cloth to finalize the installation. REMOVAL OF THE CF ACCENTS Accent-E pieces are designed for permanent adhesion, so they're not easy to remove (that's the whole idea). But it can be done. Starting at a corner, use a plastic putty knife or professional auto panel removal tool (i.e., a sharp plastic edge) and pry up the corner. You can heat the CF surface with a hair drier -- NOT a heat gun -- and this will help by making the material slightly more pliable. Then, working methodically, use the sharp plastic edge and work inward, pulling the material up as you go. DO NOT use a metal edge! It’s important to note a few things: 1) Some of the adhesive will be left on the surface. This can be removed by rolling it up with the sharp plastic edge or even your fingernail; the original surface can then be cleaned with acetone to remove any final adhesive smudges. 2) It's unlikely that you'll damage the automotive surface beneath the CF piece, but it can happen if you scratch the surface while removing the adhesive. Be careful! Also, if you adhere the pieces to a porous or soft surface, damage will occur during removal. 3) A CF piece that is removed will likely be stretched or damaged to some extent, so you should only remove it if you no longer want the look.