1. AMAR SAJJAD, SALMAN SADIQ, MUHAMMAD RIZWAN, ADBUL RAHMAN, MUHAFIZ GHOGARI 1
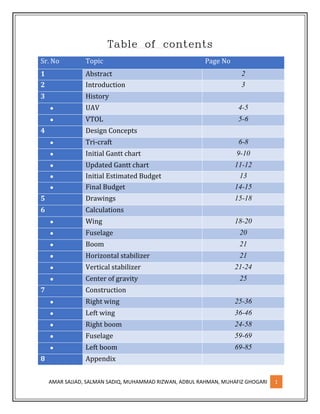
Table of contents
Sr. No Topic Page No
1 Abstract 2
2 Introduction 3
3 History
UAV 4-5
VTOL 5-6
4 Design Concepts
Tri-craft 6-8
Initial Gantt chart 9-10
Updated Gantt chart 11-12
Initial Estimated Budget 13
Final Budget 14-15
5 Drawings 15-18
6 Calculations
Wing 18-20
Fuselage 20
Boom 21
Horizontal stabilizer 21
Vertical stabilizer 21-24
Center of gravity 25
7 Construction
Right wing 25-36
Left wing 36-46
Right boom 24-58
Fuselage 59-69
Left boom 69-85
8 Appendix
2. AMAR SAJJAD, SALMAN SADIQ, MUHAMMAD RIZWAN, ADBUL RAHMAN, MUHAFIZ GHOGARI 2
Parametric study 1 86-87
Parametric study 2 87-88
Tools required 88
9 Recommendations and conclusion 89-90
10 References 91
3. AMAR SAJJAD, SALMAN SADIQ, MUHAMMAD RIZWAN, ADBUL RAHMAN, MUHAFIZ GHOGARI 3
Abstract
Our group has decided on making an aircraft which will have three motors and
will be able to have vertical takeoff as well as horizontal takeoff. Two motors
should be 90 degree rotatable and will be fixed at the front part of the booms.
This type of aircraft can be used in various applications such as military,
surveillance and business. In this project we were first required to present the
idea which we have, give the proposal and parametric studies and show the
AutoCAD design of the approved model. This aircraft is made from scratch and
all the dimensions, material selection and calculations are shown in this report.
4. AMAR SAJJAD, SALMAN SADIQ, MUHAMMAD RIZWAN, ADBUL RAHMAN, MUHAFIZ GHOGARI 4
Introduction
In this project we made a UAV from a scratch which will be capable of vertical
takeoff as well as horizontal takeoff. UAV stands for unmanned aerial vehicle
which means that the aircraft is controlled by a remote or transmitter from the
ground. There are basically two categories in the UAV one is the autonomous
UAV and other is the remotely piloted aircrafts. The one which we made is
remotely piloted aircraft and it will use aerodynamic forces to lift it and
perform different maneuvers.
The aircraft will have 3 motors which will power it and out of the 3 motors 2
will be 90 degree rotatable and will be fixed at the front section of the booms.
The third motor will be used to provide balance and stability to the aircraft
during the vertical takeoff. The third motor will stop once the aircraft starts a
horizontal flight. This motor will support the aircraft in the air while the motors
rotate 90 degrees for the horizontal flight (transition point).
In this report we have included all the previous designs that we had and the
differences between them. We have also included the different parametric
studies which match with our model. All the construction steps and procedures
are discussed in this report along with the problems we faced and how we
rectified those problem. All the materials we have selected for each part of the
aircraft and which tools we used to work on them is also mentioned. We have
also mentioned the electrical equipment’s we used and the calculations which
represent the required power of batteries and motors. In this report, we have
also shown the initial Gantt chart and the updated Gantt chart of the group and
the explanations and reasons for the failure to complete the certain task on
time.
5. AMAR SAJJAD, SALMAN SADIQ, MUHAMMAD RIZWAN, ADBUL RAHMAN, MUHAFIZ GHOGARI 5
History of UAV
Using bats to carry incendiary bombs into enemy territory wasn't a good idea,
and it wasn't the first bad idea in the
history of unmanned aerial vehicles
(UAVs). During the American Civil
War, an inventor patented an
unmanned balloon that carried
explosives that could be dropped
after a time-delay fuse mechanism
triggered the basket to overturn its
contents. Air currents and weather
patterns made it difficult to estimate
for how long to set the fuse, and the balloon was never successfully deployed.
By 1883, the first aerial photograph was taken using a kite, a camera and a very
long string attached to the shutter-release of the camera. In 1898, this
technology was put to use in the Spanish-American War, resulting in the first
military aerial reconnaissance photos.
World War I saw the development and testing of various radio-controlled
unmanned aircraft, but none emerged from the testing phase in time to be used
before the war ended.
In the- 1930s, the British Royal Navy developed a primitive, radio-controlled
UAV: the Queen Bee. The Queen Bee could be landed for future reuse and could
reach speeds of 100 mph (160 km/h). Instead of being used offensively though,
the Queen Bee primarily served as aerial target practice for British pilots.
During World War II, Nazis developed a UAV to be used against nonmilitary
targets. The Revenge Weapon 1, an unmanned flying bomb better known as the
V-1, could reach speeds of almost 500 mph (804 km/h), carry 2,000 pounds
(907 kilograms) of explosives and could travel 150 miles (241 kilometers)
before releasing its ordnance. Its wingspan was about 20 feet (6 m), and it
measured nearly 25 feet (7.6 m) long. In towns and cities across Britain, the V-
1 was responsible for more than 900 civilian deaths and 35,000 injured
civilians [source: NOVA].
Figure 1- Presentation
6. AMAR SAJJAD, SALMAN SADIQ, MUHAMMAD RIZWAN, ADBUL RAHMAN, MUHAFIZ GHOGARI 6
In the 1960s and 70s, the United States flew more than 34,000 surveillance
flights using the AQM-34 Ryan Firebee, a UAV launched from a host plane and
controlled by operators within that plane. The U.S. also employed UAVs called
Lightning Bugs that were released from airborne C-130s for missions over
China and Vietnam. Engineers from the manufacturer operated the aircraft
with a joystick control.
In the late 1970s and 80s, Israel developed the Scout and the Pioneer, which
represented a shift t-oward the lighter, glider-type model of UAV in use today.
The Scout was notable for its ability to transmit live video with a 360-degree
view of the terrain. The small size of these UAVs made them inexpensive to
produce and difficult to shoot down.
The U.S. acquired Pioneer UAVs from Israel and used them in the Gulf War. On
at least one occasion, Iraqi soldiers attempted to surrender to one of the UAVs
as it flew overhead [source: NOVA]
Although UAV technology saw sporadic development throughout the 20th
century, it wasn't until the Predator drone arrived on the scene that unmanned
aerial vehicles earned a permanent place in the arsenal. To understand the
Reaper, it'll help us to know a little about its direct predecessor, the MQ-1
Predator. We'll read about this landmark UAV next.
History of VTOL Aircrafts
In addition to the helicopter, many approaches have been tried to develop
practical aircraft with vertical take-off and landing capabilities. Nikola Tesla
patented a vertical take-off and landing vehicle concept in 1921.
In May 1951, both Lockheed and Convair were awarded contracts in the
attempt to design, construct, and test two experimental VTOL fighters.
Lockheed produced the XFV, and Convair producing the Convair XFY Pogo. Both
experimental programs proceeded to flight status and completed test flights
1954–1955, when the contracts were cancelled. Similarly, the X-13 flew a series
of test flights between 1955 and 1957, but also suffered the same fate.
The use of vertical fans driven by engines was investigated in the 1950s. The
US built an aircraft where the jet exhaust drove the fans, while British projects
not built included fans driven by mechanical drives from the jet engines.
7. AMAR SAJJAD, SALMAN SADIQ, MUHAMMAD RIZWAN, ADBUL RAHMAN, MUHAFIZ GHOGARI 7
NASA has flown other VTOL craft such as the Bell XV-15 research craft (1977),
as have the Soviet Navy and Luftwaffe. Sikorsky tested an aircraft dubbed the
X-Wing, which took off in the manner of a helicopter. The rotors would become
stationary in mid-flight, and function as wings, providing lift in addition to the
static wings. Boeing X-50 is a Canard Rotor/Wing prototype that utilizes a
similar concept.
A different British VTOL project was the gyrodyne, where a rotor is powered
during take-off and landing but which then freewheels during flight, with
separate propulsion engines providing forward thrust. Starting with the Fairey
Gyrodyne, this type of aircraft later evolved into the much larger twin-engined
Fairey Rotodyne, that used tipjets to power the rotor on take-off and landing
but which then used two Napier Eland turboprops driving conventional
propellers mounted on substantial wings to provide propulsion, the wings
serving to unload the rotor during horizontal flight. The Rotodyne was
developed to combine the efficiency of a fixed-wing aircraft at cruise with the
VTOL capability of a helicopter to provide short haul airliner service from city
centers to airports.
Design concept
Figure 2 Tri craft from top
8. AMAR SAJJAD, SALMAN SADIQ, MUHAMMAD RIZWAN, ADBUL RAHMAN, MUHAFIZ GHOGARI 8
Figure 3 Tricraft from side
Figure 4- Tri craft from side
9. AMAR SAJJAD, SALMAN SADIQ, MUHAMMAD RIZWAN, ADBUL RAHMAN, MUHAFIZ GHOGARI 9
Figure 5 Tricraft from front
The aircraft shown above is the aircraft we are going to make in the project.
We named it Tri-craft as it has three engines. The front two engines will be
movable and the third engine will be fixed. According to our plan the first two
engines should be placed at the front section of the boom and these two motors
will be rotatable. The third motor which is fixed at the back section of fuselage
will not be rotatable and this motor will be used to provide balance and stability
during the vertical takeoff.
10. AMAR SAJJAD, SALMAN SADIQ, MUHAMMAD RIZWAN, ADBUL RAHMAN, MUHAFIZ GHOGARI 10
Initial Gantt chart
7-Sep-15 17-Sep-1527-Sep-15 7-Oct-15 17-Oct-1527-Oct-156-Nov-1516-Nov-1526-Nov-156-Dec-15
Making of proposal
Calculations
Purchasing
Construction and AutoCAD
Testing and Modification
Final report
Presentation
Project Gantt Chart
TASK Start Date Duration End Date
Making of proposal 7-Sep-15 10 16-Sep-15
Calculations 17-Sep-15 16 2-Oct-15
Purchasing 3-Oct-15 6 8-Oct-15
Construction and AutoCAD 9-Oct-15 21 29-Oct-15
Testing and Modification 30-Oct-15 10 8-Nov-15
Final report 9-Nov-15 8 16-Nov-15
Presentation 25-Nov-15 12 6-Dec-15
11. AMAR SAJJAD, SALMAN SADIQ, MUHAMMAD RIZWAN, ADBUL RAHMAN, MUHAFIZ GHOGARI 11
Explanation (Initial Gantt Chart)
As the table above shows, it will took us 10 days to make a proposal and
submit. The reason for such a long time to make a proposal is that we
decided to make a group of 5 members and the proposals we were coming
with did not accommodate the use of 5th member. We tried to make different
model proposals and speak to Mr. Omar Chafiq which is why it took us that
long to get our proposal approved.
The duration for our calculation is 16 days as shown above. As we got our
proposal approved of Tri-craft, it consists of twin boom, twin rudder and has
3 motors out of which 2 will be movable. Because of the so many different
parts of the aircraft, it took us that long to do the research and get the
calculations done for each and every part.
Purchasing will be done in 6 days because we might need to go at different
shops and we have no plan of ordering online because everything is
available in ACE hardware and hobby ultimate.
It will take us 21 days to finish construction and AutoCAD because we have
no previous experience in making a aircraft and working with such tools.
Also, we planned on giving on 3 days a week for construction as we need to
focus on other subjects as well.
We will test the aircraft as soon as its ready and the time allocated for testing
and modification is 10 days. All this time is basically for modification which
we might need to do after testing.
The final report and presentation will take us 20 days combined since we
need to make sure everything is perfect in report and presentation. The
report will be lengthy as we plan on talking about each and every detail and
we will keep plenty of time for presentation as well since this will matter our
final grade.
12. AMAR SAJJAD, SALMAN SADIQ, MUHAMMAD RIZWAN, ADBUL RAHMAN, MUHAFIZ GHOGARI 12
Updated Gantt chart
10
12
18
44
5
7
7
2
2
7-Sep 17-Sep 27-Sep 7-Oct 17-Oct 27-Oct 6-Nov 16-Nov 26-Nov 6-Dec
Making of proposal
Calculations
Purchasing
Construction and AutoCAD
Programming
Testing and Modification
Assignments
Final report
Presentation
Project Gantt chart
TASK Start Date Duration End Date
Making of proposal 7-Sep-15 10 16-Sep-15
Calculations 17-Sep-15 12 28-Sep-15
Purchasing 3-Oct-15 18 20-Oct-15
Construction and AutoCAD 5-Oct-15 44 18-Nov-15
Programming 19-Nov-15 5 23-Nov-15
Testing and Modification 24-Nov-15 7 30-Nov-15
Assignments 1-Dec-15 7 7-Dec-15
Final report 7-Dec-15 2 8-Dec-15
Presentation 8-Dec-15 2 9-Dec-15
13. AMAR SAJJAD, SALMAN SADIQ, MUHAMMAD RIZWAN, ADBUL RAHMAN, MUHAFIZ GHOGARI 13
Explanation (Updated Gantt Chart)
It took us 4 days less to finish all the calculations. We found most of the
information online from one website due to which we saved our time for
calculation.
It took us 18 days to finish purchasing as we had to go around in all the
branches of ACE hardware and hobby shops. Also major reason of so much
time in purchasing is because we ordered many stuff online.
Construction took us a lot of time as it took us longer to find appropriate
material and also some of the members were working with plywood which
takes longer to file and shape. Another reason for so much time in
construction is because we had to think and make a new mechanism for 90
degree rotation in which we made mistake twice and remade it again.
It took us 4 days for programming also. If u see the initial Gantt chart you
will know that we did not count time for programming as we were planning
to get it done from some technician. Then later on we decided that since
we’re making this whole aircraft from scratch and on our own we should
also try to do the programming my ourselves which took us 4 days to
complete. Also we had to learn various functions of the transmitter which
contributes in more time waste.
The assignments were very lengthy and we had holiday for National day
celebration which is why we were so late for assignments and report. Also
another reason is that we had to do Monokote on our aircraft by ourselves
which took us one complete day since no technician was ready to complete
it in 3 days.
14. AMAR SAJJAD, SALMAN SADIQ, MUHAMMAD RIZWAN, ADBUL RAHMAN, MUHAFIZ GHOGARI 14
Initial Budget Estimation
Material Cost (AED)
Tools 500
Balsa wood 350
Bass wood 100
Plywood 140
Struts 50
Ailerons 30
Motor X 3 1500
Battery X 3 900
ESC X 3 450
Propeller X 3 60
Servos 800
Wires 400
Push rods 90
Hinges 100
Drill machine 300
Drill bits 120
Sand paper 150
Transmitter 1300
Landing gear 150
Monokote 250
Total 7740
The budget calculation we did initially was 7740 but despite of that we kept
our budget as 8000 to make sure we can cover all the damage, waste or some
changes throughout the project.
15. AMAR SAJJAD, SALMAN SADIQ, MUHAMMAD RIZWAN, ADBUL RAHMAN, MUHAFIZ GHOGARI 15
Final budget estimation
Material Cost (AED)
Tools 350
Balsa wood 400
Bass wood 140
Plywood 200
Struts 50
Carbon fiber rod 70
Brass rod 25
Ailerons 30
Motor X 3 900
Battery X 3 655
ESC X 3 300
Propeller X 3 60
Servos 400
Wires 350
Push rods 90
Hinges 40
Drill bits 60
Sand paper 220
Transmitter 410
Landing gear 20
Monokote 150
Total 4920
The overall budget decreased drastically because we ordered most of the stuff
from the Hobby Gulf website which was way cheaper. Muhammad Rizwan
provided us with most of the tools including the drilling machine and some of
16. AMAR SAJJAD, SALMAN SADIQ, MUHAMMAD RIZWAN, ADBUL RAHMAN, MUHAFIZ GHOGARI 16
the drill bits which is why we saved a lot of money on this. The hinges we used
are plastic paper hinges which is cheap as compared to other heavy hinges. As
we were very late for the submission of aircraft for Monokote, we did the
Monokote on our own which saved us the job fees of technician. Some material
was wasted because of the mistakes by all of us so we had to purchase more
material which cost us more than the initial budget for woods. Despite of the
finial budget shown above, we spent the total amount of AED 6000 which
includes the money for fuel as we had to go around a lot for shopping.
Engineering drawing
The aircraft that we made is purely electrical as all the components that we
have used are electrical. The electrical components consist of the following:
1. Servos: 2 for the rotating motors, 2 for the rudders, 2 for the aileron for left
wing and right wing and 1 for the elevator. The servo is Futaba 3003 and it
is capable of handling loads as much as 4 KG.
2. Batteries: 3 batteries we have used 1 for each motor. The center battery is
3300 mAh and the other two batteries which are inside right and left
booms are of 2600 mAh.
Figure 7- Servo placement
Figure 6- Batteries
17. AMAR SAJJAD, SALMAN SADIQ, MUHAMMAD RIZWAN, ADBUL RAHMAN, MUHAFIZ GHOGARI 17
3. ESC (Electronic speed control): we used 3 ESC’s as we have 3 motors so 1
ESC for each motor. The ESC is of 40A and it is suitable for our motor.
Figure 8- ESC
4. Receiver: which will receive the signals from the transmitter. It have
different ports for 9 channels.
Figure 9- Receiver
19. AMAR SAJJAD, SALMAN SADIQ, MUHAMMAD RIZWAN, ADBUL RAHMAN, MUHAFIZ GHOGARI 19
Explanation:
The schematic diagram above shows that there are basically 3 batteries in the
circuit. Two batteries of same power are powering the motors which are
rotatable and are attached with booms and the third battery will be in the
fuselage and power the center motor, all the seven servos, receiver and the
center ESC. The diagram above also shows that there is a receiver whose job is
to receive signal from the transmitter, this receiver has 9 channels and there
are extension cables attached to each channel for the specific servo or motor.
The first channel is for the ailerons, second channel is for elevator, third one is
for center motor, fourth one is for two rudders, and fifth channel is for the two
motors which are rotatable whereas the sixth channel is for rotation of the two
motors. The diagram above also shows us that there are three Y-connectors
which we used and this is because we want some of the servos to work together.
This will mean two servos which are connected together by a Y-connector will
actuate together with the help of single input from the transmitter.
Calculations:
Calculation part for wing
Span= 120 cm
Chord= 20 cm
Wing area = span x chord. (Equation 1)
As we know that our wing is not tapered hence there is no need to find the mac.
The wing area is 120 x 20 = 2400cm2 which is 0.24 m2.
Aspect ratio for our wing is span2/ area. (Equation 2)
Which is 1202/2400 = 6
Wing loading= weight of the aircraft/ area of the wing. (Equation 3)
Which is equal to = 3/0.24= 12.5
Now we need to find the area of the wing exposed and for if we see in our
aircraft there are 2 booms and a fuselage where the wing is un exposed/
covered and for this reason we find that the covered region of the wing is 22
cm, 6cm of boom from each side and 10 cm for the fuselage. Since we have our
reference area of the wing which is 0.24 so we find the area exposed as
Span – area covered x chord will give us the area exposed which is = 98 x 20 =
0.196 m2 (Equation 4)
The next step is finding the lift.
20. AMAR SAJJAD, SALMAN SADIQ, MUHAMMAD RIZWAN, ADBUL RAHMAN, MUHAFIZ GHOGARI 20
L= 0.5x density x velocity2 x wing area reference x coefficient of lift.
Assuming that the velocity is 10 m/s
We also assume sea level conditions and they are mentioned below in the table
Temperature 287K
Pressure 101325 pa
Density 1.2250 kg/m3
Viscosity 1.4607 x 10⁻⁵
m2
/sec
We found from the graph of NACA 0012 that the coefficient of lift at 5 degrees
is 0.6194. The graph below shows cl at the point mentioned above:
Figure 11- Graph of CF vs Alpha
The reason for taking 5 degrees is because the aircraft wings is kept at positive
angle of attack.
0.5 x 1.2250 x 102x 0.24 x 0.6194= 9.10518 N (Equation 5)
After finding the lift we need to find the parasite drag coefficient and induced
drag coefficient.
First we find CDi and for that we need Reynolds number and the formula is
mentioned below:-
21. AMAR SAJJAD, SALMAN SADIQ, MUHAMMAD RIZWAN, ADBUL RAHMAN, MUHAFIZ GHOGARI 21
RN = cruise speed x length of the wing divided by viscosity (Equation 6)
which is
(10 x 0.98)/ 1.4607 x 10-5 = 670911
The cf value is 0.005
We find K as 1.27
Then we find the Swet= Sref x 2 x 1.02 (Equation 7)
0.24 x 2 x1.02 = 0.4896
The equation for CDP is (Cf x k x Swet)/ Sref (Equation 8)
Which is
(0.005 x 1.27 x 0.4896)/ 0.24 = 0.012954
Now we find CDi and the formula is CL2/π x AR x e (Equation 9)
e is the efficiency factor = 0.95
0.61942/ π x 6 x 0.95
Therefore CDi = 0.02142
Fuselage
RN= cruise speed x length of the fuselage divided by viscosity (Equation
6)
(10 x 0.48)/ 1.4607 x 10⁻⁵
RN = 328609.5708
Once we find RN fro table we can find Cf
Cf = 0.007
After finding Cf we can find the K factor.
K = 1.39
CDp = Cf x K x Swet/ Sref (Equation 10)
(0.007 x 1.39 x 0.4896)/0.24
CDp = 0.00198492
Fuselage sizing
The length of the fuselage must be calculated by using the formula mentioned
below
Length of the fuselage = aWoc (Equation 11)
0.333 x 30.41 = 0.5224m
The reason for making the fuselage smaller is because we need to reduce the
nose weight of the aircraft and also accommodate the motor for the aircraft to
do the VTOL.
22. AMAR SAJJAD, SALMAN SADIQ, MUHAMMAD RIZWAN, ADBUL RAHMAN, MUHAFIZ GHOGARI 22
Boom
Length of the boom = 0.70
RN = cruise speed x length of the boom divided by viscosity (Equation 6)
RN = (10 x 0.70)/ 1.4607 x 10-5 = 479222.2907
Assuming the Cf as 0.006
K = 1.33
CDp = 0.006 x 1.33 x 0.4896 x 0.24 = 0.0162792
Horizontal stabilizers
L = 51 cm
Chord = 10 cm
We find the Sref by using the formula of the wing area which is
Wing area = span x chord. (Equation 1)
51 x 10 = 510 cm2 or 0.051m2
Then we find the aspect ratio by using the formula of
Aspect ratio for our wing is span2/ area. (Equation 2)
0.512/ 0.051 = 5.1
The 96 percent of the horizontal stabilizer is exposed which is 0.49m
We find the Reynold number and the equation is mentioned below.
RN = cruise speed x length of the horizontal stabilizer divided by viscosity
(Equation 6)
10 x 0.49/1.4607 x 10-5= 335455.6035
The Cf is 0.007
K = 1.39
Then we find the CDp of the stabilizers and the equation is
CDp = Cf x K x Swet/ Sref (Equation 10)
0.007 x x1.39 x 0.049/ 0.0051 = 0.009348431
Vertical stabilizers
L= 19 cm 0.62336 ft
Cr = 10 cm 0.328084 ft
Ct = 5cm 0.16404 ft
First we find the taper ratio which is
23. AMAR SAJJAD, SALMAN SADIQ, MUHAMMAD RIZWAN, ADBUL RAHMAN, MUHAFIZ GHOGARI 23
Ct/Cr = taper ratio (Equation 12)
Then we find the mac which is
mac= 2/3 x Cr x(1+ (Ct/Cr) –((Ct/Cr)/1+(Ct/Cr))) (Equation 13)
mac= 2/3 x 10 x(1+0.5 –(0.5/1+0.5)) = 7.77 cm or 1.89534121 ft
We take the value of µ from the graph
µ= 3.8 x 10⁻⁷
Then we find Reynolds number which is
RN = cruise speed x density x mac divided by viscosity (Equation 7)
RN= (0.002377 x 32.8084x 1.84584)/3.8 x 10-7= 378812.8385
The Cf value we obtain is 0.07
And then we find K as 1.39
The value of t that we find is 0.08
Then we find CDp and the formula is
CDp = Cf x K x Swet x t/ Sref (Equation 14)
1.39 x 0.007 x 0.08 x 0.135/ 0.1425
CDp = 0.000073743
Total CDp = 0.000073743 + 0.009348431 + 0.0162792 + 0.00198492 +
0.012954 = 0.040640294.
Total CD = CDp +CDi = 0.040640294 + 0.02142 = 0.062060294
D = ½ x density x velocity2 x area x coefficient of Drag (Equation 15)
0.5 x 1.2250 x 102 x 0.24 x 0.062060294 = 0.912 N
The lift to drag ratio can be calculated by using the lift which we got and divide
it by drag which is
9.10518 /0.912 = 9.98375N
Vcruise= 0.75 Vmax (Equation 16)
Assuming V max is 13.3
The cruising sped which we get is 10 m/s
Vstall = (1/0.5 x density x area x clmax) 0.5 (Equation 17)
After putting the values of CL max which is 0.8198 we get the Vstall as
8.71886m/s
Vtakeoff = 1.2 x Vstall (Equation 18)
1.2 x 8.71886 = 10.46m/s
Landing velocity = 1.23 x Vstall (Equation 19)
= 10.72 m/s
Thrust to take off = (bhp x n/ Vtakeoff) x 550 (Equation 20)
Considering the propeller is 50 percent efficient
24. AMAR SAJJAD, SALMAN SADIQ, MUHAMMAD RIZWAN, ADBUL RAHMAN, MUHAFIZ GHOGARI 24
(1000 x 0.5)/ 34.31 = 14.57 lbs appx 6 kg
Propeller sizing
D=kp 4Root of power
The max output from the motor is 1000
Where V is 16.8 and I is 54A
The number of propeller is 2
D= 1.7 x 4root of 1000 = 9.55cm
The reason we used this bigger propellers is because the greater and
aerodynamic the size of the propeller is the higher the mass flow comes into
the propeller and as we can see in equation 20 the required takeoff thrust is
around 6 kg so it is important to increase the size of the propeller as it is the
easiest and weight saving techniques that helps in provide greater amount of
thrust in lowest amount of RPM.
Endurance = Battery max / current max (Equation 21)
For boom we have 2600 mAh battery
2600 x 10 -3/ 44 = 3.5 minutes
For fuselage we have 3300 mAh
3300 x 10 -3/ 44 = 4.5 minute
25. AMAR SAJJAD, SALMAN SADIQ, MUHAMMAD RIZWAN, ADBUL RAHMAN, MUHAFIZ GHOGARI 25
Figure 12- Calculation of CG
Construction of right wing
Done by Amir Sajjad
The construction of the right wing was done by me. The aileron which is at the
right wing was also attached by me. The linkage between the servo and the
pushrod along with the installation of servo was also done by me. I am also
responsible for programming the servo which will move the right aileron.
We decided to make a cardboard prototype of our design because this
experience will help us in many ways such as we will come to know the amount
of material we are going to need and which tools to use etc. I used a normal
cutter for cutting the cardboard into proper shape and then used super glue to
join the ribs with the struts. I suggested one idea which ensured that the airfoils
we make are exactly same in shape and dimensions and this idea was that we
26. AMAR SAJJAD, SALMAN SADIQ, MUHAMMAD RIZWAN, ADBUL RAHMAN, MUHAFIZ GHOGARI 26
make the first airfoil perfectly same as the AutoCAD design and then use this
airfoil as a reference to make other airfoils. Instead of using paper to draw
marks and shape of the cardboard we used that reference airfoil to do that
which contributed towards the perfect wing. I decided that we will use the same
technique in the main construction which we will do next week. After attaching
the ribs with the struts I covered the leading and trailing edge with a cardboard
as this will give base to the cling film we will later use for the covering. After
covering the wing with a cling film I placed my wing and left wing in the housing
on the fuselage which is made by Abdul Rahman. After the whole aircraft was
ready we took it for flight test and found out that the wing span is less so we
changed the wing span from 110 cm to 120 cm in the AutoCAD deign. The
method we used for testing was to place the aircraft outside the car window
and keep holding it at the speed of around 30 km/h to 40 km/h.
Figure 14 Amir cuttiing the struts
Figure 13 Amir salman and Muhafiz working
27. AMAR SAJJAD, SALMAN SADIQ, MUHAMMAD RIZWAN, ADBUL RAHMAN, MUHAFIZ GHOGARI 27
Figure 15- Cardboard model
Old specification for my wing Updated specification of my wing
Wing chord: 20cm Wing chord: 20cm
Span: 55cm on my side Span: 60cm on my side
Three wood struts Two wood strut front and back with
carbon fiber rod in the middle
After the designing and dimension selection phase of our project I moved on to
the selection of materials and for that we searched many hardware shops such
as hobby ultimate, ACE hardware and creative minds. Once we purchased the
material and tools from the hardware shop we decided to begin the wing
construction my cutting the plywood with the appropriate tool and then make
it in the perfect shape using the sand paper. To make the first airfoil we used
our AutoCAD airfoil design to draw the exact same airfoil on a piece of paper by
keeping that paper on the computer screen and tracing the exact airfoil shape
successfully and then we glued that piece of paper on one side of the plywood
and make the markings around it with marker to get the exact shape drawing
on the plywood. Once this was done we removed that piece of paper and started
cutting the plywood beyond the markings to keep a safe clearance. Initially I
used cutter to cut the plywood but the cutter was on strong and sharp enough
to do this job so we searched for another tool which will cut the plywood easily.
28. AMAR SAJJAD, SALMAN SADIQ, MUHAMMAD RIZWAN, ADBUL RAHMAN, MUHAFIZ GHOGARI 28
We used hacksaw to cut the plywood and it took about 20 minutes to cut single
piece of airfoil excluding the filing part. Then we filed it using the sand papers
of 60 120 and 150. If we needed to file more we used 60 grain sand paper and
after the filing is done we used 150 grain sand paper to smooth the surface of
the airfoil. It took me one hour minutes to file the initial airfoil to the exact
shape and dimension. Then we compared this airfoil to the AutoCAD diagram
we had in our computer and it was of the exact shape and size. Since this airfoil
which me made was perfect in all aspects me and salman decided to use this
airfoil as a reference airfoil and make other airfoils accordingly by keeps it on
the plywood and drawing it and after completing all 22 airfoils we compared
each one separately to the reference airfoil and rectified any changes between
them.
It took us approximately 6 days to complete the construction of the airfoil
because it took us 4 days to cut the plywood into the airfoil shape and then 2
days to file it just like the exact reference airfoil.
Once all the ribs were completed we stacked them together with a duct tape
and then took it to the university workshop for drilling purposes. As me and
salman decided earlier that we will pass three struts between the ribs to make
the structure stiff, Mr. William s assisted us to drill all three holes in the airfoils.
The selection of the drill bit was based on the diameter of our struts which we
purchased from the ACE hardware. We measured the diameter of the struts
using the Vernier caliper and the diameter was exactly 6.3 millimeters. Then
we decided to use the drill bit of 6.5 millimeters as we needed some clearance
for the struts to pass through the ribs easily and luckily this size of drill bit was
available in the workshop. Mr. Williams restricted us from using the drilling
machine because of some safety purposes, so he drilled all the stacked airfoils
for us without opening the duct tape. We faced a big problem after drilling as
Mr. Williams made a big mistake while drilling a hole in the leading edge. The
hole he drilled was not straight which would seriously affect the shape of our
wing. We had various ideas in our mind like drilling a straight hole on the same
spot and closing the excess space with the hot glue and using the square strut
instead of the round strut but all these ideas were not good enough to rectify
the mistake Mr. Williams made so we came to a conclusion that we will drill
another hole slightly behind the faulty hole for each and every airfoil
separately. We discussed this plan with our group members since we had no
29. AMAR SAJJAD, SALMAN SADIQ, MUHAMMAD RIZWAN, ADBUL RAHMAN, MUHAFIZ GHOGARI 29
experience in using the drilling machine so Rizwan brought a drilling machine
and showed us how to use it and how to drill straight on a rough craft plywood.
Once we were satisfied and confident enough that we can drill our airfoils now,
we removed the duct tape and drilled the first hole on the desired spot. Once all
the three holes on the first airfoil were done, I had an idea to use that airfoil as
a reference as drill holes on the remaining airfoil by keeping it under the
reference airfoil. This helped us to drill all 22 airfoils on the exact position for
leading edge, trailing edge and center. We closed all the fault holes on the airfoil
except the leading edge hole by using a bulbond wood glue. The reason for not
closing the leading edge hole is that we can use that space for passing the servo
wires throughout the wing and towards the fuselage.
The method we used for drilling is as follows:
o We kept the craft plywood under the airfoil to use it as a base and to avoid
drilling holes in the table.
o Salman held the airfoil tight for me while I was drilling the holes in all 11
airfoils for my wing. Similarly I helped salman while he was drilling holes for
his wing.
o Before drilling salman was observing the level of the drill bits to make sure
I’m holding the machine straight and also I was careful not to press too hard
to prevent the airfoil from breaking.
o We used the clockwise drill rotation to drill holes through the airfoils and
used anti-clockwise rotation to remove drill bits from the airfoil.
After drilling the next step in our construction was to make a housing for
aileron. The initial length of aileron which we decided was 30 centimeters but
later on we realized that we if keep it 30 cm long there will be less clearance
between the propeller and the boom so we changed the length to 24 cm. Also
we realized that the wing span is less also we have to attach the booms under
the wings. Then we changed the wingspan from 110 cm to 120 cm which will
make each wing 5 cm longer so it will be 60 cm now instead of 55 cm. Another
problem that we had was that to make a wing 60 cm long we will need 24 ribs
instead of 22 then we decided to increase the gap between each airfoil by 1 cm
so there is now 6cm gap between each wing instead of 5 cm. This will solve our
problem of having less ribs for the wing. To make a space for aileron attachment
30. AMAR SAJJAD, SALMAN SADIQ, MUHAMMAD RIZWAN, ADBUL RAHMAN, MUHAFIZ GHOGARI 30
at the rear section of 4 ribs I first measured the width of the aileron which was
approximately 3.5 cm and then I drew this 3.5 cm line at the rear section of the
airfoil and cut it using the hacksaw. Then to give it the curvature shape, I rolled
the sandpaper around the wasted strut stick and filled it using that strut.
Figure 16- Complete wing
After this we attached all the ribs with the struts using super glue and to make
it a single structure wing we made one block using three hard balsa wood and
drilled holes on both sides to pass the struts through. We found that the wing is
not stiff enough as it became anhedral due to the poor joint of the wings in the
middle. Then the only solution that came to my mind was to use either a carbon
fiber rod or aluminum rod and pass it through the center. We really regretted
as we already joined all the ribs with the struts with a gap of 6 cm between each
rib, and now we were facing a big problem as we need to drill so many holes to
pass the carbon fiber rod. Then we used appropriate drill bit and drilled the
ribs at the wing tips using the drilling machine and drilled the remaining ones
using a drill bit and plyer. We rotated the plyer manually to drill the hole across
each rib. The carbon rod that we found was 45 cm long but we needed at least
80 cm so that it can also pass through the booms and give them an extra support
due to the heavy motor it will carry. We then decided to pass another light
weight rod which will have a diameter less than the carbon fiber rod. The
problem that we faced using this technique is that the center rob was quite thin
which was not helping in joining the two carbon fiber rods. Then Rizwan
suggested this idea that we can apply plenty of hot glue on the brass rod and
31. AMAR SAJJAD, SALMAN SADIQ, MUHAMMAD RIZWAN, ADBUL RAHMAN, MUHAFIZ GHOGARI 31
then slide it through each carbon fiber rod from one side and another carbon
fiber rod from the other end before it dries off.
Then the next step in our wing construction was to fix hinges at the trailing edge
of the ribs that we cut. The hinges we used were made of plastic and they were
strong enough to hold the aileron. First we made a cut on the aileron using the
surgical knife and then we placed one half of this hinge in the aileron and
applied glue and then we made another cuts on the aileron using the cutter and
placed another half of the hinge in the aileron and then joined them using super
glue. One thing that I had in mind while fixing the hinges is to make sure exactly
equal length of plastic hinge has been placed inside the aileron because if this
is not considered then there is a huge chance that the aileron will not be straight
by looking from the top view.
Figure 17- Hinges
After the aileron the next part is placing a servo and actuating the rotation of
aileron and testing. The best place to make a housing for servo is on ribs
through which the carbon fiber rod doesn’t pass. This is because our servos are
quite big in size which will prevent them from fixing on the ribs having the
carbon fiber rod because of less space. Making a housing for servo was the
toughest part as all the ribs were already attached and we were not able to find
enough room to make a cut using our hands. It was me who decided that we can
cut the rib using the cutter even if we cut it at the angle by applying the constant
required force. We first drew the housing size by placing the servo on the ribs
and then we kept on trying to make a cut on the lines using the cutter. After we
successfully made the housing we placed the servo in the housing and tightened
32. AMAR SAJJAD, SALMAN SADIQ, MUHAMMAD RIZWAN, ADBUL RAHMAN, MUHAFIZ GHOGARI 32
it using the screws and then attached the push rod to the aileron using the
control horns.
Figure 18- Hinges and control horn
The next part is programming. I and salman learned the programming together
from YouTube because we needed to connect our servos so that both the servos
respond to the same input. To begin with the programming we need both the
servos, a y-connector, electronic speed control and a battery. First we will
connect both the wires from the servos to the y connector and then we will
connect this Y-connector to the receiver at the channel one because channel one
is for aileron. And then we will connect ESC to the battery and the receiver.
When all the connections are done we made sure that all the inputs in the
transmitter are off and then we switched on the transmitter.
After programming we did the covering of our wing using thin balsa sheet. It
was not easy to cover the leading edge of the wing because of the curvature
which will break the balsa sheet into pieces. Rizwan suggested us one idea that
we can use sticky wallpaper to cover the thin balsa sheet. Once this is done, we
can bend the sheet easily and make it into proper shape of the leading edge
without breaking it. After we attached the balsa sheet with the leading edge
using the super glue, we removed the wallpaper.
Improvements that I made:
Changing our wing span:
Before starting with our project construction, we planned on making a
cardboard prototype model of our aircraft with the exact dimensions. The
reason for this is because of the cardboard we will be able to know exactly how
much material are we going to need. The material which was decided by me
33. AMAR SAJJAD, SALMAN SADIQ, MUHAMMAD RIZWAN, ADBUL RAHMAN, MUHAFIZ GHOGARI 33
and all the group member was to use B grade balsa wood. So by making the
cardboard model we will come to know how much Balsa wood we need to
purchase. This will make us use our resources more effectively and efficiently.
Another advantage of making a prototype model is that we will get the idea of
how to begin with the construction of our project and also we will be able to
determine if whether the dimensions we have selected is appropriate or not.
Because of this cardboard model we came to know that the wing span of our
aircraft is less which is why later on we changed it to 120 cm from 110 cm. This
is the first improvement we made to our project.
Choosing Plywood:
When we finalized our proposal and project design after it got approved, we
started to think about the material that we should be using for the construction
of different parts of the aircraft. Since my part is the construction of wing I will
be starting from there only, the material we selected for the construction of
aircraft wings was B grade balsa wood. The reason for this is that it was our
first time ever that we were going to use this material and we really wanted to
get our hands to that material. Another reason is that the balsa wood is really
easy to work on which will save us a lot of time and energy and also we won’t
need to buy any heavy duty cutter or tools because just the surgical knife and
normal cutter is more than enough to cut the balsa wood. Third reason for the
selection of this material is that this material is really lightweight as compared
to all other competitor materials such as bass wood and plywood.
When we analyzed and experimented on the balsa wood for its stiffness and
fracture points we came to a conclusion that even though it is light and easy to
work on, we cannot use this material for the inner structure of our wing
because it is not strong enough to be able to even survive light impacts or cuts.
This issue really mattered for us because we don’t want our project parts to
break off after they’ve been made after so much hard work, not only that but it
will also be a loss of hard work.
Another material that came to light was the bass wood. But after testing the
bass wood as well we came to know that there is not much difference between
the bass wood and the balsa wood stiffness wise. Also we came to know that
bass wood has much more ductility as it needs a lit shock only before it gets
shattered into pieces.
34. AMAR SAJJAD, SALMAN SADIQ, MUHAMMAD RIZWAN, ADBUL RAHMAN, MUHAFIZ GHOGARI 34
The third material was the plywood. According to our study, plywood is the best
material that we can use in our project construction. As plywood is much stiffer
than balsa wood and bass wood it is much safer to use plywood instead of the
balsa or bass wood. Once factor that came to my mind was that the plywood is
also much heavier than the latter material but because we won’t be using the
whole sheet of plywood and just the ribs are made out of plywood it won’t make
any significant difference to our aircraft overall weight. Even though plywood
is much harder to work on and file me and my team is ready to put all our effort
into it and make it work because the safety and stiffness of our aircraft is the
main priority.
Replacing cutter with the hacksaw:
Since it was already decided that we will be using plywood for the construction
of wing, the tools we plan to use for the cutting and filing purposes matters a
lot. This is because if the tools are not proper then it might take it forever to cut
and file the plywood into the desired shape. Initially we used normal cutter to
cut the plywood, me and salman almost struggled one whole day to make the
proper cuts on the plywood as needed. This was the point at which we realized
that this cutter is not sharp and strong enough to cut the plywood which made
us to go to ACE hardware and purchase a big hacksaw. This hacksaw was very
efficient and fast enough to cut the plywood into the desired shape and we
saved a lot of time in cutting because of this plywood so I think this was one of
the improvements that we made.
Using balsa cover sheet:
At first we bought a bass sheet for the covering of the wing and when we used
this bass wood for the covering of the leading edge it broke off. Then we realized
that this sheet is not capable of bending as much as we require because of which
we changed the material to paper balsa sheet. When we bought this sheet, even
this sheet wasn’t able to bend that much so to counteract this problem we used
a sticky wallpaper to cover one side of the sheet and then we tried to bend it.
This method solved our problem and we were able to cover curve areas as the
leading edges.
Passing wires across the airfoil holes:
35. AMAR SAJJAD, SALMAN SADIQ, MUHAMMAD RIZWAN, ADBUL RAHMAN, MUHAFIZ GHOGARI 35
As mentioned earlier, we made a big mistake of sticking the ribs on the struts
and covering it before making enough housing for the passage of 5 wires that
will pass through my wing towards the fuselage. The 5 wires are:
I. Aileron wire
II. Rudder wire
III. Elevator wire
IV. ESC extension from the boom.
V. Servo for 90 degree rotation
To pass these 5 wires which are mentioned above, I suggested that we must
remove the knob connector of each wire using a sharp pin or cutter and then
we can pass all the wires one by one without having to drill the airfoils to
increase the diameter of the whole.
Strength Weakness
The most important objective that I had
throughout the project was to maintain
perfection.
Time was the main weakness. Since I was
not used to work on such materials it took
me considerably excess time to finish of
the work.
Another strength that contributed in the
success of our project was that we all
shared our opinion and everyone came up
with great ideas and solutions.
Another weakness according to me was
that poor knowledge of tools. It took us
little time to understand and adjust with the
tools. Mistakes were made and rectified.
We all were committed to the project. We
made advanced plans to meet and work
on the project.
Clash of other work which was not related
to the project such as other subject
assignments and TCA’s.
We all worked at the same place and
guided each other to get the job done with
perfection.
Time management was a very big
weakness. We wasted a lot of time
shopping and ordering but anyhow we
completed our work before deadline.
36. AMAR SAJJAD, SALMAN SADIQ, MUHAMMAD RIZWAN, ADBUL RAHMAN, MUHAFIZ GHOGARI 36
The mistake I made during the project:
- Wrong selection of covering material. Initially we selected bass sheet to
cover the wings but then when we tried to bend it for the airfoil shape it
broke. We wasted many bass pieces just like that which made us change the
covering.
- We didn’t drill on our own. After the wrong holes were drilled by workshop
technician then we made another new holes one by one on my own.
- Attaching the ribs on the struts. We attached the ribs using the super glue
and then later on we realized that the housing for servo and carbon fiber rod
is still to be made.
Construction of left wing
Done by Salman Sadiq
I and my group started to think about making a conceptual aircraft which I think
is one of the best ideas we have come up with. Since our aircraft is completed
made independently we need all the specifications and all the criteria’s to work
properly in order to attain the desired results which we are aiming for. For this
all of our group member to make and aircraft which will be similar to the real
aircraft but will be made up of a cardboard. The reason for making this
conceptual design is to make sure that the product which we will be making
will be perfect as this was our first attempt to make an RC aircraft.
The specification of my wing is mentioned below with the old one and the
updated design are as follows:-
Old specification for my wing Updated specification of my wing
Wing chord: 20cm Wing chord: 20cm
Span: 55cm on my side Span: 60cm on my side
Three wood struts Two wood strut front and back with
carbon fiber rod in the middle
37. AMAR SAJJAD, SALMAN SADIQ, MUHAMMAD RIZWAN, ADBUL RAHMAN, MUHAFIZ GHOGARI 37
We bought cardboard from ACE and decided to work on it by making the
airfoils, this enabled me to understand of how to shape an airfoil and why it’s
important to make it perfectly as this is the only part of an RC aircraft that
produces lift. When we made the airfoils the mistakes that I have made is that
the struts were not that good as Amir had different size and I had different size
making it imbalance from one side to another. Another problem was the
covering we used cling film coating but since this was a concept we can
experiment by doing such work. The major purpose was to provide as much as
errors in the cardboard prototypes and understand what went wrong and then
never repeat it in the real RC aircraft
Figure 19 Group working
Figure 20 Cradboard model ready
38. AMAR SAJJAD, SALMAN SADIQ, MUHAMMAD RIZWAN, ADBUL RAHMAN, MUHAFIZ GHOGARI 38
My part is to make the left side of the wing. In total I had to make 12 airfoil and
since I know that my airfoil is similar to NACA 0012 as it is symmetrical which
means that the upper chamber and the lower chamber has the same shape. My
dimensions for the airfoil was 20 cm wing chord, 3 cm in thickness and length
was 55 on each side. So the gap between each struts was 5 cm and in total my
wing comprised of 12 airfoils as mentioned above. Once the designing part was
planned then I moved onto the next part which is the selection of material in
which I visited most of the hardware shops such as, ACE, wesam stationary,
creative minds, hobby ultimate, hobby center and factories to search for the
wood that I needed.
Figure 22- AutoCAD of wing
Figure 23- AutoCAD of wing
I consulted with my other group
members regarding my material
choice and my fellow colleague
who is working on the wing that
we need to use ply wood in wings
as this is one of the best woods
for the aircraft and this will make
our part stronger and stiffer as
we need this for the airfoil which
is one of the most important part
of the aircrafts structure. Then I started designing my airfoil on to the AutoCAD
Figure 21- Material we purchased
39. AMAR SAJJAD, SALMAN SADIQ, MUHAMMAD RIZWAN, ADBUL RAHMAN, MUHAFIZ GHOGARI 39
to view weather the airfoil which I have designed looks appropriate or not and
then discussed the same with Amir. Once the designing on an AutoCAD was
done then I moved onto the next part which is using the paper and computer to
draw the shape of the airfoil by tracing it and then I cut the paper according to
what I traced. Once the tracing part was done I attached that paper by using
UHF paper glue and then I stated cutting the first airfoil accordingly. Once the
material, AutoCAD and tracing was selected and implemented then I moved on
to resources that I used which is mentioned below in the next paragraph.
Figure 24- Craft wood
Starting with the resources that I used in making my airfoil. The major resource
which I used in cutting the ply wood is saw. First I started cutting the airfoil
using cutter but then I realized that cutters does not cut the airfoil properly so
then I tried using hacksaw which I believed was better than the normal cutter
but the second problem which arise while cutting is that the line which was
drawn, cutting it was a challenge as the hacksaw was cutting at an angle which
was not good because then I have to file a lot and get the proper shape of the
airfoil.
The airfoil which I experimented on was just to understand which one of the
three resources are good enough for me to use in my project work. Then I
concluded that saw is the best one and I can give the direction to it by pressing
on the opposite side, this enables me to work more efficiently by covering the
same amount of work in little time. I thought the cutting would take less time
as I heard about balsa wood which takes very little time to cut but when I
worked on ply I got to understand that this wood is very hard to cut and it will
be time consuming. According to our Gantt chart I gave time of around 7 days
for complete construction of the wing left side but then it took longer than that
as only the cutting part took more than 4 days for me. I and my colleague
decided to take one airfoil as a reference and make the other 21 airfoils with
40. AMAR SAJJAD, SALMAN SADIQ, MUHAMMAD RIZWAN, ADBUL RAHMAN, MUHAFIZ GHOGARI 40
that reference since, I know that the wing which we’re making must be perfect
in order to achieve the desired results.
Once the cutting part was done then I moved on to the filing part in which I
made sure that the filing sand paper is of 120-150 fine granules. This is
according to my research is one of the best filers for ply wood. I also considered
using 60 fine granule sand paper for quick sanding as some of the areas of the
airfoil had so much distance from the line and so that I need to make sure that
the filing part finishes quickly in order to maintain the time frame which I
proposed in my Gantt chart. The filing part took for me 2 complete days and
then me and Amir decided to file all the airfoils together to make them look
similar and must give us similar dimensions as decided earlier.
After filing the other major part is to make holes for the struts to pass through
the airfoils in order to complete inner structure of the wing. For that since,
we’re not an expert in drilling part we took assistance of Sir Williams by
combined all the airfoils and covering it with duct tape we went to sir Williams
for his assistance in drilling. Before the drilling process I decided to check all
the airfoils and make sure that the airfoils which we made must have similar
dimensions and all of them are made perfectly. Once all of the procedure got
completed we decided to buy struts which is around 6.3mm. The reason for
buying this strut is because we decided to put three struts on each wing and the
trailing edge part was very small and in order to prevent it from chipping of I
decided to buy the struts of this dimensions. Coming back to sir Williams, we
showed our drilling points to sir and he gave us the drill bit of 6.5mm which
according to us was very perfect.
Sir assisted us with the drilling part and he drilled for us three holes. Out of
those three the front one drilling point was drilling at an angle and the drilling
was not perfect as we need to pass our struts straight from each of the airfoil.
Since our drilling part went wrong, I and Amir decided to drill the airfoils again
but, we will the one using the drill in order to achieve the result which we want
to achieve.
So we bought a drill machine and then started learning how to use the drill
machine. We bought craft ply wood and started drilling in it to make sure that
when we apply these drilling techniques in the new one we should get the
results which we want to obtain. Muhammad Rizwan, another member of my
41. AMAR SAJJAD, SALMAN SADIQ, MUHAMMAD RIZWAN, ADBUL RAHMAN, MUHAFIZ GHOGARI 41
group who is working on boom taught me how to use drill machine as he is one
of the best driller in our group. There are certain techniques which he taught
me and they are mentioned below:-
1. Drilling counter clockwise and anticlockwise: this is useful as when we drill
the holes we need counter clockwise and to prevent the wood from chipping
we use anticlockwise which automatically helps to remove the drill bit from
the hole which we made.
2. Drilling with angle that is perpendicular to the surface: there is a leveler
present inside the drill machine which Rizwan said that if the white marking
is in the center then the drill machine works perfectly and the drill will be
straight.
3. Last, technique was that never press the drill too hard as it can either goo
through the wood or can break the support handle, this will decrease the
efficiency of the work.
The drilling part was done effectively and it also took 2 days as the first day was
in the university and the second day we drilled on our own to get the effective
result which I needed.
The design was updated and we changed the length of wings and increased it
by 10cm further making a total length of 120cm compared to 110cm as per our
previous selection. The reason for doing this is because the boom was shifted
18 cm away from the fuselage compared to previous 12. Since we needed the
clearance for the propellers which are 13cm so we decided to shift the boom 6
cm away in order to get good clearance.
After the drilling part was done we decided to make housing for the ailerons in
order for the aircraft to achieve the banking turn perfectly. For that we took 5
airfoils out of 11 and made a u type shape which provides the housing for the
aileron. The aileron balsa was filed and checked weather the end of the aileron
matches the trailing edge this will not make the control surface look odd by
sticking outside the trailing edge of airfoil. We also used the hinges that was
made up of paper and that paper hinges will make sure that the connection
between the airfoil and the ailerons are ok.
42. AMAR SAJJAD, SALMAN SADIQ, MUHAMMAD RIZWAN, ADBUL RAHMAN, MUHAFIZ GHOGARI 42
Figure 25- Wing inner structure
Then when we connected the two sides of the wing, I and Amir decided that this
work is not that good as we saw in our aircraft the wings were anhedral. Which
means that the wings were tilted downwards. Which was my biggest concern
as we need perfection. Then our group discussed with Sir Omar Chafic
regarding the problem which we faced and then sir guided us by saying that we
need carbon fiber rod to pass through the center. This will help us to solve the
problem regarding tilting. The reason why I was concerned about the tilting
part is because since our wing will be attached with the boom in which we will
be having batteries, electric motor and servos. So if the wing is already tilted
without these attachments, then it will be more tilted if those things gets
attached with it. Coming back to the carbon fiber rod, another problem which
I encountered and I think was my biggest mistake in this whole project work
was the gluing part. I used super glue to attach the wings with struts. Once it
got dried up it was really hard for me and Amir to make holes for the carbon
fiber rod, because the thickness of the rod was 10.5mm and the drilled hole at
the center was at 6.5mm making harder for us to drill through the holes. I and
Amir decided to increase the holes of the drill by using two techniques which
are mentioned below:-
1. We take the drill bit 7mm and above and started increasing the holes by
using pliers, this procedure was done step by step but we made sure that the
43. AMAR SAJJAD, SALMAN SADIQ, MUHAMMAD RIZWAN, ADBUL RAHMAN, MUHAFIZ GHOGARI 43
drilling is perfect and we get the results which we need the last drill bit
which I used was around 11mm.
2. The next step is since we have 6 struts and the center one was removed
because of the carbon fiber rod, I decided to cover the strut with the sand
paper of 150 granules and started filing the rough areas to make sure that
the filing provides perfect housing for the carbon fiber rod to pass through
it.
Figure 26- Sand paper
This problem was solved by our ideas and we finally made the desired airfoil as
needed.
By doing all of the above procedures I concluded with the inner structure of the
wing. Moving on the electrical part which is the wing and the electrical
component which I used is the servo for the ailerons. The servo which I used is
the futaba S3003 series. This servo can be used in normal mechanism and can
take a load of up to 4 kg. For this servo I again had an issue because we need
housing for the servo in order to rotate the ailerons and we get the desired
deflection during banking turn. This was again solved by making a housing in
one of the 9th airfoil where as you can see that the carbon fiber rod ends on the
7th airfoil and the carbon fiber since the ailerons are attached at the tip part of
the wing, so therefore it is important to attach the servo’s either on the 8 or 9th
airfoil which I did and then there are pushrods and control horns are connected
which is then connected to the ailerons and made sure that the rotation is equal
from both sides.
44. AMAR SAJJAD, SALMAN SADIQ, MUHAMMAD RIZWAN, ADBUL RAHMAN, MUHAFIZ GHOGARI 44
Figure 27- Servo connection
Figure 28- Hinges connection
Another best idea which we came up with is the leading edge hole which where
me and Amir came up with an idea that we will pass the wirings of the servos
from that hole making a proper channel for the wiring while not disturbing any
airflow. Lastly, when we did everything our only part was to cover the leasing
edge and trailing edge with the balsa sheet thin one. Which is very effective
when we do the Monokote covering.
Figure 29- Wing inner structure
Then I did the programming part for my ailerons by connecting the receiver to
channel 1 and then adjusting the sub trim and then deflecting the ailerons up
45. AMAR SAJJAD, SALMAN SADIQ, MUHAMMAD RIZWAN, ADBUL RAHMAN, MUHAFIZ GHOGARI 45
and down and then by adjusting the sub trim I managed to complete the
programming part of the wing which I made.
The strength and weaknesses during my project work.
Strength Weakness
I was very conscious about making
the wing perfect by analyzing
smallest imperfection possible and
made sure that they are corrected in
minimum time.
The time scale was not maintained,
especially I think I have wasted most
of my time and not following the
deadline which I made on my own to
finish the wing part. The deadline
which I thought was 20 November.
Made some of the strong decisions
and made sure that all of the
members comply/agree to the
decisions that I made.
Another weakness I think was lack of
understanding about the products, as
I have never seen a balsa wood and
other components although I know
how to work with them but at the
time of shopping I was not able to
decide so I took my whole group
members for assistance.
Always made sure that I listen to my
group members and they are happy
with the working environment
Time management is very bad, all of
the assignments, project work and
exams were on our head and the
workload was increased unnecessary.
46. AMAR SAJJAD, SALMAN SADIQ, MUHAMMAD RIZWAN, ADBUL RAHMAN, MUHAFIZ GHOGARI 46
The mistakes that I did in my project work.
One of the major mistake I did was glued the strut with the airfoil at the start
which made it hard for us to make the housing for the servo.
Drilling part was also hard as we glued and there is no drill bit that can drill
up to 60cm so we had to use pliers and we used this to make hole in the
airfoil increasing the working time for us.
Lastly, when we started covering it though of using bass wood and I used
glue to stick the bass wood with the leading edge of the airfoil. Once I started
bending the bass wood it broke into pieces. I had to remove all the pieces of
bass and file it which makes the airfoil much harder to cover. Filing
procedure took long time for me which again increases the time of work
unnecessarily.
Construction of right boom
Done by Muhammad Rizwan
Materials:
B grade balsa
Basswood
Plywood
Carbon rod
Aluminum sheet
Aluminum wire
Paper hinges
Push rods
Servos
Motors
Propeller
Screws
Control horns
Copper rods
Landing gear
Monokote
Hot glue stick
47. AMAR SAJJAD, SALMAN SADIQ, MUHAMMAD RIZWAN, ADBUL RAHMAN, MUHAFIZ GHOGARI 47
Tools:
Pliers
Nose plier
Screw driver
Hammer
Hot glue gun
LN keys
Saw
Hacksaw
Clamp
Superglue
Iron
Construction:
The chosen aircraft is a concept and is never made in the world. In order to
make such an aircraft is very difficult task as all the dimensions and
specifications are self-made and all the things needs to be calculated and should
be perfect. The aircraft similar with our aircraft is heron-tp and Harfang. These
both are spy drones and are used for spying purpose. The difference between
our aircraft and these drones is that our aircraft can take off vertically i.e. VTOL.
In order to obtain perfect result all the group members agreed on making a
conceptual design made from cardboard. The cardboard for the conceptual
design is bought from Ace hardware. I worked on the right boom as this was
my work and all the other group members worked on their parts accordingly.
There were many errors and flaws in our work and in the aircraft and this was
the main reason we decided to work on a dummy aircraft first. This dummy
aircraft we all made with cardboard.
Figure 30- Rizwan working
48. AMAR SAJJAD, SALMAN SADIQ, MUHAMMAD RIZWAN, ADBUL RAHMAN, MUHAFIZ GHOGARI 48
Figure 31- Card board model ready
Figure 32- Card board ready
For making this dummy aircraft cardboard and other material we bought from
Ace hardware. Later on the same day we started working on it and each group
member started working on his part. So my part was right boom and right
vertical stabilizer and horizontal stabilizer so I worked on it. I measured the
boom dimension with a ruler and started cutting the cardboard with paper
cutter. After cutting each side of the boom I started joining the sides with the
49. AMAR SAJJAD, SALMAN SADIQ, MUHAMMAD RIZWAN, ADBUL RAHMAN, MUHAFIZ GHOGARI 49
help of glue. The glue I used was superglue. After joining all the sides of the
boom I started cutting the vertical stabilizer. With the help of ruler I drew
vertical stabilizer on cardboard and later cut of out with scissors. After
completing cutting the stabilizer I started making housing on the boom for the
vertical stabilizer and fixed it on the boom with the help of super glue. The main
idea of working on the dummy aircraft was learning to work in group and
learning to making things in perfection and also we wanted to see the scale of
the aircraft and how it looks. Working in the dummy aircraft helped us a lot as
we were able to think of the dimensions and overall weight of the aircraft. The
dimensions we set for the boom seemed a bit large so we decided to reduce it
by 1cm from side. The length of the boom we kept same but the thickness we
reduced by 1cm because the extra 1cm seemed too thick and also it was of no
use as accommodating the batteries and other electrical stuff won’t require this
much room. Also thickness in overall will increase drag. After completing the
dummy prototype all the group members
including me understood the issues and
mistakes and we made sure this should not
happen in our real prototype.
For making the RC aircraft I started making
right boom. For the material as there was
shortage of balsa wood we (the group
members) went in many stores including some
wood factories and in the end after waiting for
the stock to arrive in the hardware shop I and
my fellow group member bought the material.
All the material and tools are bought from Ace
hardware and hobby ultimate. Boom is made of b grade balsa and is like a box
that goes 40cm in length and then it starts to shrink like a cone and the cone
length is 30cm so overall the boom is of 70cm. the box is of 6X6cm in width and
height and 40cm in length and the cone is of 6X6 in width and height and is
30cm in length. For the stabilizers I made it with solid piece of balsa wood.
Thick 10mm solid balsa piece is cut and filed to get desired shape and size.
Figure 33- Rizwan
working
Figure 34- Rizwan
cutting plywood
50. AMAR SAJJAD, SALMAN SADIQ, MUHAMMAD RIZWAN, ADBUL RAHMAN, MUHAFIZ GHOGARI 50
For cutting the wood and getting it in desired shape accuracy should be kept in
mind. I started cutting wood with wood saw and it was easy to cut but I kept
some clearance that could be filed later to make it perfect.
Cutting the balsa wood and filing is relatively easy when compared to other
woods but as balsa wood is light weight the balsa dust while cutting it mixes
with atmosphere making it difficult to breath near the place where the cutting
is being done. This issue further became worst when I started filing balsa wood.
In order to resolve this issue I used mask. By wearing mask the issue somehow
resolved but was not completely finished. After completing cutting all the
pieces of balsa wood for the box in front and cone rearwards I had to make
vertical stabilizer and horizontal stabilizer. For the stabilizers as mentioned
above I used one solid 10mm thick piece of balsa wood cut and filed it to get the
desired shape.
After all the cutting work is done these stabilizers and the sides of the boom
which I made need to be joined to form a stiff 1 boom. For joining the vertical
stabilizer as in our design the vertical stabilizers is going through the boom and
also the horizontal stabilizer is requires cavity that could hold it firm at a place.
For making the cavity I used surgical blade and after that is done I passed the
stabilizer through the boom and glued it. The glue I used is hot glue. The reason
I used hot glue gun and stick is that this glue is stiff and sticks and cooled very
quickly and if something went wrong it can be removed by heating and melting
it again. Only one problem I faced while using the hot glue is that while
removing the excess glue sometimes by mistake when I touch the glue it is
extremely hot and almost burnt my skin 2 or 3 times.
After completing and joining the boom me along with my group members went
to ultimate hobby to buy the electrical stuff. I bought stuff for my boom and the
specifications of each of the electronic and along with picture are as follows:
51. AMAR SAJJAD, SALMAN SADIQ, MUHAMMAD RIZWAN, ADBUL RAHMAN, MUHAFIZ GHOGARI 51
Motors:
Figure 35- Motor which we used
Type: Brushless outrunner
Size: Replacement for 25-size glow engine
Bearings or Bushings: One 5 x 14 x 5mm Bearing, and Two 5 x 11 x 4mm
Bearings
Wire Gauge: 14
Recommended Prop Range: 11x8 to 14x7
Voltage: 12–16.8
RPM/Volt (Kv): 870
Resistance (Ri): .03 ohms
Idle Current (Io): 2.40A @ 10V
Continuous Current: 32A
Maximum Burst Current: 44A (15 sec)
Cells: 3S-4S Li-Po or 10–14 Ni-MH/Ni-Cd
Speed Control: 40–45A brushless
Weight: 190 g (6.7 oz)
Overall Diameter:35mm (1.40 in)
Shaft Diameter: 5mm (.20 in)
52. AMAR SAJJAD, SALMAN SADIQ, MUHAMMAD RIZWAN, ADBUL RAHMAN, MUHAFIZ GHOGARI 52
Overall Length: 54mm (2.10 in)
Servos:
Figure 36- Servo
Specifications:
Modulation: Analog
Torque: 4.8V: 44.0 oz-in (3.17 kg-cm) 6.0V: 4.10 kg-cm
Speed: 4.8V: 0.23 sec/60° 6.0V: 0.19 sec/60°
Weight: 1.31 oz (37.0 g)
Dimensions: Length:1.57 in (39.9 mm)
Width: 0.79 in (20.1 mm)
Height: 1.42 in (36.1 mm)
Gear Type: Plastic
Rotation/Support: Bushing
One heavy duty servo for rotating the engine:
54. AMAR SAJJAD, SALMAN SADIQ, MUHAMMAD RIZWAN, ADBUL RAHMAN, MUHAFIZ GHOGARI 54
Specifications:
2600mAh 25C 14.8V 4S1P
Endurance: 3.5 min
I started working on the mount for the engine. The mount is made with
basswood and aluminium sheet. I bought heavy duty hinges and glued it on
aluminium sheet box which I fixed on the front side of the box. The aluminium
box was of the same width and height of the boom so that it fixes properly and
it is stiff. This mount wasn’t strong enough to hold the handle the force
produced by the motor as it would break. Me and my group other group
member who is working on other boom discussed this issue.
Figure 39- Boom mounting
Figure 40- Boom mounting
The design for the movable mount of the boom was not efficient and it would
also create a lot of drag. So we decided to change the design and came up with
a totally new idea. For this new mechanism we needed to cut the boom at an
angle from the front side as shown in the figure below.
Figure 41- Boom front section
I cut a ply wood of the same dimension as the front side of the boom. I drilled
four holes at a gap of approximately 2cm horizontally and 0.5cm vertically. I
55. AMAR SAJJAD, SALMAN SADIQ, MUHAMMAD RIZWAN, ADBUL RAHMAN, MUHAFIZ GHOGARI 55
passed two metal wires top to bottom in the pair of holes and inserted a carbon
fibre rod in it. The wire I got from the clothes hanger made of aluminium wire.
I took the clothes hanger and with the help of wire cutter I cut the straight part
of the hanger as I wanted only the straight part. After cutting the aluminium
wire I with the help of pliers bent the wire and made it a U. After all that is done
I cut another ply and mounted the motor and the two U wires on it too. I cut one
more ply which was of 3cm x 6cm and attached it to an aluminium cross section
by using super glue. Then I cut the ply in hexagon shape on which I made the
same holes as on the ply attached to the boom to pass the metal U wire through
this hole and make two loops and then glued the 3cm x 6cm ply using glue gun.
This was the mount for the motor. Now I drilled two holes in the top and bottom
corners of the hexagon and two holes horizontally on the sides of the ply
attached on top of the hexagon. I mounted the motor and screwed it to the
mount. Then I placed the mount on the front side of the boom and passed a
carbon fibre rod through the four loops of the wires. This mechanism let the
motor mount rotate by 90 degrees. The mechanism is shows in the figure
below.
Figure 42- Mounting
56. AMAR SAJJAD, SALMAN SADIQ, MUHAMMAD RIZWAN, ADBUL RAHMAN, MUHAFIZ GHOGARI 56
After making the mount I cut a D shape from ply and drilled 7 4mm holes on the
D sides and 1 12 mm hole in the center of the D. the 12mm holes was to pass
the carbon rod. I attached the D with the movable part of the mount with 2
screws. Other holes I made were for the push rod. The push rods will be
attached with that D and second end of the push rod is attached with the servo
that ultimately rotate the mount by pushing the pushrod and the pushrod
pushes the D that is attached with the moving part of the mount and hence in
this way the engine rotates 90 degrees.
After this is done I now had to join the boom with the wing. For joining the boom
with wing I made 3 holes in the boom with drill machine. 2 holes of 6.5mm and
1 holes of 12mm. from the 6.5mm holes the struts pass in the wing pass and
from the 12mm hole the carbon fibre pass. As these rods pass from the booms
and also these passing though the wing the boom in this way is attached with
the wing.
After this is done I had to mount the landing gear under the boom. For landing
gear I bought tire from ultimate hobby and took it to welding shop. From there
I bought 1 copper wire and passed the copper rod through the wheel and bent
it forming a L shape. I then asked the worker in the shop to weld one end of the
copper rod and make it thick so that the wheel doesn’t come out of the rod. The
landing gear looked like this:
Figure 43- Landing gear
57. AMAR SAJJAD, SALMAN SADIQ, MUHAMMAD RIZWAN, ADBUL RAHMAN, MUHAFIZ GHOGARI 57
Figure 44-Sponge Wheel
I then went back to my workstation and
decided to fix the landing gear with the
boom. For the fixing of landing gear I took
measurement of the area inside the boom
and cut the ply accurately so that it fit in that
area inside the boom perfectly leaving no
clearance. I made a 4mm hole in the center
of that ply. After making hole I took another
ply of same dimensions and started cutting
the ply from center in a line. Later I filed the ply to make it smooth. I cut another
ply in same dimensions. Then I measured the length of the landing gear as
required and bent the excess part of the landing gear to form a L. one end of this
rod I passed through the hole I made in the ply and attached all the 3 ply I made
with this with the help of superglue to form a sandwich so that the landing gear
shouldn’t move. Later I glued this sandwich section with the boom keeping the
landing gear out with hot glue.
After completing the landing gear work I decided to put in the electrical stuff
and for electrical stuff I required calculated center of gravity. I got the center of
gravity from online and started putting in the batteries, ESC and wires. I had to
mount the battery, ESC and wires in the boom properly as it should not move
when in flight as these are heavy and needs to be placed at CG or to maintain
center of gravity properly. For mounting I took 1 small piece of balsa wood and
cut it in my desired size and keeping cg and battery position in mind I glued it
inside the boom in front side of the battery. For the back part of the battery
Figure 45- Boom from inside
58. AMAR SAJJAD, SALMAN SADIQ, MUHAMMAD RIZWAN, ADBUL RAHMAN, MUHAFIZ GHOGARI 58
again I did the same thing and glued it behind the battery so that it should not
move. This inside configuration looks like this:
For checking the center of gravity of the boom I placed my finger straight and
tried to balance the boom on it. When doing this I figured out that the boom
balance just under the carbon fibre rod and that is the boom actual center of
gravity.
After completing the whole boom the boom looked like:
Figure 46- Right boom and right wing
Strength:
I was very conscious about making my part perfect by analyzing smallest
imperfection possible and made sure that they are corrected in minimum
time.
Made some of the strong decisions and made sure that all of the members
comply/agree to the decisions that I made.
Always made sure that I listen to my group members and they are happy
with the working environment
Weakness:
The time scale was not maintained, especially I think I have wasted most of
my time and not following the deadline which I made on my own to finish
the my part.
Another weakness I think was lack of understanding about the products, as
I have never seen a balsa wood and other components although I know how
59. AMAR SAJJAD, SALMAN SADIQ, MUHAMMAD RIZWAN, ADBUL RAHMAN, MUHAFIZ GHOGARI 59
to work with them but at the time of shopping I was not able to decide so I
took my whole group members for assistance.
Time management is very bad, all of the assignments, project work and
exams were on our head and the workload was increased unnecessary.
Construction of Fuselage
Done by Abdul Rahman
In this project me and my group decide to make a conceptual H-type Tricraft
which I think it is one of the best ideas we have come up with. Since our aircraft
is completed made independently we need all the specifications and all the
criteria’s to work properly in order to attain the desired results which we are
aiming for.
My part is to construct the whole fuselage according to the selected dimensions.
The dimensions which I selected is approved by the group leader and all the
members. The dimensions are given below:
Before start the construction of our project, we decided to construct our project
with the help of cardboard as it’s a new invention so with the help of this
cardboard model we can easily get our lags and it provide us benefits during
material selection plus we will get the idea of construction, which method we
can apply and which tools we require and how to properly attach the parts
using the glue.
60. AMAR SAJJAD, SALMAN SADIQ, MUHAMMAD RIZWAN, ADBUL RAHMAN, MUHAFIZ GHOGARI 60
Figure 47- Card board model ready
Figure 48 abdul rehman doing work on his fuselage
After the designing and dimension selection phase of our project I moved on to
the selection of materials and for
that we searched many hardware
shops such as hobby ultimate, ACE
hardware and creative minds. Once
we purchased the material and
tools from the hardware shop, I
decided to start the construction of
fuselage.
First I start from the outer surface
of the fuselage because our fuselage
is like a curve box, the curve area is the frontal
nose part and the box are is the belly of the
Figure 49 balsa b grade
61. AMAR SAJJAD, SALMAN SADIQ, MUHAMMAD RIZWAN, ADBUL RAHMAN, MUHAFIZ GHOGARI 61
fuselage including tail. To start constructing the curve nose design of the
fuselage I took help from our AutoCAD design. I print the whole fuselage design
on the chart and place a BASS wood on the chart to get a proper dimensions of
the curve. I mark the dimension on the bass wood and start cutting it with some
clearance to keep a safe distance.
Figure 50 fuselage drawing with dimensions
I used jigsaw Machine to cut the Bass wood for the construction of the nose
curve. It consumes a lot of time to cut a proper curve but with the using of jigsaw
I can easily achieve it within 15 minutes. After cutting the nose curve I start
filing by 120 & 150 sand paper on the nose curve to achieve a proper design
according to the given proposal. After finishing the nose part I start working on
the tail and belly of the fuselage. I use the same technique that I used on the
nose curve but this time it is easier for me to cut the BASS wood linearly with
the help of cutter. The outer surface of the fuselage took me 4 days to complete
cutting and filing process.
Once all the cutting and filing process completed I start putting the pieces
together to fix it with the help of glue gun. I stick the square bar at the tip of the
connections which is stiffer to attach the BASS wood pieces together.
After completing the outer structure I have to make housing for wing
attachment, servo, motor and landing gears. To make a space for servo and
62. AMAR SAJJAD, SALMAN SADIQ, MUHAMMAD RIZWAN, ADBUL RAHMAN, MUHAFIZ GHOGARI 62
landing gears first I wait for rizwan, salman and amir because it’s difficult for
me to place a servo with consulting it with them. As servo is used to control the
elevator which is rizwans part and wing attachment housing is done after
completing the wing structure, so I wait 3 days for that but in between I used to
work on landing gears.
Talking about the landing gears. Fist I plan to buy the readymade landing gears
but I didn’t find the proper landing gears for our project, so I decide to construct
it by my own self. I went to the welding shop buy a copper rod because copper
is stiffer than aluminum, check that the tires of the gear is placed inside the rod
properly or not, well it is placed properly so I do start constructing the landing
gear. I do weld the one end of the rod with bolt and then install the landing tire
inside the rod and bend the rod at 90 degree, as I achieve the l shape landing
gear. Then I place the 15cm rod inside the fuselage and take do measure for
booms propeller clearance from the ground. I placed 15 cm long rod inside the
fuselage and make a l shape bend after 10 cm, as after the bending part is placed
inside the fuselage for fixing so the length that we requires for landing gear is
10cm. The bended portion inside the fuselage is fixed in between the fuselage
by using ply-wood. I placed the bended rod between the ply wood and screw
the ply-wood tightly.
Figure 51- Abdul
Rahman glueing his
fuselage
63. AMAR SAJJAD, SALMAN SADIQ, MUHAMMAD RIZWAN, ADBUL RAHMAN, MUHAFIZ GHOGARI 63
Figure 52landing gear
After completing all these things I install nose landing gear by connecting all the
parts of the aircraft. I placed a propeller on booms motors which tells me about
the ground clearance. I know how much clearance is required to the propellers
before fitting the landing gear. The ground clearance is 10cm for the nose
landing gear.
Figure 53 landing gear copper rod bent for fixing
64. AMAR SAJJAD, SALMAN SADIQ, MUHAMMAD RIZWAN, ADBUL RAHMAN, MUHAFIZ GHOGARI 64
Figure 54landing gear fixed on fuselage
I have to make a platform for motor mounting, I use square sparks for the
housing of motor mounting with the help of glue gun. This housing is internally
fixed with fuselage accordingly.
Figure 55fuselage shown from inside
Salman and Amir complete its wing structure and show it to me for making the
housing of wing at the top of the fuselage. The thickness of the airfoil is 3cm and
airfoil chord is 20cm, according to this dimension is use to cut the upper surface
of my fuselage part with the help of saw and then file it properly. And for the
servo Rizwan told me to put a servo aty the tail part of the fuselage inside the
motor fixing area. And make a hole at the tail area from where the string
attached between servo and Horizontal Elevator.
65. AMAR SAJJAD, SALMAN SADIQ, MUHAMMAD RIZWAN, ADBUL RAHMAN, MUHAFIZ GHOGARI 65
Figure 56wing cavity on fuselage
After finishing the programing I did the coving of the fuselage nose with using
balsa sheet. I used 4 balsa sheets whose width is 10cm and stick it with the
nose section with the help of hot glue.
Figure 57fuselage front covering
Mounting of the motor is very crucial part of the construction, as I have no idea
how I can attach my mounting with fuselage. First I used to fix it with glue only
but as motor have to face a heavy pressure so I use the sliding technique in
which it holds the mounting from bottom and upper side. And I use ply wood
for mounting of motor, so first I decide to place one ply only but later on testing
I realize that single ply wood piece isn’t face the huge amount of pressure, so I
place one more ply wood bar at the bottom of the mounting due to which the
strength of the mounting get increases and it can able to face u huge amount of
pressure.
66. AMAR SAJJAD, SALMAN SADIQ, MUHAMMAD RIZWAN, ADBUL RAHMAN, MUHAFIZ GHOGARI 66
Figure 58 center motor mounted on fuselage
Figure 59fuselage shown after engine mounted
Finally when all the construction completed, me start learn about programing
from Salman & Amir. I need to connect my motor with ESC and then connect
the ESC with the battery & the transmitter making it work and then adjust the
motor at channel 5, when all the connections are done we made sure that all the
inputs in the transmitter are off and then we switched on the transmitter and
check it, as it work perfectly or not.
Figure 60ESC shown
67. AMAR SAJJAD, SALMAN SADIQ, MUHAMMAD RIZWAN, ADBUL RAHMAN, MUHAFIZ GHOGARI 67
The battery I used in fuselage is high performance Li-po Battery 3300mAh, 25C-
14.8V-4S1P. It is a 4 cell battery and work till 4.5 minutes during heavy
operation. In normal operation it works around 6 to 8 minutes.
Figure 61 3300 mAh center fuselage battery shown
We use the Brushless Out runner
Motor 870Kv which have 25 power. It can hold the aircraft up to 2.5 KG
weight. It is high torque direction drive alternative to in runner brushless
motor.
Specification of motor:
Diameter: 35mm
Case length: 54mmWeight: 190g
Shaft Diameter: 5mm
Continuous current: 32A
Max burst Current: 44A
Max power output: 537.6 watts
Figure 62 motor box shown specs
Figure 63 motor box showing specifications
68. AMAR SAJJAD, SALMAN SADIQ, MUHAMMAD RIZWAN, ADBUL RAHMAN, MUHAFIZ GHOGARI 68
Cells 3-4S Li-Po
Requires 40A or higher brushless ESC.
After the programing part I start working on the fuselage upper covering. I used
this Balsa sheet for the covering of the top part. I cut two pieces of it and place
it around the wing attachment rod. There is some gap in between the two pieces
which is covered by monokote. And I fix that coving by screwing bolt.
Figure 64 fuselage upper part fixed where wing is mounted
For Monokote I have no idea how I do monokote my part so didn’t take help any
of our group member but there is one person who help me to provide me the
tools and teach me how to monokote the parts, this problem is overcome by
David as he teach me properly how I do monokote the fuselage part properly.
Then I easily do the whole monokote to my fuselage
Figure 65 fuselage after monokote covering
Strength of my work during project:
I was very conscious about making the Fuselage perfect by analysing smallest
imperfection possible and made sure that they are corrected in minimum
time. I made some of the strong decisions and made sure that all of the
members are agree to the decisions that I made. Always made sure that I
69. AMAR SAJJAD, SALMAN SADIQ, MUHAMMAD RIZWAN, ADBUL RAHMAN, MUHAFIZ GHOGARI 69
listen to my group members and they are happy with the working
environment.
Weakness of my work during project:
Time management is very bad, all of the assignments, project work and exams
were on our head and the workload was increased unnecessary. Lack of
knowledge about programming the whole aircraft. Difficult to produce report
and making presentation because I’m not good in it.
The mistakes that I did in my project work.
One of the major mistake I did was I fixed the servo of horizontal elevator
at the tail of fuselage. And then I have to remove it because of rizwan’s
decision.
The nose covering that I did I have to peal it off because I have to install the
landing gears then I cover the nose part.
I made a single plywood housing for the motor mounting instead of single I
have to use twice to make it stiffer.
The experience that I had with the team was very good as we encourage each
other’s work and adjust with each other’s decisions. Although we had some
arguments but then at the end of the day it was for a goof purpose and I think
this should continue till the end, the coordination and working environment
also contributes to good working We were little late in our work but I think the
late submission is genuine as we had assignments, housework’s and exams
coming in between.
Construction of the left boom
Done by Muhafiz Ghogari
The part which I am making in the project is the boom. It is cuboidal shaped and
will be made by using balsa wood.
The balsa wood is very light in weight and at the same time strong too. It can be
easily cut with blades and shaped easily using sand paper to give it smooth
shape and surface. The different grades of balsa wood include:
- Ultra-Light
- Light
70. AMAR SAJJAD, SALMAN SADIQ, MUHAMMAD RIZWAN, ADBUL RAHMAN, MUHAFIZ GHOGARI 70
- Light Medium
- Medium
- Medium Hard
- Hard,
Amongst which, ultra-light is the lightest balsa wood with the lowest density
and the hard balsa being the strongest and heaviest balsa with the highest
density. Furthermore the balsa wood is also divided in grain types,
A – Grain. This type of balsa wood has long straight lines and is very flexible and
light weight. It is generally used to wrap the fuselage, leading edge or trailing
edge surfaces of the wings.
B - Grain. This type pf wood is A & C mix type. It is long weight to medium type
and it is used to make fuselage or the wing ribs. This is the type of balsa which
I will use in my project to make the boom.
C – Grain. This type of balsa is short length grain which is medium hard to hard.
It is generally used for making fuselage and empennage The balsa wood I have
already purchased from Ace
Figure 66 grades of balsa
71. AMAR SAJJAD, SALMAN SADIQ, MUHAMMAD RIZWAN, ADBUL RAHMAN, MUHAFIZ GHOGARI 71
hardware shop. I tried to order online but the cost of shipping was more than
the cost of products and also it was taking long to be delivered.
The length of the boom is 70cm and as one of the three motors will be mounted
on this part, this part needs to be strong.
Once I have finished cutting all the parts needed for my boom, for the parts of
the boom which will be needed to be smoothened and I will smoothen it using
a sand paper of grade 150 or 180. The sand paper I have already purchased
from ace hardware shop along with the balsa wood.
Once I have finished smoothening the surfaces I will start gluing the parts with
each other. For this I will use Ciano / super glue to hold the surfaces in desired
angle and position at first and then apply glue gun to make the hold stronger. I
will attach the ribs and all the other parts of the boom except the front part and
the top side of the boom. This is because I will need to place
Figure 67superglue
Figure 68hotglue gun
the batteries, wires, servos and the motors in the boom.
72. AMAR SAJJAD, SALMAN SADIQ, MUHAMMAD RIZWAN, ADBUL RAHMAN, MUHAFIZ GHOGARI 72
Also, for the servo and the battery I will make a housing of the same grade balsa
wood and glue it to the inner side of the bottom of the boom so that they don’t
move and stick to their place during flight.
The last thing that I will work on the boom is the motor before covering the
boom from the top side. For the motor (which we haven’t decided yet as we
want to see the weight of the aircraft before deciding the appropriate motor to
use) I will use hard balsa to make its housing in the front side of the boom. The
housing will be used to hold firmly the servo and the rods which will help the
motor to rotate by 90 degree up. I will use aluminium rods to hold the motor
and a ring in which the motor will be placed. At last I will connect the motor,
servos and the batteries and see the working of the motor. If it is working
perfectly I will finally close the boom from the top side by gluing the top side of
the boom. Once the whole structure is complete, I will use sand paper to
smoother the edges and the extra glue on the edges will be filed using a metal
file. If there is some spacing left in the boom it can be easily filled using baking
soda and super glue. Baking soda and super glue make a very hard hold also
cover the surface easily.
My part of the model was the left side of the boom. The whole boom was of
70cm in length but we planned to make it into two sections of 40cm and 30cm.
the width and height of the boom is 6cm x 6cm. the front section of the boom is
40cm long which is a simple cuboid. The rear section of the boom which is 30cm
long is of conical shape which at the front end is 6cm x 6cm and at the rear is
1cm x 1cm.
The reason we came up with this idea of dividing the boom into two section was
because it wouldn’t be possible to bend the balsa sheet into a perfect cuboid
into a cone section as the balsa would break. To make things easy and save time
and resources we first decided to make
Figure 69dummy prototype from front
73. AMAR SAJJAD, SALMAN SADIQ, MUHAMMAD RIZWAN, ADBUL RAHMAN, MUHAFIZ GHOGARI 73
Figure 70dummy prototype from side
the model with cardboard. Given below are some images of the model made by
cardboard.
After making the model with cardboard we decided what all resources we
would need to make the model with balsa wood.
The resources are as follows:
Glue Gun: the glue gun was used to make stick the different parts of the model
which needed extra tough bond which we wouldn’t get with superglue.
Surgical Blades: the surgical blades were used to cut the balsa wood. As the
surgical blades are very sharp they cut the wood very precisely and easily.
Sand Paper: the sand paper were used to give finishing to the cut parts and also
shape them. I used grade 150 and 180 sand paper for my part.
Aluminum Sheet: the aluminum sheet was used at the front of the boom where
the motor was to be attached.
Cutter: the hard cutter was used to cut the aluminum and ply wood used for the
front part of the boom where the motor was to be attached.
Drill Machine: the drill machine was used to drill holes in the front part of the
mount of the motor.
Hack Saw: the hack saw was used to cut the aluminum sheet.
Motor Used:
Type: Brushless out runner
Size: Replacement for 25-size glow engine
74. AMAR SAJJAD, SALMAN SADIQ, MUHAMMAD RIZWAN, ADBUL RAHMAN, MUHAFIZ GHOGARI 74
Bearings or Bushings: One 5 x 14 x 5mm Bearing, and Two 5 x 11 x 4mm
Bearings
Wire Gauge: 14
Recommended Prop Range: 11x8 to 14x7
Voltage: 12–16.8
RPM/Volt (Kv): 870
Resistance (Ri): .03 ohms
Idle Current (Io): 2.40A @ 10V
Continuous Current: 32A
Maximum Burst Current: 44A (15 sec)
Cells: 3S-4S Li-Po or 10–14 Ni-MH/Ni-Cd
Speed Control: 40–45A brushless
Weight: 190 g (6.7 oz)
Overall Diameter: 35mm (1.40 in)
Shaft Diameter: 5mm (.20 in)
Overall Length: 54mm (2.10 in)
9) Servo used for the Rudder
Modulation: Analog
Torque: 4.8V: 44.0 oz.-in (3.17 kg-cm) 6.0V:
4.10 kg-cm
Speed: 4.8V: 0.23 sec/60° 6.0V: 0.19
sec/60°
Weight: 1.31 oz.
(37.0 g)
Dimensions: Length: 1.57
in (39.9 mm)
75. AMAR SAJJAD, SALMAN SADIQ, MUHAMMAD RIZWAN, ADBUL RAHMAN, MUHAFIZ GHOGARI 75
Width: 0.79 in
(20.1 mm)
Height: 1.42 in
(36.1 mm)
Gear Type:
Plastic
Rotation/Support:
Bushing
Servo used for the motor:
Specifications:
Voltage: 4.5v~6v
Speed: .19sec
Torque: 10.5kg/cm
Bearings: 2BB
Gears: Metal
Weight: 49g
Size: 40.7x20x39.4mm
10) Battery Used:
Specifications:
2600mAh 25C 14.8V 4S1P
Endurance: 3.5 min
The work was going as per the Gantt chart and all my work was up to date. The
cutting of balsa, joining them and making one single boom. But one of my group
members by mistake broke my boom as the drill machine he was using fell on
76. AMAR SAJJAD, SALMAN SADIQ, MUHAMMAD RIZWAN, ADBUL RAHMAN, MUHAFIZ GHOGARI 76
my boom. Due to this I had to go and buy new balsa wood and make the whole
boom again which merely took one day as I gave one whole day to keep up with
the date. Once the boom was made I started fitting the motor but the
mechanism we had thought was not efficient and thus we had to think of a new
mechanism which took us two more day to search and develop the mechanism.
So we were late by two days again. Once we decided the mechanism it was easy
to mount the motors and servos and that didn’t take much time and thus we
were again in flow with our decided plan and dates on when to complete the
model. Everything was according to the plan to submit the project on 25th
November but just some days before the date our project examiner said the
submission date was 6th December. This gave us the time to do the finishing
work more accurately and modify some things a little and also cover the model
with monokote. The whole model was ready to be submitted on 6th December
but again one of my group member damaged the model as he tried to test the
model if it moves forward with the motors or not and by mistake he applied full
throttle and the model straightaway crashed into the wall. We showed the
broken model to our examiner and convinced him it was a mistake and the
model was complete to which he agreed and said it was fine. That same day
after college we repaired the model and everything was fine only the monokote
was left which was done two days later. So basically we weren’t late in making
the model and were up to date.
Techniques Used for Construction:
Now the procedure of how I made the boom is already discussed above. The
boom was made into two sections, the front and the rear. The whole boom is of
a cuboid shape. So four balsa sheets were used to make the front section of the
boom and four balsa sheet
77. AMAR SAJJAD, SALMAN SADIQ, MUHAMMAD RIZWAN, ADBUL RAHMAN, MUHAFIZ GHOGARI 77
Figure 71 boom corner
were used to make the rear part of the boom. For the front section the balsa
sheets were cut having dimensions of 40cm x 6 cm x 6cm. the balsa sheets were
cut using surgical blade and then on the sides of the all four cut parts I used
sand paper to make the sides slant so it would make it easy for the four parts to
attach perpendicular to each other as shown in the figure below.
Figure 72 rotating motor mount
Figure 73 rotating motor mount from side