On National Teacher Day, meet the 2024-25 Kenan Fellows
Est 3 iind
1. EMBEDDED SYSTEMS TUTORIAL3- MAKING OUR FIRST
PROJECT -PART2......
Hii ..........friends this is second part of our first project tutorial,In this part we will discuss how to
program our AVR MCU with the hex file which we have generated. here is step wise process for
burning the microcontroller and implementing and testing our very first LED blinking project.
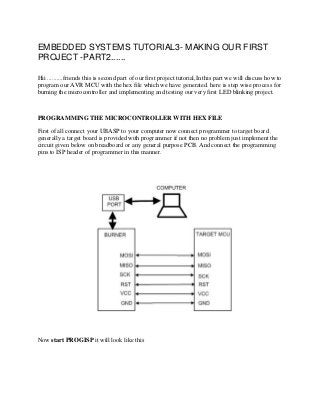
PROGRAMMING THE MICROCONTROLLER WITH HEX FILE
First of all connect your UBASP to your computer now connect programmer to target board .
generally a target board is provided with programmer if not then no problem just implement the
circuit given below on breadboard or any general purpose PCB. And connect the programming
pins to ISP header of programmer in this manner.
Now start PROGISP it will look like this
2. Choose your device i.e. ATMEGA 8 or whatever you are using, check the functions as shown,
load the flash( hex file from the project folder) click on auto …and burning starts.
3. If everything was correct till now flash will be loaded successfully.
TROUBLESHOOTING
In case flash is not successfully loaded
4. 1. Make sure programmer is working fine.
2. programmer is rightly connected to target board.
3. target board is powered up accurately.
4. In case of new ATMEGA 32 set high and low fuse bit to 0xC9 and 0xFF.
So our microcontroller in now programmed and we have to implement the circuit it
is so simple , implement given below circuit on a breadboard or vero board and provide
power supply now u can see our led is blinking and we have completed our very first
AVR project successfully.
you can use similar circuit for ATMEGA16 and ATMEGA 32 just check datasheet for
power supply pin and PB1, rest will work fine.
TROUBLESHOOTING
In case your project is not working.
1. Check weather power supply is properly connected.
2. Make sure circuit is not wrong.
3. Make sure LED is connected to right pin.
5. So this was our first blinking LED project , we implemented it
successfully , I hope it was beneficial for all of you. if you have any doubts, questions, critical
view you can leave comments. In case if you have faced some problem with hardware and your
project was not successful do not worry in next Tutorial we will make this project
on PROTEUSand will virtually simulate our project.....till then bye.....:)