SlideShare uma empresa Scribd logo
1 de 11
Baixar para ler offline
AKAI SYNTHSTATION STUDIO
QUICK NOTES
On almost every page of SynthStation Studio, you can find the MENU button in the
upper left-hand corner and the TRANSPORT tab in the upper right-hand corner.
MENU: Opens the Main Menu where you can select any page within the app.
TRANSPORT: Reveals the transport controls (touch anywhere outside the
TRANSPORT tab to hide it again):
       BACK: Scans back through the current Song/Sequence.
       STOP: Stops playback of the current Song/Sequence. You can "double-tap" the
       STOP button to jump to the beginning of the current Sequence.
       PLAY: Starts playback of the current Song/Sequence.
       FORWARD: Scans forward through the current Song/Sequence.
       DRUM / SYNTH 1 / SYNTH 2 / SYNTH 3: Selects that part of the
       Song/Sequence for playback/editing.
       Note: When the DRUM part is selected, certain features in the app will be
       disabled because they do not apply to the drums. These include the Synth Edit
       Page controls, the X/Y controls, and inapplicable faders on the Perform Page.
To adjust the position of sliders/faders, touch anywhere along the fader line to make
it "jump" to that point or touch and slide a fader to adjust it.

To adjust the position of knobs, touch the knob and slide up or down. Double-tapping
a knob will either reset it to the center position (if that is its default position) or make it
jump to the maximum level.


TABLE OF CONTENTS
MAIN (The Main Menu)
SONG/SEQ (Songs and Sequences)
      Playing a Song
      Assigning a Drum Kit to the Drum part of a Sequence
      Selecting Sounds for your Songs and Sequences
      Creating a Sequence
      Creating a Song
      Naming a Song/Sequence
      Recording a song as a WAV and MIDI file
      Deleting recorded files
PERFORM (Using the keyboard-style performance editor)
SOUNDS (Selecting Sounds for your Synths)
MIXER (Mixing your levels)
X/Y (Using the X/Y modulation controller)
SYNTH EDIT (Editing modules in your Synths)
GRID EDIT (Using the grid-style editor for your Sequences)
TEMPO (Adjusting the tempo)
DRUM KIT (Selecting & previewing Drum Kits)
DRUM EDIT (Editing Drum Kits)
EFFECTS (Selecting & adjusting Effects)
MORE INFORMATION (Help & support)


MAIN
The first screen of the SynthStudio app provides shortcut buttons to other areas of the
app as well as additional menus:
       MENU: Opens the Main Menu where you can select any page within the app.
       HELP: Opens this Help file.
       ABOUT: Opens a page indicating the current software version.
       1st panel: This is a shortcut to the Kit Select Page.
       2nd panel: This is a shortcut to the Perform Page.
       3rd panel: This is a shortcut to the Mixer Page.


SONG/SEQ
The Song/Seq Page lets you create, edit, play, and record Songs or Sequences.

In SynthStudio, a Sequence is a 1-, 2-, 4-, or 8-measure-long phrase consisting of Drum
and Synth parts. Several Sequences can be chained together to form a Song.

To enter the Song/Seq Page, touch MENU then SONG/SEQ.

Playing a Song:
(1) On the Song Grid, touch any number from 1 to 16 to select a preset Song. Touch
any number from 17 to 32 to select a Song you have already recorded.
(2) Touch TRANSPORT to reveal the transport controls.
(3) Touch PLAY to play the Song. As the Song plays, the currently playing Sequence
will be shown.
Tip: During playback, you can jump to another Sequence within the song by tapping the
Sequence you want to play next. That Sequence will then be occupied by a blue cursor.
Once the current Sequence is done playing, the blue cursor will turn gray, indicating that
it is currently playing.

Assigning a Drum Kit to the Drum part of a Sequence:
(1) Touch MENU.
(2) Touch DRUM KIT to enter the Kit Select Page.
(3) Scroll through the available Kits by touching and sliding the list up or down. Select
one by touching it. You can preview the Kit's sounds by tapping the pads on the right.
(4) If you want to adjust the pitch, level, or panning of the drum pads of a Kit, touch the
DRUM EDIT button at the top of the screen and make whatever adjustments you like.
(5) When you are finished, touch MENU to go to another page.

Selecting Sounds for your Songs and Sequences:
(1) Touch MENU.
(2) Touch SOUNDS to enter the Sounds Page.
(3) Touch TRANSPORT to reveal the transport controls.
(4) Touch the Synth part (SYNTH 1, SYNTH 2, or SYNTH 3) whose Sound you want to
assign. Touch anywhere outside the TRANSPORT tab to hide it again.
(5) Touch a number on the 64-number grid below to assign that Sound to the selected
Synth. The Sound's name will be displayed on the left. To select a different number,
touch another number or touch PREV or NEXT to move through the Sounds
sequentially.
(6) When you are finished, repeat Steps 3-5 or touch MENU to go to another page.

Creating a Sequence:
(1) On the Song Grid, touch any number from 17 to 32 to select an empty Song ("new
proj").
(2) Touch MENU.
(3) Touch GRID EDIT.
(4) Touch BACK or FORWARD to select a Sequence to create. The Sequence ("S") is
displayed on the left.
(5) Touch the part of the Sequence you want to create (DRUM, SYNTH 1, SYNTH 2, or
SYNTH 3).
(6) In the grid, the horizontal axis represents one measure of the current Sequence,
divided into 16th notes. The vertical axis represents the range of notes used in the
Sequence. (You can shift the visible section of the keyboard by touching and sliding it
up or down.) To place a note on the grid, touch an empty square. Touching any
occupied square will delete that note. (When creating Synth parts, you can touch and
slide your finger to extend the note.)
(7) When you are finished with your current Sequence, touch BACK or FORWARD to
select another Sequence, or touch MENU to go to another page.

Note: SYNTH 1 is polyphonic (multiple notes can sound simultaneously) while SYNTH
2 and SYNTH 3 are monophonic (only one note can sound at a time). When creating
mono Synth parts (SYNTH 2 and SYNTH 3), you can make legato notes by creating an
sustained note (as mentioned above) then creating another note above or below the
gray bar.

Creating a Song:
(1) On the Song Grid, touch any number from 17 to 32 to select an empty Song ("new
proj").
(2) The Sequences of the song will – by default – be arranged sequentially (the first
Sequence will be "Sequ-01," the second Sequence will be "Sequ-02," etc., unless you
named them differently). You can arrange and rearrange the order of your Sequences
by touching and holding your finger over a Sequence until a menu appears:
        SAVE: Saves the Sequence.
        COPY: Copies the Sequence.
        PASTE: Pastes a copied Sequence over the current one.
        CLEAR: Deletes the Sequence.
        CANCEL: Closes the menu.
Tip: To use the same Sequence repeatedly, instead of copying and pasting it several
times in a row, you can tap the Sequence you want to repeat then touch MEAS. The
MEAS button will turn the selected Sequence into a 1-, 2-, 4-, or 8-measure phrase of
that Sequence, depending on how many times you touch the button. (The Sequence
"cursor" will be divided into that many equal parts to indicate its length.)
(3) To play the Song, touch the TRANSPORT tab to reveal the transport controls and
touch PLAY. (Touch anywhere outside the TRANSPORT tab to hide it again.)
Tip: Touch the CHAIN button to activate or deactivate Chain Mode. When Chain Mode
is on, the CHAIN button will be lit and playback will advance through the Sequences
(and loop the entire chain of Sequences) until you deactivate CHAIN or touch STOP.
When not in Chain Mode, only the currently selected Sequence will loop until you
activate CHAIN or press STOP.
(4) When are you finished with your Song, touch and hold your finger over it until a
menu appears. Touch SAVE to save it or CANCEL to return to the previous screen
without saving.

Naming a Song/Sequence:
(1) On the Song/Seq Page, touch a Song/Sequence number to select it.
(2) Touch the blue box on the left of its grid where the name is displayed.
(3) Using the keyboard that appears, enter a name for the Song/Sequence. When you
are finished, tap "Done."
(4) To save that name to that Song/Sequence, touch and hold your finger over it until a
menu appears.
(5) Touch SAVE to save the new name or CANCEL to return to the previous screen
without saving.


Recording a song as a WAV and MIDI file:

Note: The SynthStation Studio recorder will capture all audio played by your
iPhone/iPod touch. This includes the effects of changes you make on any of the other
pages during recording, allowing you to use the app's controls in real time. (The app will
continue recording even if you exit the recording page.)

(1) Connect your iPhone/iPod touch to a local Wi-Fi network.*
(2) Connect your computer to the same Wi-Fi network.
(3) Touch the RECORDER button in the bottom right-hand corner.
(4) Touch the RECORD FILE NAME field.
(5) Using the keyboard that appears, enter a name for the Song/Sequence. When you
are finished, touch "Done."
Note: If you record a track with the same name as another track currently stored on
your iPhone/iPod touch, it will overwrite the existing track.
(6) Start recording by touching REC. (The REC button will be red while recording is in
progress.)
(7) Once you are recording, you may play your Song, play your Sequence, perform on
the Perform or Drum Edit Pages, make changes to the audio in the Mixer, Effects, or
Synth Edit Pages, etc. All audio heard on the iPhone/iPod touch will be captured in the
recording.
(8) Touch REC to stop recording. (The button will become gray again.)
(9) At the bottom of the recorder page, there will be an IP address (beginning with
"http://"). Enter this address into your computer's browser. You will see the file you
recorded as both a WAV and MIDI file.
(10) To download your file, right-click the link and select "Save Link As" (PC) or
"Download Linked File" (Mac).

* If the app is having trouble finding an IP address, we recommend deactivating then
reactivating your iPhone's/iPod touch's wi-fi connection. If this does not work, we
recommend backing up your iPhone's/iPod touch's files and apps on your computer,
resetting the iPhone/iPod touch, then resyncing it.

Deleting recorded files:
You can delete your recorded WAV and MIDI files from your iPhone/iPod touch simply
by clicking the "delete" link next to the file name in your browser when downloading.
(See Recording a song as a WAV and MIDI file to access the downloading page in
your browser.)


PERFORM
The Performance Editor is a keyboard with an octave range selector, miniature X/Y-
controller, and arpeggiator controls. On this page, you can perform Drum or Synth parts
and manipulate the sounds with the arpeggiator controls.

Select what kind of part you want to play by extending the transport controls by touching
the TRANSPORT tab. Touch DRUM, SYNTH 1, SYNTH 2, or SYNTH 3. (Touch once
anywhere outside the tab to hide the transport controls.)

Note: When the DRUM part is selected, certain features in the app will be disabled
because they do not apply to the drums. These include the Synth Edit Page controls,
the X/Y controls, and inapplicable faders on the Perform Page.

When a Synth part is selected, you can use the keyboard at the bottom of the screen to
play different notes. The entire keyboard is represented in miniature above it, and the
currently playable section is highlighted in red. You can select the range of the keyboard
by touching an area of this miniature keyboard (the red highlight will jump to that
section). You can change the number of currently playable keys (12 or 25) by double-
tapping the red section.

You can use the various faders to modify your sound:
RANGE: Determines the range of the arpeggiator (1-4 octaves).
ARP: Determines the type of arpeggiation:
       Up: The arpeggiator plays the notes you are holding from the bottom to the top.
       Once the top note is reached, the arpeggio begins from the bottom again.
       Down: The arpeggiator plays the notes you are holding from the top to the
       bottom. Once the bottom note is reached, the arpeggio begins from the top
       again.
       Incl (Inclusive): This mixes the up and down settings, playing up the notes you
       are holding and repeating the top note and the bottom note.
       Excl (Exclusive): This mixes the up and down settings, playing up the notes you
       are holding without repeating the top note and the bottom note.
       Random: The arpeggiator plays the notes you are holding down in a random
       order.
TIME DIV: Determines the note value used by the app's master clock during playback.
SWING: Determines the amount of "swing." At 50%, no "swing" will be heard (i.e.,
"straight" notes).
TEMPO: Determines the tempo of the Sequence playback.
There are two more arpeggio control buttons on the right:
       ON: Touch this to turn the arpeggiator on or off. The button will be lit when the
       arpeggiator is activated.
       LATCH: Touch this to activate Latching, which enables you to trigger continuous
       arpeggios without having to hold down the keys. A latched arpeggio will continue
       sounding until another arpeggio is triggered or Latching is deactivated. The
       button will be lit when Latching is activated.
The miniature X/Y controller lets you change the modulation of your synths. (Note: The
parameters affected by the X/Y controller can be found in the XY MOD area of the
Synth Edit Page.)


SOUNDS
On the Sounds Page, you can select different Sounds for Synth 1, Synth 2, and Synth
3.

(1) Touch TRANSPORT to reveal the transport controls.
(2) Touch the Synth part (SYNTH 1, SYNTH 2, or SYNTH 3) whose Sound you want to
assign. Touch anywhere outside the TRANSPORT tab to hide it again.
(3) Touch a number on the 64-number grid below to assign that Sound to the selected
Synth. The Sound's name will be displayed on the left. To select a different number,
touch another number or touch PREV or NEXT to move through the Sounds
sequentially.
(4) When you are finished, repeat Steps 3-5 or touch MENU to go to another page.
Touch and hold a Sound number to bring up a window in which you can:
       SAVE: Saves the Sound.
       COPY: Copies the Sound.
       PASTE: Pastes a copied Sound over the current one.
       CLEAR: Deletes the Sound.
       CANCEL: Closes the menu.


MIXER
The Mixer Page allows you to adjust the fader levels of the Drum Kit, Synth 1, Synth 2,
and Synth 3 as well as Send levels and the Master Volume.

Touch anywhere along the fader line to make it "jump" to that point or touch and slide a
fader to adjust it.

To adjust the Send levels, touch the knob and slide up or down. You can make it
automatically "jump" to the maximum level by double-tapping it.

To mute a part, press the corresponding button at the bottom of the fader. The button
will be red when muting. (Note: This will mute the MIDI of a part but not the audio, so
some notes may trail off after muting the part before it actually falls silent.)

Touch the FX CONFIG button at the top of the page to jump to the Effects Page (where
you can easily jump back to the Mixer Page by pressing the Mixer shortcut button).


X/Y
The X/Y Page contains both a standard X/Y pad and Joystick controller, which changes
the modulation of your synths. Press the X/Y PAD or JOYSTICK button to select the
view. (Note: The parameters affected by the X/Y controller can be found in the XY MOD
area of the Synth Edit Page.)

Note: When the DRUM part is selected, certain features in the app will be disabled
because they do not apply to the drums. These include the Synth Edit Page controls,
the X/Y controls, and inapplicable faders on the Perform Page.
To adjust the point on the X/Y controller, touch anywhere on the pad and the point will
"jump" to that point. You can also touch and slide the point for finer adjustments. To
create a "patterned" modulation, you can touch and slide the point then release it to set
it in motion. It will remain in motion – likely ricocheting around the X/Y pad – until you
touch the pad to set it in one place again.

The Joystick controller allows you to move the point within a circular area (as opposed
to the rectangular X/Y pad).

You can also set the Joystick so the point automatically snaps back to center after you
release it from any point. To do this, touch the SNAP button, which will light when this
function is activated. You can adjust the speed at which the point moves back to the
center with the RETURN SPEED slider.


SYNTH EDIT
The Synth Edit Page allows you to adjust the modules in your Synths. The first screen
of the page shows you the 12 available modules. Touch one to enter it. To return to the
main Synth Edit Page, touch the BACK button or double-tap an area with no
buttons/sliders.

To adjust faders, touch anywhere along the fader line to make it "jump" to that point or
touch and slide a fader to adjust it. To adjust knobs, touch the knob and slide up or
down. To reset a knob, double-tap it.

You can change which Synth you are editing from any screen by touching the
TRANSPORT tab then touching SYNTH 1, SYNTH 2, or SYNTH 3.


GRID EDIT
The Grid Edit Page lets you edit your Sequences, one measure at a time, in grid format.
To select which measure or Sequence you are editing, touch the BACK or FORWARD
buttons to scroll through them.

Note: While playing a Song in the Grid Edit page (with Chain Mode activated), the grid
will only show one measure of each Sequence (though it will actually play every
measure), and that number measure will be the only one shown in each Sequence that
follows.

For instance, if you play a Song and are viewing Measure 3 of Sequence 1, you will
hear Sequence 1 playing normally but only see Measure 3. When Sequence 2 begins
playing, you will hear the entire Sequence but only see its Measure 3. When Sequence
3 begins playing, you will hear the entire Sequence but only see its Measure 3.

You can change the measure you are viewing with the BACK or FORWARD buttons in
the TRANSPORT tab. (When Chain Mode is deactivated, the current Sequence will be
looped during playback. In this case, each measure will be shown in the grid as it is
playing.)
Creating/editing a Sequence:
(1) Touch BACK or FORWARD to select a Sequence to create/edit. The Sequence ("S")
and measure ("M") numbers are displayed on the left.
(2) Touch the part of the Sequence you want to create/edit (DRUM, SYNTH 1, SYNTH
2, or SYNTH 3).
(3) In the grid, the horizontal axis represents one measure of the current Sequence,
divided into 16th notes. The vertical axis represents the range of notes used in the
Sequence. (You can shift the visible section of the keyboard by touching and sliding it
up or down.)
        -- To place a note on the grid, touch an empty square.
        -- Touching any occupied square will delete that note.
        -- When creating Synth parts, you can touch and slide your finger to extend the
        note, causing it to sustain. The sustained part of the note will be shown as a gray
        bar on the grid.
        -- When creating mono Synth parts (SYNTH 2 and SYNTH 3), you can make
        legato notes by creating an sustained note (as mentioned above) then creating
        another note above or below the gray bar.
(4) When you are finished with your current Sequence, touch BACK or FORWARD to
select another Sequence, or touch MENU to go to another page.

Note: SYNTH 1 is polyphonic (multiple notes can sound simultaneously) while SYNTH
2 and SYNTH 3 are monophonic (only one note can sound at a time). When creating
mono Synth parts (SYNTH 2 and SYNTH 3), you can make legato notes by creating an
sustained note (as mentioned above) then creating another note above or below the
gray bar.


TEMPO
The Tempo Page lets you set the playback tempo for the current Sequence. You can do
this one of two ways:

TAP TEMPO: You can tap the TAP TEMPO button at the desired tempo, and the
software will automatically detect the BPM reading and display it above. For more
precise detection, increase the setting of the TAP AMOUNT slider on the left, which
determines how many taps are required to derive a tempo.
TEMPO SLIDER: You can manually adjust the tempo by touching and sliding the
TEMPO SLIDER on the right-hand side until the desired BPM is displayed.


DRUM KIT
The Kit Select Page lets you select the Drum Kit for the current Sequence:

(1) Scroll through the available Kits by touching and sliding the list up or down. Select
one by touching it. You can preview the Kit's sounds by tapping the pads on the right.
(2) If you want to adjust the pitch, level, or panning of the drum pads of a Kit, touch the
DRUM EDIT button at the top of the screen and make whatever adjustments you like.
For convenience, you can jump between the Drum Kit and Drum Edit Pages in this
fashion.
(3) When you are finished, touch MENU to go to another page.


DRUM EDIT
The Drum Edit Page lets you adjust the pitch, level, and left/right panning of each pad of
a Drum Kit.

To adjust the PITCH or LEVEL faders, touch anywhere along the fader line to make it
"jump" to that point or touch and slide a fader to adjust it. To adjust PAN knob, touch the
knob and slide up or down. You can reset the knob to the center by double-tapping it.

To jump to the Kit Select Page, press the KIT SELECT button at the top of the screen.
For convenience, you can jump between the Drum Kit and Drum Edit Pages in this
fashion.


EFFECTS
The Effects Page lets you apply various effects. You can select the desired effect
(Phaser, Flanger, Chorus, and/or Delay) with the corresponding button at the top of the
page.

How much effect is heard is determined by the LEVEL fader on each effect's page. To
adjust the faders, touch anywhere along the fader line to make it "jump" to that point or
touch and slide a fader to adjust it.
To turn off effects, press the FX NONE button so it is lit. To turn effects back on, press it
again so it is unlit.

To jump to the Mixer Page, press the MIXER button in the upper right-hand corner of
the screen. For convenience, you can jump between the Effects Page (FX CONFIG)
and Mixer Page (MIXER) in this fashion.


MORE INFORMATION
For more information about this software, download a PDF of the Reference Manual to
your computer by visiting http://www.akaipro.com/synthstation and clicking the "Docs
& Downloads" tab.

Mais conteúdo relacionado

Mais procurados

Manuale Karaoke5 En
Manuale Karaoke5 EnManuale Karaoke5 En
Manuale Karaoke5 EnRafael R.
 
Channel strip week3_imp
Channel strip week3_impChannel strip week3_imp
Channel strip week3_impJan Zurcher
 
Music video script_template_update_nov_2013
Music video script_template_update_nov_2013Music video script_template_update_nov_2013
Music video script_template_update_nov_2013DenniHepburn
 
How To Use A Digital Voice Recorder
How To Use A Digital Voice RecorderHow To Use A Digital Voice Recorder
How To Use A Digital Voice Recordercramars
 
Desktop Production Logic Pro X Keyboard Shortcuts
Desktop Production Logic Pro  X Keyboard ShortcutsDesktop Production Logic Pro  X Keyboard Shortcuts
Desktop Production Logic Pro X Keyboard ShortcutsMagic Finger Lounge
 
Can You Hear Me Now? Exercises
Can You Hear Me Now? ExercisesCan You Hear Me Now? Exercises
Can You Hear Me Now? ExercisesAlison Aldrich
 
Aprisa Quick Start
Aprisa Quick StartAprisa Quick Start
Aprisa Quick Startsweetapplej
 
97expedition audio
97expedition audio97expedition audio
97expedition audiorukford1
 
Ashleigh darlington audio sequencing annotations
Ashleigh darlington audio sequencing annotationsAshleigh darlington audio sequencing annotations
Ashleigh darlington audio sequencing annotationssnailguinproductions
 
Using The Field Recorder
Using The Field RecorderUsing The Field Recorder
Using The Field RecorderSamuel Edsall
 
Intro to music prdctn assignment week 3
Intro to music prdctn assignment week 3Intro to music prdctn assignment week 3
Intro to music prdctn assignment week 3ianlima12
 
Descriptionof walkman
Descriptionof walkmanDescriptionof walkman
Descriptionof walkmans1190030
 

Mais procurados (20)

Manuale Karaoke5 En
Manuale Karaoke5 EnManuale Karaoke5 En
Manuale Karaoke5 En
 
MNN Studio Equipment Manual
MNN Studio Equipment ManualMNN Studio Equipment Manual
MNN Studio Equipment Manual
 
Sampling with the ESX24
Sampling with the ESX24Sampling with the ESX24
Sampling with the ESX24
 
ArpeggioUserManual
ArpeggioUserManualArpeggioUserManual
ArpeggioUserManual
 
Sjx40 fb 9xaf
Sjx40 fb 9xafSjx40 fb 9xaf
Sjx40 fb 9xaf
 
Channel strip week3_imp
Channel strip week3_impChannel strip week3_imp
Channel strip week3_imp
 
Music video script_template_update_nov_2013
Music video script_template_update_nov_2013Music video script_template_update_nov_2013
Music video script_template_update_nov_2013
 
How To Use A Digital Voice Recorder
How To Use A Digital Voice RecorderHow To Use A Digital Voice Recorder
How To Use A Digital Voice Recorder
 
CL119
CL119CL119
CL119
 
Desktop Production Logic Pro X Keyboard Shortcuts
Desktop Production Logic Pro  X Keyboard ShortcutsDesktop Production Logic Pro  X Keyboard Shortcuts
Desktop Production Logic Pro X Keyboard Shortcuts
 
Can You Hear Me Now? Exercises
Can You Hear Me Now? ExercisesCan You Hear Me Now? Exercises
Can You Hear Me Now? Exercises
 
Aprisa Quick Start
Aprisa Quick StartAprisa Quick Start
Aprisa Quick Start
 
Syl smpk8858 en
Syl smpk8858 enSyl smpk8858 en
Syl smpk8858 en
 
97expedition audio
97expedition audio97expedition audio
97expedition audio
 
Ashleigh darlington audio sequencing annotations
Ashleigh darlington audio sequencing annotationsAshleigh darlington audio sequencing annotations
Ashleigh darlington audio sequencing annotations
 
Using The Field Recorder
Using The Field RecorderUsing The Field Recorder
Using The Field Recorder
 
Sound Workshop
Sound WorkshopSound Workshop
Sound Workshop
 
Midi editing: Quantization
Midi editing: QuantizationMidi editing: Quantization
Midi editing: Quantization
 
Intro to music prdctn assignment week 3
Intro to music prdctn assignment week 3Intro to music prdctn assignment week 3
Intro to music prdctn assignment week 3
 
Descriptionof walkman
Descriptionof walkmanDescriptionof walkman
Descriptionof walkman
 

Semelhante a Synthesizer Software Music Studio App SynthStation Quickstart Guide

Using Audacity for audio recordings
Using Audacity for audio recordingsUsing Audacity for audio recordings
Using Audacity for audio recordingsNives Torresi
 
Tracer audio
Tracer audioTracer audio
Tracer audiorukford1
 
How to work reason
How to work reasonHow to work reason
How to work reasondoconjam
 
Audacity study guide
Audacity study guideAudacity study guide
Audacity study guideshannyboo18
 
How to work reason
How to work reasonHow to work reason
How to work reasondoconjam
 
Naomi Cubase Presentation
Naomi Cubase PresentationNaomi Cubase Presentation
Naomi Cubase PresentationZoe Harris
 
BeepComp - Chiptune Creator - User's Guide (v0.2.2)
BeepComp - Chiptune Creator - User's Guide (v0.2.2)BeepComp - Chiptune Creator - User's Guide (v0.2.2)
BeepComp - Chiptune Creator - User's Guide (v0.2.2)Hiro Morozumi
 
FLStudio12QuickStartGuide
FLStudio12QuickStartGuideFLStudio12QuickStartGuide
FLStudio12QuickStartGuideMarcus Britt
 
How To Create A Song Using Garage Band Without
How To Create A Song Using Garage Band Without How To Create A Song Using Garage Band Without
How To Create A Song Using Garage Band Without Luke
 
Add a software instrument and record midi and quantize in your daw
Add a software instrument and record midi and quantize in your dawAdd a software instrument and record midi and quantize in your daw
Add a software instrument and record midi and quantize in your dawSebastián La Rocca
 

Semelhante a Synthesizer Software Music Studio App SynthStation Quickstart Guide (20)

Sound editing with adacity
Sound editing with adacitySound editing with adacity
Sound editing with adacity
 
N264 76
N264   76N264   76
N264 76
 
Using Audacity for audio recordings
Using Audacity for audio recordingsUsing Audacity for audio recordings
Using Audacity for audio recordings
 
Tracer audio
Tracer audioTracer audio
Tracer audio
 
How to work reason
How to work reasonHow to work reason
How to work reason
 
Korg D1200mkii manual
Korg D1200mkii manualKorg D1200mkii manual
Korg D1200mkii manual
 
Audacity study guide
Audacity study guideAudacity study guide
Audacity study guide
 
How to work reason
How to work reasonHow to work reason
How to work reason
 
How to use reason
How to use reasonHow to use reason
How to use reason
 
Nanoloop for iOS
Nanoloop for iOSNanoloop for iOS
Nanoloop for iOS
 
A guide to reason 7
A guide to reason 7A guide to reason 7
A guide to reason 7
 
Naomi Cubase Presentation
Naomi Cubase PresentationNaomi Cubase Presentation
Naomi Cubase Presentation
 
BeepComp - Chiptune Creator - User's Guide (v0.2.2)
BeepComp - Chiptune Creator - User's Guide (v0.2.2)BeepComp - Chiptune Creator - User's Guide (v0.2.2)
BeepComp - Chiptune Creator - User's Guide (v0.2.2)
 
FLStudio12QuickStartGuide
FLStudio12QuickStartGuideFLStudio12QuickStartGuide
FLStudio12QuickStartGuide
 
How To Create A Song Using Garage Band Without
How To Create A Song Using Garage Band Without How To Create A Song Using Garage Band Without
How To Create A Song Using Garage Band Without
 
How to use reason
How to use reasonHow to use reason
How to use reason
 
Br 800 l-v1.1_e01
Br 800 l-v1.1_e01Br 800 l-v1.1_e01
Br 800 l-v1.1_e01
 
Add a software instrument and record midi and quantize in your daw
Add a software instrument and record midi and quantize in your dawAdd a software instrument and record midi and quantize in your daw
Add a software instrument and record midi and quantize in your daw
 
Sample editing
Sample editingSample editing
Sample editing
 
CL118
CL118CL118
CL118
 

Último

Introducing to billionaire brain wave.pdf
Introducing to billionaire brain wave.pdfIntroducing to billionaire brain wave.pdf
Introducing to billionaire brain wave.pdfnoumannajam04
 
Call Girls Anjuna beach Mariott Resort ₰8588052666
Call Girls Anjuna beach Mariott Resort ₰8588052666Call Girls Anjuna beach Mariott Resort ₰8588052666
Call Girls Anjuna beach Mariott Resort ₰8588052666nishakur201
 
$ Love Spells^ 💎 (310) 882-6330 in West Virginia, WV | Psychic Reading Best B...
$ Love Spells^ 💎 (310) 882-6330 in West Virginia, WV | Psychic Reading Best B...$ Love Spells^ 💎 (310) 882-6330 in West Virginia, WV | Psychic Reading Best B...
$ Love Spells^ 💎 (310) 882-6330 in West Virginia, WV | Psychic Reading Best B...PsychicRuben LoveSpells
 
Lucknow 💋 High Class Call Girls Lucknow 10k @ I'm VIP Independent Escorts Gir...
Lucknow 💋 High Class Call Girls Lucknow 10k @ I'm VIP Independent Escorts Gir...Lucknow 💋 High Class Call Girls Lucknow 10k @ I'm VIP Independent Escorts Gir...
Lucknow 💋 High Class Call Girls Lucknow 10k @ I'm VIP Independent Escorts Gir...anilsa9823
 
9892124323, Call Girls in mumbai, Vashi Call Girls , Kurla Call girls
9892124323, Call Girls in mumbai, Vashi Call Girls , Kurla Call girls9892124323, Call Girls in mumbai, Vashi Call Girls , Kurla Call girls
9892124323, Call Girls in mumbai, Vashi Call Girls , Kurla Call girlsPooja Nehwal
 
LC_YouSaidYes_NewBelieverBookletDone.pdf
LC_YouSaidYes_NewBelieverBookletDone.pdfLC_YouSaidYes_NewBelieverBookletDone.pdf
LC_YouSaidYes_NewBelieverBookletDone.pdfpastor83
 
CALL ON ➥8923113531 🔝Call Girls Aliganj Lucknow best sexual service
CALL ON ➥8923113531 🔝Call Girls Aliganj Lucknow best sexual serviceCALL ON ➥8923113531 🔝Call Girls Aliganj Lucknow best sexual service
CALL ON ➥8923113531 🔝Call Girls Aliganj Lucknow best sexual serviceanilsa9823
 
call girls in candolim beach 9870370636] NORTH GOA ..
call girls in candolim beach 9870370636] NORTH GOA ..call girls in candolim beach 9870370636] NORTH GOA ..
call girls in candolim beach 9870370636] NORTH GOA ..nishakur201
 
2k Shots ≽ 9205541914 ≼ Call Girls In Mukherjee Nagar (Delhi)
2k Shots ≽ 9205541914 ≼ Call Girls In Mukherjee Nagar (Delhi)2k Shots ≽ 9205541914 ≼ Call Girls In Mukherjee Nagar (Delhi)
2k Shots ≽ 9205541914 ≼ Call Girls In Mukherjee Nagar (Delhi)Delhi Call girls
 
Top Rated Pune Call Girls Tingre Nagar ⟟ 6297143586 ⟟ Call Me For Genuine Se...
Top Rated  Pune Call Girls Tingre Nagar ⟟ 6297143586 ⟟ Call Me For Genuine Se...Top Rated  Pune Call Girls Tingre Nagar ⟟ 6297143586 ⟟ Call Me For Genuine Se...
Top Rated Pune Call Girls Tingre Nagar ⟟ 6297143586 ⟟ Call Me For Genuine Se...Call Girls in Nagpur High Profile
 
call Now 9811711561 Cash Payment乂 Call Girls in Dwarka Mor
call Now 9811711561 Cash Payment乂 Call Girls in Dwarka Morcall Now 9811711561 Cash Payment乂 Call Girls in Dwarka Mor
call Now 9811711561 Cash Payment乂 Call Girls in Dwarka Morvikas rana
 
Lilac Illustrated Social Psychology Presentation.pptx
Lilac Illustrated Social Psychology Presentation.pptxLilac Illustrated Social Psychology Presentation.pptx
Lilac Illustrated Social Psychology Presentation.pptxABMWeaklings
 
8377087607 Full Enjoy @24/7-CLEAN-Call Girls In Chhatarpur,
8377087607 Full Enjoy @24/7-CLEAN-Call Girls In Chhatarpur,8377087607 Full Enjoy @24/7-CLEAN-Call Girls In Chhatarpur,
8377087607 Full Enjoy @24/7-CLEAN-Call Girls In Chhatarpur,dollysharma2066
 
2k Shots ≽ 9205541914 ≼ Call Girls In Dashrath Puri (Delhi)
2k Shots ≽ 9205541914 ≼ Call Girls In Dashrath Puri (Delhi)2k Shots ≽ 9205541914 ≼ Call Girls In Dashrath Puri (Delhi)
2k Shots ≽ 9205541914 ≼ Call Girls In Dashrath Puri (Delhi)Delhi Call girls
 
CALL ON ➥8923113531 🔝Call Girls Jankipuram Lucknow best sexual service
CALL ON ➥8923113531 🔝Call Girls Jankipuram Lucknow best sexual serviceCALL ON ➥8923113531 🔝Call Girls Jankipuram Lucknow best sexual service
CALL ON ➥8923113531 🔝Call Girls Jankipuram Lucknow best sexual serviceanilsa9823
 
The Selfspace Journal Preview by Mindbrush
The Selfspace Journal Preview by MindbrushThe Selfspace Journal Preview by Mindbrush
The Selfspace Journal Preview by MindbrushShivain97
 
CALL ON ➥8923113531 🔝Call Girls Rajajipuram Lucknow best sexual service
CALL ON ➥8923113531 🔝Call Girls Rajajipuram Lucknow best sexual serviceCALL ON ➥8923113531 🔝Call Girls Rajajipuram Lucknow best sexual service
CALL ON ➥8923113531 🔝Call Girls Rajajipuram Lucknow best sexual serviceanilsa9823
 
2k Shots ≽ 9205541914 ≼ Call Girls In Palam (Delhi)
2k Shots ≽ 9205541914 ≼ Call Girls In Palam (Delhi)2k Shots ≽ 9205541914 ≼ Call Girls In Palam (Delhi)
2k Shots ≽ 9205541914 ≼ Call Girls In Palam (Delhi)Delhi Call girls
 

Último (20)

Introducing to billionaire brain wave.pdf
Introducing to billionaire brain wave.pdfIntroducing to billionaire brain wave.pdf
Introducing to billionaire brain wave.pdf
 
Call Girls Anjuna beach Mariott Resort ₰8588052666
Call Girls Anjuna beach Mariott Resort ₰8588052666Call Girls Anjuna beach Mariott Resort ₰8588052666
Call Girls Anjuna beach Mariott Resort ₰8588052666
 
$ Love Spells^ 💎 (310) 882-6330 in West Virginia, WV | Psychic Reading Best B...
$ Love Spells^ 💎 (310) 882-6330 in West Virginia, WV | Psychic Reading Best B...$ Love Spells^ 💎 (310) 882-6330 in West Virginia, WV | Psychic Reading Best B...
$ Love Spells^ 💎 (310) 882-6330 in West Virginia, WV | Psychic Reading Best B...
 
Lucknow 💋 High Class Call Girls Lucknow 10k @ I'm VIP Independent Escorts Gir...
Lucknow 💋 High Class Call Girls Lucknow 10k @ I'm VIP Independent Escorts Gir...Lucknow 💋 High Class Call Girls Lucknow 10k @ I'm VIP Independent Escorts Gir...
Lucknow 💋 High Class Call Girls Lucknow 10k @ I'm VIP Independent Escorts Gir...
 
9892124323, Call Girls in mumbai, Vashi Call Girls , Kurla Call girls
9892124323, Call Girls in mumbai, Vashi Call Girls , Kurla Call girls9892124323, Call Girls in mumbai, Vashi Call Girls , Kurla Call girls
9892124323, Call Girls in mumbai, Vashi Call Girls , Kurla Call girls
 
LC_YouSaidYes_NewBelieverBookletDone.pdf
LC_YouSaidYes_NewBelieverBookletDone.pdfLC_YouSaidYes_NewBelieverBookletDone.pdf
LC_YouSaidYes_NewBelieverBookletDone.pdf
 
CALL ON ➥8923113531 🔝Call Girls Aliganj Lucknow best sexual service
CALL ON ➥8923113531 🔝Call Girls Aliganj Lucknow best sexual serviceCALL ON ➥8923113531 🔝Call Girls Aliganj Lucknow best sexual service
CALL ON ➥8923113531 🔝Call Girls Aliganj Lucknow best sexual service
 
call girls in candolim beach 9870370636] NORTH GOA ..
call girls in candolim beach 9870370636] NORTH GOA ..call girls in candolim beach 9870370636] NORTH GOA ..
call girls in candolim beach 9870370636] NORTH GOA ..
 
2k Shots ≽ 9205541914 ≼ Call Girls In Mukherjee Nagar (Delhi)
2k Shots ≽ 9205541914 ≼ Call Girls In Mukherjee Nagar (Delhi)2k Shots ≽ 9205541914 ≼ Call Girls In Mukherjee Nagar (Delhi)
2k Shots ≽ 9205541914 ≼ Call Girls In Mukherjee Nagar (Delhi)
 
Top Rated Pune Call Girls Tingre Nagar ⟟ 6297143586 ⟟ Call Me For Genuine Se...
Top Rated  Pune Call Girls Tingre Nagar ⟟ 6297143586 ⟟ Call Me For Genuine Se...Top Rated  Pune Call Girls Tingre Nagar ⟟ 6297143586 ⟟ Call Me For Genuine Se...
Top Rated Pune Call Girls Tingre Nagar ⟟ 6297143586 ⟟ Call Me For Genuine Se...
 
call Now 9811711561 Cash Payment乂 Call Girls in Dwarka Mor
call Now 9811711561 Cash Payment乂 Call Girls in Dwarka Morcall Now 9811711561 Cash Payment乂 Call Girls in Dwarka Mor
call Now 9811711561 Cash Payment乂 Call Girls in Dwarka Mor
 
(Anamika) VIP Call Girls Navi Mumbai Call Now 8250077686 Navi Mumbai Escorts ...
(Anamika) VIP Call Girls Navi Mumbai Call Now 8250077686 Navi Mumbai Escorts ...(Anamika) VIP Call Girls Navi Mumbai Call Now 8250077686 Navi Mumbai Escorts ...
(Anamika) VIP Call Girls Navi Mumbai Call Now 8250077686 Navi Mumbai Escorts ...
 
Lilac Illustrated Social Psychology Presentation.pptx
Lilac Illustrated Social Psychology Presentation.pptxLilac Illustrated Social Psychology Presentation.pptx
Lilac Illustrated Social Psychology Presentation.pptx
 
8377087607 Full Enjoy @24/7-CLEAN-Call Girls In Chhatarpur,
8377087607 Full Enjoy @24/7-CLEAN-Call Girls In Chhatarpur,8377087607 Full Enjoy @24/7-CLEAN-Call Girls In Chhatarpur,
8377087607 Full Enjoy @24/7-CLEAN-Call Girls In Chhatarpur,
 
2k Shots ≽ 9205541914 ≼ Call Girls In Dashrath Puri (Delhi)
2k Shots ≽ 9205541914 ≼ Call Girls In Dashrath Puri (Delhi)2k Shots ≽ 9205541914 ≼ Call Girls In Dashrath Puri (Delhi)
2k Shots ≽ 9205541914 ≼ Call Girls In Dashrath Puri (Delhi)
 
CALL ON ➥8923113531 🔝Call Girls Jankipuram Lucknow best sexual service
CALL ON ➥8923113531 🔝Call Girls Jankipuram Lucknow best sexual serviceCALL ON ➥8923113531 🔝Call Girls Jankipuram Lucknow best sexual service
CALL ON ➥8923113531 🔝Call Girls Jankipuram Lucknow best sexual service
 
The Selfspace Journal Preview by Mindbrush
The Selfspace Journal Preview by MindbrushThe Selfspace Journal Preview by Mindbrush
The Selfspace Journal Preview by Mindbrush
 
CALL ON ➥8923113531 🔝Call Girls Rajajipuram Lucknow best sexual service
CALL ON ➥8923113531 🔝Call Girls Rajajipuram Lucknow best sexual serviceCALL ON ➥8923113531 🔝Call Girls Rajajipuram Lucknow best sexual service
CALL ON ➥8923113531 🔝Call Girls Rajajipuram Lucknow best sexual service
 
2k Shots ≽ 9205541914 ≼ Call Girls In Palam (Delhi)
2k Shots ≽ 9205541914 ≼ Call Girls In Palam (Delhi)2k Shots ≽ 9205541914 ≼ Call Girls In Palam (Delhi)
2k Shots ≽ 9205541914 ≼ Call Girls In Palam (Delhi)
 
(Aarini) Russian Call Girls Surat Call Now 8250077686 Surat Escorts 24x7
(Aarini) Russian Call Girls Surat Call Now 8250077686 Surat Escorts 24x7(Aarini) Russian Call Girls Surat Call Now 8250077686 Surat Escorts 24x7
(Aarini) Russian Call Girls Surat Call Now 8250077686 Surat Escorts 24x7
 

Synthesizer Software Music Studio App SynthStation Quickstart Guide

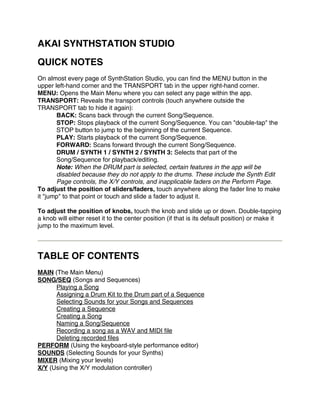
  • 1. AKAI SYNTHSTATION STUDIO QUICK NOTES On almost every page of SynthStation Studio, you can find the MENU button in the upper left-hand corner and the TRANSPORT tab in the upper right-hand corner. MENU: Opens the Main Menu where you can select any page within the app. TRANSPORT: Reveals the transport controls (touch anywhere outside the TRANSPORT tab to hide it again): BACK: Scans back through the current Song/Sequence. STOP: Stops playback of the current Song/Sequence. You can "double-tap" the STOP button to jump to the beginning of the current Sequence. PLAY: Starts playback of the current Song/Sequence. FORWARD: Scans forward through the current Song/Sequence. DRUM / SYNTH 1 / SYNTH 2 / SYNTH 3: Selects that part of the Song/Sequence for playback/editing. Note: When the DRUM part is selected, certain features in the app will be disabled because they do not apply to the drums. These include the Synth Edit Page controls, the X/Y controls, and inapplicable faders on the Perform Page. To adjust the position of sliders/faders, touch anywhere along the fader line to make it "jump" to that point or touch and slide a fader to adjust it. To adjust the position of knobs, touch the knob and slide up or down. Double-tapping a knob will either reset it to the center position (if that is its default position) or make it jump to the maximum level. TABLE OF CONTENTS MAIN (The Main Menu) SONG/SEQ (Songs and Sequences) Playing a Song Assigning a Drum Kit to the Drum part of a Sequence Selecting Sounds for your Songs and Sequences Creating a Sequence Creating a Song Naming a Song/Sequence Recording a song as a WAV and MIDI file Deleting recorded files PERFORM (Using the keyboard-style performance editor) SOUNDS (Selecting Sounds for your Synths) MIXER (Mixing your levels) X/Y (Using the X/Y modulation controller)
  • 2. SYNTH EDIT (Editing modules in your Synths) GRID EDIT (Using the grid-style editor for your Sequences) TEMPO (Adjusting the tempo) DRUM KIT (Selecting & previewing Drum Kits) DRUM EDIT (Editing Drum Kits) EFFECTS (Selecting & adjusting Effects) MORE INFORMATION (Help & support) MAIN The first screen of the SynthStudio app provides shortcut buttons to other areas of the app as well as additional menus: MENU: Opens the Main Menu where you can select any page within the app. HELP: Opens this Help file. ABOUT: Opens a page indicating the current software version. 1st panel: This is a shortcut to the Kit Select Page. 2nd panel: This is a shortcut to the Perform Page. 3rd panel: This is a shortcut to the Mixer Page. SONG/SEQ The Song/Seq Page lets you create, edit, play, and record Songs or Sequences. In SynthStudio, a Sequence is a 1-, 2-, 4-, or 8-measure-long phrase consisting of Drum and Synth parts. Several Sequences can be chained together to form a Song. To enter the Song/Seq Page, touch MENU then SONG/SEQ. Playing a Song: (1) On the Song Grid, touch any number from 1 to 16 to select a preset Song. Touch any number from 17 to 32 to select a Song you have already recorded. (2) Touch TRANSPORT to reveal the transport controls. (3) Touch PLAY to play the Song. As the Song plays, the currently playing Sequence will be shown. Tip: During playback, you can jump to another Sequence within the song by tapping the Sequence you want to play next. That Sequence will then be occupied by a blue cursor. Once the current Sequence is done playing, the blue cursor will turn gray, indicating that it is currently playing. Assigning a Drum Kit to the Drum part of a Sequence: (1) Touch MENU. (2) Touch DRUM KIT to enter the Kit Select Page.
  • 3. (3) Scroll through the available Kits by touching and sliding the list up or down. Select one by touching it. You can preview the Kit's sounds by tapping the pads on the right. (4) If you want to adjust the pitch, level, or panning of the drum pads of a Kit, touch the DRUM EDIT button at the top of the screen and make whatever adjustments you like. (5) When you are finished, touch MENU to go to another page. Selecting Sounds for your Songs and Sequences: (1) Touch MENU. (2) Touch SOUNDS to enter the Sounds Page. (3) Touch TRANSPORT to reveal the transport controls. (4) Touch the Synth part (SYNTH 1, SYNTH 2, or SYNTH 3) whose Sound you want to assign. Touch anywhere outside the TRANSPORT tab to hide it again. (5) Touch a number on the 64-number grid below to assign that Sound to the selected Synth. The Sound's name will be displayed on the left. To select a different number, touch another number or touch PREV or NEXT to move through the Sounds sequentially. (6) When you are finished, repeat Steps 3-5 or touch MENU to go to another page. Creating a Sequence: (1) On the Song Grid, touch any number from 17 to 32 to select an empty Song ("new proj"). (2) Touch MENU. (3) Touch GRID EDIT. (4) Touch BACK or FORWARD to select a Sequence to create. The Sequence ("S") is displayed on the left. (5) Touch the part of the Sequence you want to create (DRUM, SYNTH 1, SYNTH 2, or SYNTH 3). (6) In the grid, the horizontal axis represents one measure of the current Sequence, divided into 16th notes. The vertical axis represents the range of notes used in the Sequence. (You can shift the visible section of the keyboard by touching and sliding it up or down.) To place a note on the grid, touch an empty square. Touching any occupied square will delete that note. (When creating Synth parts, you can touch and slide your finger to extend the note.) (7) When you are finished with your current Sequence, touch BACK or FORWARD to select another Sequence, or touch MENU to go to another page. Note: SYNTH 1 is polyphonic (multiple notes can sound simultaneously) while SYNTH 2 and SYNTH 3 are monophonic (only one note can sound at a time). When creating mono Synth parts (SYNTH 2 and SYNTH 3), you can make legato notes by creating an sustained note (as mentioned above) then creating another note above or below the gray bar. Creating a Song: (1) On the Song Grid, touch any number from 17 to 32 to select an empty Song ("new proj").
  • 4. (2) The Sequences of the song will – by default – be arranged sequentially (the first Sequence will be "Sequ-01," the second Sequence will be "Sequ-02," etc., unless you named them differently). You can arrange and rearrange the order of your Sequences by touching and holding your finger over a Sequence until a menu appears: SAVE: Saves the Sequence. COPY: Copies the Sequence. PASTE: Pastes a copied Sequence over the current one. CLEAR: Deletes the Sequence. CANCEL: Closes the menu. Tip: To use the same Sequence repeatedly, instead of copying and pasting it several times in a row, you can tap the Sequence you want to repeat then touch MEAS. The MEAS button will turn the selected Sequence into a 1-, 2-, 4-, or 8-measure phrase of that Sequence, depending on how many times you touch the button. (The Sequence "cursor" will be divided into that many equal parts to indicate its length.) (3) To play the Song, touch the TRANSPORT tab to reveal the transport controls and touch PLAY. (Touch anywhere outside the TRANSPORT tab to hide it again.) Tip: Touch the CHAIN button to activate or deactivate Chain Mode. When Chain Mode is on, the CHAIN button will be lit and playback will advance through the Sequences (and loop the entire chain of Sequences) until you deactivate CHAIN or touch STOP. When not in Chain Mode, only the currently selected Sequence will loop until you activate CHAIN or press STOP. (4) When are you finished with your Song, touch and hold your finger over it until a menu appears. Touch SAVE to save it or CANCEL to return to the previous screen without saving. Naming a Song/Sequence: (1) On the Song/Seq Page, touch a Song/Sequence number to select it. (2) Touch the blue box on the left of its grid where the name is displayed. (3) Using the keyboard that appears, enter a name for the Song/Sequence. When you are finished, tap "Done." (4) To save that name to that Song/Sequence, touch and hold your finger over it until a menu appears. (5) Touch SAVE to save the new name or CANCEL to return to the previous screen without saving. Recording a song as a WAV and MIDI file: Note: The SynthStation Studio recorder will capture all audio played by your iPhone/iPod touch. This includes the effects of changes you make on any of the other pages during recording, allowing you to use the app's controls in real time. (The app will continue recording even if you exit the recording page.) (1) Connect your iPhone/iPod touch to a local Wi-Fi network.* (2) Connect your computer to the same Wi-Fi network. (3) Touch the RECORDER button in the bottom right-hand corner.
  • 5. (4) Touch the RECORD FILE NAME field. (5) Using the keyboard that appears, enter a name for the Song/Sequence. When you are finished, touch "Done." Note: If you record a track with the same name as another track currently stored on your iPhone/iPod touch, it will overwrite the existing track. (6) Start recording by touching REC. (The REC button will be red while recording is in progress.) (7) Once you are recording, you may play your Song, play your Sequence, perform on the Perform or Drum Edit Pages, make changes to the audio in the Mixer, Effects, or Synth Edit Pages, etc. All audio heard on the iPhone/iPod touch will be captured in the recording. (8) Touch REC to stop recording. (The button will become gray again.) (9) At the bottom of the recorder page, there will be an IP address (beginning with "http://"). Enter this address into your computer's browser. You will see the file you recorded as both a WAV and MIDI file. (10) To download your file, right-click the link and select "Save Link As" (PC) or "Download Linked File" (Mac). * If the app is having trouble finding an IP address, we recommend deactivating then reactivating your iPhone's/iPod touch's wi-fi connection. If this does not work, we recommend backing up your iPhone's/iPod touch's files and apps on your computer, resetting the iPhone/iPod touch, then resyncing it. Deleting recorded files: You can delete your recorded WAV and MIDI files from your iPhone/iPod touch simply by clicking the "delete" link next to the file name in your browser when downloading. (See Recording a song as a WAV and MIDI file to access the downloading page in your browser.) PERFORM The Performance Editor is a keyboard with an octave range selector, miniature X/Y- controller, and arpeggiator controls. On this page, you can perform Drum or Synth parts and manipulate the sounds with the arpeggiator controls. Select what kind of part you want to play by extending the transport controls by touching the TRANSPORT tab. Touch DRUM, SYNTH 1, SYNTH 2, or SYNTH 3. (Touch once anywhere outside the tab to hide the transport controls.) Note: When the DRUM part is selected, certain features in the app will be disabled because they do not apply to the drums. These include the Synth Edit Page controls, the X/Y controls, and inapplicable faders on the Perform Page. When a Synth part is selected, you can use the keyboard at the bottom of the screen to
  • 6. play different notes. The entire keyboard is represented in miniature above it, and the currently playable section is highlighted in red. You can select the range of the keyboard by touching an area of this miniature keyboard (the red highlight will jump to that section). You can change the number of currently playable keys (12 or 25) by double- tapping the red section. You can use the various faders to modify your sound: RANGE: Determines the range of the arpeggiator (1-4 octaves). ARP: Determines the type of arpeggiation: Up: The arpeggiator plays the notes you are holding from the bottom to the top. Once the top note is reached, the arpeggio begins from the bottom again. Down: The arpeggiator plays the notes you are holding from the top to the bottom. Once the bottom note is reached, the arpeggio begins from the top again. Incl (Inclusive): This mixes the up and down settings, playing up the notes you are holding and repeating the top note and the bottom note. Excl (Exclusive): This mixes the up and down settings, playing up the notes you are holding without repeating the top note and the bottom note. Random: The arpeggiator plays the notes you are holding down in a random order. TIME DIV: Determines the note value used by the app's master clock during playback. SWING: Determines the amount of "swing." At 50%, no "swing" will be heard (i.e., "straight" notes). TEMPO: Determines the tempo of the Sequence playback. There are two more arpeggio control buttons on the right: ON: Touch this to turn the arpeggiator on or off. The button will be lit when the arpeggiator is activated. LATCH: Touch this to activate Latching, which enables you to trigger continuous arpeggios without having to hold down the keys. A latched arpeggio will continue sounding until another arpeggio is triggered or Latching is deactivated. The button will be lit when Latching is activated. The miniature X/Y controller lets you change the modulation of your synths. (Note: The parameters affected by the X/Y controller can be found in the XY MOD area of the Synth Edit Page.) SOUNDS On the Sounds Page, you can select different Sounds for Synth 1, Synth 2, and Synth 3. (1) Touch TRANSPORT to reveal the transport controls. (2) Touch the Synth part (SYNTH 1, SYNTH 2, or SYNTH 3) whose Sound you want to assign. Touch anywhere outside the TRANSPORT tab to hide it again.
  • 7. (3) Touch a number on the 64-number grid below to assign that Sound to the selected Synth. The Sound's name will be displayed on the left. To select a different number, touch another number or touch PREV or NEXT to move through the Sounds sequentially. (4) When you are finished, repeat Steps 3-5 or touch MENU to go to another page. Touch and hold a Sound number to bring up a window in which you can: SAVE: Saves the Sound. COPY: Copies the Sound. PASTE: Pastes a copied Sound over the current one. CLEAR: Deletes the Sound. CANCEL: Closes the menu. MIXER The Mixer Page allows you to adjust the fader levels of the Drum Kit, Synth 1, Synth 2, and Synth 3 as well as Send levels and the Master Volume. Touch anywhere along the fader line to make it "jump" to that point or touch and slide a fader to adjust it. To adjust the Send levels, touch the knob and slide up or down. You can make it automatically "jump" to the maximum level by double-tapping it. To mute a part, press the corresponding button at the bottom of the fader. The button will be red when muting. (Note: This will mute the MIDI of a part but not the audio, so some notes may trail off after muting the part before it actually falls silent.) Touch the FX CONFIG button at the top of the page to jump to the Effects Page (where you can easily jump back to the Mixer Page by pressing the Mixer shortcut button). X/Y The X/Y Page contains both a standard X/Y pad and Joystick controller, which changes the modulation of your synths. Press the X/Y PAD or JOYSTICK button to select the view. (Note: The parameters affected by the X/Y controller can be found in the XY MOD area of the Synth Edit Page.) Note: When the DRUM part is selected, certain features in the app will be disabled because they do not apply to the drums. These include the Synth Edit Page controls, the X/Y controls, and inapplicable faders on the Perform Page.
  • 8. To adjust the point on the X/Y controller, touch anywhere on the pad and the point will "jump" to that point. You can also touch and slide the point for finer adjustments. To create a "patterned" modulation, you can touch and slide the point then release it to set it in motion. It will remain in motion – likely ricocheting around the X/Y pad – until you touch the pad to set it in one place again. The Joystick controller allows you to move the point within a circular area (as opposed to the rectangular X/Y pad). You can also set the Joystick so the point automatically snaps back to center after you release it from any point. To do this, touch the SNAP button, which will light when this function is activated. You can adjust the speed at which the point moves back to the center with the RETURN SPEED slider. SYNTH EDIT The Synth Edit Page allows you to adjust the modules in your Synths. The first screen of the page shows you the 12 available modules. Touch one to enter it. To return to the main Synth Edit Page, touch the BACK button or double-tap an area with no buttons/sliders. To adjust faders, touch anywhere along the fader line to make it "jump" to that point or touch and slide a fader to adjust it. To adjust knobs, touch the knob and slide up or down. To reset a knob, double-tap it. You can change which Synth you are editing from any screen by touching the TRANSPORT tab then touching SYNTH 1, SYNTH 2, or SYNTH 3. GRID EDIT The Grid Edit Page lets you edit your Sequences, one measure at a time, in grid format. To select which measure or Sequence you are editing, touch the BACK or FORWARD buttons to scroll through them. Note: While playing a Song in the Grid Edit page (with Chain Mode activated), the grid will only show one measure of each Sequence (though it will actually play every measure), and that number measure will be the only one shown in each Sequence that follows. For instance, if you play a Song and are viewing Measure 3 of Sequence 1, you will hear Sequence 1 playing normally but only see Measure 3. When Sequence 2 begins
  • 9. playing, you will hear the entire Sequence but only see its Measure 3. When Sequence 3 begins playing, you will hear the entire Sequence but only see its Measure 3. You can change the measure you are viewing with the BACK or FORWARD buttons in the TRANSPORT tab. (When Chain Mode is deactivated, the current Sequence will be looped during playback. In this case, each measure will be shown in the grid as it is playing.) Creating/editing a Sequence: (1) Touch BACK or FORWARD to select a Sequence to create/edit. The Sequence ("S") and measure ("M") numbers are displayed on the left. (2) Touch the part of the Sequence you want to create/edit (DRUM, SYNTH 1, SYNTH 2, or SYNTH 3). (3) In the grid, the horizontal axis represents one measure of the current Sequence, divided into 16th notes. The vertical axis represents the range of notes used in the Sequence. (You can shift the visible section of the keyboard by touching and sliding it up or down.) -- To place a note on the grid, touch an empty square. -- Touching any occupied square will delete that note. -- When creating Synth parts, you can touch and slide your finger to extend the note, causing it to sustain. The sustained part of the note will be shown as a gray bar on the grid. -- When creating mono Synth parts (SYNTH 2 and SYNTH 3), you can make legato notes by creating an sustained note (as mentioned above) then creating another note above or below the gray bar. (4) When you are finished with your current Sequence, touch BACK or FORWARD to select another Sequence, or touch MENU to go to another page. Note: SYNTH 1 is polyphonic (multiple notes can sound simultaneously) while SYNTH 2 and SYNTH 3 are monophonic (only one note can sound at a time). When creating mono Synth parts (SYNTH 2 and SYNTH 3), you can make legato notes by creating an sustained note (as mentioned above) then creating another note above or below the gray bar. TEMPO The Tempo Page lets you set the playback tempo for the current Sequence. You can do this one of two ways: TAP TEMPO: You can tap the TAP TEMPO button at the desired tempo, and the software will automatically detect the BPM reading and display it above. For more precise detection, increase the setting of the TAP AMOUNT slider on the left, which determines how many taps are required to derive a tempo.
  • 10. TEMPO SLIDER: You can manually adjust the tempo by touching and sliding the TEMPO SLIDER on the right-hand side until the desired BPM is displayed. DRUM KIT The Kit Select Page lets you select the Drum Kit for the current Sequence: (1) Scroll through the available Kits by touching and sliding the list up or down. Select one by touching it. You can preview the Kit's sounds by tapping the pads on the right. (2) If you want to adjust the pitch, level, or panning of the drum pads of a Kit, touch the DRUM EDIT button at the top of the screen and make whatever adjustments you like. For convenience, you can jump between the Drum Kit and Drum Edit Pages in this fashion. (3) When you are finished, touch MENU to go to another page. DRUM EDIT The Drum Edit Page lets you adjust the pitch, level, and left/right panning of each pad of a Drum Kit. To adjust the PITCH or LEVEL faders, touch anywhere along the fader line to make it "jump" to that point or touch and slide a fader to adjust it. To adjust PAN knob, touch the knob and slide up or down. You can reset the knob to the center by double-tapping it. To jump to the Kit Select Page, press the KIT SELECT button at the top of the screen. For convenience, you can jump between the Drum Kit and Drum Edit Pages in this fashion. EFFECTS The Effects Page lets you apply various effects. You can select the desired effect (Phaser, Flanger, Chorus, and/or Delay) with the corresponding button at the top of the page. How much effect is heard is determined by the LEVEL fader on each effect's page. To adjust the faders, touch anywhere along the fader line to make it "jump" to that point or touch and slide a fader to adjust it.
  • 11. To turn off effects, press the FX NONE button so it is lit. To turn effects back on, press it again so it is unlit. To jump to the Mixer Page, press the MIXER button in the upper right-hand corner of the screen. For convenience, you can jump between the Effects Page (FX CONFIG) and Mixer Page (MIXER) in this fashion. MORE INFORMATION For more information about this software, download a PDF of the Reference Manual to your computer by visiting http://www.akaipro.com/synthstation and clicking the "Docs & Downloads" tab.