SlideShare uma empresa Scribd logo
1 de 15
Baixar para ler offline
Instruction manual
                        Kidzofix


 Rearward facing with Isofix    Forward facing with seat belt
        9 - 18 kilo                      9 - 18 kilo

Rearward facing with seat belt Forward facing with adult belt
         9 - 25 kilo                    15 - 25 kilo

             Tested and approved according to

                   ECE R44 / 04
                     Isofix size C/R3
Important information
Thank you for choosing a child seat from Axon Kids. The team developing Kidzo-
fix have more than 30 years of experience in child safety products between us, and
we have done our outmost to make this child seat as safe as possible.
The Kidzofix child seat has of course also been tested and certified according to
ECE R/44 04, the latest European standard for child safety.
To maximize your child’s safety, please observe the following:

   Read the instructions thoroughly before you attempt to install
   the child seat. If you have any doubts, please contact your store
   of purchase, which can show you the correct installation. Incor-
   rect installation means danger to your child.

   Never mount the child seat in a seat with an active airbag. If you
   still wish to use the seat, disconnect the airbag at an authorized
   service center, or if your car is equipped with it, use the key to
   turn the airbag off. It is important to always note if the car’s in-
   dicator shows that the airbag is turned off.

   Keep the child seat facing backwards as long as possible. Studies
   have shown that the risk for an accident to be fatal for your child
   is five times higher if your seat is front facing.

   Always use the support leg when the seat is mounted backwards.
   The support leg serves a very important safety purpose and is
   designed to maximize your child’s safety in an accident.

   In case of a car accident, no matter how small, always replace the
   car seat. It may have invisible damage that seriously affects your
   child’s safety. This is also the reason for why you never should by
   a used child seat. Axon Kids recommendation is that you always
   should buy a new chair in a store.


              Read this instruction manual before assemble the
              child seat in the car.
Contents
The Kidzofix child seat is possible to use from when the child is approximately
six months, or can sit without support, up to about the age of six. The chair can
be mounted in four different ways, depending on your child’s age and size, and if
your car has ISOfix attachments or not. A review of the chair’s parts can be found
on the next page. On the following pages you will find instructions on how to
assemble your chair:
                                                                          5
Rearward facing assembly with ISOfix
If your car has ISOfix attachments, and your child weighs between 9 and 18 kilos
(20 to 39 lb), Axon Kids recommends this assembly.
                                                                               8
Rearward facing fastened with seat belt
If your car is not equipped with ISOfix attachments, you can still easily and safely
install the seat using the car’s three-point belt. This assembly can be used when the
child weighs between 9 and 25 kilos (20 to 55 lb).
                                                                            11
Forward facing assembly with seatbelt
If you want your child to sit forward and it weighs between 9 and 18 kilos, this
assembly can be used in all car seats with a three-point belt.
                                                                             13
Forward facing with adult belt				
Once the child has become large enough to sit forward and use the car’s three-point
belt, you can secure the child restraint and your child by using your Kidzone as
a booster seat. This assembly is suitable for children weighing between 15 and 25
kilos.


              Never use this child seat in a car seat that is not
              equipped with an ECE Reg 16 approved
              three-point belt.


              For the safety of you child; Use backwards
              assembly as long as possible
16


1. Belt guide top (Forward facing with       9. ISOfix
internal harness only)                       10. Tether strap
2. Head support                              11. Support leg
3. Belt guides head support (Forward fac-    12. Adjuster handles for support leg.
ing with vehicle 3 point belt)               13. Heels
4. Internal harness.                         14. Adjuster for ISOfix
5. Lower belt guide. (Forward facing with    15. Lock-off
vehicle 3 point belt)                        16. Pocket for storing manual
6. Adjuster for internal harness             17. Guide for assembly
7. Adjuster arm for seat angel               18. Indicator
8. Base                                      19. Release button
5


Rearward facing with ISOfix
                            Important to remember
                            Never mount the child seat in a seat
                   1   with an active frontal airbag. If you still
                       wish to use the seat, disconnect the airbag
                       at an authorized service center, or if your
                       car is equipped with it, use the key to turn
                       the airbag off. It is important to always note
                       if the car’s indicator shows that the airbag is
                       turned off.

                           Place the child seat
               2           Before you lift the child seat into the car,
                       start by pressing and holding the locking le-
                       ver (1). Now you can fold out the ISOfix
                       arms (2), located on the bottom side of the
                       child seat. The simplest way to lifting the
                       child seat into the car is with its back first.
                           Place the child seat in the car seat and
                       turn it so that the back is facing the front
                       direction of the car. When mounting the
                       child seat in the car’s front sear, it is possi-
                       ble, but not crucial, for the back of the child
                       seat to have contact with the dashboard.

                           Attach ISOfix-arms
                           There are two ISOfix mounts in every
                       seat of the car. You can find the brackets
                       between the backrest and the seat cushion.
                       The supplementary guides (3), which you
                       will find in the child seat, can help you find
           3              Continued on next page


 Never use the child seat in a car seat where
 airbag hasn’t been disabled.
6

the brackets and also protects upholstery on
the cushion.
Press the ISOfix arms through the guides
and fix them in the car´s mounts. When
you hear a click and both indicators (1) are
green it is properly secured. If you later wish
to remove the car seat, hold down both of
                                                            2
the release buttons (2).
Push down the lever for adjusting the sit-
ting angle (3). With the lever depressed,
you can then adjust the seat and choose one
of its three tilt positions. The choice of tilt
position should be one that is as upright
as possible, but the child should be able to            1
keep its head up on its own and the head
should not hang forward if the child falls
asleep. The rule of thumb is that the older
the child grows, the more upright the tilt
position can be. Also note that the child
seat will be angled down slightly when it is
clamped and sinks into the car’s seat.

Attach the tether straps
Your car may have two eyelets in the front          3
seat rails, or when mounting in the front
seat, in front of the same seat.

When your car has no eyelet you should in-
stead use the supplied strap which is in the
child seat. If the child seat is installed in the
rear seat, put one end of the strap through
either the rear of the front seat rails or an-
other suitable fastening point in the front
seat. The loop should be as close as possible
to the floor. Choose an appropriate length
of the strap and then put the loop through
one of the openings on the side of the strap.
When installing in the front seat the strap
    Continued on next page
7

                    has to be attached under the seat.
                    Pull out the strap from the anchor roll
                    (4) to an appropriate length. Please check
                    that the white marks on the straps(5) is
                    visible. Otherwise you could try and cross
                    the straps to give them some extra length,
                    white marks will then be visible.
                    Secure the fastening device in the loop of
                    the car or the strap. Repeat on the other
                    side. Wiggle the child seat a few times,
4                   easily from side to side.Unfold the sup-
                    port leg (6) to its maximal angle. Pull the
                    latch on the upper length adjuster (7) and
        5           pull down the leg so that it gets in con-
                    tact with the car’s floor. If the leg still can-
                    not reach the floor, repeat on the bottom
                    length adjuster (7).
                    Wiggle the chair from side to side a few
                    times more, this time with more power.
                    This will automatically tighten the anchor
                    roll.If you have mounted the child seat in
                6   the rear seat of the car, move the front seat
                    to a comfortable location. The seat’s back-
                    side can, but must not, have contact with
                    the car seat.

            7       Adjust the seat belt
                    Place the child in the child seat. Place
                    the child’s arms in between the shoul-
                    der straps so that the shoulder straps are
                    hanging over the chest and stomach of
                    the child. Put together the shoulder belts
                    and fasten the buckle between the child’s
                    legs. Pull the adjustment strap (8). This
                    will tighten the belt and the headrest will
                    automatically slide down to the proper
                    height. To loosen the belt, hold down belt
    8               adjustment and pull both belts.
8

Rearward facing fastened with
seat belt
     Important to remember
     Never mount the child seat in a seat with
an active airbag. If you still wish to use the
seat, disconnect the airbag at an authorized
service center, or if your car is equipped with
it, use the key to turn the airbag off. It is im-
portant to always note if the car’s indicator
shows that the airbag is turned off.

     Place the chair
     The simplest way to lift the child seat
into the car is with its back first.
     Place the child seat in the car seat and
turn it so that the back is facing the front
of the car. The heels of the seat (1) should
bend over the edge of the seat. The highlight
on the side of the heel should align vertically
with the end of the car seat. If you have a
small car, and the child is small enough not
to require extra leg room, you can instead
put the car seat with the heel up on the car             1
seat. When mounting the child seat in the
car’s front seat it is possible, but not crucial,
for the back of the child seat to have contact
with the dashboard.
     Push down the lever for adjusting the
backrest angle (2). With the lever pushed
down, you can then adjust the seat and
choose one of its three tilt positions. The
choice of tilt position should be one that is
as upright as possible, but the child should        2
    Continued on next page

                 Never use the child seat in a car seat where
                 airbag hasn’t been disabled.
9

                      be able to keep its head up on its own, and the
                      head should not hang forward if the child falls
                      asleep. The rule of thumb is that the older the
                      child grows, the more upright the tilt position
                      can be. Also note that the child seat will be angled
4                     down slightly when it is clamped and sinks into
                      the car’s seat.

                          Fasten seat belt in the car
                          Open both belt lock-offs(3) on the child seat.
                      Grasp the seat belt, and pull the belt roll. The lap
                      section of the belt should be at least 70-80 centi-
                      meters (27-32 inch) long.
                          Now place the belt through the hole in (4)
                      and push it under the fabric until it comes out on
                      the other side. If you prefer you can instead pull
                      the belt on top of the fabric.
         3
                          Next step is to fasten the seat belt. Tighten
                      the belt firmly, the belt passing through or over
                      the seat should not have any slack. Fasten your
                      belt in belt buckle. In the belt lock-off closest to
                      the car-buckle both lap and shoulder belt should
                      be secured. In the belt lock-off on the opposite
                      side, only the lap belt should be secured.
    Skip this part
     if your car is
                           Attach the tether straps
    equipped with
         eyelets           Your car may have two eyelets in the front seat
                      rails, or when mounting in the front seat, in front
                      of the same seat. When your car has no eyelet you
                      should instead use the supplied strap which is in
                      the child seat. If the child seat is installed in the
                      rear seat, put one end of the strap through either
                      the rear of the front seat rails or another suitable
                      fastening point in the front seat. The loop should
                      be as close as possible to the floor. Choose an ap-
                      propriate length of the strap and then put the
                      loop through one of the openings on the side of
                             Continued on next page
10

the strap. When installing in the front seat the
strap has to be attached under the seat.

    Pull out the strap from the anchor roll (1)
to an appropriate length. Please check that
the white marks on the straps(2) is visible.
Otherwise you could try and cross the straps
to give them some extra length, white marks
will then be visible.
    Secure the fastening device in the loop of
the car or the strap. Repeat on the other side.          1
Wiggle the child seat a few times, easily from
side to side.
                                                                 2
    Unfold the support leg (3) to its maximal
angle. Pull the latch on the upper length ad-
juster (4) and pull down the leg so that it gets
in contact with the car’s floor. If the leg still can-
not reach the floor, repeat on the bottom length
adjuster (4).
    Wiggle the chair from side to side a few
                                                                     3
times more, this time with more power. This
will automatically tighten the anchor roll.
    If you have mounted the child seat in the
rear seat of the car, move the front seat to a com-
fortable location. The seat’s backside can, but
must not, have contact with the car seat.
                                                                     4
    Adjust the seat belt
    Place the child in the child seat. Place the
child’s arms in between the shoulder straps so
that the shoulder straps are hanging over the
chest and stomach of the child. Put together the
shoulder belts and fasten the buckle between
the child’s legs. Pull the adjustment strap (5).
This will tighten the belt and the headrest will
automatically slide down to the proper height.
To loosen the belt, hold down belt adjustment                5
and pull both belts.
11


     Forward facing with seatbelt
Step 0
                                        Fixed installation of seat
                                        Make sure the seat’s tilt is in its
                                    0-position. If not, hold the adjust-
                                    ment lever for its angle (1) change the
                                    chair until it stands straight up.
     Step 1                             Place your Kidzofix on the seat.
                                    Pull the car’s safety belt and place the
                                    shoulder strap into belt guide(2) on
                                    the upper side of the seat. Then pull
                                    the belt straight vertically down, on
                 Step 2             the backside, to the nearest hole in
                                    the backseat (3). Lap section of the
                                    belt is simultaneously pulled up and
                                    guided into the same hole as shoul-
                                    der belt. Bring the belts through the
                                    hole, across the front of the chair and
                                    then back through the second hole
                                    (3). Pull both belts horizontally across
                                    the side on the chair and then down.
                                    Fasten seat belts in the belt buckle and
                                    secure it with the lock-off(4). Please
         1                          make sure that the belts hasn’t tangled
                                    up or been folded anywhere.
                             2
                                        Also make sure that both shoulder
                                    and lap belt is securely fastened every-
                                    where. Use your own weight to press
                                    down the chair in order to automati-
 4                                  cally fasten the seat belt further.

                                       Adjust the seat belt
                            3          Place the child in the child seat.
                                       Continued on next page

             Never use the child seat in a car seat where
             airbag hasn’t been disabled.
12

Place the child’s arms in between the
shoulder straps so that the shoulder straps
is hanging over the chest and stomach
of the child. Put together the shoulder
belts and fasten the buckle between the
child’s legs. Pull the adjustment strap (3).
This will tighten the belt and the head-
rest will automatically slide down to the
proper height. The headrest must always
be drawn down at least 35 millimeters.          3
There is a line in the headrest which can
be detected with your fingers. If it is
behind the cover the headrest has been           Picture A
pulled down correctly. (See picture A)
      Make sure that the headrest is in the
locked position by pulling the belt ad-
juster one more time. The headrest shall
not move down when you pull the belt.
If it is impossible to get the headrest in
a locked position, the child seat should
instead be used as a booster seat (see next
chapter).
    To loosen the belt, hold down the belt
adjuster and pull both belts.
                                               This line should be hidden
                                               behind the cover.


              Never use the child seat in a car seat where
              airbag hasn’t been disabled.
13


      Forward facing with adult belt
                 1
                          Important to remember
                          Never mount the child seat in a seat with
                          an active airbag. If you still wish to use
                          the seat, disconnect the airbag at an au-
                          thorized service center, or if your car is
                          equipped with it, use the key to turn the
                          airbag off. It is important to always note if
                          the car’s indicator shows that the airbag is
                          turned off. Since the air bag is designed
                          for adults, it can seriously harm your
                          child in a crash.
             2
  3                       Remove the seat belt
                          Since you are now going to use car
                          belts, you must first remove the inter-
                          nal child seat belts.
                          Loosen the shoulder straps of the yoke
                          (1) and pull the belt up on the chair.
                          The part passing through the yoke
                          forming a loop, must be attached in
         4                the neck rest’s fixing plate(2).
                          After inserting the loop, pull down
                          the retaining plate and the headrest
Step 0
                          to a height appropriate for your child.
                          Tighten the strap by pulling the belt
                          adjustment (3) in the front of the
                          chair.
      Step 1              Make sure the seat’s angle is in its
                          0-position. If not, hold the lever for
                          adjusting its angle (4) change the
                          chair until it stands straight up. Now
                          your Kidzofix can be used as a booster
                 Step 2   seat.

                             Continued on next page
14


    Mount the seat in the car
    Place Kidzofix child seat in the car’s
seat. Then place the child in the child                       4
seat. Grab the car’s three-point belt and
then guide the shoulder belt through the
red belt guide (4), located on the car seat
just above the child’s shoulder, and then
guide it over the next red mark just above
the armrest. You may need to move the
chair slightly sideways for the belt to fit
comfortably in the seat belt guide.
    Then move the lap belt through the
red belt guides down at the sides of the
chair (5) and attach the belt buckle in
the car. The belt must not be tangled,
                                              5
twisted or folded at any location and
needs to have a firm tension. Picture B is
describing the complete belt routing.
                                                  Picture B


              Before your child uses the Kidzofiz child seat make
              sure that all the steps in this instruction manual
              has been followed and that the child seat is se-
              curely fastened.
Warranty and handling
If the child seat cover is replaced; make sure only to use original products
from Axon Kids. If not the safety system could be compromised and may
lead to death or injury of your child in case of an accident.

The child seat cover can be taken off and washed in the laundry. Use the
“handwash”-program or similar (max temp 30 ˚ C ). Do not use the dryer
since this can cause the padding to detach from the cloth. Never use the
baby seat without it´s cover.

The plastic details of the child seat shall be cleaned with a non aggressive
cleaning chemicals such as soap water. Aggressive chemicals like solvents etc
may cause damage to the material and by this compromise the safety of the
child seat.

The parts of the child seat can be recycled and shall be sorted in compliance
with your local legislation. Ask your local recycling center for advice when
recycling the product.

Do not do any repairs or make any adjustment to the child seat other then
those described in this user guide. Follow closely the installation instructions
provided by the child restraint manufacturer.

Our warranty policy is inline with your local consumer
agency. Make sure to save your receipt and bring it to your dealer if you have
any warranty issues. The warranty does not cover:
o	      Wear down as a consequence of normal use.
o	      Damages as a consequence of incorrect use.

All our materials keep a very high standard with respect to UV-resistance (sun
light). In long term UV light is very aggressive and will lead to that the cloth
will be bleached. This is not covered by the warranty since it is considered as
normal usage.

Never leave your child unattended in the baby seat.

Any luggage or other objects liable to cause injuries in the event of a collision
shall be properly secured.

Store this user manual in the assigned pocket underneath the seat.

Mais conteúdo relacionado

Semelhante a AXKID Kidzofix handleiding (ENG)

1504 The New Parent's Guide to Practical Car Seat Safety PRINT
1504 The New Parent's Guide to Practical Car Seat Safety PRINT1504 The New Parent's Guide to Practical Car Seat Safety PRINT
1504 The New Parent's Guide to Practical Car Seat Safety PRINT
Tom Hubbard
 
Mod8 January 2015
Mod8 January 2015Mod8 January 2015
Mod8 January 2015
cpsboard
 
Mod9 January 2015
Mod9 January 2015Mod9 January 2015
Mod9 January 2015
cpsboard
 
Mod9 jan2014 mp4
Mod9 jan2014 mp4Mod9 jan2014 mp4
Mod9 jan2014 mp4
cpsboard
 
Mod10 January 2015
Mod10 January 2015Mod10 January 2015
Mod10 January 2015
cpsboard
 
Mod8 jan2014 wmv
Mod8 jan2014 wmvMod8 jan2014 wmv
Mod8 jan2014 wmv
cpsboard
 
Car Seat Stroller.pdf
Car Seat Stroller.pdfCar Seat Stroller.pdf
Car Seat Stroller.pdf
Marcus McDonnell
 
Start Safe Travel presentation
Start Safe Travel presentationStart Safe Travel presentation
Start Safe Travel presentation
SafeKeepers, LLC
 
Canada driver's knowledge test 2
Canada driver's knowledge test 2Canada driver's knowledge test 2
Canada driver's knowledge test 2
GUL HASSAN QUADRI
 

Semelhante a AXKID Kidzofix handleiding (ENG) (20)

Manual de Montagem e Utilização Cadeira Auto Concord Air Safe
Manual de Montagem e Utilização Cadeira Auto Concord Air SafeManual de Montagem e Utilização Cadeira Auto Concord Air Safe
Manual de Montagem e Utilização Cadeira Auto Concord Air Safe
 
4 steps to child passenger safety
4 steps to child passenger safety4 steps to child passenger safety
4 steps to child passenger safety
 
Car seat presentation
Car seat presentationCar seat presentation
Car seat presentation
 
Child Passenger Safety
Child Passenger SafetyChild Passenger Safety
Child Passenger Safety
 
1504 The New Parent's Guide to Practical Car Seat Safety PRINT
1504 The New Parent's Guide to Practical Car Seat Safety PRINT1504 The New Parent's Guide to Practical Car Seat Safety PRINT
1504 The New Parent's Guide to Practical Car Seat Safety PRINT
 
Mod8 January 2015
Mod8 January 2015Mod8 January 2015
Mod8 January 2015
 
Tips for choosing a child's car seat
Tips for choosing a child's car seatTips for choosing a child's car seat
Tips for choosing a child's car seat
 
Mod9 January 2015
Mod9 January 2015Mod9 January 2015
Mod9 January 2015
 
Child Passenger Safety In Car
Child Passenger Safety In CarChild Passenger Safety In Car
Child Passenger Safety In Car
 
Mod9 jan2014 mp4
Mod9 jan2014 mp4Mod9 jan2014 mp4
Mod9 jan2014 mp4
 
Transporting children safely 2018
Transporting children safely 2018Transporting children safely 2018
Transporting children safely 2018
 
Mod10 January 2015
Mod10 January 2015Mod10 January 2015
Mod10 January 2015
 
Manual montagem utilização concord transformer t 2015
Manual montagem utilização concord transformer t 2015Manual montagem utilização concord transformer t 2015
Manual montagem utilização concord transformer t 2015
 
Mod8 jan2014 wmv
Mod8 jan2014 wmvMod8 jan2014 wmv
Mod8 jan2014 wmv
 
Manual de instruções Ultimax.3 da Concord
Manual de instruções Ultimax.3 da ConcordManual de instruções Ultimax.3 da Concord
Manual de instruções Ultimax.3 da Concord
 
Transporting Children Safely (rev. 3 2020)
Transporting Children Safely (rev. 3 2020)Transporting Children Safely (rev. 3 2020)
Transporting Children Safely (rev. 3 2020)
 
Manual montagem utilização concord transformer xt 2015
Manual montagem utilização concord transformer xt 2015Manual montagem utilização concord transformer xt 2015
Manual montagem utilização concord transformer xt 2015
 
Car Seat Stroller.pdf
Car Seat Stroller.pdfCar Seat Stroller.pdf
Car Seat Stroller.pdf
 
Start Safe Travel presentation
Start Safe Travel presentationStart Safe Travel presentation
Start Safe Travel presentation
 
Canada driver's knowledge test 2
Canada driver's knowledge test 2Canada driver's knowledge test 2
Canada driver's knowledge test 2
 

Mais de Achterwaarts, Eindhoven

Mais de Achterwaarts, Eindhoven (14)

Prijzen achterwaartse autostoeltjes sept 2014
Prijzen achterwaartse autostoeltjes sept 2014Prijzen achterwaartse autostoeltjes sept 2014
Prijzen achterwaartse autostoeltjes sept 2014
 
BeSafe achterwaarts gerichte autostoeltjes in een overzicht
BeSafe achterwaarts gerichte autostoeltjes in een overzichtBeSafe achterwaarts gerichte autostoeltjes in een overzicht
BeSafe achterwaarts gerichte autostoeltjes in een overzicht
 
Achterwaartse Autostoeltje montage vergelijk
Achterwaartse Autostoeltje montage vergelijkAchterwaartse Autostoeltje montage vergelijk
Achterwaartse Autostoeltje montage vergelijk
 
ADAC autostoeltjes test 2013
ADAC autostoeltjes test 2013ADAC autostoeltjes test 2013
ADAC autostoeltjes test 2013
 
Uitzicht voorwaarts vs achterwaarts
Uitzicht voorwaarts vs achterwaartsUitzicht voorwaarts vs achterwaarts
Uitzicht voorwaarts vs achterwaarts
 
BeSafe iZi Go autostoel handleiding
BeSafe iZi Go autostoel handleidingBeSafe iZi Go autostoel handleiding
BeSafe iZi Go autostoel handleiding
 
CYBEX Sirona handleiding
CYBEX Sirona handleidingCYBEX Sirona handleiding
CYBEX Sirona handleiding
 
Achteruitkijkende autostoeltjes en hun montage
Achteruitkijkende autostoeltjes en hun montageAchteruitkijkende autostoeltjes en hun montage
Achteruitkijkende autostoeltjes en hun montage
 
Flyer Achterwaarts.nl
Flyer Achterwaarts.nlFlyer Achterwaarts.nl
Flyer Achterwaarts.nl
 
BeSafe combi Isofix handleiding
BeSafe combi Isofix handleidingBeSafe combi Isofix handleiding
BeSafe combi Isofix handleiding
 
BeSafe Combi voertuiglijst
BeSafe Combi voertuiglijstBeSafe Combi voertuiglijst
BeSafe Combi voertuiglijst
 
BeSafe combi x3 handleiding
BeSafe combi x3 handleidingBeSafe combi x3 handleiding
BeSafe combi x3 handleiding
 
ECE-R44 autostoeltjes gewichtsklasse overzicht
ECE-R44 autostoeltjes gewichtsklasse overzichtECE-R44 autostoeltjes gewichtsklasse overzicht
ECE-R44 autostoeltjes gewichtsklasse overzicht
 
Autostoeltjes ingedeeld naar de ECE-R44 groepen
Autostoeltjes ingedeeld naar de ECE-R44 groepenAutostoeltjes ingedeeld naar de ECE-R44 groepen
Autostoeltjes ingedeeld naar de ECE-R44 groepen
 

Último

Jual Obat Aborsi Hongkong ( Asli No.1 ) 085657271886 Obat Penggugur Kandungan...
Jual Obat Aborsi Hongkong ( Asli No.1 ) 085657271886 Obat Penggugur Kandungan...Jual Obat Aborsi Hongkong ( Asli No.1 ) 085657271886 Obat Penggugur Kandungan...
Jual Obat Aborsi Hongkong ( Asli No.1 ) 085657271886 Obat Penggugur Kandungan...
ZurliaSoop
 

Último (20)

SKILL OF INTRODUCING THE LESSON MICRO SKILLS.pptx
SKILL OF INTRODUCING THE LESSON MICRO SKILLS.pptxSKILL OF INTRODUCING THE LESSON MICRO SKILLS.pptx
SKILL OF INTRODUCING THE LESSON MICRO SKILLS.pptx
 
This PowerPoint helps students to consider the concept of infinity.
This PowerPoint helps students to consider the concept of infinity.This PowerPoint helps students to consider the concept of infinity.
This PowerPoint helps students to consider the concept of infinity.
 
Single or Multiple melodic lines structure
Single or Multiple melodic lines structureSingle or Multiple melodic lines structure
Single or Multiple melodic lines structure
 
SOC 101 Demonstration of Learning Presentation
SOC 101 Demonstration of Learning PresentationSOC 101 Demonstration of Learning Presentation
SOC 101 Demonstration of Learning Presentation
 
Towards a code of practice for AI in AT.pptx
Towards a code of practice for AI in AT.pptxTowards a code of practice for AI in AT.pptx
Towards a code of practice for AI in AT.pptx
 
Spatium Project Simulation student brief
Spatium Project Simulation student briefSpatium Project Simulation student brief
Spatium Project Simulation student brief
 
Food safety_Challenges food safety laboratories_.pdf
Food safety_Challenges food safety laboratories_.pdfFood safety_Challenges food safety laboratories_.pdf
Food safety_Challenges food safety laboratories_.pdf
 
ICT Role in 21st Century Education & its Challenges.pptx
ICT Role in 21st Century Education & its Challenges.pptxICT Role in 21st Century Education & its Challenges.pptx
ICT Role in 21st Century Education & its Challenges.pptx
 
Key note speaker Neum_Admir Softic_ENG.pdf
Key note speaker Neum_Admir Softic_ENG.pdfKey note speaker Neum_Admir Softic_ENG.pdf
Key note speaker Neum_Admir Softic_ENG.pdf
 
Micro-Scholarship, What it is, How can it help me.pdf
Micro-Scholarship, What it is, How can it help me.pdfMicro-Scholarship, What it is, How can it help me.pdf
Micro-Scholarship, What it is, How can it help me.pdf
 
HMCS Max Bernays Pre-Deployment Brief (May 2024).pptx
HMCS Max Bernays Pre-Deployment Brief (May 2024).pptxHMCS Max Bernays Pre-Deployment Brief (May 2024).pptx
HMCS Max Bernays Pre-Deployment Brief (May 2024).pptx
 
How to Give a Domain for a Field in Odoo 17
How to Give a Domain for a Field in Odoo 17How to Give a Domain for a Field in Odoo 17
How to Give a Domain for a Field in Odoo 17
 
Fostering Friendships - Enhancing Social Bonds in the Classroom
Fostering Friendships - Enhancing Social Bonds  in the ClassroomFostering Friendships - Enhancing Social Bonds  in the Classroom
Fostering Friendships - Enhancing Social Bonds in the Classroom
 
2024-NATIONAL-LEARNING-CAMP-AND-OTHER.pptx
2024-NATIONAL-LEARNING-CAMP-AND-OTHER.pptx2024-NATIONAL-LEARNING-CAMP-AND-OTHER.pptx
2024-NATIONAL-LEARNING-CAMP-AND-OTHER.pptx
 
Sensory_Experience_and_Emotional_Resonance_in_Gabriel_Okaras_The_Piano_and_Th...
Sensory_Experience_and_Emotional_Resonance_in_Gabriel_Okaras_The_Piano_and_Th...Sensory_Experience_and_Emotional_Resonance_in_Gabriel_Okaras_The_Piano_and_Th...
Sensory_Experience_and_Emotional_Resonance_in_Gabriel_Okaras_The_Piano_and_Th...
 
Sociology 101 Demonstration of Learning Exhibit
Sociology 101 Demonstration of Learning ExhibitSociology 101 Demonstration of Learning Exhibit
Sociology 101 Demonstration of Learning Exhibit
 
ICT role in 21st century education and it's challenges.
ICT role in 21st century education and it's challenges.ICT role in 21st century education and it's challenges.
ICT role in 21st century education and it's challenges.
 
Jamworks pilot and AI at Jisc (20/03/2024)
Jamworks pilot and AI at Jisc (20/03/2024)Jamworks pilot and AI at Jisc (20/03/2024)
Jamworks pilot and AI at Jisc (20/03/2024)
 
Wellbeing inclusion and digital dystopias.pptx
Wellbeing inclusion and digital dystopias.pptxWellbeing inclusion and digital dystopias.pptx
Wellbeing inclusion and digital dystopias.pptx
 
Jual Obat Aborsi Hongkong ( Asli No.1 ) 085657271886 Obat Penggugur Kandungan...
Jual Obat Aborsi Hongkong ( Asli No.1 ) 085657271886 Obat Penggugur Kandungan...Jual Obat Aborsi Hongkong ( Asli No.1 ) 085657271886 Obat Penggugur Kandungan...
Jual Obat Aborsi Hongkong ( Asli No.1 ) 085657271886 Obat Penggugur Kandungan...
 

AXKID Kidzofix handleiding (ENG)

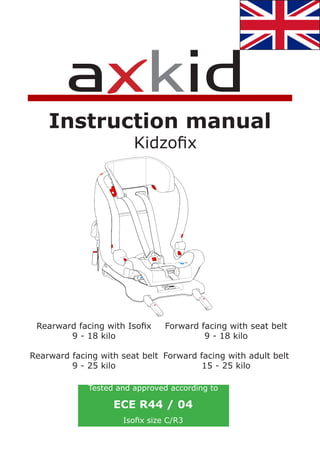
  • 1. Instruction manual Kidzofix Rearward facing with Isofix Forward facing with seat belt 9 - 18 kilo 9 - 18 kilo Rearward facing with seat belt Forward facing with adult belt 9 - 25 kilo 15 - 25 kilo Tested and approved according to ECE R44 / 04 Isofix size C/R3
  • 2. Important information Thank you for choosing a child seat from Axon Kids. The team developing Kidzo- fix have more than 30 years of experience in child safety products between us, and we have done our outmost to make this child seat as safe as possible. The Kidzofix child seat has of course also been tested and certified according to ECE R/44 04, the latest European standard for child safety. To maximize your child’s safety, please observe the following: Read the instructions thoroughly before you attempt to install the child seat. If you have any doubts, please contact your store of purchase, which can show you the correct installation. Incor- rect installation means danger to your child. Never mount the child seat in a seat with an active airbag. If you still wish to use the seat, disconnect the airbag at an authorized service center, or if your car is equipped with it, use the key to turn the airbag off. It is important to always note if the car’s in- dicator shows that the airbag is turned off. Keep the child seat facing backwards as long as possible. Studies have shown that the risk for an accident to be fatal for your child is five times higher if your seat is front facing. Always use the support leg when the seat is mounted backwards. The support leg serves a very important safety purpose and is designed to maximize your child’s safety in an accident. In case of a car accident, no matter how small, always replace the car seat. It may have invisible damage that seriously affects your child’s safety. This is also the reason for why you never should by a used child seat. Axon Kids recommendation is that you always should buy a new chair in a store. Read this instruction manual before assemble the child seat in the car.
  • 3. Contents The Kidzofix child seat is possible to use from when the child is approximately six months, or can sit without support, up to about the age of six. The chair can be mounted in four different ways, depending on your child’s age and size, and if your car has ISOfix attachments or not. A review of the chair’s parts can be found on the next page. On the following pages you will find instructions on how to assemble your chair: 5 Rearward facing assembly with ISOfix If your car has ISOfix attachments, and your child weighs between 9 and 18 kilos (20 to 39 lb), Axon Kids recommends this assembly. 8 Rearward facing fastened with seat belt If your car is not equipped with ISOfix attachments, you can still easily and safely install the seat using the car’s three-point belt. This assembly can be used when the child weighs between 9 and 25 kilos (20 to 55 lb). 11 Forward facing assembly with seatbelt If you want your child to sit forward and it weighs between 9 and 18 kilos, this assembly can be used in all car seats with a three-point belt. 13 Forward facing with adult belt Once the child has become large enough to sit forward and use the car’s three-point belt, you can secure the child restraint and your child by using your Kidzone as a booster seat. This assembly is suitable for children weighing between 15 and 25 kilos. Never use this child seat in a car seat that is not equipped with an ECE Reg 16 approved three-point belt. For the safety of you child; Use backwards assembly as long as possible
  • 4. 16 1. Belt guide top (Forward facing with 9. ISOfix internal harness only) 10. Tether strap 2. Head support 11. Support leg 3. Belt guides head support (Forward fac- 12. Adjuster handles for support leg. ing with vehicle 3 point belt) 13. Heels 4. Internal harness. 14. Adjuster for ISOfix 5. Lower belt guide. (Forward facing with 15. Lock-off vehicle 3 point belt) 16. Pocket for storing manual 6. Adjuster for internal harness 17. Guide for assembly 7. Adjuster arm for seat angel 18. Indicator 8. Base 19. Release button
  • 5. 5 Rearward facing with ISOfix Important to remember Never mount the child seat in a seat 1 with an active frontal airbag. If you still wish to use the seat, disconnect the airbag at an authorized service center, or if your car is equipped with it, use the key to turn the airbag off. It is important to always note if the car’s indicator shows that the airbag is turned off. Place the child seat 2 Before you lift the child seat into the car, start by pressing and holding the locking le- ver (1). Now you can fold out the ISOfix arms (2), located on the bottom side of the child seat. The simplest way to lifting the child seat into the car is with its back first. Place the child seat in the car seat and turn it so that the back is facing the front direction of the car. When mounting the child seat in the car’s front sear, it is possi- ble, but not crucial, for the back of the child seat to have contact with the dashboard. Attach ISOfix-arms There are two ISOfix mounts in every seat of the car. You can find the brackets between the backrest and the seat cushion. The supplementary guides (3), which you will find in the child seat, can help you find 3 Continued on next page Never use the child seat in a car seat where airbag hasn’t been disabled.
  • 6. 6 the brackets and also protects upholstery on the cushion. Press the ISOfix arms through the guides and fix them in the car´s mounts. When you hear a click and both indicators (1) are green it is properly secured. If you later wish to remove the car seat, hold down both of 2 the release buttons (2). Push down the lever for adjusting the sit- ting angle (3). With the lever depressed, you can then adjust the seat and choose one of its three tilt positions. The choice of tilt position should be one that is as upright as possible, but the child should be able to 1 keep its head up on its own and the head should not hang forward if the child falls asleep. The rule of thumb is that the older the child grows, the more upright the tilt position can be. Also note that the child seat will be angled down slightly when it is clamped and sinks into the car’s seat. Attach the tether straps Your car may have two eyelets in the front 3 seat rails, or when mounting in the front seat, in front of the same seat. When your car has no eyelet you should in- stead use the supplied strap which is in the child seat. If the child seat is installed in the rear seat, put one end of the strap through either the rear of the front seat rails or an- other suitable fastening point in the front seat. The loop should be as close as possible to the floor. Choose an appropriate length of the strap and then put the loop through one of the openings on the side of the strap. When installing in the front seat the strap Continued on next page
  • 7. 7 has to be attached under the seat. Pull out the strap from the anchor roll (4) to an appropriate length. Please check that the white marks on the straps(5) is visible. Otherwise you could try and cross the straps to give them some extra length, white marks will then be visible. Secure the fastening device in the loop of the car or the strap. Repeat on the other side. Wiggle the child seat a few times, 4 easily from side to side.Unfold the sup- port leg (6) to its maximal angle. Pull the latch on the upper length adjuster (7) and 5 pull down the leg so that it gets in con- tact with the car’s floor. If the leg still can- not reach the floor, repeat on the bottom length adjuster (7). Wiggle the chair from side to side a few times more, this time with more power. This will automatically tighten the anchor roll.If you have mounted the child seat in 6 the rear seat of the car, move the front seat to a comfortable location. The seat’s back- side can, but must not, have contact with the car seat. 7 Adjust the seat belt Place the child in the child seat. Place the child’s arms in between the shoul- der straps so that the shoulder straps are hanging over the chest and stomach of the child. Put together the shoulder belts and fasten the buckle between the child’s legs. Pull the adjustment strap (8). This will tighten the belt and the headrest will automatically slide down to the proper height. To loosen the belt, hold down belt 8 adjustment and pull both belts.
  • 8. 8 Rearward facing fastened with seat belt Important to remember Never mount the child seat in a seat with an active airbag. If you still wish to use the seat, disconnect the airbag at an authorized service center, or if your car is equipped with it, use the key to turn the airbag off. It is im- portant to always note if the car’s indicator shows that the airbag is turned off. Place the chair The simplest way to lift the child seat into the car is with its back first. Place the child seat in the car seat and turn it so that the back is facing the front of the car. The heels of the seat (1) should bend over the edge of the seat. The highlight on the side of the heel should align vertically with the end of the car seat. If you have a small car, and the child is small enough not to require extra leg room, you can instead put the car seat with the heel up on the car 1 seat. When mounting the child seat in the car’s front seat it is possible, but not crucial, for the back of the child seat to have contact with the dashboard. Push down the lever for adjusting the backrest angle (2). With the lever pushed down, you can then adjust the seat and choose one of its three tilt positions. The choice of tilt position should be one that is as upright as possible, but the child should 2 Continued on next page Never use the child seat in a car seat where airbag hasn’t been disabled.
  • 9. 9 be able to keep its head up on its own, and the head should not hang forward if the child falls asleep. The rule of thumb is that the older the child grows, the more upright the tilt position can be. Also note that the child seat will be angled 4 down slightly when it is clamped and sinks into the car’s seat. Fasten seat belt in the car Open both belt lock-offs(3) on the child seat. Grasp the seat belt, and pull the belt roll. The lap section of the belt should be at least 70-80 centi- meters (27-32 inch) long. Now place the belt through the hole in (4) and push it under the fabric until it comes out on the other side. If you prefer you can instead pull the belt on top of the fabric. 3 Next step is to fasten the seat belt. Tighten the belt firmly, the belt passing through or over the seat should not have any slack. Fasten your belt in belt buckle. In the belt lock-off closest to the car-buckle both lap and shoulder belt should be secured. In the belt lock-off on the opposite side, only the lap belt should be secured. Skip this part if your car is Attach the tether straps equipped with eyelets Your car may have two eyelets in the front seat rails, or when mounting in the front seat, in front of the same seat. When your car has no eyelet you should instead use the supplied strap which is in the child seat. If the child seat is installed in the rear seat, put one end of the strap through either the rear of the front seat rails or another suitable fastening point in the front seat. The loop should be as close as possible to the floor. Choose an ap- propriate length of the strap and then put the loop through one of the openings on the side of Continued on next page
  • 10. 10 the strap. When installing in the front seat the strap has to be attached under the seat. Pull out the strap from the anchor roll (1) to an appropriate length. Please check that the white marks on the straps(2) is visible. Otherwise you could try and cross the straps to give them some extra length, white marks will then be visible. Secure the fastening device in the loop of the car or the strap. Repeat on the other side. 1 Wiggle the child seat a few times, easily from side to side. 2 Unfold the support leg (3) to its maximal angle. Pull the latch on the upper length ad- juster (4) and pull down the leg so that it gets in contact with the car’s floor. If the leg still can- not reach the floor, repeat on the bottom length adjuster (4). Wiggle the chair from side to side a few 3 times more, this time with more power. This will automatically tighten the anchor roll. If you have mounted the child seat in the rear seat of the car, move the front seat to a com- fortable location. The seat’s backside can, but must not, have contact with the car seat. 4 Adjust the seat belt Place the child in the child seat. Place the child’s arms in between the shoulder straps so that the shoulder straps are hanging over the chest and stomach of the child. Put together the shoulder belts and fasten the buckle between the child’s legs. Pull the adjustment strap (5). This will tighten the belt and the headrest will automatically slide down to the proper height. To loosen the belt, hold down belt adjustment 5 and pull both belts.
  • 11. 11 Forward facing with seatbelt Step 0 Fixed installation of seat Make sure the seat’s tilt is in its 0-position. If not, hold the adjust- ment lever for its angle (1) change the chair until it stands straight up. Step 1 Place your Kidzofix on the seat. Pull the car’s safety belt and place the shoulder strap into belt guide(2) on the upper side of the seat. Then pull the belt straight vertically down, on Step 2 the backside, to the nearest hole in the backseat (3). Lap section of the belt is simultaneously pulled up and guided into the same hole as shoul- der belt. Bring the belts through the hole, across the front of the chair and then back through the second hole (3). Pull both belts horizontally across the side on the chair and then down. Fasten seat belts in the belt buckle and secure it with the lock-off(4). Please 1 make sure that the belts hasn’t tangled up or been folded anywhere. 2 Also make sure that both shoulder and lap belt is securely fastened every- where. Use your own weight to press down the chair in order to automati- 4 cally fasten the seat belt further. Adjust the seat belt 3 Place the child in the child seat. Continued on next page Never use the child seat in a car seat where airbag hasn’t been disabled.
  • 12. 12 Place the child’s arms in between the shoulder straps so that the shoulder straps is hanging over the chest and stomach of the child. Put together the shoulder belts and fasten the buckle between the child’s legs. Pull the adjustment strap (3). This will tighten the belt and the head- rest will automatically slide down to the proper height. The headrest must always be drawn down at least 35 millimeters. 3 There is a line in the headrest which can be detected with your fingers. If it is behind the cover the headrest has been Picture A pulled down correctly. (See picture A) Make sure that the headrest is in the locked position by pulling the belt ad- juster one more time. The headrest shall not move down when you pull the belt. If it is impossible to get the headrest in a locked position, the child seat should instead be used as a booster seat (see next chapter). To loosen the belt, hold down the belt adjuster and pull both belts. This line should be hidden behind the cover. Never use the child seat in a car seat where airbag hasn’t been disabled.
  • 13. 13 Forward facing with adult belt 1 Important to remember Never mount the child seat in a seat with an active airbag. If you still wish to use the seat, disconnect the airbag at an au- thorized service center, or if your car is equipped with it, use the key to turn the airbag off. It is important to always note if the car’s indicator shows that the airbag is turned off. Since the air bag is designed for adults, it can seriously harm your child in a crash. 2 3 Remove the seat belt Since you are now going to use car belts, you must first remove the inter- nal child seat belts. Loosen the shoulder straps of the yoke (1) and pull the belt up on the chair. The part passing through the yoke forming a loop, must be attached in 4 the neck rest’s fixing plate(2). After inserting the loop, pull down the retaining plate and the headrest Step 0 to a height appropriate for your child. Tighten the strap by pulling the belt adjustment (3) in the front of the chair. Step 1 Make sure the seat’s angle is in its 0-position. If not, hold the lever for adjusting its angle (4) change the chair until it stands straight up. Now your Kidzofix can be used as a booster Step 2 seat. Continued on next page
  • 14. 14 Mount the seat in the car Place Kidzofix child seat in the car’s seat. Then place the child in the child 4 seat. Grab the car’s three-point belt and then guide the shoulder belt through the red belt guide (4), located on the car seat just above the child’s shoulder, and then guide it over the next red mark just above the armrest. You may need to move the chair slightly sideways for the belt to fit comfortably in the seat belt guide. Then move the lap belt through the red belt guides down at the sides of the chair (5) and attach the belt buckle in the car. The belt must not be tangled, 5 twisted or folded at any location and needs to have a firm tension. Picture B is describing the complete belt routing. Picture B Before your child uses the Kidzofiz child seat make sure that all the steps in this instruction manual has been followed and that the child seat is se- curely fastened.
  • 15. Warranty and handling If the child seat cover is replaced; make sure only to use original products from Axon Kids. If not the safety system could be compromised and may lead to death or injury of your child in case of an accident. The child seat cover can be taken off and washed in the laundry. Use the “handwash”-program or similar (max temp 30 ˚ C ). Do not use the dryer since this can cause the padding to detach from the cloth. Never use the baby seat without it´s cover. The plastic details of the child seat shall be cleaned with a non aggressive cleaning chemicals such as soap water. Aggressive chemicals like solvents etc may cause damage to the material and by this compromise the safety of the child seat. The parts of the child seat can be recycled and shall be sorted in compliance with your local legislation. Ask your local recycling center for advice when recycling the product. Do not do any repairs or make any adjustment to the child seat other then those described in this user guide. Follow closely the installation instructions provided by the child restraint manufacturer. Our warranty policy is inline with your local consumer agency. Make sure to save your receipt and bring it to your dealer if you have any warranty issues. The warranty does not cover: o Wear down as a consequence of normal use. o Damages as a consequence of incorrect use. All our materials keep a very high standard with respect to UV-resistance (sun light). In long term UV light is very aggressive and will lead to that the cloth will be bleached. This is not covered by the warranty since it is considered as normal usage. Never leave your child unattended in the baby seat. Any luggage or other objects liable to cause injuries in the event of a collision shall be properly secured. Store this user manual in the assigned pocket underneath the seat.