American Libraries Live: How to Design Your Own READ Poster (March 2017)
•Transferir como PPTX, PDF•
1 gostou•2,499 visualizações

American Libraries Live: How to Design Your Own READ Poster (March 2017)

Recomendados
Recomendados
Mais conteúdo relacionado
Mais de ALATechSource
Mais de ALATechSource (20)
Último
Último (20)
American Libraries Live: How to Design Your Own READ Poster (March 2017)
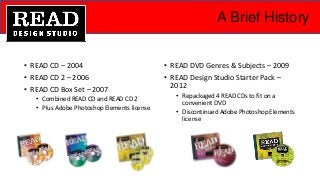
- 1. A Brief History • READ CD – 2004 • READ CD 2 – 2006 • READ CD Box Set – 2007 • Combined READ CD and READ CD 2 • Plus Adobe Photoshop Elements license • READ DVD Genres & Subjects – 2009 • READ Design Studio Starter Pack – 2012 • Repackaged 4 READ CDs to fit on a convenient DVD • Discontinued Adobe Photoshop Elements license
- 2. How to Make a READ® Poster Start with a good photo—it will make designing easier for you. Some tips: • If you have one, use a “green screen.” • Or simply pose your reader in front of a solid background that contrasts with what they’re wearing.
- 3. How to Make a READ® Poster No “green screen”? No problem! Some tips: • Good lighting helps. • Full body image gives you more options—you can always crop the image later.
- 4. Extracting your reader / erasing the background Find the tool that works best for you: • Magic Wand • Lasso (Magnetic and Polygonal) • Selection Brush Eraser options: • Eraser, Magic Eraser, Background Eraser Let’s give it a try... The dotted line shows the area that you’ve selected to erase. The checkered background indicates transparency.
- 5. Putting Your Poster Together • Click and drag your reader’s layer onto the poster template; click and drag corners of reader’s image to resize, reposition and choose OK. • The “fx” symbol on the placeholder layer indicates layer style. Right-click and select “copy layer style” and then right-click on reader layer and select “paste layer style.” Recap: • Extract your reader. • Find and open the poster template you want. • Use the Layout tool to view the poster template and reader files side-by-side. • Select the “placeholder” layer in the poster file to correctly position your reader.
- 6. Saving Your Files • If you want to preserve the layers in your poster file so that it can be edited in the future, save it as a .PDF, .PSD, or .TIFF. Note that the files sizes can be extremely large. • If your poster is complete, it’s a good idea to “flatten” the layers of your file and save your poster as a .PDF or .JPG. This will make printing quicker and give you a more manageable file size.
- 7. Overcoming Obstacles My reader’s image is only from the waist up, but the template’s placeholder shows the full body. How can I make this work?
- 8. Moving Layers and Resizing Objects Use the Layers to hide the lower half of her body: • Move objects in front of your reader • Make objects larger and move them move them around • Copy a layer (like this grass) to make more of it
- 9. Problematic Pics What if you have a photo you love but the Magic Wand isn’t cooperating? • Don’t give up if you have a great image, but a complicated background, poor lighting, etc. There are ways to make it work—you just need some practice and patience. Here are some things to try... Skin tone and background are too similar Pants and background color are too similar
- 10. Trying Different Tools Recap: • Crop the image so it only includes your reader. • Use the Magic Wand in the sections where there’s the most contrast; adjust the tolerance. • Try using the Lasso, Magnetic Lasso, or Polygonal Lasso. • Zoom in and work in sections, erasing a little bit at a time.
- 11. Quick & Easy “Frame” Option And if all else fails or you are simply in a hurry, you can pop your image in a READ “frame.” It’s really quick and easy to do!
- 12. READ® Frames Here are 9 Layered READ Poster files that make easy READ frames. • Select the “background” layer in the template and click on the eye symbol to turn it off • Keep the background layer selected and then drag your new reader image into the template
- 13. READers in the Stacks
- 14. Get Creative Use the cooking theme to make double-sided bookmarks and share simple recipes! Use various themes for informational posters, services, or programming. • The READ trademark is for use by non-profit entities for the sole purpose of promoting reading and literacy. • Not for commercial purposes or used in items for sale, but can be used in exchange for donations (e.g. patron makes a donation and receives a custom READ poster as a thank-you gift).
Notas do Editor
- The first READ CD came out in 2004 to give libraries a trademark compliant way to create their own READ posters featuring local celebrities. With its advent, “everyone could be a celebrity reader.” Its popularity launched READ CD 2 with new designs in 2006 followed by a Box Set in 2007 which included a license for Adobe Photoshop Elements. A note on Elements. While it is the preferred software ALA uses to show customers how to create posters and other items, it is by no means the only software. Elements as a part of the Box Set was phased out due to the frequency in which Adobe upgraded the versions. Additionally, we found that customers were using other programs or free software such as GIMP (GNU Image Manipulation Program) to edit their photos. In 2009 we added fresh designs with the READ DVD Genres & Subjects with designs that ranged from Adventure, Crafts, and Cooking to Gaming, Mystery, and Science. Which all leads to where we are now–with the READ CD Starter Pack, a repackaging of the original Box Set all on 1 convenient DVD. The files on this DVD and Genres and Subjects can be used together for unlimited designs. Let’s get started – NEXT SLIDE.
- Now more than ever is it easy to take better pictures. The majority of the ones you’ll see today were taken with my cell phone. Most important is to have as much contrast between your reader and the back ground as possible. This makes extracting your reader much easier. NEXT SLIDE
- This can be done in many cases by posing them in front of a plain white or off-white wall– as long as they’re not wearing white or have really like hair color. As you can see here, I posed Julie Cai, our project coordinator in front of a plain wall in her office. Consider your final poster before taking the picture. Taking a full body image will give you more options when it’s time to design and you can always crop out the lower body. NEXT SLIDE
- First I should mention that I’m not an expert with Adobe Photoshop Elements. I’m self taught and likely there are folks taking part in the webinar that have more experience and know other ways to do things. I’m going to show you how to use tools such as the Magic Wand, the Lasso and the Selection Brush. Before I start the first demonstration, let’s take a look at this slide. You’ll see in the first image that I’ve started using the Magic Wand to select portions of the background. This is indicated by the dotted black line. The checkered background begins appearing as I erase the sections of the background. Until you have your readers completely extracted. Let me demonstrate...DEMO
- I’ve included a quick recap of the demonstration. Extract your reader Open your poster template and use the layout tool to see them side by side. Select the placeholder layer in your poster Click and drag your reader over onto your poster Resize and move until you’re satisfied. I hope that explanation showed that creating a poster can be easy—but starting with a good image helps! Let’s recap saving your files...NEXT SLIDE
- If you want to be able to edit your poster in the future, you’ll want to keep it layered. But that also means a large file. If you’re satisfied, you can flatten and save your image but you’ll lose the layers. I suggest once you get your reader outlined and all the background removed to save it as a .PSD or .TIFF to preserve the transparent background. Then you can drop it into as many different designs as you want to try! Now that we’ve successfully completed an EASY poster, let’s take a look at an example of one that needs a little more adjustment. NEXT SLIDE
- In this next example you can see that the image I took is good, but because I only took it from the waist up, I may encounter some difficulties placing Julie in certain poster designs. For example, she’s holding Alice in Wonderland in this photo which I thought would be perfect for the Fairy Tale layered poster file. Unfortunately you can see here that my initial attempt at design has her torso floating. Don’t despair. There’s a way around this. Let me demonstrate...DEMO
- To recap, you can move your layers forward and backward and you can enlarge, duplicate, and move images in other layers around to make designs work. But what if you have a photo of a reader that you love but the background is proving difficult to remove? NEXT SLIDE
- Here’s a problematic pic. This is my nephew dressed up for Book Character Day at school. I was thrilled when his mom sent this to me, but in trying to make it into a READ poster I got a little frustrated. As you can see, he’s very fair-skinned and his facial color and that of the mantle are very similar. Further more, lighting at the bottom combined with the dark jeans against the fireplace are making outlining this difficult. Here’s what I decided to do...DEMO
- Crop 2. See if you can use the Magic Wand in certain areas Use the Magnetic Lasso and work in sections Zoom in on difficult areas and have patience But if you don’t have patience—or time—there are other ways. Let me show you an easy solution! NEXT SLIDE
- You can use the photo without removing the background and frame it with a poster design. Let me show you how...DEMO
- In thinking about this “framing” idea, I looked through both DVDs and found at least 9 templates for which this idea works well. Here you can see them shown with the background layers turned off. You can make some fantastic and quick posters. NEXT SLIDE
- I snapped some pics of Julie in the library and I really love the way they look in these frames. And they were so quick and easy to make! My goal was to show you how to make a READ poster and work around some common issues. I also wanted to show some ideas for making quick posters as we can probably all agree that there’s never enough time! I hope I’ve also inspired you to get creative...NEXT SLIDE.
- Think outside of the READ poster. The templates can be used without readers to make informational posters, programming flyers and signs, and so much more. What about sharing simple recipes on the back of bookmarks? The creativity is limitless. The READ Design Studio is for use by non-profit entities for the purpose of promoting reading and literacy. Though products created cannot be sold, you can use it to create items to give away as a thank you for donations. For additional instructions and information available visit alastore.ala.org/rds where we will also be archiving these slides and webinar.