Manual de Recarga Samsung ML 1210 | ML 1510 | ML 1610 | ML 1710 | ML 2010
•
0 gostou•1,443 visualizações

Manual utilizado nos modelos Samsung para Impressoras ML 1210 | ML 1510 | ML 1610 | ML 1710 | ML 2010.

Recomendados
Recomendados
Mais conteúdo relacionado
Mais procurados
Mais procurados (20)
Semelhante a Manual de Recarga Samsung ML 1210 | ML 1510 | ML 1610 | ML 1710 | ML 2010
Semelhante a Manual de Recarga Samsung ML 1210 | ML 1510 | ML 1610 | ML 1710 | ML 2010 (18)
Mais de Valejet
Mais de Valejet (15)
Último
Último (20)
Manual de Recarga Samsung ML 1210 | ML 1510 | ML 1610 | ML 1710 | ML 2010
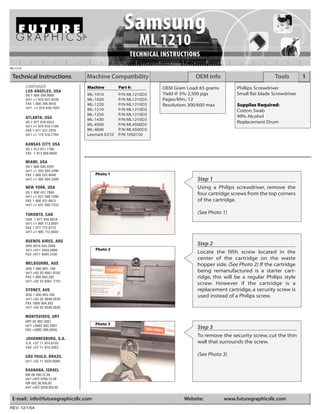
- 1. ML1210 Technical Instructions Machine Compatibility OEM Info Tools 1 CORPORATE Machine Par t #: OEM Gram Load: 65 grams Phillips Screwdriver LOS ANGELES, USA US 1 800 394.9900 ML-1010 P/N ML1210D3 Yield @ 5%: 2,500 pgs Small flat blade Screwdriver Int’l +1 818 837.8100 ML-1020 P/N ML1210D3 Pages/Min.: 12 FAX 1 800 394.9910 ML-1220 P/N ML1210D3 Resolution: 300/600 max Supplies R equired: Int’l +1 818 838.7047 ML-1210 P/N ML1210D3 Cotton Swab ML-1250 P/N ML1210D3 99% Alcohol ATLANTA, USA ML-1430 P/N ML1210D3 US 1 877 676.4223 Replacement Drum Int’l +1 678 919.1189 ML-4500 P/N ML4500D3 FAX 1 877 337.7976 ML-4600 P/N ML4500D3 Int’l +1 770 516.7794 Lexmark E210 P/N 10S0150 KANSAS CITY, USA US 1 913 871.1700 FAX 1 913 888.0626 MIAMI, USA US 1 800 595.4297 Int’l +1 305 594.3396 FAX 1 800 522.8640 Photo 1 Int’l +1 305 594.3309 Step 1 NEW YORK, USA Using a Philips screwdriver, remove the US 1 800 431.7884 four cartridge screws from the top corners Int’l +1 631 588.7300 FAX 1 800 431.8812 of the cartridge. Int’l +1 631 588.7333 TORONTO, CAN (See Photo 1) CAN 1 877 848.0818 Int’l +1 905 712.9501 FAX 1 877 772.6773 Int’l +1 905 712.9502 BUENOS AIRES, ARG ARG 0810 444.2656 Step 2 Int’l +011 4583.5900 Photo 2 FAX +011 4584.3100 Locate the fifth screw located in the center of the cartridge on the waste MELBOURNE, AUS hopper side. (See Photo 2) If the cartridge AUS 1 800 003. 100 Int’l +62 03 9561.8102 being remanufactured is a starter cart- FAX 1 800 004.302 ridge, this will be a regular Philips style Int’l +62 03 9561-7751 screw. However if the cartridge is a SYDNEY, AUS replacement cartridge, a security screw is AUS 1 800 003.100 used instead of a Philips screw. Int’l +62 02 9648.2630 FAX 1800 004.302 Int’l +62 02 9548.2635 MONTEVIDEO, URY URY 02 902.2001 Int’l +5982 902.2001 Photo 3 FAX +5982 900.0858 Step 3 To remove the security screw, cut the thin JOHANNESBURG, S.A. S.A. +27 11 974.6155 wall that surrounds the screw. FAX +27 11 974.3593 SÃO PAULO, BRAZIL (See Photo 3) Int’l +55 11 5524.8000 RAANANA, ISRAEL ISR 09 760.12.39 Int’l +972 9760.12.39 ISR 052.38.555.82 Int’l +972 5238.555.82 E-mail: info@futuregraphicsllc.com Website: www.futuregraphicsllc.com REV. 12/1/04
- 2. 6 Samsung ML1210 Technical Instructions Photo 4 Step 4 Using either diagonal cutters or needle nose pliers, grab the head of the screw and twist. (See Photo 4) Photo 5 Photo 6 Step 5 Find the four locking tabs that hold the two halves of the cartridge together. (See Photo 5) To release the tabs, insert a small flat blade screwdriver into the tabs and care- fully pry them apart. (See Photo 6) Photo 7 Notes Step 6 Lift the top cover up away from the cartridge. (See Photo 7) Clean the cover using dry compressed air or a vacuum. Photo 8 NOTE: On some older cartridges, a metal plate covers the PCR and drum. Remove the two screws that hold the metal cover in place. (See Photo 8) Remove the cover. Photo 9 Step 7 Using A Philips screwdriver, remove the three screws holding the cartridge end cap. (See Photo 9) Need trust-worthy, detailed Technical Instructions for another engine? Visit: www.futuregraphicsllc.com
- 3. Samsung ML1210 Technical Instructions 3 Photo 10 Step 8 Pull the end cap from the side of the cartridge. Notes (See Photo 10) Photo 11 Step 9 Remove the five gears from the end of the cartridge. (See Photo 11) Photo 12 Step 10 Rotate the cartridge 180º. Remove the three screws holding the cartridge end cap. (See Photo 12) Photo 13 Step 11 Pull the end cap from the side of the cartridge. (See Photo 13) Photo 14 Step 12 Lift out the PCR. (See Photo 14) Clean the PCR using a lint-free cloth. Need help with a particular remanu- facturing problem? Call the Technical Resource Center from 8am - 5pm PST: 800 394.9900
- 4. 4 Samsung ML1210 Technical Instructions Photo 15 Step 13 Remove the two screws holding the wiper blade assembly. (See Photo 15) Lift the wiper blade assembly from the cartridge. Photo 16 Photo 17 Step 14 Push up the drum drive gear from the bottom of the cartridge. (See Photo 16) Carefully lift the drum from the cartridge. (See Photo 17) NOTE: If you are going to reuse the drum, clean the drum using a dry lint free cloth and place the drum in a protected area away from the light. Step 15 Dump the toner from the toner hopper. Photo 18 Using dry compressed air or a vacuum, Notes clean the toner from the toner hopper. Step 16 Using a small flat blade screwdriver, release the two locking tabs that hold the developer roller end cap to the side of the hopper. (See Photo 18 & 19) Photo 19 Photo 20 Step 17 Slide the developer roller out from the side of the cartridge. (See Photo 20) Clean the developer roller using a lint-free cloth. Need trust-worthy, detailed Technical Instructions for another engine? Visit: www.futuregraphicsllc.com
- 5. Samsung ML1210 Technical Instructions 5 Photo 21 Step 18 Carefully clean the doctor blade using Acetone and a cotton swab. (See Photo 21) NOTE: If too much pressure is applied Notes while cleaning the doctor blade, the blade could bend. If this occurs, a dark streak would appear running down the page. Photo 22 Step 19 Slide the cleaned developer roller back into the cartridge. (See Photo 22) Photo 23 Step 20 Install the developer roller end plate. Press the end plate until the two locking tabs are pushed into place. (See Photo 23) Photo 24 Step 21 Install the five gears on the end of the cartridge. (See Photo 24) Photo 25 Step 22 Carefully place the drum into the cartridge. (See Photo 25) Need help with a particular remanu- facturing problem? Call the Technical Resource Center from 8am - 5pm PST: 800 394.9900
- 6. 6 Samsung ML1210 Technical Instructions Photo 26 Step 23 Place the wiper blade assembly into Notes the cartridge. Install the two screws that hold the wiper blade assembly in place. (See Photo 26) Photo 27 Step 24 Install the cartridge end cap on the gear end of the cartridge. Install the three screws that hold the end cap. (See Photo 27) Photo 28 Step 25 Install the non-gear end of the PCR into the saddle clip on the cartridge end plate. (See Photo 28) Photo 29 Step 26 Slide the cartridge end cap onto the opposite end of the cartridge. Lift up on the PCR saddle and install the PCR axle into the saddle clip. (See Photo 29) Photo 30 Step 27 Install the three screws that hold the end cap. (See Photo 30) E-mail: info@futuregraphicsllc.com Website: www.futuregraphicsllc.com
- 7. Samsung ML1210 Technical Instructions 7 Photo 31 Step 28 Step 28: Fill the cartridge with toner. (See Photo 31) Notes NOTE: If the cartridge being remanufac- tured had a metal plate that covered the PCR and drum, place the metal plate back onto the cartridge at this time. Install the two screws that holds the plate in place. See Photo 32) Photo 32 Photo 33 Step 29 Place the top of the cartridge onto the cartridge. Press down on the top of the cartridge until it snaps into place. Install five screws into the cartridge. (See Photo 33) Step 30 Test the cartridge. Need help with a particular remanu- facturing problem? Call the Technical Resource Center from 8am - 5pm PST: 800 394.9900
- 8. 8 Samsung ML1210 Technical Instructions Remanufacturing the Samsung ML1210 Released in 2001, the Samsung cartridge P/N ML1210D3. The ML-4500 ML-1210 engine was utilized by Lexmark and the 4600 use P/N ML4500D3. in the E210 and by Samsung in the The part number for the Lexmark ML-1010, 1220M, 1210, 1220M, 1250, version cartridge is 1OS0150. 1430, 4500, and the ML-4600 series of printers. The Samsung ML-1210 engine is One unique feature of this engine is capable of printing 12 pages per minute the use of a toner that is stated to have at 600dpi and is rated at a 5,000 page 100% transfer efficiency. The waste hop- duty cycle. These printers were discon- per has no real chamber that could hold tinued back in 2002 but are still fairly a large amount of waste. The use of a popular amongst remanufactures. toner that wasn’t close to having 100% ML1210 transfer efficiency would overload the The all-in-one cartridge holds 65 chamber and result in toner leaking from grams of toner and yields only 2,500 the so called waste hopper. Lastly, the pages at 5% coverage. Two sepatate part cartridges. The ML-1010, 1020M, 1210, wiper blade is a mylar strip that resem- numbers are given for the Samsung M1220, 1250, and 1430 printers use bles a recovery blade, not a wiper blade. Future Graphics (FG) is a distributor of compatible replacement parts and products for imagining equipment. None of FG's products are genuine OEM replacement parts and no affiliation or sponsorship is to be implied between FG and any OEM.