Instalação do Squid3 no Ubuntu
•
0 gostou•2,315 visualizações

O documento fornece instruções passo-a-passo para instalar e configurar o Squid3 como proxy transparente em um servidor Ubuntu, incluindo compilar o código fonte, criar scripts de inicialização e regras de firewall para redirecionar tráfego para a porta do proxy. Ele também fornece dicas para obter ajuda online caso haja problemas na configuração.

Recomendados
Mais conteúdo relacionado
Mais procurados
Mais procurados (20)
Semelhante a Instalação do Squid3 no Ubuntu
Semelhante a Instalação do Squid3 no Ubuntu (20)
Mais de Aécio Pires
Mais de Aécio Pires (20)
Instalação do Squid3 no Ubuntu
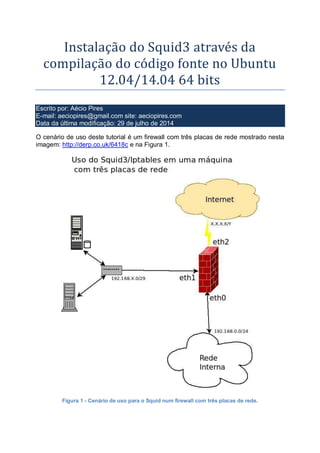
- 1. Instalação do Squid3 através da compilação do código fonte no Ubuntu 12.04/14.04 64 bits Escrito por: Aécio Pires E-mail: aeciopires@gmail.com site: aeciopires.com Data da última modificação: 29 de julho de 2014 O cenário de uso deste tutorial é um firewall com três placas de rede mostrado nesta imagem: http://derp.co.uk/6418c e na Figura 1. Figura 1 - Cenário de uso para o Squid num firewall com três placas de rede.
- 2. ETAPA 0- Instalando as dependências da compilação. $ sudo apt-get update $ sudo apt-get install gawk g++ cpp gpp acl lsb-cxx openssl libssl-dev ETAPA 1- Baixando o código fonte da versão 3.4.6. $ cd ~ $ wget http://www.squid-cache.org/Versions/v3/3.4/squid-3.4.6.tar.bz2 ETAPA 2- Descompactando o código fonte da versão 3.4.6. $ tar xjvf squid-3.4.6.tar.bz2 ETAPA 3- Dando permissão de execução aos arquivos do diretório squid-3.4.6. $ sudo chmod -R +x squid-3.4.6 ETAPA 4- Acessando o diretório squid-3.4.6. $ cd squid-3.4.6 ETAPA 5- Compilando o Squid3. $ sudo su # ./configure --prefix=/usr --includedir=${prefix}/include -- mandir=${prefix}/share/man --infodir=${prefix}/share/info -- sysconfdir=/etc --localstatedir=/var --libexecdir=${prefix}/lib/squid3 -- srcdir=. --disable-maintainer-mode --datadir=/usr/share/squid3 -- sysconfdir=/etc/squid3 --mandir=/usr/share/man --with- logdir=/var/log/squid3 --with-pidfile=/var/run/squid3.pid --enable- removal-policies="lru,heap" --enable-digest-auth-helpers="password" -- enable-basic-auth-helpers="getpwnam,YP,NCSA,MSNT" --enable-external-acl- helpers="unix_group,wbinfo_group" --enable-ntlm-auth- helpers="fakeauth,no_check" --enable-removal-policies --enable-linux- netfilter --enable-ident-lookups --enable-useragent-log --enable-cache- digests --enable-delay-pools --enable-referer-log --enable-underscores -- enable-async-io --enable-truncate --enable-arp-acl --with-pthreads -- enable-icmp --enable-htcp --enable-carp --enable-poll --enable-snmp -- enable-wccp --enable-ssl --with-default-user=proxy # make all # make install # chown -R proxy:proxy /var/log/squid3 # chmod -R 755 /var/log/squid3 ETAPA 6- Foi deito um backup do arquivo de configuração /etc/squid3/squid.conf. # cp /etc/squid3/squid.conf /etc/squid3/squid.conf.original ETAPA 7- O arquivo ficou com a seguinte configuração para funcionar apenas como um proxy-cache transparente. #-------------------------------------------------------# Link para baixar o conteúdo de /etc/squid3/squid.conf http://pastebin.com/6248t7kH
- 3. #------------------- BEGIN FILE -------------------------------# # # Recommended minimum configuration: # # Example rule allowing access from your local networks. # Adapt to list your (internal) IP networks from where browsing # should be allowed #acl localnet src 10.0.0.0/8# RFC1918 possible internal network #acl localnet src 172.16.0.0/12 # RFC1918 possible internal network #acl localnet src 192.168.0.0/16 # RFC1918 possible internal network acl localnet src 192.168.0.0/24 acl localnet src fc00::/7 # RFC 4193 local private network range acl localnet src fe80::/10 # RFC 4291 link-local (directly plugged) machines acl SSL_ports port 443 acl Safe_ports port 80 # http acl Safe_ports port 21 # ftp acl Safe_ports port 443 # https acl Safe_ports port 70 # gopher acl Safe_ports port 210 # wais acl Safe_ports port 1025-65535 # unregistered ports acl Safe_ports port 280 # http-mgmt acl Safe_ports port 488 # gss-http acl Safe_ports port 591 # filemaker acl Safe_ports port 777 # multiling http acl CONNECT method CONNECT # # Recommended minimum Access Permission configuration: # # Deny requests to certain unsafe ports http_access deny !Safe_ports # Deny CONNECT to other than secure SSL ports http_access deny CONNECT !SSL_ports # Only allow cachemgr access from localhost http_access allow localhost manager http_access deny manager # We strongly recommend the following be uncommented to protect innocent # web applications running on the proxy server who think the only # one who can access services on "localhost" is a local user #http_access deny to_localhost # # INSERT YOUR OWN RULE(S) HERE TO ALLOW ACCESS FROM YOUR CLIENTS # # Example rule allowing access from your local networks. # Adapt localnet in the ACL section to list your (internal) IP networks # from where browsing should be allowed http_access allow localnet http_access allow localhost
- 4. # And finally deny all other access to this proxy http_access deny all # Squid normally listens to port 3128 http_port 192.168.0.1:3128 intercept # OPTIONS WHICH AFFECT THE CACHE SIZE # ============================== #--A cache sera de 8 MB cache_mem 8 MB maximum_object_size_in_memory 32 KB memory_replacement_policy heap GDSF cache_replacement_policy heap LFUDA cache_dir aufs /home/squid/cache 10000 14 256 maximum_object_size 128000 KB cache_swap_low 95 cache_swap_high 99 # TIMEOUTS # ======= # forward_timeout 240 second connect_timeout 30 second peer_connect_timeout 5 second read_timeout 600 second request_timeout 60 second shutdown_lifetime 10 second # LOGFILE PATHNAMES AND CACHE DIRECTORIES # ================================== # access_log /home/squid/log/access.log squid cache_log /home/squid/cache/cache.log cache_store_log /home/squid/cache/store.log logfile_rotate 5 log_icp_queries off # ADMINISTRATIVE PARAMETERS # ===================== # cache_mgr ninja cache_effective_user proxy cache_effective_group proxy #MUDE PARA off PARA OMITIR INFORMACOES DO SQUID httpd_suppress_version_string off #COMENTE ESSA LINHA PARA OMITIR O NOME DO HOST #visible_hostname ninja # ftp_passive on ftp_sanitycheck on # # DNS OPTIONS # ========== # dns_timeout 5 seconds dns_defnames on #--DNS Servers
- 5. dns_nameservers 8.8.8.8 8.8.4.4 # Leave coredumps in the first cache dir coredump_dir /var/cache/squid # # Add any of your own refresh_pattern entries above these. # refresh_pattern ^ftp: 1440 20% 10080 refresh_pattern ^gopher: 1440 0% 1440 refresh_pattern -i (/cgi-bin/|?) 0 0% 0 refresh_pattern . 0 20% 4320 #------------------- END FILE -------------------------------# 192.168.0.1 é o IP do firewall referente a placa de rede que se comunica com a rede interna. ETAPA 8- Crie o script de inicialização do Squid /etc/init.d/squid3 com o seguinte conteúdo. #-------------------------------------------------------# Link para baixar o conteúdo de /etc/init.d/squid3 http://pastebin.com/YvW6iv3Z #!/bin/bash #------------------------------------------------------------------# # Start/stop/restart/reload the Squid Internet Object Cache (squid) # To make Squid start automatically at boot at Ubuntu 14.04, make this # file executable: # sudo chmod 755 /etc/init.d/squid3 # sudo update-rc.d -f squid3 defaults #------------------------------------------------------------------# #---------------------------------------------------- isroot(){ MYUID=$(id | cut -d= -f2 | cut -d( -f1) [ $MYUID -eq 0 ] && echo YES || echo NO } #-------------------------------- getSquidPID(){ # Method 1: Getting the PID through the file. AUX2=$(cat $PIDFILE 2> /dev/null) if [ ! -z $AUX2 ] ; then echo $AUX2 else #Indicates that the PID file is empty or does not exist, then the process never existed. #Showing a very large ID not only to generate runtime error. echo 700000 fi
- 6. # Method 2: Getting the PID by process name #ps ax | pgrep -fl squid | sed "s/^ *//" | cut --field=1 --delimiter=" " > /dev/null 2>&1 } #-------------------------------- status(){ PID=$(getSquidPID) AUX=`ps h -p $PID 2> /dev/null` # Pesquisando se o processo esta ou nao em execucao if [ -z "$AUX" ] ; then echo "[STATUS]: Squid3 version=$SQUIDVERSION is not running..." return 1 else echo "[STATUS]: Squid3 version=$SQUIDVERSION is running: PID=$PID" return 0 fi } #-------------------------------- start() { PID=$(getSquidPID) AUX=`ps h -p $PID 2> /dev/null` # Pesquisando se o processo esta ou nao em execucao if [ ! -z "$AUX" ] ; then echo "[START]: Squid3 version=$SQUIDVERSION is already running PID=$PID. Use "restart"" exit 1 fi # Create cache directory hierarchy if needed ALL_DIRS=$(awk '/^cache_dir/ {print $3}' $SQUIDCFG) [ -z "$ALL_DIRS" ] && ALL_DIRS=/var/cache/squid for CACHE_DIR in $ALL_DIRS ; do if [ ! -d $CACHE_DIR/00 ] ; then echo "[INFO]: Creating swap directories: $SQUIDCMD -z" $SQUIDCMD -z 2> /dev/null break fi done echo "[START]: Starting Squid3 version=$SQUIDVERSION ..." $SQUIDCMD -F } #-------------------------------- stop() { COUNTDOWN=$(awk '/^shutdown_lifetime/ {print $2}' $SQUIDCFG) [ -z "$COUNTDOWN" ] && COUNTDOWN=30 echo -n "[STOP]: Shutting down Squid in $COUNTDOWN seconds: " $SQUIDCMD -k shutdown 2> /dev/null while $SQUIDCMD -k check 2> /dev/null ; do sleep 1 echo -n . COUNTDOWN=$[ $COUNTDOWN - 1 ]
- 7. if [ $COUNTDOWN -le 0 ] ; then $SQUIDCMD -k interrupt 2> /dev/null sleep 1 break fi done echo } #-------------------------------- reload() { $SQUIDCMD -k reconfigure 2> /dev/null } #-----------------------------# #---------- MAIN -------------# #-----------------------------# if [ $(isroot) = NO ] ; then echo "[ERROR]: You must be root to run this command.." echo "Run the command "sudo $CMDLINE"" exit 1 fi #----------- Declaration of Variables ------------------------- SQUIDCFG=/etc/squid3/squid.conf PIDFILE=/var/run/squid3.pid SQUIDCMD=/usr/sbin/squid SQUIDVERSION=$($SQUIDCMD -version | grep "Cache" | cut -d" " -f4) #--------------------------------------------------------------- if [ ! -r $SQUIDCFG ]; then echo "[ERROR]: Please set the correct path to $SQUIDCFG" exit 1 fi if [ ! -x $SQUIDCMD ]; then echo "[ERROR]: $SQUIDCMD not found" exit 1 fi case $1 in start) start ;; stop) stop ;; restart) stop sleep 3 start ;; status) status ;;
- 8. reload) reload ;; *) echo "[ERROR]: Type $0 {start|stop|restart|status|reload} " exit 1 ;; esac #------------------- END FILE -------------------------------# ETAPA 9- Dê permissão de execução ao script e habilite a execução do mesmo no boot do sistema operacional. # chmod 755 /etc/init.d/squid3 # update-rc.d -f squid3 defaults ETAPA 10- O squid pode ser iniciado/parado ou verificado o status da execução da seguinte forma, respectivamente. # /etc/init.d/squid3 start # /etc/init.d/squid3 stop # /etc/init.d/squid3 status ETAPA 11- Para poder fazer proxy transparente adicione essa regra no seu script de firewall. iptables -t nat -A PREROUTING -i PLACA_REDE_INTERNA -p tcp --dport 80 -j REDIRECT --to-port 3128 iptables -A INPUT -p tcp -i PLACA_REDE_INTERNA --dport 3128 -j ACCEPT O termo PLACA_REDE_INTERNA deve ser substituído pelo nome da interface (placa da rede do firewall que se comunica com a rede local). É nessa placa que o proxy receberá as requisições dos clientes e o 3128 indica a porta usada pelo Squid. Verifique o log do Squid de acessos no arquivo /var/log/squid3/access.log ETAPA 12- O roteamento de pacotes entre as placas de rede do firewall também deve estar habilitado com o comando abaixo. # echo 1 > /proc/sys/net/ipv4/ip_forward ETAPA FINAL- Teste o acesso a Internet através dos clientes. Se não funcionar. Desabilite a regra de redirecionamento das requisições que vão da porta 80 para a 3128. Revise com muita calma tudo o que foi feito até aqui. Cadastre-se na lista Squid-BR https://br.groups.yahoo.com/neo/groups/squid-br e informe o maior nível de detalhes possível para que as pessoas possam lhe ajudar com mais precisão.
- 9. Sugestão. Cole o conteúdo dos arquivos access.log, cache.log, squid.conf, sendo um por vez, no site http://pastebin.com para que ele gere três página diferentes um por vez e no email, ao invés de informar o longo conteúdos dos arquivos, informe as URLs destas páginas para que as pessoas possam ver como está o seu ambiente de forma elegante. :-) Exemplo de um squid.conf usando o pastebin: http://pastebin.com/vw2uCHzu Também informe no email o resultado dos comandos abaixo. squid3 -version squid3 -k parse Também use o site http://pastebin.com para colar os resultados dos comandos e gerar mais duas URLs, uma para cada resultado do comando. Fonte de consulta: Mundo da Computação Integral - Configurando servidor proxy transparent com Squid. Disponível em: http://mundodacomputacaointegral.blogspot.com.br/2011/11/configurando-servidor- proxy-com-squid.html Acessado em: 29 de julho de 2014. Ubuntu Server Guide - How to Install and Configure Proxy Server with Squid3 on Ubuntu Server 12.04 LTS. Disponível em: http://ubuntuserverguide.com/2012/05/how-to-install-and-configure-proxy-server-with- squid3-on-ubuntu-server-12-04-lts.html e Acessado em: 29 de julho de 2014. Porque Deus amou o mundo de tal maneira que deu o seu Filho unigênito, para que todo aquele que nele crê não pereça, mas tenha a vida eterna. João 3:16 Eis que estou à porta, e bato; se alguém ouvir a minha voz, e abrir a porta, entrarei em sua casa, e com ele cearei, e ele comigo. Apocalipse 3:20 Carta de Deus para você http://blog.aeciopires.com/wp-content/uploads/2014/06/a.png