SlideShare uma empresa Scribd logo
1 de 30
Baixar para ler offline
MICROSOFT EXCEL TUTORIAL HANDOUT
                   Opening Microsoft Excel
                   1.     Click on the START button.

                   2.     Click on PROGRAMS.

                   3.     Click on MICROSOFT EXCEL.


                        The Excel Screen
                                                                                 Formula Bar   Minimize   Restore          Close
                                                                                               Buttons    Buttons          Button


  Title Bar

Menu Bar


Standard Toolbar
                                                                                                                      Close Window
                                                                                                                      Button


  Name Box

                                                      Active Cell


                                                                                         Worksheet
                                         Select All
                                         Button


  Status Bar


                                                                    Sheet Tabs


                             Tab Scrolling Buttons                                                                  Scroll Bars


                                                                                                                       1
Title Bar:              Displays the name of the current program and workbook.

Menu Bar:               Displays the names of the Excel menus.

Standard:               Displays the buttons of the most frequently used functions.
Toolbar

Name Box:               Displays the coordinates of the active cell.

Formula Bar:            Displays the contents of the active cell.

Status Bar:             Displays information about a selected command as well as
                        the status of certain keys, such as CapsLock and NumLock

Scroll Bars:            Used to move through the worksheet. You can move up,
                        down, left, and right.

Select All Button       Selects every cell in a worksheet.

Sheet Tabs:             Displays the names of the worksheets within a workbook.

Tab Scrolling           Used to scroll through the worksheets in a workbook.
Buttons:

Worksheet:              A single page in a workbook, divided into rows and
                        columns. Columns and rows intersect to form cells.

Active Cell:            The cell surrounded by a border where you enter or edit
                        data.

Minimize button:        Minimizes the window to a button on the Windows
                        taskbar.

Maximize/Restore:       Toggles (switches back and forth) between displaying a
button                  window in its maximum size and restoring a window to its
                        previous size.

Close Window Button: Closes the current window.

Close Button:           Closes the current program.


                                     Tip
        Move the mouse pointer over a button on the toolbar and a
        ToolTip will appear. This is the name of the button which gives
        a brief description of its purpose.


                                                                                   2
OPENING AND CLOSING A WORKBOOK
Opening A New Workbook:

1.    Click on the FILE menu.

2.    Click on NEW.

3.    Click OK

      OR

1.    Click on the NEW button.


Existing Workbook:

1.    Click on the FILE menu.

2.    Click on OPEN.

3.    Once the explorer window opens, select the files you wish to open.

4.    Click OPEN.

      OR

1.    Click on the OPEN button      .

2.    Once the explorer window opens, select the file you wish to open.

3.    Click OPEN.


Closing a Workbook:
                                                                           Close button
1.    Click on the CLOSE WINDOW button
      in the top-right corner of the window.

      OR

1.    Click on the FILE menu.

2.    Click CLOSE.


                                                                                          3
NAVIGATING THROUGH A WORKSHEET


              TO MOVE                           PRESS

           Left one column                 [ ] or Shift + Tab

           Right one column                    [ ] or Tab

 To the first column in the worksheet          [Ctrl] [ ]

  To the last column in the worksheet          [Ctrl] [ ]

To the last column in the row with data        [Ctrl] [ ]

To the first column in the row with data       [Ctrl] [ ]

              Up one row                   [ ] or Shift + Enter

            Down one row                      [ ] or Enter

      To the next worksheet Page           [Ctrl] [Page Down]

    To the previous worksheet Page          [Ctrl] [Page Up]

            Up one screen                      [Page Up]

           Down one screen                    [Page Down]

        Beginning of worksheet               [Ctrl] [Home]

       To the last cell with data             [Ctrl] [End]

            Left one screen                 [Alt] [Page Up]

           Right One Screen                [Alt] [Page Down]


                                                                  4
Moving Between Worksheets:

1.    Click on the desired sheet tab at the bottom left of the Excel window.


Scrolling Through a Worksheet

1.    Click on the left, right , up, or down scroll arrows to move one column/row.

      OR

      Drag the horizontal or vertical scroll box along the scroll bar to move the window
      in the corresponding direction.

      OR

      Click the scroll bar (either to the left or right of the horizontal scroll box, or above
      or below the vertical scroll box) to move the window in the direction of the mouse
      pointer.


Renaming Worksheets

1.    Double-click the desired sheet tab.

2.    Type the new name.

3.    Press ENTER.


                                            Tip
                  You can right-click a sheet tab to insert or delete
                  worksheets.


                                                                                            5
Selecting Cells


Single Cell:

1.     Click on the desired cell.
       The cell will have a black border,
       which indicates that this is the
       active cell.


A Range of Cells:

Using the Mouse
1.     Click on the cell in the upper, left-hand corner of the range.

2.     Move the mouse pointer to the lower, right-hand corner and release.

Using the Keyboard
1.     Click on the cell in the upper, left-hand corner of the range.

2.     Hold down the SHIFT key

3.     Click on the cell in the lower, right-hand corner of the range.

       OR

1.     Hold down the SHIFT key while pressing the arrow keys.


                                                                             6
Nonadjacent Cells

1.        Click on the first cell.

2.        Hold down the CTRL key.

3.        Click on the remaining desired cells.

A Single Row or Column:

1.        Click on the desired row or column heading.

More Than One Adjacent Column or Row:

     1.       Click and move the mouse pointer over
              the desired rows and columns.

Every Cell in A Worksheet:

1.        Click on the SELECT ALL button.


          Select All button                 Column C is selected


                                                                   7
CREATING A WORKSHEET
Entering Data:

1.    Select a cell.

2.    Enter the data.

3.    Press ENTER or click on the            in the formula bar

Entering a Range of Data:

1.    Select the cells.

2.    Enter the date

3.    Press ENTER.

4.    Continue until all cells are filled.

Editing Data:

1.    Double-click the cell.

      OR

1.    Click on the cell.

2.    Click on the formula bar.
                                                                  Cancel   Enter

      OR

1.    Click on the cell

2.    Press F2.

      OR

1.    Click on the CANCEL button in the formula
      bar to erase data before it is entered.


                                                                                   8
CREATING FOLDERS

You can create your own folders to organize your files. You can also create folders within folders.


1.       Click on the FILE menu.

2.       Click SAVE AS.

3.       Click on the CREATE NEW FOLDER button                           .

4.       Type the desired name for the folder in the space provided


                                                                                                      9
SAVING A DOCUMENT

Use SAVE AS: when you are saving a new document and you need to name it or if you are opening a
document and saving it with a new name. This does not replace the old file.

Use SAVE: when you are saving changes made to an existing document. The old information will be
overwritten.

Save As:

1.      Click the FILE menu.

2.      Click SAVE AS.


3.      Click on the SAVE IN drop down list to select the drive and folder where you
        wish to save this document.

4.      In the FILE NAME text box, type in the name you wish to give this document.

5.      Select “Microsoft Excel Workbook” from the FILE TYPE text box.

6.      Click SAVE

Save:

1.      Use the SAVE button                 or press [Ctrl] [S]


                                                                                                  10
FORMATTING CELLS, ROWS, AND COLUMNS

Numbers:
      Formatting can be done before or after data is entered.

1.    Select the cell(s)

2.    Click on the FORMAT menu.

3.    Click on CELLS.

4.    Select a format from the CATEGORY
      list.

5.    Click on the number of decimal places
      to be used, if applicable.

6.    Click OK.

      OR

1.    Select the cell(s).

2.    Right-click

3.    Click on FORMAT CELLS and follow steps 4-6 from above.

Cell Alignment:

1.    Select the cell(s).

2.    Click on the FORMAT menu.

3.    Click the ALIGNMENT tab.

4.    Choose the desired alignment by
      clicking on the drop down menu in
      the horizontal section.

5.    Click OK.


                                                                11
Change Font:

1.    Select the cell(s).

2.    Click on the FORMAT menu.

3.    Click on CELLS.

4.    Click on FONT.

5.    Make changes and click OK.


The Formatting Toolbar can also be used to make changes.

1.    Select the cell(s).
                                                 Italic    Left       Right Currency     Increase Decimal

2.    Click on the desired button.


          Font              Font Size   Bold   Underline     Center       Merge/Center                 Decrease Decimal


                                                                                                            12
Resize Columns And Rows:

Adjust the width of a column:

1.     Move the mouse pointer to the right of the
       column heading border until it turns into a
       double headed arrow

2.     Click and drag to the border to
       the right or left.

3.     Release the mouse at the desired width.

       OR

1.     Move the mouse pointer to the right of the column heading border until it turns
       into a double headed arrow.

2.     Double-click. The column is automatically resized to fit the widest entry.

Adjust the width of Multiple Columns:

1.     Select desired columns.

2.     Click on the FORMAT menu.

3.     Click on COLUMN.

4.     Click on WIDTH.

5.     Enter the desired width.

6.     Click OK.


                                                                                         13
INSERTING, DELETING, AND MERGING CELLS

Inserting Cells:

1.     Select the cell(s) above or to the left of the
       cells you want to move.

2.     Click on the INSERT menu.

3.     Click on CELLS.

4.     Click on appropriate selection.

5.     Click OK.

       OR

1.     Select the cell(s) above or to the left of the cells you want to move.

2.     Right-click.

3.     Click on INSERT.

4.     Follow steps 3-5 from above.

Inserting Rows and Columns:

1.     Select a cell to the left of the column or above the row that will be moved.

2.     Click on the INSERT menu.

3.     Click on COLUMNS or ROWS

       OR

1.     Right-click the column or row heading.

2.     Follow steps 2-3 from above.


                                                                                      14
Deleting Cells:

1.     Select the cell(s) to delete.

2.     Click on the EDIT menu.

3.     Click on DELETE.

4.     Click on appropriate selection.

5.     Click OK.

       OR

1.     Select the cell(s) to delete.

2.     Right-click.

3.     Follow steps 3-5 from above.

Deleting Rows and Columns:

1.     Select at least one cell in the column or row.

2.     Click on the EDIT menu.

3.     Click on DELETE

4.     Click on appropriate selection.

5.     Click OK.

Merging Cells:

1.     Select the cells you want to merge.

2.     Click the MERGE AND CENTER button
       on the toolbar.


                                             Tip
          Click the Undo button        to reverse the last change made. To
          “undo the undo” click the Redo button         .


                                                                             15
PRINTING WORKSHEETS AND WORKBOOKS

Previewing a Worksheet:

To preview the worksheet before you print it, click the PRINT PREVIEW button   .

To exit the Print Preview screen, click on CLOSE.

Setting the Print Area:

1.     Select the area of the worksheet that is to be printed.

2.     Click on the FILE menu.

3.     Click on PRINT AREA.

4.     Click on SET PRINT AREA.

Clearing the Print Area:

1.     Click on the FILE menu.

2.     Click on PRINT AREA.

3.     Click on CLEAR PRINT AREA.

Printing:

1.     Click on the FILE menu.

2.     Click on PRINT. A dialog box
       will appear.

3.     Select the options you wish to change
       (page name, name of printer, etc.)

4.     Select the number of copies.

5.     Click OK.


       OR

1.     Click the PRINT button         on the toolbar.


                                                                                   16
CREATING FORMULAS
The following mathematical operators can be used in a formula:

^      Exponentiation
*      Multiplication
/      Division
+      Addition
-      Subtraction

***Operations should be performed in the order listed above.

Entering a Formula:

1.     Click on the desired cell.

2.     Type = and the cell names.

3.     Press ENTER.

OR

1.     Click on the desired cell.

2.     Type =

3.     Click on the appropriate cell.

4.     Enter the desired mathematical
       operator.

5.     Repeat steps 3 & 4 until the
       formula is complete.

6.     Press ENTER or click on t
       he on the FORMULA BAR.


                                         Tip
              You can use lowercase or uppercase letters when typing cell
              references.


                                                                            17
Copying a Formula:

1.    Select the cell with the formula you want to copy.

2.    Point to the fill handle.

3.    Move the fill handle to the last cell in the range.


                                       Fill Handle


                                  Tip
     The fill handle can be used to complete a series of years,
     dates, days, etc.


Editing a Formula:

1.    Click on the appropriate cell.

2.    Position the insertion point in the FORMULA BAR, or click on the
      EDIT FORMULA button              on the formula bar.

3.    Make the changes and press ENTER.

Deleting a Formula:

1.    Click on the appropriate cell

2.    Press DELETE.


                                                                         18
USING FUNCTIONS

A function is a special formula, “built-in” to Excel, that performs a specific task

1.       Click on a cell.

2,       Click the PASTE FUNCTION button                       on the toolbar.

3.       Select the desired function and enter necessary information.

4.       Click OK.


                                        Using Autosum:
Autosum is a button on the toolbar which allows you to total adjacent cells.

1.       Select the cell that will contain the total.

2.       Click on the AUTOSUM button
         on the toolbar.

3.       Modify the formula if needed.

4.       Press ENTER


                                                                                      19
MOVING DATA
Cutting, Copying, and Pasting :

        Cutting text removes data from a cell while copying duplicates the data so that it can be
        pasted to another location.

1.      Select the cell(s) that contain the data to be cut or copied.


2.      Click on the CUT or COPY button.

3.      Select the cell(s) where the data will be pasted.

4.      Click on the PASTE button.


Copying Data Using the Fill Handle:

1.      Select the cell(s) that contain the data to be copied.

2.      Drag the fill handle to the desired cells.


Paste Special:

Paste Special allows you to choose which parts of a cell you want to paste. You can paste only the
cell’s formatting, formula, or width if desired.

1.      Select the cells that you want
        to cut or copy.

2.      Click on the CUT or COPY button.


3.      Select the cell(s) where the data
        will be pasted.

4.      Click on the EDIT menu.

5.      Click on PASTE SPECIAL

6.      Click on the desired pasteoption.

7.      Click OK.


                                                                                                20
FIND AND REPLACE
Find:

1.      Go to the beginning of the document
        by pressing [Ctrl] [Home].

2.      Click on the EDIT menu.

3.      Click on FIND.

4.      Click on the FIND tab in the dialog
        box that opens.

5.      Enter the word or number you wish to find in the “FIND WHAT” text
        box.

6.      Click on the SEARCH drop-down menu and click on rows or columns.

7.      Click on the LOOK IN drop-down menu and click on formulas, values,
        or comments.

8.      Click on FIND NEXT.

9.      Click OK when finished.


                                                                             21
Replace:

1.    Repeat steps 1thru 3 from above.

2.    Click on the REPLACE TAB in
      the dialog box that opens.

3.    Enter the word or number you wish
      to find in the “FIND WHAT” text box.

4.    Enter the word or number you wish to
      replace it with in the “REPLACE WITH”
      text box.

5.    Click on the SEARCH drop-down menu
      and click on rows or columns.

6.    Click on REPLACE ALL to replace every occurrence.


                                                          22
BORDERS AND SHADING

Adding Borders to Cells:
      Borders can be placed around a cell, a range of cells, or an entire worksheet.

1.    Select the cell(s).

2.    Click on the FORMAT menu.


3.    Click on CELLS.

4.    Click on the BORDER tab.

5.    Choose which edges you want to
      add the border to in the PRESETS
      and BORDER sections.

6.    Select the desired border line type
      and color.

7.    Click OK.
                                                            Border Preview Box


      OR

1.    Click on the BORDERS drop-down menu
      on the toolbar.

2.    Select the desired options.


                                                                                       23
Adding Shading:

1.      Select the cell(s).

2.      Click on the FORMAT
        menu.

3.      Click on CELLS.

4.      Click the PATTERNS
        tab.

5.      Select the desired color
        and pattern.

6.      Click OK.

        OR

1.      Click on the FILL COLOR drop-down
        menu on the toolbar.

2.      Click on the desired color.

Clearing Cell Contents and Formats:

The delete key deletes values, but does not delete formatting. The Clear command deletes contents,
         formatting, or both.

1.      Select the cell(s).

2.      Click on the EDIT menu.

3.      Click on CLEAR.

4.      Click on the desired option.


                                                                                               24
Displaying the Drawing Toolbar:

      1.      Click on the VIEW menu.

      2.      Click on TOOLBARS.

      3.      Click on DRAWING.

              OR

      1.      Click on the DRAWING button on the toolbar.

                                     Rectangle
                                                   Oval


                Line             Arrow           Text Box


Creating Lines and Objects:

1.    Click the button on the DRAWING toolbar for the line or object you want to
      create.

2.    Drag to the desired location in the worksheet.

Resizing Lines and Objects:

1.    Click on the line or object to select it.

2.    Move the mouse pointer over a sizing handle.

3.    Move the sizing handle until the desired size is reached.

Deleting Lines and Objects:

1.    Click on the line or object.

2.    Press the DELETE key.


                                                                                   25
ADDING HEADERS AND FOOTERS


1.    Click on the VIEW menu.

2.    Click on HEADER AND FOOTER.

3.    Click on the header or footer drop-
      down menu and select the desired
      header and footer.

4.    Click OK.


Customizing Headers and Footers:

1.    Repeat steps 1 & 2 from above.

2.    Click on the CUSTOM HEADER or CUSTOM FOOTER button.

        Font Button                 Total Pages Button     Time Button              Sheet Name Button


               Page Number Button            Date Button         File Name Button


3.    Type desired text and field codes into the appropriate sections.

4.    Click OK in the Header/Footer dialog box.

5.    Click OK in the Page Setup dialog box.


                                                                                                        26
MAKING CHANGES TO THE PAGE LAYOUT

Changing Margins:

1.     Click on the FILE menu.

2.     Click on PAGE SETUP.

3.     Click on the MARGINS tab.

4.     Change the margins by clicking
       on the arrows or typing a new
       setting into the text box.

5.     Click OK.


Inserting and Deleting Page Breaks:

Insert
1.     Select a cell below and to the right of where you want the page break to be added.

2.     Click on the INSERT menu.

3,     Click on PAGE BREAK.

Delete
1.     Follow steps 1 & 2 from above.

2.     Click on REMOVE PAGE BREAK.

Previewing Page Breaks:

1.     Click on the VIEW menu.

2.     Click on PAGE BREAK PREVIEW.


                                                                                       27
CREATING CHARTS

Creating a Chart with the Chart Wizard

1.    Select the desired data.

2.    Click on the Chart Wizard button
      on the toolbar

3.    Click on the desired chart type
      and sub-type in the Step 1 of 4
      dialog box and click NEXT.

4.    Click ROWS or COLUMNS in the
      Step 2 of 4 dialog box.

5.    Enter titles for the chart and axes in
      Step 3 of 4 dialog box click NEXT.

6.    Click on AS NEW SHEET to create
      a chart sheet in the STEP 4 of 4
      dialog box. Click on AS OBJECT
      IN to create an embedded chart.

7.    Click FINISH.


                                                   28
Deleting a Chart Sheet:

1.    Select the desired chart sheet tab.

2.    Click on the EDIT menu.

3.    Click on DELETE SHEET.

4.    Click OK.


Previewing and Printing a Chart Sheet:

1.    Click the desired chart sheet tab.

2.    Click on the PREVIEW button on the toolbar.

3.    Click the PRINT button on the preview toolbar.


                                            Tip
              You can move and resize a chart the same way you
              move objects.


                                                                 29
HELP

Getting Help:

There are two types of help within Word. One is the Screen Tips and the other is the
       Office Assistant.

                 Screen Tip: A brief explanation about an item on the screen. It is used
                             when you are unsure about what an item is or what it does..

                 To Activate Screen Tips:

                 1.       Click on HELP on the Menu bar.

                 2.       Click on WHAT’S THIS?

                 3.       Click on the item you want to know about.


OFFICE ASSISTANT

Office Assistant: An animated icon displayed on the screen. When activated, it offers
                  tips on how to use Word’s features or you can search a topic for step-
                  by-step instructions for completing a specific task.

If the Office Assistant is not visible, click on the OFFICE ASSISTANT button           on
the MENU bar.


                      To Activate Office Assistant:
1.        Click on the ASSISTANT. A window
          opens asking “What Would You Like To Do?”

2.        The assistant automatically tries to guess
          what you need help on. If you do not see the topic
          you are looking for, type your question in the text
          box and click on the SEARCH button.

3.        To view topic instructions click on the bullet
          of that topic.

To Deactivate Office Assistant:

     1.      Right click on the ASSISTANT and click HIDE.


                                                                                            30

Mais conteúdo relacionado

Mais procurados

Mais procurados (20)

Excel Shortcuts & Formulas
Excel Shortcuts & FormulasExcel Shortcuts & Formulas
Excel Shortcuts & Formulas
 
MS Excel 2010 training module
MS Excel 2010 training moduleMS Excel 2010 training module
MS Excel 2010 training module
 
MS EXCEL
MS EXCELMS EXCEL
MS EXCEL
 
Ms excel
Ms excelMs excel
Ms excel
 
Excel lesson01
Excel lesson01Excel lesson01
Excel lesson01
 
Excel 2010
Excel 2010Excel 2010
Excel 2010
 
Teaching Excel
Teaching ExcelTeaching Excel
Teaching Excel
 
Ms excel
Ms excelMs excel
Ms excel
 
Introduction to Microsoft Excel for beginners
Introduction to Microsoft Excel for beginnersIntroduction to Microsoft Excel for beginners
Introduction to Microsoft Excel for beginners
 
PPT On Microsoft Excel 2007 Full Information.
PPT On Microsoft Excel 2007 Full Information.PPT On Microsoft Excel 2007 Full Information.
PPT On Microsoft Excel 2007 Full Information.
 
ms excel presentation...
ms excel presentation...ms excel presentation...
ms excel presentation...
 
Basic Ms excel
Basic Ms excelBasic Ms excel
Basic Ms excel
 
Excel for beginner
Excel for beginnerExcel for beginner
Excel for beginner
 
Excel Tutorial
Excel TutorialExcel Tutorial
Excel Tutorial
 
Ms excel 2007
Ms excel 2007Ms excel 2007
Ms excel 2007
 
MS WORD
MS WORDMS WORD
MS WORD
 
Ms access
Ms accessMs access
Ms access
 
A practical tutorial to excel
A practical tutorial to excelA practical tutorial to excel
A practical tutorial to excel
 
MS Word Introduction and Tools.
MS Word Introduction and Tools.MS Word Introduction and Tools.
MS Word Introduction and Tools.
 
Microsoft excel
Microsoft excelMicrosoft excel
Microsoft excel
 

Destaque

Excel Tutorials
Excel TutorialsExcel Tutorials
Excel TutorialsLUZ PINGOL
 
Microsoft Office Excel 2003 Tutorials (Sasha Y7)
Microsoft Office Excel 2003 Tutorials (Sasha Y7) Microsoft Office Excel 2003 Tutorials (Sasha Y7)
Microsoft Office Excel 2003 Tutorials (Sasha Y7) Aimina Salsabila
 
Tutorial of microsoft excel 2007
Tutorial of microsoft excel 2007Tutorial of microsoft excel 2007
Tutorial of microsoft excel 2007sabillafh
 
Microsoft Office Access 2003 Tutorial for Beginners
Microsoft Office Access 2003 Tutorial for BeginnersMicrosoft Office Access 2003 Tutorial for Beginners
Microsoft Office Access 2003 Tutorial for BeginnersAimina Salsabila
 
Microsoft Excel 2007 Tutorial
Microsoft Excel 2007 TutorialMicrosoft Excel 2007 Tutorial
Microsoft Excel 2007 Tutorialdhafinnaviansyah
 
Excel slide show
Excel slide showExcel slide show
Excel slide showRemon sai
 
Tutorial 5: Excel Tables, PivotTables, and Pivot Charts
Tutorial 5: Excel Tables, PivotTables, and Pivot ChartsTutorial 5: Excel Tables, PivotTables, and Pivot Charts
Tutorial 5: Excel Tables, PivotTables, and Pivot Chartscios135
 
Functions and formulas of ms excel
Functions and formulas of ms excelFunctions and formulas of ms excel
Functions and formulas of ms excelmadhuparna bhowmik
 

Destaque (10)

Lo3
Lo3Lo3
Lo3
 
Excel Tutorials
Excel TutorialsExcel Tutorials
Excel Tutorials
 
Microsoft Office Excel 2003 Tutorials (Sasha Y7)
Microsoft Office Excel 2003 Tutorials (Sasha Y7) Microsoft Office Excel 2003 Tutorials (Sasha Y7)
Microsoft Office Excel 2003 Tutorials (Sasha Y7)
 
Tutorial of microsoft excel 2007
Tutorial of microsoft excel 2007Tutorial of microsoft excel 2007
Tutorial of microsoft excel 2007
 
Microsoft Office Access 2003 Tutorial for Beginners
Microsoft Office Access 2003 Tutorial for BeginnersMicrosoft Office Access 2003 Tutorial for Beginners
Microsoft Office Access 2003 Tutorial for Beginners
 
Microsoft Excel 2007 Tutorial
Microsoft Excel 2007 TutorialMicrosoft Excel 2007 Tutorial
Microsoft Excel 2007 Tutorial
 
Excel slide show
Excel slide showExcel slide show
Excel slide show
 
Tutorial 5: Excel Tables, PivotTables, and Pivot Charts
Tutorial 5: Excel Tables, PivotTables, and Pivot ChartsTutorial 5: Excel Tables, PivotTables, and Pivot Charts
Tutorial 5: Excel Tables, PivotTables, and Pivot Charts
 
Functions and formulas of ms excel
Functions and formulas of ms excelFunctions and formulas of ms excel
Functions and formulas of ms excel
 
Ppt on ms excel
Ppt on ms excelPpt on ms excel
Ppt on ms excel
 

Semelhante a Ms Excel Tutorials

Semelhante a Ms Excel Tutorials (20)

lecture 2
 lecture 2 lecture 2
lecture 2
 
Learn excel
Learn excelLearn excel
Learn excel
 
Introduction to microsoft excel 2007
Introduction to microsoft excel 2007Introduction to microsoft excel 2007
Introduction to microsoft excel 2007
 
Word excel
Word excelWord excel
Word excel
 
Word excel
Word excelWord excel
Word excel
 
MS Excel 2010 tutorial 2
MS Excel 2010 tutorial 2MS Excel 2010 tutorial 2
MS Excel 2010 tutorial 2
 
ppt-2-for-DATA-MANAGEMENT.pdf
ppt-2-for-DATA-MANAGEMENT.pdfppt-2-for-DATA-MANAGEMENT.pdf
ppt-2-for-DATA-MANAGEMENT.pdf
 
introductiontomicrosoftexcel2007-131031090350-phpapp01.pdf
introductiontomicrosoftexcel2007-131031090350-phpapp01.pdfintroductiontomicrosoftexcel2007-131031090350-phpapp01.pdf
introductiontomicrosoftexcel2007-131031090350-phpapp01.pdf
 
02.modifying worksheet
02.modifying worksheet02.modifying worksheet
02.modifying worksheet
 
02.modifying worksheet
02.modifying worksheet02.modifying worksheet
02.modifying worksheet
 
Excel for beginners class 4
Excel for beginners class 4Excel for beginners class 4
Excel for beginners class 4
 
Presentation-Ms Excel.pptx
Presentation-Ms Excel.pptxPresentation-Ms Excel.pptx
Presentation-Ms Excel.pptx
 
Keyboard shortcuts
Keyboard shortcutsKeyboard shortcuts
Keyboard shortcuts
 
Learning MS Excel - A Handout
Learning MS Excel - A HandoutLearning MS Excel - A Handout
Learning MS Excel - A Handout
 
Microsoft excel tutorial (part i)
Microsoft excel tutorial (part i)Microsoft excel tutorial (part i)
Microsoft excel tutorial (part i)
 
W5_MSEXCEL.pdf
W5_MSEXCEL.pdfW5_MSEXCEL.pdf
W5_MSEXCEL.pdf
 
Excel Objective 1: Creating and Manipulating Data
Excel Objective 1: Creating and Manipulating DataExcel Objective 1: Creating and Manipulating Data
Excel Objective 1: Creating and Manipulating Data
 
Microsoft excel-2003-keyboard-shortcuts
Microsoft excel-2003-keyboard-shortcutsMicrosoft excel-2003-keyboard-shortcuts
Microsoft excel-2003-keyboard-shortcuts
 
Phim Tat Trong Excel
Phim Tat Trong ExcelPhim Tat Trong Excel
Phim Tat Trong Excel
 
Excel shortcut keys
Excel shortcut keysExcel shortcut keys
Excel shortcut keys
 

Mais de LUZ PINGOL

Elements of Computer
Elements  of ComputerElements  of Computer
Elements of ComputerLUZ PINGOL
 
Rizal essay writing final
Rizal essay writing finalRizal essay writing final
Rizal essay writing finalLUZ PINGOL
 
searching & copyright
searching & copyrightsearching & copyright
searching & copyrightLUZ PINGOL
 
Rizal Aking Idolo
Rizal Aking IdoloRizal Aking Idolo
Rizal Aking IdoloLUZ PINGOL
 
Dr. Jose Rizal
Dr. Jose RizalDr. Jose Rizal
Dr. Jose RizalLUZ PINGOL
 
Movie Maker Tutorial
Movie Maker TutorialMovie Maker Tutorial
Movie Maker TutorialLUZ PINGOL
 
Word Tutorial 2007
Word Tutorial 2007Word Tutorial 2007
Word Tutorial 2007LUZ PINGOL
 
Pc Fundamentalspart 2 Word
Pc Fundamentalspart 2 WordPc Fundamentalspart 2 Word
Pc Fundamentalspart 2 WordLUZ PINGOL
 
Module Internet
Module InternetModule Internet
Module InternetLUZ PINGOL
 
Application Of Computers with Pictures
Application Of Computers with PicturesApplication Of Computers with Pictures
Application Of Computers with PicturesLUZ PINGOL
 
Application Of Computers To Society
Application Of Computers To SocietyApplication Of Computers To Society
Application Of Computers To SocietyLUZ PINGOL
 
Booting Up And Shutting Down Computer
Booting Up And Shutting Down ComputerBooting Up And Shutting Down Computer
Booting Up And Shutting Down ComputerLUZ PINGOL
 
Booting Up And Shutting Down Computer
Booting Up And Shutting Down ComputerBooting Up And Shutting Down Computer
Booting Up And Shutting Down ComputerLUZ PINGOL
 
Proper Care Of Computers
Proper Care Of ComputersProper Care Of Computers
Proper Care Of ComputersLUZ PINGOL
 
Application Of Computers
Application Of ComputersApplication Of Computers
Application Of ComputersLUZ PINGOL
 
Computer Laboratory Rules
Computer Laboratory RulesComputer Laboratory Rules
Computer Laboratory RulesLUZ PINGOL
 
What Is Computer
What Is ComputerWhat Is Computer
What Is ComputerLUZ PINGOL
 
Computer Laboratory Rules
Computer Laboratory RulesComputer Laboratory Rules
Computer Laboratory RulesLUZ PINGOL
 

Mais de LUZ PINGOL (20)

Elements of Computer
Elements  of ComputerElements  of Computer
Elements of Computer
 
Rizal essay writing final
Rizal essay writing finalRizal essay writing final
Rizal essay writing final
 
searching & copyright
searching & copyrightsearching & copyright
searching & copyright
 
INSET 2011
INSET 2011INSET 2011
INSET 2011
 
Rizal Aking Idolo
Rizal Aking IdoloRizal Aking Idolo
Rizal Aking Idolo
 
Dr. Jose Rizal
Dr. Jose RizalDr. Jose Rizal
Dr. Jose Rizal
 
Movie Maker Tutorial
Movie Maker TutorialMovie Maker Tutorial
Movie Maker Tutorial
 
How To Paint
How To PaintHow To Paint
How To Paint
 
Word Tutorial 2007
Word Tutorial 2007Word Tutorial 2007
Word Tutorial 2007
 
Pc Fundamentalspart 2 Word
Pc Fundamentalspart 2 WordPc Fundamentalspart 2 Word
Pc Fundamentalspart 2 Word
 
Module Internet
Module InternetModule Internet
Module Internet
 
Application Of Computers with Pictures
Application Of Computers with PicturesApplication Of Computers with Pictures
Application Of Computers with Pictures
 
Application Of Computers To Society
Application Of Computers To SocietyApplication Of Computers To Society
Application Of Computers To Society
 
Booting Up And Shutting Down Computer
Booting Up And Shutting Down ComputerBooting Up And Shutting Down Computer
Booting Up And Shutting Down Computer
 
Booting Up And Shutting Down Computer
Booting Up And Shutting Down ComputerBooting Up And Shutting Down Computer
Booting Up And Shutting Down Computer
 
Proper Care Of Computers
Proper Care Of ComputersProper Care Of Computers
Proper Care Of Computers
 
Application Of Computers
Application Of ComputersApplication Of Computers
Application Of Computers
 
Computer Laboratory Rules
Computer Laboratory RulesComputer Laboratory Rules
Computer Laboratory Rules
 
What Is Computer
What Is ComputerWhat Is Computer
What Is Computer
 
Computer Laboratory Rules
Computer Laboratory RulesComputer Laboratory Rules
Computer Laboratory Rules
 

Último

BASLIQ CURRENT LOOKBOOK LOOKBOOK(1) (1).pdf
BASLIQ CURRENT LOOKBOOK  LOOKBOOK(1) (1).pdfBASLIQ CURRENT LOOKBOOK  LOOKBOOK(1) (1).pdf
BASLIQ CURRENT LOOKBOOK LOOKBOOK(1) (1).pdfSoniaTolstoy
 
Software Engineering Methodologies (overview)
Software Engineering Methodologies (overview)Software Engineering Methodologies (overview)
Software Engineering Methodologies (overview)eniolaolutunde
 
Web & Social Media Analytics Previous Year Question Paper.pdf
Web & Social Media Analytics Previous Year Question Paper.pdfWeb & Social Media Analytics Previous Year Question Paper.pdf
Web & Social Media Analytics Previous Year Question Paper.pdfJayanti Pande
 
A Critique of the Proposed National Education Policy Reform
A Critique of the Proposed National Education Policy ReformA Critique of the Proposed National Education Policy Reform
A Critique of the Proposed National Education Policy ReformChameera Dedduwage
 
The basics of sentences session 2pptx copy.pptx
The basics of sentences session 2pptx copy.pptxThe basics of sentences session 2pptx copy.pptx
The basics of sentences session 2pptx copy.pptxheathfieldcps1
 
URLs and Routing in the Odoo 17 Website App
URLs and Routing in the Odoo 17 Website AppURLs and Routing in the Odoo 17 Website App
URLs and Routing in the Odoo 17 Website AppCeline George
 
Advanced Views - Calendar View in Odoo 17
Advanced Views - Calendar View in Odoo 17Advanced Views - Calendar View in Odoo 17
Advanced Views - Calendar View in Odoo 17Celine George
 
Activity 01 - Artificial Culture (1).pdf
Activity 01 - Artificial Culture (1).pdfActivity 01 - Artificial Culture (1).pdf
Activity 01 - Artificial Culture (1).pdfciinovamais
 
Beyond the EU: DORA and NIS 2 Directive's Global Impact
Beyond the EU: DORA and NIS 2 Directive's Global ImpactBeyond the EU: DORA and NIS 2 Directive's Global Impact
Beyond the EU: DORA and NIS 2 Directive's Global ImpactPECB
 
The Most Excellent Way | 1 Corinthians 13
The Most Excellent Way | 1 Corinthians 13The Most Excellent Way | 1 Corinthians 13
The Most Excellent Way | 1 Corinthians 13Steve Thomason
 
Organic Name Reactions for the students and aspirants of Chemistry12th.pptx
Organic Name Reactions  for the students and aspirants of Chemistry12th.pptxOrganic Name Reactions  for the students and aspirants of Chemistry12th.pptx
Organic Name Reactions for the students and aspirants of Chemistry12th.pptxVS Mahajan Coaching Centre
 
Nutritional Needs Presentation - HLTH 104
Nutritional Needs Presentation - HLTH 104Nutritional Needs Presentation - HLTH 104
Nutritional Needs Presentation - HLTH 104misteraugie
 
Separation of Lanthanides/ Lanthanides and Actinides
Separation of Lanthanides/ Lanthanides and ActinidesSeparation of Lanthanides/ Lanthanides and Actinides
Separation of Lanthanides/ Lanthanides and ActinidesFatimaKhan178732
 
CARE OF CHILD IN INCUBATOR..........pptx
CARE OF CHILD IN INCUBATOR..........pptxCARE OF CHILD IN INCUBATOR..........pptx
CARE OF CHILD IN INCUBATOR..........pptxGaneshChakor2
 
Contemporary philippine arts from the regions_PPT_Module_12 [Autosaved] (1).pptx
Contemporary philippine arts from the regions_PPT_Module_12 [Autosaved] (1).pptxContemporary philippine arts from the regions_PPT_Module_12 [Autosaved] (1).pptx
Contemporary philippine arts from the regions_PPT_Module_12 [Autosaved] (1).pptxRoyAbrique
 
Introduction to AI in Higher Education_draft.pptx
Introduction to AI in Higher Education_draft.pptxIntroduction to AI in Higher Education_draft.pptx
Introduction to AI in Higher Education_draft.pptxpboyjonauth
 
microwave assisted reaction. General introduction
microwave assisted reaction. General introductionmicrowave assisted reaction. General introduction
microwave assisted reaction. General introductionMaksud Ahmed
 

Último (20)

BASLIQ CURRENT LOOKBOOK LOOKBOOK(1) (1).pdf
BASLIQ CURRENT LOOKBOOK  LOOKBOOK(1) (1).pdfBASLIQ CURRENT LOOKBOOK  LOOKBOOK(1) (1).pdf
BASLIQ CURRENT LOOKBOOK LOOKBOOK(1) (1).pdf
 
Software Engineering Methodologies (overview)
Software Engineering Methodologies (overview)Software Engineering Methodologies (overview)
Software Engineering Methodologies (overview)
 
Staff of Color (SOC) Retention Efforts DDSD
Staff of Color (SOC) Retention Efforts DDSDStaff of Color (SOC) Retention Efforts DDSD
Staff of Color (SOC) Retention Efforts DDSD
 
Mattingly "AI & Prompt Design: Structured Data, Assistants, & RAG"
Mattingly "AI & Prompt Design: Structured Data, Assistants, & RAG"Mattingly "AI & Prompt Design: Structured Data, Assistants, & RAG"
Mattingly "AI & Prompt Design: Structured Data, Assistants, & RAG"
 
Web & Social Media Analytics Previous Year Question Paper.pdf
Web & Social Media Analytics Previous Year Question Paper.pdfWeb & Social Media Analytics Previous Year Question Paper.pdf
Web & Social Media Analytics Previous Year Question Paper.pdf
 
A Critique of the Proposed National Education Policy Reform
A Critique of the Proposed National Education Policy ReformA Critique of the Proposed National Education Policy Reform
A Critique of the Proposed National Education Policy Reform
 
The basics of sentences session 2pptx copy.pptx
The basics of sentences session 2pptx copy.pptxThe basics of sentences session 2pptx copy.pptx
The basics of sentences session 2pptx copy.pptx
 
URLs and Routing in the Odoo 17 Website App
URLs and Routing in the Odoo 17 Website AppURLs and Routing in the Odoo 17 Website App
URLs and Routing in the Odoo 17 Website App
 
Advanced Views - Calendar View in Odoo 17
Advanced Views - Calendar View in Odoo 17Advanced Views - Calendar View in Odoo 17
Advanced Views - Calendar View in Odoo 17
 
Activity 01 - Artificial Culture (1).pdf
Activity 01 - Artificial Culture (1).pdfActivity 01 - Artificial Culture (1).pdf
Activity 01 - Artificial Culture (1).pdf
 
Beyond the EU: DORA and NIS 2 Directive's Global Impact
Beyond the EU: DORA and NIS 2 Directive's Global ImpactBeyond the EU: DORA and NIS 2 Directive's Global Impact
Beyond the EU: DORA and NIS 2 Directive's Global Impact
 
The Most Excellent Way | 1 Corinthians 13
The Most Excellent Way | 1 Corinthians 13The Most Excellent Way | 1 Corinthians 13
The Most Excellent Way | 1 Corinthians 13
 
Organic Name Reactions for the students and aspirants of Chemistry12th.pptx
Organic Name Reactions  for the students and aspirants of Chemistry12th.pptxOrganic Name Reactions  for the students and aspirants of Chemistry12th.pptx
Organic Name Reactions for the students and aspirants of Chemistry12th.pptx
 
Nutritional Needs Presentation - HLTH 104
Nutritional Needs Presentation - HLTH 104Nutritional Needs Presentation - HLTH 104
Nutritional Needs Presentation - HLTH 104
 
Separation of Lanthanides/ Lanthanides and Actinides
Separation of Lanthanides/ Lanthanides and ActinidesSeparation of Lanthanides/ Lanthanides and Actinides
Separation of Lanthanides/ Lanthanides and Actinides
 
CARE OF CHILD IN INCUBATOR..........pptx
CARE OF CHILD IN INCUBATOR..........pptxCARE OF CHILD IN INCUBATOR..........pptx
CARE OF CHILD IN INCUBATOR..........pptx
 
Contemporary philippine arts from the regions_PPT_Module_12 [Autosaved] (1).pptx
Contemporary philippine arts from the regions_PPT_Module_12 [Autosaved] (1).pptxContemporary philippine arts from the regions_PPT_Module_12 [Autosaved] (1).pptx
Contemporary philippine arts from the regions_PPT_Module_12 [Autosaved] (1).pptx
 
Introduction to AI in Higher Education_draft.pptx
Introduction to AI in Higher Education_draft.pptxIntroduction to AI in Higher Education_draft.pptx
Introduction to AI in Higher Education_draft.pptx
 
microwave assisted reaction. General introduction
microwave assisted reaction. General introductionmicrowave assisted reaction. General introduction
microwave assisted reaction. General introduction
 
INDIA QUIZ 2024 RLAC DELHI UNIVERSITY.pptx
INDIA QUIZ 2024 RLAC DELHI UNIVERSITY.pptxINDIA QUIZ 2024 RLAC DELHI UNIVERSITY.pptx
INDIA QUIZ 2024 RLAC DELHI UNIVERSITY.pptx
 

Ms Excel Tutorials

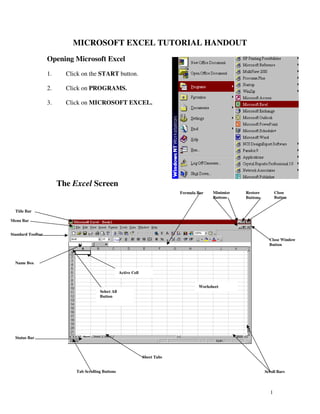
  • 1. MICROSOFT EXCEL TUTORIAL HANDOUT Opening Microsoft Excel 1. Click on the START button. 2. Click on PROGRAMS. 3. Click on MICROSOFT EXCEL. The Excel Screen Formula Bar Minimize Restore Close Buttons Buttons Button Title Bar Menu Bar Standard Toolbar Close Window Button Name Box Active Cell Worksheet Select All Button Status Bar Sheet Tabs Tab Scrolling Buttons Scroll Bars 1
  • 2. Title Bar: Displays the name of the current program and workbook. Menu Bar: Displays the names of the Excel menus. Standard: Displays the buttons of the most frequently used functions. Toolbar Name Box: Displays the coordinates of the active cell. Formula Bar: Displays the contents of the active cell. Status Bar: Displays information about a selected command as well as the status of certain keys, such as CapsLock and NumLock Scroll Bars: Used to move through the worksheet. You can move up, down, left, and right. Select All Button Selects every cell in a worksheet. Sheet Tabs: Displays the names of the worksheets within a workbook. Tab Scrolling Used to scroll through the worksheets in a workbook. Buttons: Worksheet: A single page in a workbook, divided into rows and columns. Columns and rows intersect to form cells. Active Cell: The cell surrounded by a border where you enter or edit data. Minimize button: Minimizes the window to a button on the Windows taskbar. Maximize/Restore: Toggles (switches back and forth) between displaying a button window in its maximum size and restoring a window to its previous size. Close Window Button: Closes the current window. Close Button: Closes the current program. Tip Move the mouse pointer over a button on the toolbar and a ToolTip will appear. This is the name of the button which gives a brief description of its purpose. 2
  • 3. OPENING AND CLOSING A WORKBOOK Opening A New Workbook: 1. Click on the FILE menu. 2. Click on NEW. 3. Click OK OR 1. Click on the NEW button. Existing Workbook: 1. Click on the FILE menu. 2. Click on OPEN. 3. Once the explorer window opens, select the files you wish to open. 4. Click OPEN. OR 1. Click on the OPEN button . 2. Once the explorer window opens, select the file you wish to open. 3. Click OPEN. Closing a Workbook: Close button 1. Click on the CLOSE WINDOW button in the top-right corner of the window. OR 1. Click on the FILE menu. 2. Click CLOSE. 3
  • 4. NAVIGATING THROUGH A WORKSHEET TO MOVE PRESS Left one column [ ] or Shift + Tab Right one column [ ] or Tab To the first column in the worksheet [Ctrl] [ ] To the last column in the worksheet [Ctrl] [ ] To the last column in the row with data [Ctrl] [ ] To the first column in the row with data [Ctrl] [ ] Up one row [ ] or Shift + Enter Down one row [ ] or Enter To the next worksheet Page [Ctrl] [Page Down] To the previous worksheet Page [Ctrl] [Page Up] Up one screen [Page Up] Down one screen [Page Down] Beginning of worksheet [Ctrl] [Home] To the last cell with data [Ctrl] [End] Left one screen [Alt] [Page Up] Right One Screen [Alt] [Page Down] 4
  • 5. Moving Between Worksheets: 1. Click on the desired sheet tab at the bottom left of the Excel window. Scrolling Through a Worksheet 1. Click on the left, right , up, or down scroll arrows to move one column/row. OR Drag the horizontal or vertical scroll box along the scroll bar to move the window in the corresponding direction. OR Click the scroll bar (either to the left or right of the horizontal scroll box, or above or below the vertical scroll box) to move the window in the direction of the mouse pointer. Renaming Worksheets 1. Double-click the desired sheet tab. 2. Type the new name. 3. Press ENTER. Tip You can right-click a sheet tab to insert or delete worksheets. 5
  • 6. Selecting Cells Single Cell: 1. Click on the desired cell. The cell will have a black border, which indicates that this is the active cell. A Range of Cells: Using the Mouse 1. Click on the cell in the upper, left-hand corner of the range. 2. Move the mouse pointer to the lower, right-hand corner and release. Using the Keyboard 1. Click on the cell in the upper, left-hand corner of the range. 2. Hold down the SHIFT key 3. Click on the cell in the lower, right-hand corner of the range. OR 1. Hold down the SHIFT key while pressing the arrow keys. 6
  • 7. Nonadjacent Cells 1. Click on the first cell. 2. Hold down the CTRL key. 3. Click on the remaining desired cells. A Single Row or Column: 1. Click on the desired row or column heading. More Than One Adjacent Column or Row: 1. Click and move the mouse pointer over the desired rows and columns. Every Cell in A Worksheet: 1. Click on the SELECT ALL button. Select All button Column C is selected 7
  • 8. CREATING A WORKSHEET Entering Data: 1. Select a cell. 2. Enter the data. 3. Press ENTER or click on the in the formula bar Entering a Range of Data: 1. Select the cells. 2. Enter the date 3. Press ENTER. 4. Continue until all cells are filled. Editing Data: 1. Double-click the cell. OR 1. Click on the cell. 2. Click on the formula bar. Cancel Enter OR 1. Click on the cell 2. Press F2. OR 1. Click on the CANCEL button in the formula bar to erase data before it is entered. 8
  • 9. CREATING FOLDERS You can create your own folders to organize your files. You can also create folders within folders. 1. Click on the FILE menu. 2. Click SAVE AS. 3. Click on the CREATE NEW FOLDER button . 4. Type the desired name for the folder in the space provided 9
  • 10. SAVING A DOCUMENT Use SAVE AS: when you are saving a new document and you need to name it or if you are opening a document and saving it with a new name. This does not replace the old file. Use SAVE: when you are saving changes made to an existing document. The old information will be overwritten. Save As: 1. Click the FILE menu. 2. Click SAVE AS. 3. Click on the SAVE IN drop down list to select the drive and folder where you wish to save this document. 4. In the FILE NAME text box, type in the name you wish to give this document. 5. Select “Microsoft Excel Workbook” from the FILE TYPE text box. 6. Click SAVE Save: 1. Use the SAVE button or press [Ctrl] [S] 10
  • 11. FORMATTING CELLS, ROWS, AND COLUMNS Numbers: Formatting can be done before or after data is entered. 1. Select the cell(s) 2. Click on the FORMAT menu. 3. Click on CELLS. 4. Select a format from the CATEGORY list. 5. Click on the number of decimal places to be used, if applicable. 6. Click OK. OR 1. Select the cell(s). 2. Right-click 3. Click on FORMAT CELLS and follow steps 4-6 from above. Cell Alignment: 1. Select the cell(s). 2. Click on the FORMAT menu. 3. Click the ALIGNMENT tab. 4. Choose the desired alignment by clicking on the drop down menu in the horizontal section. 5. Click OK. 11
  • 12. Change Font: 1. Select the cell(s). 2. Click on the FORMAT menu. 3. Click on CELLS. 4. Click on FONT. 5. Make changes and click OK. The Formatting Toolbar can also be used to make changes. 1. Select the cell(s). Italic Left Right Currency Increase Decimal 2. Click on the desired button. Font Font Size Bold Underline Center Merge/Center Decrease Decimal 12
  • 13. Resize Columns And Rows: Adjust the width of a column: 1. Move the mouse pointer to the right of the column heading border until it turns into a double headed arrow 2. Click and drag to the border to the right or left. 3. Release the mouse at the desired width. OR 1. Move the mouse pointer to the right of the column heading border until it turns into a double headed arrow. 2. Double-click. The column is automatically resized to fit the widest entry. Adjust the width of Multiple Columns: 1. Select desired columns. 2. Click on the FORMAT menu. 3. Click on COLUMN. 4. Click on WIDTH. 5. Enter the desired width. 6. Click OK. 13
  • 14. INSERTING, DELETING, AND MERGING CELLS Inserting Cells: 1. Select the cell(s) above or to the left of the cells you want to move. 2. Click on the INSERT menu. 3. Click on CELLS. 4. Click on appropriate selection. 5. Click OK. OR 1. Select the cell(s) above or to the left of the cells you want to move. 2. Right-click. 3. Click on INSERT. 4. Follow steps 3-5 from above. Inserting Rows and Columns: 1. Select a cell to the left of the column or above the row that will be moved. 2. Click on the INSERT menu. 3. Click on COLUMNS or ROWS OR 1. Right-click the column or row heading. 2. Follow steps 2-3 from above. 14
  • 15. Deleting Cells: 1. Select the cell(s) to delete. 2. Click on the EDIT menu. 3. Click on DELETE. 4. Click on appropriate selection. 5. Click OK. OR 1. Select the cell(s) to delete. 2. Right-click. 3. Follow steps 3-5 from above. Deleting Rows and Columns: 1. Select at least one cell in the column or row. 2. Click on the EDIT menu. 3. Click on DELETE 4. Click on appropriate selection. 5. Click OK. Merging Cells: 1. Select the cells you want to merge. 2. Click the MERGE AND CENTER button on the toolbar. Tip Click the Undo button to reverse the last change made. To “undo the undo” click the Redo button . 15
  • 16. PRINTING WORKSHEETS AND WORKBOOKS Previewing a Worksheet: To preview the worksheet before you print it, click the PRINT PREVIEW button . To exit the Print Preview screen, click on CLOSE. Setting the Print Area: 1. Select the area of the worksheet that is to be printed. 2. Click on the FILE menu. 3. Click on PRINT AREA. 4. Click on SET PRINT AREA. Clearing the Print Area: 1. Click on the FILE menu. 2. Click on PRINT AREA. 3. Click on CLEAR PRINT AREA. Printing: 1. Click on the FILE menu. 2. Click on PRINT. A dialog box will appear. 3. Select the options you wish to change (page name, name of printer, etc.) 4. Select the number of copies. 5. Click OK. OR 1. Click the PRINT button on the toolbar. 16
  • 17. CREATING FORMULAS The following mathematical operators can be used in a formula: ^ Exponentiation * Multiplication / Division + Addition - Subtraction ***Operations should be performed in the order listed above. Entering a Formula: 1. Click on the desired cell. 2. Type = and the cell names. 3. Press ENTER. OR 1. Click on the desired cell. 2. Type = 3. Click on the appropriate cell. 4. Enter the desired mathematical operator. 5. Repeat steps 3 & 4 until the formula is complete. 6. Press ENTER or click on t he on the FORMULA BAR. Tip You can use lowercase or uppercase letters when typing cell references. 17
  • 18. Copying a Formula: 1. Select the cell with the formula you want to copy. 2. Point to the fill handle. 3. Move the fill handle to the last cell in the range. Fill Handle Tip The fill handle can be used to complete a series of years, dates, days, etc. Editing a Formula: 1. Click on the appropriate cell. 2. Position the insertion point in the FORMULA BAR, or click on the EDIT FORMULA button on the formula bar. 3. Make the changes and press ENTER. Deleting a Formula: 1. Click on the appropriate cell 2. Press DELETE. 18
  • 19. USING FUNCTIONS A function is a special formula, “built-in” to Excel, that performs a specific task 1. Click on a cell. 2, Click the PASTE FUNCTION button on the toolbar. 3. Select the desired function and enter necessary information. 4. Click OK. Using Autosum: Autosum is a button on the toolbar which allows you to total adjacent cells. 1. Select the cell that will contain the total. 2. Click on the AUTOSUM button on the toolbar. 3. Modify the formula if needed. 4. Press ENTER 19
  • 20. MOVING DATA Cutting, Copying, and Pasting : Cutting text removes data from a cell while copying duplicates the data so that it can be pasted to another location. 1. Select the cell(s) that contain the data to be cut or copied. 2. Click on the CUT or COPY button. 3. Select the cell(s) where the data will be pasted. 4. Click on the PASTE button. Copying Data Using the Fill Handle: 1. Select the cell(s) that contain the data to be copied. 2. Drag the fill handle to the desired cells. Paste Special: Paste Special allows you to choose which parts of a cell you want to paste. You can paste only the cell’s formatting, formula, or width if desired. 1. Select the cells that you want to cut or copy. 2. Click on the CUT or COPY button. 3. Select the cell(s) where the data will be pasted. 4. Click on the EDIT menu. 5. Click on PASTE SPECIAL 6. Click on the desired pasteoption. 7. Click OK. 20
  • 21. FIND AND REPLACE Find: 1. Go to the beginning of the document by pressing [Ctrl] [Home]. 2. Click on the EDIT menu. 3. Click on FIND. 4. Click on the FIND tab in the dialog box that opens. 5. Enter the word or number you wish to find in the “FIND WHAT” text box. 6. Click on the SEARCH drop-down menu and click on rows or columns. 7. Click on the LOOK IN drop-down menu and click on formulas, values, or comments. 8. Click on FIND NEXT. 9. Click OK when finished. 21
  • 22. Replace: 1. Repeat steps 1thru 3 from above. 2. Click on the REPLACE TAB in the dialog box that opens. 3. Enter the word or number you wish to find in the “FIND WHAT” text box. 4. Enter the word or number you wish to replace it with in the “REPLACE WITH” text box. 5. Click on the SEARCH drop-down menu and click on rows or columns. 6. Click on REPLACE ALL to replace every occurrence. 22
  • 23. BORDERS AND SHADING Adding Borders to Cells: Borders can be placed around a cell, a range of cells, or an entire worksheet. 1. Select the cell(s). 2. Click on the FORMAT menu. 3. Click on CELLS. 4. Click on the BORDER tab. 5. Choose which edges you want to add the border to in the PRESETS and BORDER sections. 6. Select the desired border line type and color. 7. Click OK. Border Preview Box OR 1. Click on the BORDERS drop-down menu on the toolbar. 2. Select the desired options. 23
  • 24. Adding Shading: 1. Select the cell(s). 2. Click on the FORMAT menu. 3. Click on CELLS. 4. Click the PATTERNS tab. 5. Select the desired color and pattern. 6. Click OK. OR 1. Click on the FILL COLOR drop-down menu on the toolbar. 2. Click on the desired color. Clearing Cell Contents and Formats: The delete key deletes values, but does not delete formatting. The Clear command deletes contents, formatting, or both. 1. Select the cell(s). 2. Click on the EDIT menu. 3. Click on CLEAR. 4. Click on the desired option. 24
  • 25. Displaying the Drawing Toolbar: 1. Click on the VIEW menu. 2. Click on TOOLBARS. 3. Click on DRAWING. OR 1. Click on the DRAWING button on the toolbar. Rectangle Oval Line Arrow Text Box Creating Lines and Objects: 1. Click the button on the DRAWING toolbar for the line or object you want to create. 2. Drag to the desired location in the worksheet. Resizing Lines and Objects: 1. Click on the line or object to select it. 2. Move the mouse pointer over a sizing handle. 3. Move the sizing handle until the desired size is reached. Deleting Lines and Objects: 1. Click on the line or object. 2. Press the DELETE key. 25
  • 26. ADDING HEADERS AND FOOTERS 1. Click on the VIEW menu. 2. Click on HEADER AND FOOTER. 3. Click on the header or footer drop- down menu and select the desired header and footer. 4. Click OK. Customizing Headers and Footers: 1. Repeat steps 1 & 2 from above. 2. Click on the CUSTOM HEADER or CUSTOM FOOTER button. Font Button Total Pages Button Time Button Sheet Name Button Page Number Button Date Button File Name Button 3. Type desired text and field codes into the appropriate sections. 4. Click OK in the Header/Footer dialog box. 5. Click OK in the Page Setup dialog box. 26
  • 27. MAKING CHANGES TO THE PAGE LAYOUT Changing Margins: 1. Click on the FILE menu. 2. Click on PAGE SETUP. 3. Click on the MARGINS tab. 4. Change the margins by clicking on the arrows or typing a new setting into the text box. 5. Click OK. Inserting and Deleting Page Breaks: Insert 1. Select a cell below and to the right of where you want the page break to be added. 2. Click on the INSERT menu. 3, Click on PAGE BREAK. Delete 1. Follow steps 1 & 2 from above. 2. Click on REMOVE PAGE BREAK. Previewing Page Breaks: 1. Click on the VIEW menu. 2. Click on PAGE BREAK PREVIEW. 27
  • 28. CREATING CHARTS Creating a Chart with the Chart Wizard 1. Select the desired data. 2. Click on the Chart Wizard button on the toolbar 3. Click on the desired chart type and sub-type in the Step 1 of 4 dialog box and click NEXT. 4. Click ROWS or COLUMNS in the Step 2 of 4 dialog box. 5. Enter titles for the chart and axes in Step 3 of 4 dialog box click NEXT. 6. Click on AS NEW SHEET to create a chart sheet in the STEP 4 of 4 dialog box. Click on AS OBJECT IN to create an embedded chart. 7. Click FINISH. 28
  • 29. Deleting a Chart Sheet: 1. Select the desired chart sheet tab. 2. Click on the EDIT menu. 3. Click on DELETE SHEET. 4. Click OK. Previewing and Printing a Chart Sheet: 1. Click the desired chart sheet tab. 2. Click on the PREVIEW button on the toolbar. 3. Click the PRINT button on the preview toolbar. Tip You can move and resize a chart the same way you move objects. 29
  • 30. HELP Getting Help: There are two types of help within Word. One is the Screen Tips and the other is the Office Assistant. Screen Tip: A brief explanation about an item on the screen. It is used when you are unsure about what an item is or what it does.. To Activate Screen Tips: 1. Click on HELP on the Menu bar. 2. Click on WHAT’S THIS? 3. Click on the item you want to know about. OFFICE ASSISTANT Office Assistant: An animated icon displayed on the screen. When activated, it offers tips on how to use Word’s features or you can search a topic for step- by-step instructions for completing a specific task. If the Office Assistant is not visible, click on the OFFICE ASSISTANT button on the MENU bar. To Activate Office Assistant: 1. Click on the ASSISTANT. A window opens asking “What Would You Like To Do?” 2. The assistant automatically tries to guess what you need help on. If you do not see the topic you are looking for, type your question in the text box and click on the SEARCH button. 3. To view topic instructions click on the bullet of that topic. To Deactivate Office Assistant: 1. Right click on the ASSISTANT and click HIDE. 30