Atutor Quickstart
•
2 likes•486 views

Short intro on how to use ATutor, a popular e-learning app.

Recommended
More Related Content
What's hot
What's hot (20)
Viewers also liked
Viewers also liked (14)
Similar to Atutor Quickstart
Similar to Atutor Quickstart (20)
Recently uploaded
Recently uploaded (20)
Atutor Quickstart
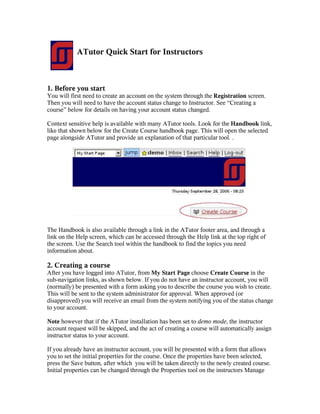
- 1. ATutor Quick Start for Instructors 1. Before you start You will first need to create an account on the system through the Registration screen. Then you will need to have the account status change to Instructor. See “Creating a course” below for details on having your account status changed. Context sensitive help is available with many ATutor tools. Look for the Handbook link, like that shown below for the Create Course handbook page. This will open the selected page alongside ATutor and provide an explanation of that particular tool. . The Handbook is also available through a link in the ATutor footer area, and through a link on the Help screen, which can be accessed through the Help link at the top right of the screen. Use the Search tool within the handbook to find the topics you need information about. 2. Creating a course After you have logged into ATutor, from My Start Page choose Create Course in the sub-navigation links, as shown below. If you do not have an instructor account, you will (normally) be presented with a form asking you to describe the course you wish to create. This will be sent to the system administrator for approval. When approved (or disapproved) you will receive an email from the system notifying you of the status change to your account. Note however that if the ATutor installation has been set to demo mode, the instructor account request will be skipped, and the act of creating a course will automatically assign instructor status to your account. If you already have an instructor account, you will be presented with a form that allows you to set the initial properties for the course. Once the properties have been selected, press the Save button, after which you will be taken directly to the newly created course. Initial properties can be changed through the Properties tool on the instructors Manage
- 2. screen, described below. See the Handbook page for details of the various properties that can be set. 3. Managing course tools A newly created course will be setup with a default set of tools enabled, as predetermined by the system administrator. The tool icons on the course home page, the main navigation tabs across the top of the screen, and the menu blocks down the side of the screen, can all be added and removed by an instructor as required by a particular course. Most of the course management tools can be found under the Manage tab, as shown below, when logged into a course as its instructor. To add and remove tools, choose Student Tools from the Manage screen, then check or uncheck the appropriate checkboxes to either modify the tools available on the Home page, or modify the tabs that appear across the top of the course area. To change the menu blocks that appear down the side of the screen, choose Side Menu from the Student Tool sub-navigation links. 4. Managing Content ATutor has many ways to add content to a course, all of which can be found by choosing Content from the Manage screen. Instructors can use the built in authoring tools in the Content Editor, shown below, by choosing Create Content from the content sub-navigation links. Either HTML or plain text content can be created using this editor. Near the bottom of the editor is a Paste from File tool that allows you to import HTML pages you have created in an external HTML editor. See the notes in the Content section of the Handbook for more about setting content properties, adding glossary items, and checking content accessibility.
- 3. Other files can be added to a course through the File Manager, accessed through the Manage screen. After uploading files to the File Manager, they can be inserted into content pages by opening the Popup File Manager (shown below) from within the Content Editor, then clicking the Insert button next to the file. This will either create a link to the file, or it will embed the file in the content page if it is an image. The Popup File Manage works in a similar way when creating test items, allowing authors to link files and embed images in test items.
- 4. Prepackaged content can also be imported into ATutor as a standard IMS/SCORM Content Package. Content packages can either be uploaded from a local computer, retrieved through a URL location on the Web (both shown below), or imported from a content repository (see TILE and TLE repository in the Handbook). See the Handbook notes for further details on importing prepackaged content. Imported content, and content created in ATutor, can also be exported as content packages, to be reused in other courses, or imported into another learning management system or content repository. It also possible to import SCORM Sharable Content Objects (SCOs) using the SCORM Packages tool found on the Manage screen. This type of content is generally authored in a SCORM authoring tool such as Reload (http://www.reload.ac.uk.), or eXe
- 5. (http://exelearning.org/), then imported into ATutor as a self-contained content unit. Unlike content packages imported into ATutor, which can be modified after importing, imported SCOs are generally not editable. Note that Java must be installed on the instructor's and students' computer in order to view SCORM SCOs in ATutor. For example content that can be imported into ATutor, visit: http://www.atutor.ca/atutor/content.php 5. Managing course members There are a variety of ways to add students to a course, either having students self- register, by importing a course list, by manually creating and adding new students, or by manually adding students from those already registered on the system. It is also possible to automatically authenticate students through an external registration database using a customized bridge application that allows ATutor to draw user information from an external source. The four manual methods will be outlined here. If the Registration form is enabled, students can Self-Register themselves on the system, then browse through the available courses, and enroll themselves in a course. If it is a private course (see Course Properties in the handbook), an enrollment request notification will be sent to the course instructor, after which s/he can approve the enrollment through the Pending Enrollment feature in the Enrollment Manager, shown below. Other enrollment methods are all managed with the Enrollment Manager found through the Manage screen. Instructors can Import a Course List using a comma separated values (CSV) file in the format “Firstname”,”Lastname”,”Email” like that below. Click on Import Course List in the Enrollment Manager sub-navigation to open the import screen. CSV Formatted course list "Bill","West","bwest@utm.edu" "Karen","Byer","kbyer@utm.edu" "Ali","Usami","ausami@utm.edu" "Vito","Rabasca","vrabasca@utm.edu" "Uwe","Schaffer","uschaffer@utm.edu" The imported list will be checked to ensure there are no errors, and to see if any of the persons listed are already registered on the system. The list will be displayed on a screen like that shown below, where you may choose to make adjustments if necessary. Press
- 6. Add to Enrollment List to immediately enroll students in the course, giving them access to the course. All students added to the enrollment list will receive an email with information on how to enter the course. It is also possible to add students to a course by choosing the Create Course List link in the Enrollment Manager sub-navigation. This method works much the same as the Import Course List method described above, except names and email addresses are entered directly into the form, instead of being imported from a list. This method can be useful for adding single students who may be starting a course late. It is also possible to select students from the Not Enrolled list (next to Pending Enrollment described above) and add them to a course. All students registered on the system are listed here. Another function of the Enrollment Manager is to create assistants. Once enrolled in a course, a course member can be assigned any of the Management Privileges available to an instructor, so they can be responsible for marking tests, moderating groups, managing content etc. In the Enrollment Manager select the checkbox next to the enrolled course member you wish to give privileges to, then select from the privileges available the ones this person will manage. In the example below, the course member “a_usami”, is being given the three privileges just described.
- 7. The system administrator has all these tools available as well, so instructors do not necessarily have to enroll students themselves. 5. Managing Groups Students enrolled in a course can be divided into groups using the Groups tools linked from the Manage Screen. Using the Create Groups link in the Groups sub-navigation, choose to manually create groups, or to automatically generate groups from the student enrolled in the course. Then, on the screen that follows, define the type of group, and the group name. The group type could be project, assignment, or perhaps a tutorial group type, and the group name might be Group1, Ben's Group, Course Assignment1. Groups types and names are arbitrary, so you may use whatever labels work best for you or the course. Note that course members can only be added once to a particular group type, but may belong to multiple group over several group types. A group can include all members of the course. In the example screen below, a single group is being created and the Blog tool is being enabled. All students in the class will then be assigned to the group to create a course blog (as opposed to a private group blog). Other tools that can also be made available to groups, so only group members (and the instructor) have access to them. After the group has been create, you will need to add course members to the group if you are creating the groups manually. The new group will be listed on the Groups manage page, below which the Members button can be selected to choose enrolled student to add to the group. Choose from the groups menus listed next to each student, the group they should be assigned to, as shown below.
- 8. Assignments can also be group specific. To create an assignment, first create a group, and make the File Storage tool available to the group. This will create an entry in the workspaces in the File Storage tool through which course members can submit their assignments.
- 9. Tests can also be assigned to groups, if for example an instructor wanted to have different groups take different tests, or if a make up test had to be given to students who had missed a test. See the Handbook pages when creating questions and tests for more details. 6. Additional help sources In addition to the the ATutor Handbook included with every installation, help is also available through the support forums on the atutor.ca Web site. http://www.atutor.ca/forums/index.php 7. Modules ATutor includes a core set of feature modules, as well as a collection extra module which link third party applications into ATutor or perhaps add custom functionality to the system. Extra modules are listed on the atutor.ca site. Modules can add such features as a whiteboard (Marratech), audio and video conferencing ( Elluminate, Userplane), content repository (The Learning Edge, TLE), and Webcasting (epresences), among other extensions to the system. In the case of third party modules, documentation is often found through the Web site of the third party software itself. ATutor Modules http://www.atutor.ca/atutor/modules.php