unwanted pregnancy Kit [+918133066128] Abortion Pills IN Dubai UAE Abudhabi
Dohc16 v dismant
1. 2,0 DOHC-16V engine
09/97 Scorpio ’95 00-01-1
Engine Assembly – Dismantle and Assemble (engine removed) (21 134 8)
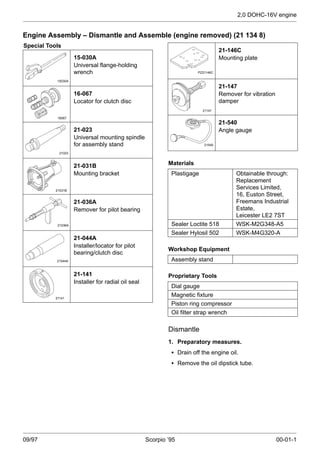
Special Tools
15030A
15-030A
Universal flange-holding
wrench
16067
16-067
Locator for clutch disc
21023
21-023
Universal mounting spindle
for assembly stand
21031B
21-031B
Mounting bracket
21036A
21-036A
Remover for pilot bearing
21044A
21-044A
Installer/locator for pilot
bearing/clutch disc
21141
21-141
Installer for radial oil seal
PZ21146C
21-146C
Mounting plate
21147
21-147
Remover for vibration
damper
21540
21-540
Angle gauge
Materials
Plastigage Obtainable through:
Replacement
Services Limited,
16, Euston Street,
Freemans Industrial
Estate,
Leicester LE2 7ST
Sealer Loctite 518 WSK-M2G348-A5
Sealer Hylosil 502 WSK-M4G320-A
Workshop Equipment
Assembly stand
Proprietary Tools
Dial gauge
Magnetic fixture
Piston ring compressor
Oil filter strap wrench
Dismantle
1. Preparatory measures.
S Drain off the engine oil.
S Remove the oil dipstick tube.
2. 2,0 DOHC-16V engine
09/97 Scorpio ’95 00-01-2
S2102030
2. Detach the engine mounting bracket with
the engine mounting.
S2102018
21–146
21–103A
3. Attach the engine to the assembly stand.
S2102019
4. Detach the bracket.
S2102026
5. Detach the EGR system.
3. 2,0 DOHC-16V engine
09/97 Scorpio ’95 00-01-3
S2102027
6. Detach the inlet manifold bracket from
the engine.
S2102028
7. Detach the alternator and bracket.
S2102031
8. Detach the engine mounting bracket with
the engine mounting.
9. Detach the crankshaft position sensor
(CKP sensor).
10. Detach the oil filter.
M2101218
11. Detach the clutch.
4. 2,0 DOHC-16V engine
09/97 Scorpio ’95 00-01-4
J2101060
21–147
12. Detach the crankshaft belt
pulley/vibration damper.
S Immobilise the flywheel using Special Tool
21-168.
S Remove the bolt.
S Pull it off using the special tool.
J2101059
13. Detach the flywheel.
S Remove the bolts.
S Remove the flywheel.
IAR2101161
2
3
1
14. Detach the crankcase breather (PCV)
tube.
1 Detach the bracket from the cylinder head.
2 Disconnect the tube from the inlet
manifold.
3 Lever it off exhaust manifold.
5. 2,0 DOHC-16V engine
09/97 Scorpio ’95 00-01-5
S2102032
15. Remove the spark plugs.
S Detach the ignition coil cover.
S Disconnect the spark plug connectors.
S Remove the ignition coils (two bolts each).
S Remove the spark plugs.
J2101061
16. Detach the engine lifting eyes.
17. Detach the cylinder head cover (eleven
bolts and four nuts).
S2102021
18. Detach the upper timing chain cover.
6. 2,0 DOHC-16V engine
09/97 Scorpio ’95 00-01-6
ELJ2101204
19. Detach the lower timing chain cover.
J2101064
1
2
20. Detach the oil pump sprocket and chain.
1 Remove the chain tensioner for the oil pump
chain.
2 Remove the oil pump sprocket with the
chain.
2,9°2,2°
J2101065
21. Set the camshaft sprockets to the marks.
J2101066
NOTE: The chain guide must be renewed
during installation.
22. Remove the upper chain guide rail.
7. 2,0 DOHC-16V engine
09/97 Scorpio ’95 00-01-7
J2101067
15–030A
23. Remove the camshaft sprockets.
J2101068
1 2 3
24. Remove the chain tensioner arm.
1 Remove the retaining ring with a pair of
pliers.
2 Withdraw the chain tensioner pivot pin with a
bolt (M6).
3 Remove the chain tensioner arm from the
housing.
J2101069
25. Release the chain guide.
8. 2,0 DOHC-16V engine
09/97 Scorpio ’95 00-01-8
J2101070
26. Remove the timing chain.
S Remove the Woodruff key from the
crankshaft.
S Remove the crankshaft chain sprocket with
the timing chain.
J2101071
DCAUTION: Do not reuse the oil-filled
plunger.
27. Remove the chain tensioner plunger and
the timing chain.
S2102034
R5R4R3
R2R1
L1
L3 L5
L2
L4
28. Remove the camshafts.
S Detach the chain guide bracket with the
front bearing caps.
S Remove the hydraulic tappets and keep
them in order.
9. 2,0 DOHC-16V engine
09/97 Scorpio ’95 00-01-9
J2101073
3 7 9 5 1
2 6 10 8 4
NOTE: Release the three auxiliary bolts first.
DCAUTION: Cylinder head bolts should not
be re-used.
29. Detach the cylinder head.
DCAUTION: Before the bolts are released,
the cylinder head must have cooled to at
least 30°C.
J2101074
30. Detach the water pump.
J2101075
31. Detach the oil pump.
10. 2,0 DOHC-16V engine
09/97 Scorpio ’95 00-01-10
J2101077
DCAUTION: Oil sludge and abraded
particles must not get into the engine.
32. Remove the sump downwards.
J2101078
DCAUTION: Do not damage the cylinder
bore.
33. Remove the carbon from the upper edge
of the cylinder bore.
J2101079
34. Detach the oil intake pipe and oil baffle.
11. 2,0 DOHC-16V engine
09/97 Scorpio ’95 00-01-11
J2101080
35. Detach the crankshaft front oil seal
housing.
J2101081
36. Detach the crankshaft rear oil seal
housing.
J2101082
21–036A
37. Remove the crankshaft pilot bearing.
41 2 3
J2101083
5
38. Remove the pistons.
S Detach the big-end bearing caps.
S Remove the big-end bearing shells from the
big-end bearing caps and connecting rods
and mark them.
S Press out the pistons with the connecting
rods.
12. 2,0 DOHC-16V engine
09/97 Scorpio ’95 00-01-12
41 2 3
J2101084
39. Remove the crankshaft.
S Detach the main bearing caps.
S Remove the crankshaft.
S Remove the bearing shells and thrust half
rings and keep them in order or mark them
for further use.
Assemble
40. Preparatory measures.
S Clean all the mating faces and reusable
parts thoroughly and check them for
damage.
S When applicable, the upper and lower
timing chain covers are renewed complete
with the radial oil seal in place.
D2103570
NOTE: If the measurements are not as
specified in the technical data, the crankshaft
must be overhauled or changed.
41. Measure the diameters of the main and
big-end bearing journals using a
proprietary micrometer screw.
Repeat each measurement at 90°.
J2101085
Measure bearing clearance
DCAUTION: Do not damage the crankshaft
bearings during fitment.
42. Fit the crankshaft.
S Place the grooved bearing shells in the
cylinder block.
S Place the crankshaft dry in the cylinder
block.
13. 2,0 DOHC-16V engine
09/97 Scorpio ’95 00-01-13
M2101727
DCAUTION: The crankshaft must not be
turned during the measuring operation.
43. Measure the crankshaft main bearing
clearance.
NOTE: The point at which the measurement is
made must be dry.
S Lay a length of Plastigage thread on the
bearing journal across the bearing.
S Fit the bearing cap (see sub-operation 42.).
41 2 3
J2101586
5
2 3 541
97 Nm
NOTE: Measure the clearance of the bearings
in turn in numerical order (1 – 5).
44. Measure the crankshaft main bearing
clearance (continued).
S Fit the bearing cap with the associated
bearing shell, with the arrow pointing
towards the timing chain end, and secure it.
NOTE: The bearing cap numbering starts at the
timing chain end.
S Fit the bearing cap.
M2101728
NOTE: If the specified bearing clearance is not
achieved, on a standard cylinder block and with
a crankshaft which is a maximum of 0,02 mm
undersize, the next largest bearing shells may
be fitted. The bearing clearance must not have
been more than 0,098 mm however.
45. Measure the crankshaft main bearing
clearance (continued).
S Compare the Plastigage thread with the
Plastigage scale.
S The reading corresponds to the bearing
clearance.
NOTE: If the specified bearing clearance of
0,011 – 0,048 mm is not obtained, the bearing
shells should be changed and the measuring
operation repeated from sub-operation 42.
onwards.
14. 2,0 DOHC-16V engine
09/97 Scorpio ’95 00-01-14
41 2 3
J2101584
97 Nm
NOTE: Fit the bolts with the threaded pins in
bearings 3 and 5.
46. Fit the crankshaft.
S Lubricate the main bearing journals and
bearing shells and the threads and contact
faces of all the bolts with engine oil.
S Fit the crankshaft.
S Fit the thrust half rings with the
copper-coloured side facing the crankshaft.
S Coat the contact faces and the sides of the
rear main bearing cap with sealer.
S Fit the crankshaft main bearing caps with the
associated bearing shells.
NOTE: The bearing cap numbering starts at the
timing chain end, to which the arrows also point.
S Tighten the bolts.
M2101729
47. Check the crankshaft end float.
S Set up a dial indicator.
S Measure the end float by lifting the
crankshaft with the aid of a screwdriver.
S Correct the end float as necessary by fitting
new thrust half rings to main bearing no. 3.
J2101111
48. Check the piston ring gaps.
The figures indicated in the Technical Data
are for a gauge ring used in production. The
figures measured in the cylinder can exceed
these by 0,15 mm.
15. 2,0 DOHC-16V engine
09/97 Scorpio ’95 00-01-15
S2102024
DCAUTION: The maximum width of the
piston rings corresponds to the diameter of
the cylinder bore + 1,7 mm.
49. Arrangement of the piston rings.
DCAUTION: The upper piston rings are
coated with molybdenum. This coating
must not be damaged.
M2101738
NOTE: The connecting rod numbering 1 to 4
starts at the timing chain end. The arrow on the
piston crown points towards the timing case.
50. Install the pistons.
S Lubricate the pistons and cylinder liner bores
with engine oil.
S Distribute the piston ring gaps uniformly
around the circumference; this also applies
to the elements of the oil control ring.
S Compress the piston rings using a
proprietary piston ring compressor.
S Press pistons 1 and 4 into the cylinders
using the handle of a hammer. The big-end
bearing journal must be at BDC.
S Lubricate the bearing shells with engine oil.
S Fit the appropriate bearing shells in the
connecting rod and bearing cap.
S Use new connecting rod bolts (bolt head
marking ”KX120” on connecting rods with
side groove).
S Fit the bearing caps.
S Turn the crankshaft 180°, fit pistons 2 and 3.
51. Measure the big-end bearing clearance.
Measure the big-end bearing clearance as
described in sub-operations 42. to 45.
16. 2,0 DOHC-16V engine
09/97 Scorpio ’95 00-01-16
41 2 3
J2101583
1
1
o16 Nm 90°7 Nm
NOTE: The connecting rods and their bearing
caps have the same numbers.
52. Fit the bearing caps.
S Lubricate the bearing shells and bearing
journals with engine oil.
S Fit the associated bearing caps and bearing
shells and secure them.
J2101582
21–044A
53. Install the crankshaft pilot bearing.
J2101088
54. Remove the oil seal from the rear oil seal
housing.
J2101581
1
13 Nm 2
Install the rear oil seal housing
55. Align the oil seal housing.
S Fit the oil seal housing using a new gasket
and screw in the bolts loosely.
1 The mating face of the oil seal housing must
be below the mating face of the cylinder
block. The difference in height must not
exceed 0,46 mm.
2 Tighten the bolts.
17. 2,0 DOHC-16V engine
09/97 Scorpio ’95 00-01-17
J2101089
1 2
56. General description of the procedure for
fitting a radial oil seal into a special tool
with a guide sleeve.
DCAUTION: The radial oil seal must be
fitted into the tool as far as the shoulder.
S For correct fitment, the special tool is
placed on a vice and the radial oil seal is
pressed in using the handle of a hammer.
1 Incorrect fitment.
2 Correct fitment.
J2101090
21–141
57. Fit the crankshaft rear oil seal.
Pull in the oil seal using two flywheel bolts.
J2101580
26 Nm
66
78
NOTE: Do not remove any excess sealer before
installing the sump.
58. Fit the crankshaft front oil seal housing.
S Use sealer (WSK-M2G348-A5).
S Apply four beads of sealer, each 3-5 mm
diameter and 10 mm long.
NOTE: After installing the oil seal carrier the
sealer must stand proud adequately at the front
and sides.
18. 2,0 DOHC-16V engine
09/97 Scorpio ’95 00-01-18
21 Nm
13 Nm
J2101639
59. Fit the oil baffle.
NOTE: Fit the oil baffle so that the oil dipstick
and oil strainer can be fitted.
60. Fit the oil strainer.
J2101091
10
50mm
6
Install the sump
NOTE: The bead of sealer must cover the
mating face gaps.
61. Apply sealing compound to the cylinder
block on the flywheel side.
S Use sealer (WSK-M4G320-A).
S Apply a bead of sealer with a thickness of
3 – 5 mm and a width of 10 mm on both
sides.
J2101577
9 Nm
11 Nm
25 Nm
62. Fit the sump using a new gasket.
S Align the sump as described in
sub-operation 63.
S Tighten the three nuts and the twelve bolts.
19. 2,0 DOHC-16V engine
09/97 Scorpio ’95 00-01-19
J2101092
63. Align the sump.
S Align the sump so that it stands a maximum
of 0,25 mm short or 0,1 mm proud.
S Measure the difference in height using a
steel straightedge and a feeler gauge; make
a note of the measurement.
S Reduce the difference to zero when
installing the engine by using shims (see
Technical Data).
87 Nm
J2101559
NOTE: It can only be fitted in one position.
DCAUTION: Use new bolts.
64. Fit the flywheel.
M1601514
16–067
65. Centre the clutch disc on the pressure
plate.
M2101718
1
3
2
24 Nm
66. Fit the clutch assembly.
1 Fit the clutch pressure plate with the centred
clutch disc.
2 Tighten the six bolts uniformly, working
diagonally.
3 Remove the special tool.
20. 2,0 DOHC-16V engine
09/97 Scorpio ’95 00-01-20
J2101093
DCAUTION: A new oil pump must be filled
with oil and turned over by hand before it
is fitted.
67. Clean the oil pump.
Dismantle the oil pump.
NOTE: If excessively worn, the oil pump is only
changed complete.
68. Reassemble the oil pump.
NOTE: The dot marks must face outwards.
12 Nm
2
3
J2101640
NOTE: The passages of the oil pump must not
be covered by the gasket.
69. Fit the oil pump using a new gasket.
J2101095
25mm
Install the cylinder head
70. Bring the piston of cylinder no. 1 to a
point 25 mm before TDC.
21. 2,0 DOHC-16V engine
09/97 Scorpio ’95 00-01-21
S2102523
8 4 2 6 10
9 5 73
1
55 Nm
40 Nm
DCAUTION: Use new bolts.
71. Fit the cylinder head and tighten the
bolts.
Fit the cylinder head gasket.
J2101097
21–540
90 o
90 o
DCAUTION: The cylinder head bolts must
not be retorqued.
72. Tighten the cylinder head bolts
(continued).
Tighten twice through 905.
J2101098
38 Nm
73. Tighten the auxiliary cylinder head bolts.
22. 2,0 DOHC-16V engine
09/97 Scorpio ’95 00-01-22
J2101137
Install the camshafts
74. Bring the piston of cylinder no. 1 to a
point approximately 25 mm before TDC.
Position of the crankshaft belt
pulley/vibration damper.
S2101534
R5R4R3
R2R1
L1
L3 L5
L2
L4
3 24 Nm
2
1
75. Install the camshafts.
DCAUTION: Before the camshafts are
installed, the piston of cylinder no. 1 must
be at a point approximately 25 mm
before TDC.
DCAUTION: After installation of the
camshafts, it is imperative to wait
15 minutes before the engine is turned.
S Oil the bearings.
1 Fit the hydraulic tappets.
2 Fit the camshafts so that none of the cams
is at full lift.
NOTE: R is the inlet side, L is the exhaust
side.
3 Fit the camshaft bearing caps so that the
position markings can be read from the
rear.
S Fit the chain guide bracket with the front
bearing caps.
J2101100
2,2° 2,9°
Install the timing chain
76. Bring the camshafts and crankshaft to
TDC.
23. 2,0 DOHC-16V engine
09/97 Scorpio ’95 00-01-23
J2101101
1 2 3
DCAUTION: Fully and partially released
plungers (whether new or used) must not
be fitted.
77. Check the new chain tensioner plunger.
1 Plunger latched.
2 Plunger partially latched.
3 Plunger fully released (the detent ring is
visible).
J2101571
78. Install the chain tensioner plunger.
DCAUTION: Only use a new latched
plunger.
79. Insert the timing chain with the chain
guide.
Do not secure the chain guide yet.
J2101103
80. Fit the timing chain at the bottom.
S Slide the sprocket on approximately 10 mm.
S Lay the timing chain around the inner
sprocket.
S Fit the Woodruff key in the crankshaft.
24. 2,0 DOHC-16V engine
09/97 Scorpio ’95 00-01-24
12 Nm
26 Nm
J2101569
81. Tighten the timing chain guide rail bolts.
J2101568
3 2 1
82. Install the chain tensioner.
1 Insert the chain tensioner.
2 Insert the pin.
3 Fit the circlip.
J2101104
83. Fit the timing chain at the top.
NOTE: The timing chain must be taut on the
long side.
If necessary, turn the camshaft slightly.
25. 2,0 DOHC-16V engine
09/97 Scorpio ’95 00-01-25
J2101105
NOTE: The timing chain may sag slightly
between the camshaft sprockets.
84. Fit the timing chain at the top (continued).
J2101066
85. Clip a new upper chain guide into the
bracket.
J2101106
NOTE: If the chain tensioner arm does not
reach the oil-filled plunger, the plunger must be
released using and auxiliary tool.
86. Release the chain tensioner plunger.
Press the chain tensioner arm down by
hand and unlatch the oil-filled plunger.
J2101107
approx.100 mm
approx.15 mm
approx.5 mm
2,5 mm
approx.100 mm
5 mm
87. Fabricate an auxiliary tool.
Use a 120 mm length of 2,5 mm welding
rod.
26. 2,0 DOHC-16V engine
09/97 Scorpio ’95 00-01-26
J2101567
15–030A
59 Nm
88. Tighten the camshaft sprockets.
J2101600
2,2° 2,9°
NOTE: If it is necessary to correct the valve
timings, i.e. release the timing chain, a new
oil-filled plunger must also be fitted for the chain
tensioner.
89. Check the valve timings.
Turn the engine in the normal direction of
rotation and line up the sprockets on the
mark.
J2101108
90. Additional check.
1 Turn the engine in the normal direction of
rotation to the next TDC position.
2 The markings on the camshaft sprockets
must be exactly opposite each other at the
height of the cylinder head top edge.
J2101641
1
3
2
18 Nm
12 Nm
91. Install the oil pump drive assembly.
1 Lay the chain around the crankshaft driving
sprocket.
2 Fit the oil pump sprocket with the chain to
the oil pump.
3 Fit the chain tensioner.
27. 2,0 DOHC-16V engine
09/97 Scorpio ’95 00-01-27
ELJ2101704
10 Nm
92. Fit the lower timing chain cover.
NOTE: Use a new cover with an integral gasket
and radial oil seal.
S Fit the cover with the centring cap.
S Tighten the bolts.
S Remove the centring cap.
J2101560
85°
52 Nm
DCAUTION: Keep to the torque settings
without fail. Use Special Tool 21–540.
93. Fit the crankshaft vibration damper.
Immobilise the engine.
23 Nm
J2101574
94. Fit the water pump with a new gasket.
11 Nm
S2101521
NOTE: The upper edge of the cover must be a
maximum of 0,13 mm below the mating face of
the cylinder head cover.
95. Fit the upper timing chain cover.
28. 2,0 DOHC-16V engine
09/97 Scorpio ’95 00-01-28
IAR2101661
3
1
2 9 Nm
96. Connect the crankcase breather (PCV)
pipe.
1 Press it into the exhaust manifold.
2 Attach the bracket to the cylinder head.
3 Connect it to the inlet manifold.
S2102535
23487
6
5
23487
6
5
9 Nm1 3 Nm
97. Fit the cylinder head cover with a new
gasket (11 bolts and 4 nuts).
29. 2,0 DOHC-16V engine
09/97 Scorpio ’95 00-01-29
S2102531
47 Nm
98. Attach the engine mounting bracket with
the engine mounting.
99. Attach the CKP sensor.
100.Attach the oil filter.
S2102528
47 Nm
101.Attach the alternator and bracket.
S2102527
23 Nm
102.Attach the inlet manifold bracket.
S2102526
75 Nm
23 Nm
23 Nm
103.Attach the EGR system.
30. 2,0 DOHC-16V engine
09/97 Scorpio ’95 00-01-30
47 Nm
S2102519
104.Install the brackets for the air
conditioning compressor and the
exhaust.
S2102018
21–146
21–103A
105.Detach the engine from the assembly
stand.
S2102030
106.Attach the engine mounting bracket with
the engine mounting.
107.Finishing operations.
Fill up with engine oil.