SlideShare uma empresa Scribd logo
1 de 13
Baixar para ler offline
PHP-Nuke Tutorial
How to operate your PHP-Nuke website
22603 West Main Street                       Ph: 262.820.8201 Fax: 262.820.8202              www.OnYourMark.com
Sussex, WI 53089                     Outside Metro Milwaukee Call Toll Free: 800.747.3399   office@OnYourMark.com


Accessing PHP Nuke Administration
Your PHP Nuke Admin is located at: _____________________________________________
You will be prompted for a user name an password to access your PHP Nuke Admin.

Your user name is: _______________________ Your password is: _________________________

Logging in to PHP Nuke
To log in to your PHP Nuke administration area,
visit the URL specified above.

Your screen will show a page similar to the one o n
the right.

Simply enter the username and password provided
to you. Then enter the numbers that appear in the
gray box on your screen in the field labeled
“Security Code.” The “Security Code” field is a secu-
rity feature that helps protect your site.


The Administration Page
After logging in, you will be taken to a page
like the one shown here. Each graphic is a
link to a page that will give you control over
one area of your site.

Here is a brief overview of some of the ad-
ministration sections:

Add Story - Adds a new item to the “News”
module
Blocks - Allows you to rearrange the “Blocks”
on your site’s pages
Calendar - Add / remove events on your Cal-
endar
Cpage - Edit your homepage
Edit Admins - Create other Administrators on
your site
Edit Users - If you are allowing users to register on your site, you may
edit them here
Encyclopedia - Definition of terms
Ephemerids - A “quote of the day” block

nukesop.pub Eff:Oct04 Page 1 of 13
The Administration Page (Continued)

FAQ - A Question and Answer Section
Forums - A message board
HTTP Referrers - Sites that link to your site
KKA Content Pages - “Static” Text pages on
your site
Messages - Messages you may display to
your visitors
Modules - Edit modules on your site
News Articles - Another self updateable
news section
Preferences - General site configuration op-
tions
Submissions - User submitted news items
Surveys / Polls - Add a poll to your site
Topics - Different topics you may have for
the “Add Story” section
Web Links - Manage your links directory
Logout - Log out of the administration section


nukesop.pub Eff:Oct04 Page 2 of 13
The Modules Section
In PHP Nuke, a “module” is a self-
updateable section of your site. The
“Modules” Link allows you to rename your
modules, as well as turn them off or on.

The image to the right shows a sample Mod-
ules Administration page. Each of the mod-
ules on your site are listed in the table, with
the module’s original name, the custom
name you have given it, whether the module
is currently active on your site, which visitors
to your site may use the module, and some
administration options.

The modules you have available to you may
vary from the modules shown here. If you
are interested in additional modules, please
contact Keith Klein & Associates for more
information.


Editing a Module
Lets say that you have the “Calendar” module
installed and you would like to rename it to
“Events.”

In the “Title” column, find “Calendar.”
In “Calendar’s” row, in the far right
column, click the “Edit” link.

You will see a page like the one on
the right. In the “Custom Module
Name” field, change “Calendar” to
“Events.”

If you would like to restrict access to
the module, you may select “Administrators
Only” in the “Who can View This?” drop
down box. If you would like the module to be
active, but not shown in the site’s menu, you
may change “Visible in Modules Block?”
from “Yes” to “No.”

When you are finished, click the “Save
Changes” button. If you have made
changes to the module and decide that you
do not wish to save them, click the “Go
Back” link. You will be taken to the previous page and no changes will be made.

nukesop.pub Eff:Oct04 Page 3 of 13
Activating a Module
All modules currently installed on your site are shown in the
modules list. These modules are either “Active” or “Inactive.”
Active modules are the modules that your site is
currently using. Inactive modules are modules that
are unavailable to your users.

If you wish to activate one of your Inactive modules,
simple click the “Activate” link in the “Functions” col-
umn. Deactivating an Active module works the
same way, except the link will read “Deactivate” in-
stead of “Activate.”

It is a good idea to make sure a module is fully con-
figured before you decide to activate it. Also, do not
deactivate any modules, unless you are sure of its
purpose and that it is no longer desired.


The “Put in Home” Option
The module that is loaded when a visitor first goes to your
site is said to be the “Home” module. This module
appears in the list with a gray background. By de-
fault, this is “cpage.”

Cpage is a simple module that displays text to your visitor,
and is normally used as the “Home” module. It is
recommended that you do not change this setting.

If you do wish to use another module as your “Home” mod-
ule, click the “Put in Home” link next to the module you wish
to set as your “Home” module.


nukesop.pub Eff:Oct04 Page 4 of 13
Changing Specific Modules - Cpage

The “Modules” section allows you to configure how the modules appear on your site, but you are
also able to configure specific modules.

The simplest module to configure is Cpage. As discussed earlier, Cpage is your homepage, unless
you have changed this in the modules section.

To configure Cpage, click the “Cpage” icon in the Administration Menu.


To preview your current Cpage, click the “Preview Page.” A new window will open with the contents
of your Cpage.


To edit Cpage, click the “Edit Page” link.

If you are using Internet Explorer, you will be able to edit your page like you would edit a document
in a word processor.

The toolbar above
the textbox allows
you to make bold
and italic text,
bulleted lists, insert
links and more.

If you are using a dif-
ferent a different
browser, please refer
to the HTML tutorial
at the end of this
document.


When you finish your
changes, click the
update button on the
bottom of your page.

To return to the previous page without saving any changes you have made, click the “Cancel
Changes” button.


nukesop.pub Eff:Oct04 Page 5 of 13
“Blocks” Administration

“Blocks” are components that can be added to the sides, top, or bottom of your site. The “Blocks”
Section of the Administration Menu allows you to add, remove, or rearrange the blocks on your site.

Blocks may contain anything, but common uses of blocks include polls, search boxes, boxes con-
taining address information, and news feeds.

First, click the “Blocks” icon.

The “Blocks Administration” page contains two parts.

The fist part lists the blocks you currently have on your
site. This is shown in the screenshot to the right.


The second part allows you to add more blocks to your
site. This is shown in the screenshot to the right. Ad-
ministration of these fields is explained on Page 8 of
this tutorial.


nukesop.pub Eff:Oct04 Page 6 of 13
“Blocks” Administration (Continued)

First let’s look at how to edit the blocks you cur-
rently have on your page.

The image to the right is similar to your “Blocks
Administration” page. Each block you have on
your site is listed in the chart. The blocks are
listed as they appear on your site. The blocks
that are on the left side are listed first, with
blocks on the top, bottom and right sides listed
after.

For example, the “Menu” block is the top block
on the left side of the page, so it is listed in the
chart first.

You may rearrange the order of the blocks by
clicking the up or down arrows in the weight col-
umn. This will reorder how the blocks are dis-
played on your site.

Note that the top block will not have an up arrow,
and the bottom block will not have a down arrow.


You may also edit each of your blocks. You may
change the side of the page the block appears
on, the name of the block, whether the block is
active, and the visitors the block is shown to.

To edit your blocks, click the edit link in the far
right column of the block yo u would like to edit.

The “Title” of the block is the text that is shown
in the title part of the block. In the example to the
right, the title of the block is “Menu.”

Filename is the actual name of the file. This should only be changed if you want to change the type
of block you wish to display. Files will be covered in the “Adding New Blocks” section.

Position determines whe re on your page the block will be displayed. You may choose to display the
block on the Left, Top, Bottom, or Right side of a page. Note that the Top, Bottom, and Right blocks
may not appear on every page.

“Activate” shows the block on your site. This may be turned on or off as often as you like.

“Who can view this?” selects which visitors will see the block. You may wish to create certain blocks
for certain visitors. For example, if you are allowing your visitors to register for an account, you may
wish to create a block that encourages visitors to register for an account, then set the “Who can view
this?” to “Anonymous Users.”

nukesop.pub Eff:Oct04 Page 7 of 13
“Blocks” Administration (Continued)
You may also choose to remove blocks from your
site. This is done by clicking the “Deactivate” or
“Delete” links next to the block you wish to remove.

Deactivating a block will remove it from your site,
but will keep it in your blocks list as “Inactive.” No-
tice that all “Right” blocks in the screenshot above
are listed as “Inactive.”

Deleting a block will remove it from your site, and
your list of blocks. There is no way to undo this ac-
tion, so if you plan on removing a block, then add-
ing it again later (For example, posting a message
during the holidays) you may wish to deactivate the
block instead of deleting it.


If you wish to add more blocks to your site, you may
use the “Add a New Block” form on the main blocks
administration page.

The “Add a New Block” form is very similar to the “Edit Block” form, but has a few extra options.

“Title”, “Position”, “Activate”, and “Who can View
This?” all function the same as the “Edit Page”
screen.

“Filename” and “Content” are for regular blocks
and “RSS/RDF file URL:” and “Refresh Time” are
for News Feeds.

If you would like to use a previously made block,
use the “Filename” block to pick one. Depending
on the modules you are using, some of them may
not apply to your site.

If you would like to add a block that displays some
text, such as your address, you may use the
“Content” field. The text should be HTML format-
ted (see the tutorial at the end of this document).

The “RSS/RDF file URL:” is used to add news
from another site, such as Slashdot, theBubbler, or
Yahoo! News to your site. You may either enter
the URL for the news feed in the “RSS/RDF file URL:” box, or select one of the preset news feeds
from the dropdown to the right of the “RSS/RDF file URL:” box.

There are many sites, such as www.syndic8.com, that provide news feeds. Your site may use any
of the feeds marked “XML.”

nukesop.pub Eff:Oct04 Page 8 of 13
“Blocks” Administration (Continued)

“Refresh Time” determines how frequently your site will check the news feed for new in-
formation. For example, if the news feed you have on your page is updated daily, you
should set this option to 24 hours. You may set it to 1/2 hour, but since the feed is updated

Uploading Images to your site

The “Upload Images” administration section allows you to upload images to your website.

To upload an image, click the “Browse” but-
ton.


Use the window that pops up to find the image on your
computer. When you find the image, click “Open.”

Finally, click the “Add image” button next to the browse
button. The image will be uploaded to PHPNuke.

Directly under the “Add Image” form, there is a list of all
images you have added to your site. Please note that the
image name in this list will not be the same as the name of
the image you uploaded; PHPNuke renames the files. If
you uploaded an image named “flowerpicture.jpg” from
your own files, PHPNuke may rename the file to “image2.jpg”. Clicking “Preview” next to the listed
images will show you the image you have uploaded.

To have the image appear on your pages, HTML must be added. Each image is listed with the
HTML code necessary to add the image to your site and a link to preview the image. We recom-
mend copying the block of code that says <img src=“userimages/image2.jpg” border=“0”> and past-
ing it into your pages when adding images.

You may change where the image ap-
pears on your page by adding an
“alignment” tag.

To align an image on the right of a page, add align=“right” before the final bracket of the tag.
<img src=“userimages/image2.jpg” border=“0” align=“right”>

     To align an image on the left of a page, add align=“left” before the final bracket of the tag.
     <img src=“userimages/image2.jpg” border=“0” align=“left”>


nukesop.pub Eff:Oct04 Page 9 of 13
Adding and Editing Your Site’s Pages

There are two ways to add, edit, or delete the pages on your site.


One method is to use the KKA Content Pages
section of the Admin section. A directory of all
your site’s pages will be displayed.


If you wish to add a new page, click the “Add a
page” link above the directory list.

“Priority” determines how your pages will be organized. Higher priority pages will be listed above
lower pages. To have your pages listed alphabetically, simple set them all to “0”.

“Page Title” determines the name that will ap-
pear at the top of the page and in menus.

If you wish to add text after the title of the page,
but before the content of the page, enter it in
the “Page Subtitle” field.

“List this page under” is for organizing your
pages. It may help to think of your site as a di-
rectory.
The main pages with more generalized content
are listed in the menu of your page. Pages that
have more specific content are listed under the
main pages.

For example, if you have an Automotive website, one of your main pages might be called “Tires.”
It would be listed in the menu of the site. Once a visitor views the “Tires” page, they would be shown
links to sub pages in the “Tires” section, such as “Winter Tires” or “Racing Tires.”

You may expand this further by adding sub pages to the “Winter Tires” section, such as “15 inch
Winter Tires” or “20 inch Winter Tires.”

Using this method, you will make your site more friendly to your visitors.

The “Page Text” field contains the actual text that will be displayed on your site.
The text in this field needs to be HTML formatted (See the tutorial at the end of this document)

When you have finished entering the page’s information, click the “Create Page” Button at the bot-
tom.


nukesop.pub Eff:Oct04 Page 10 of 13
Adding and Editing Your Site’s Pages (Continued)

To edit one of your existing pages, click the “Edit” link next
to page you wish to edit.

The form that is displayed is nearly identical to the “Add a Page” form and it works the same way.

You may change the information, then click the “Save Changes” link at the bottom when you are fin-
ished.


If you would like to remove a page from your site,
click the “Delete” link next to the page. You will be
shown the contents of the page, and will be asked
if you really want to delete it.

If you do, click the “YES” button, if not, click “NO,”
you will be taken to the previous page.


Another way to manage your pages

As mentioned earlier, there is another way to edit your pages, which may be eas-
ier for you than the above method.

First, make sure you are logged in as an administrator.

Next, use the navigation of your site to find the page you wish to edit.

For example, if you wish to edit your “Contact Us” page, click the “Contact Us”
page in the menu.

Notice that there are two extra lines at the bottom of the page that only administra-
tors receive.


The Edit, Delete, and Add functions on the page are similar to the admin section. The major differ-
ence is that if you are using Internet Explorer, you may edit the text of the page using a special tool-
bar that works similar to a word processor.


nukesop.pub Eff:Oct04 Page 11 of 13
Another way to manage your pages (Continued)

Just as in a word processor, you may highlight text and click icons in the toolbar to make the text
bold, italic, or underlined. You may also create bulleted lists, indent the text and change colors.

If you don’t know what a particular icon does in the toolbar, hold your mouse over the icon, and a
short description will be displayed.


If you are using the word processing view and wish to work with raw HTML, click the < > icon at the
top of the word processor. You will then be able to view and edit the HTML coding. Clicking this
icon in the HTML view will switch back to the word processor.


nukesop.pub Eff:Oct04 Page 12 of 13
HTML Quick Reference

To have these effects appear on your pages, copy the tag and replace the content in red.

Bold: <b>text between these tags will appear bold</b>

Italic: <i>text between these tags will appear italic</i>

Email Link: <a href="mailto:johndoe@domain.com">johndoe@domain.com</a>
After the mailto:, enter your email address.
Enter it again between the ></a>.
This will appear as the text of your link: johndoe@domain.com

Page Link: <a href="/modules.php?name=KKA_Content&pa=detail&cid=42">About Us</a>
Enter the page URL between the " "..
Enter text describing the page between the ></a>. Text entered here will appear as the page name
in your text: About Us

When creating links to external websites, you must write the domain like this:
                    <a href=“http://www.domain.com” target=“new”>Website Name</a>
The target=“new” will cause the external website to open in a new browser window.

Some characters in HTML must be written with special codes:
&= &amp; Example: Thank you & come again must be written as Thank you &amp; come again
“”=&quot; Example: Our new “Specials” must be written as Our new &quot;Specials&quot;


HTML Example

If you want the text on your pages to appear like this:
                                      Welcome to our new website!

                                      Visit our Capabilities page to see what w e can do for you!

                                      Learn more about our company at the Company Profile page.

                                      See us at the Trade Show this month!


Write the text in a word processing program like this:
                                      Welcome to our new website!

                                      Visit our Capabilities page to see what we can do for you!

                                      Learn more about our company at the Company Profile page.

                                      See us at the Trade Show this month!


Add HTML to create effects and links, then past into the page editor:
<b>Welcome to our new website!</b>

Visit our <a href=“/modules.php?name=KKA_Content&pa=detail&cid=42”>Capabilities</a> page to see what we can do for you!

Learn more about our company at the <a href=“/modules.php?name=KKA_Content&pa=detail&cid=57”>Company Profile</a> page.

See us at the <a href=“”http://www.tradeshow.com” target=“new”>Trade Show</a> this month!


nukesop.pub Eff:Oct04 Page 13 of 13

Mais conteúdo relacionado

Mais procurados (15)

About the New Facebook Page Layout
About the New Facebook Page LayoutAbout the New Facebook Page Layout
About the New Facebook Page Layout
 
Quick reference for disappearing Web Parts in SharePoint.
Quick reference for disappearing Web Parts in SharePoint.Quick reference for disappearing Web Parts in SharePoint.
Quick reference for disappearing Web Parts in SharePoint.
 
Joomla 15 Quickstart
Joomla 15 QuickstartJoomla 15 Quickstart
Joomla 15 Quickstart
 
WordPress Gallery tutorial
WordPress Gallery tutorialWordPress Gallery tutorial
WordPress Gallery tutorial
 
Virtual Doc how to
Virtual Doc how toVirtual Doc how to
Virtual Doc how to
 
Blog Instructions
Blog InstructionsBlog Instructions
Blog Instructions
 
blogs911.com
blogs911.comblogs911.com
blogs911.com
 
WordPress HTML, CSS & Child Themes
WordPress HTML, CSS & Child ThemesWordPress HTML, CSS & Child Themes
WordPress HTML, CSS & Child Themes
 
Websphere portal theme menu framework
Websphere portal theme menu frameworkWebsphere portal theme menu framework
Websphere portal theme menu framework
 
Facebook Developer Garage Milan
Facebook Developer Garage MilanFacebook Developer Garage Milan
Facebook Developer Garage Milan
 
Creating wordpress website step by step easy
Creating wordpress website step by step easyCreating wordpress website step by step easy
Creating wordpress website step by step easy
 
Google sites
Google sitesGoogle sites
Google sites
 
IBM Connections 4.5 User Data Propagation.
IBM Connections 4.5 User Data Propagation.IBM Connections 4.5 User Data Propagation.
IBM Connections 4.5 User Data Propagation.
 
Ra how to
Ra how toRa how to
Ra how to
 
Enable seo friendly url in websphere portal
Enable seo friendly url in websphere portalEnable seo friendly url in websphere portal
Enable seo friendly url in websphere portal
 

Destaque

Newscrafting and Trendspotting
Newscrafting and TrendspottingNewscrafting and Trendspotting
Newscrafting and TrendspottingHavasPR
 
Lending 101 201
Lending 101 201Lending 101 201
Lending 101 201Felixn
 
Bellagio information 2014
Bellagio information 2014Bellagio information 2014
Bellagio information 2014PromoBellagio
 
Instabuilder license key
Instabuilder license keyInstabuilder license key
Instabuilder license keykoyu1202
 
Brochure promobellagio eng.con bls
Brochure promobellagio eng.con blsBrochure promobellagio eng.con bls
Brochure promobellagio eng.con blsPromoBellagio
 
L'Officiel Украина 2013 ru
L'Officiel Украина 2013 ruL'Officiel Украина 2013 ru
L'Officiel Украина 2013 ruAnna Katrulina
 

Destaque (10)

Newscrafting and Trendspotting
Newscrafting and TrendspottingNewscrafting and Trendspotting
Newscrafting and Trendspotting
 
Lending 101 201
Lending 101 201Lending 101 201
Lending 101 201
 
Bellagio information 2014
Bellagio information 2014Bellagio information 2014
Bellagio information 2014
 
104 K203 E03
104 K203 E03104 K203 E03
104 K203 E03
 
Broken objects
Broken objectsBroken objects
Broken objects
 
Instabuilder license key
Instabuilder license keyInstabuilder license key
Instabuilder license key
 
Brochure promobellagio eng.con bls
Brochure promobellagio eng.con blsBrochure promobellagio eng.con bls
Brochure promobellagio eng.con bls
 
Bellagio info
Bellagio infoBellagio info
Bellagio info
 
L'Officiel Украина 2013 ru
L'Officiel Украина 2013 ruL'Officiel Украина 2013 ru
L'Officiel Украина 2013 ru
 
Solved problems
Solved problemsSolved problems
Solved problems
 

Semelhante a nukesop

Blog Pro 2.0 User Guide
Blog Pro 2.0 User GuideBlog Pro 2.0 User Guide
Blog Pro 2.0 User GuideIgor Goltsov
 
Drupal Gardens Tutorial 1 of 4
Drupal Gardens Tutorial 1 of 4Drupal Gardens Tutorial 1 of 4
Drupal Gardens Tutorial 1 of 4Kevin Duggan
 
WeeblyTrainingManual
WeeblyTrainingManualWeeblyTrainingManual
WeeblyTrainingManualGracie Wardin
 
How to use wordpress
How to use wordpressHow to use wordpress
How to use wordpressKyle Roberts
 
A360 - Guide to Getting Started
A360 - Guide to Getting StartedA360 - Guide to Getting Started
A360 - Guide to Getting StartedAutodesk A360
 
Sites Overview
Sites OverviewSites Overview
Sites Overviewsmwilson22
 
Getting started with_alfresco_share_collaboration_for_enterprise
Getting started with_alfresco_share_collaboration_for_enterpriseGetting started with_alfresco_share_collaboration_for_enterprise
Getting started with_alfresco_share_collaboration_for_enterpriseelenaallakaeva
 
Drupal For Dummies
Drupal For DummiesDrupal For Dummies
Drupal For DummiesKoen Delvaux
 
The dashboard
The dashboardThe dashboard
The dashboardNLandUSA
 
Joomla basic-iii undersrtanding-installing-configuring-joomla-extensions
Joomla basic-iii undersrtanding-installing-configuring-joomla-extensionsJoomla basic-iii undersrtanding-installing-configuring-joomla-extensions
Joomla basic-iii undersrtanding-installing-configuring-joomla-extensionsChanratha Sorn
 
How to - Edit the Settings and Layout on Netvibes
How to - Edit the Settings and Layout on NetvibesHow to - Edit the Settings and Layout on Netvibes
How to - Edit the Settings and Layout on Netvibesmmoore17
 
Telt Training: Wiki Fundamentals
Telt Training: Wiki FundamentalsTelt Training: Wiki Fundamentals
Telt Training: Wiki FundamentalsMike Bogle
 
6 Special Howtos for Drupal
6 Special Howtos for Drupal6 Special Howtos for Drupal
6 Special Howtos for DrupalWingston
 
Source httpsites.google.comsupport University of Nevad.docx
Source httpsites.google.comsupport University of Nevad.docxSource httpsites.google.comsupport University of Nevad.docx
Source httpsites.google.comsupport University of Nevad.docxrosemariebrayshaw
 
Behance prosite beginners guide
Behance prosite beginners guideBehance prosite beginners guide
Behance prosite beginners guideMicrosoft
 

Semelhante a nukesop (20)

Blog Pro 2.0 User Guide
Blog Pro 2.0 User GuideBlog Pro 2.0 User Guide
Blog Pro 2.0 User Guide
 
Drupal Gardens Tutorial 1 of 4
Drupal Gardens Tutorial 1 of 4Drupal Gardens Tutorial 1 of 4
Drupal Gardens Tutorial 1 of 4
 
WeeblyTrainingManual
WeeblyTrainingManualWeeblyTrainingManual
WeeblyTrainingManual
 
How to use wordpress
How to use wordpressHow to use wordpress
How to use wordpress
 
A360 - Guide to Getting Started
A360 - Guide to Getting StartedA360 - Guide to Getting Started
A360 - Guide to Getting Started
 
Sites Overview
Sites OverviewSites Overview
Sites Overview
 
Edison cms manual
Edison cms manualEdison cms manual
Edison cms manual
 
Getting started with_alfresco_share_collaboration_for_enterprise
Getting started with_alfresco_share_collaboration_for_enterpriseGetting started with_alfresco_share_collaboration_for_enterprise
Getting started with_alfresco_share_collaboration_for_enterprise
 
Drupal For Dummies
Drupal For DummiesDrupal For Dummies
Drupal For Dummies
 
The dashboard
The dashboardThe dashboard
The dashboard
 
Joomla basic-iii undersrtanding-installing-configuring-joomla-extensions
Joomla basic-iii undersrtanding-installing-configuring-joomla-extensionsJoomla basic-iii undersrtanding-installing-configuring-joomla-extensions
Joomla basic-iii undersrtanding-installing-configuring-joomla-extensions
 
Wordpress for Beginners: 10 Must Knows
Wordpress for Beginners: 10 Must KnowsWordpress for Beginners: 10 Must Knows
Wordpress for Beginners: 10 Must Knows
 
Sharepoint
SharepointSharepoint
Sharepoint
 
Sharepoint
SharepointSharepoint
Sharepoint
 
Sharepoint
SharepointSharepoint
Sharepoint
 
How to - Edit the Settings and Layout on Netvibes
How to - Edit the Settings and Layout on NetvibesHow to - Edit the Settings and Layout on Netvibes
How to - Edit the Settings and Layout on Netvibes
 
Telt Training: Wiki Fundamentals
Telt Training: Wiki FundamentalsTelt Training: Wiki Fundamentals
Telt Training: Wiki Fundamentals
 
6 Special Howtos for Drupal
6 Special Howtos for Drupal6 Special Howtos for Drupal
6 Special Howtos for Drupal
 
Source httpsites.google.comsupport University of Nevad.docx
Source httpsites.google.comsupport University of Nevad.docxSource httpsites.google.comsupport University of Nevad.docx
Source httpsites.google.comsupport University of Nevad.docx
 
Behance prosite beginners guide
Behance prosite beginners guideBehance prosite beginners guide
Behance prosite beginners guide
 

Mais de tutorialsruby

&lt;img src="../i/r_14.png" />
&lt;img src="../i/r_14.png" />&lt;img src="../i/r_14.png" />
&lt;img src="../i/r_14.png" />tutorialsruby
 
TopStyle Help &amp; &lt;b>Tutorial&lt;/b>
TopStyle Help &amp; &lt;b>Tutorial&lt;/b>TopStyle Help &amp; &lt;b>Tutorial&lt;/b>
TopStyle Help &amp; &lt;b>Tutorial&lt;/b>tutorialsruby
 
The Art Institute of Atlanta IMD 210 Fundamentals of Scripting &lt;b>...&lt;/b>
The Art Institute of Atlanta IMD 210 Fundamentals of Scripting &lt;b>...&lt;/b>The Art Institute of Atlanta IMD 210 Fundamentals of Scripting &lt;b>...&lt;/b>
The Art Institute of Atlanta IMD 210 Fundamentals of Scripting &lt;b>...&lt;/b>tutorialsruby
 
&lt;img src="../i/r_14.png" />
&lt;img src="../i/r_14.png" />&lt;img src="../i/r_14.png" />
&lt;img src="../i/r_14.png" />tutorialsruby
 
&lt;img src="../i/r_14.png" />
&lt;img src="../i/r_14.png" />&lt;img src="../i/r_14.png" />
&lt;img src="../i/r_14.png" />tutorialsruby
 
Standardization and Knowledge Transfer – INS0
Standardization and Knowledge Transfer – INS0Standardization and Knowledge Transfer – INS0
Standardization and Knowledge Transfer – INS0tutorialsruby
 
0047ecaa6ea3e9ac0a13a2fe96f4de3bfd515c88f5d90c1fae79b956363d7f02c7fa060269
0047ecaa6ea3e9ac0a13a2fe96f4de3bfd515c88f5d90c1fae79b956363d7f02c7fa0602690047ecaa6ea3e9ac0a13a2fe96f4de3bfd515c88f5d90c1fae79b956363d7f02c7fa060269
0047ecaa6ea3e9ac0a13a2fe96f4de3bfd515c88f5d90c1fae79b956363d7f02c7fa060269tutorialsruby
 
BloggingWithStyle_2008
BloggingWithStyle_2008BloggingWithStyle_2008
BloggingWithStyle_2008tutorialsruby
 
BloggingWithStyle_2008
BloggingWithStyle_2008BloggingWithStyle_2008
BloggingWithStyle_2008tutorialsruby
 
cascadingstylesheets
cascadingstylesheetscascadingstylesheets
cascadingstylesheetstutorialsruby
 
cascadingstylesheets
cascadingstylesheetscascadingstylesheets
cascadingstylesheetstutorialsruby
 

Mais de tutorialsruby (20)

&lt;img src="../i/r_14.png" />
&lt;img src="../i/r_14.png" />&lt;img src="../i/r_14.png" />
&lt;img src="../i/r_14.png" />
 
TopStyle Help &amp; &lt;b>Tutorial&lt;/b>
TopStyle Help &amp; &lt;b>Tutorial&lt;/b>TopStyle Help &amp; &lt;b>Tutorial&lt;/b>
TopStyle Help &amp; &lt;b>Tutorial&lt;/b>
 
The Art Institute of Atlanta IMD 210 Fundamentals of Scripting &lt;b>...&lt;/b>
The Art Institute of Atlanta IMD 210 Fundamentals of Scripting &lt;b>...&lt;/b>The Art Institute of Atlanta IMD 210 Fundamentals of Scripting &lt;b>...&lt;/b>
The Art Institute of Atlanta IMD 210 Fundamentals of Scripting &lt;b>...&lt;/b>
 
&lt;img src="../i/r_14.png" />
&lt;img src="../i/r_14.png" />&lt;img src="../i/r_14.png" />
&lt;img src="../i/r_14.png" />
 
&lt;img src="../i/r_14.png" />
&lt;img src="../i/r_14.png" />&lt;img src="../i/r_14.png" />
&lt;img src="../i/r_14.png" />
 
Standardization and Knowledge Transfer – INS0
Standardization and Knowledge Transfer – INS0Standardization and Knowledge Transfer – INS0
Standardization and Knowledge Transfer – INS0
 
xhtml_basics
xhtml_basicsxhtml_basics
xhtml_basics
 
xhtml_basics
xhtml_basicsxhtml_basics
xhtml_basics
 
xhtml-documentation
xhtml-documentationxhtml-documentation
xhtml-documentation
 
xhtml-documentation
xhtml-documentationxhtml-documentation
xhtml-documentation
 
CSS
CSSCSS
CSS
 
CSS
CSSCSS
CSS
 
0047ecaa6ea3e9ac0a13a2fe96f4de3bfd515c88f5d90c1fae79b956363d7f02c7fa060269
0047ecaa6ea3e9ac0a13a2fe96f4de3bfd515c88f5d90c1fae79b956363d7f02c7fa0602690047ecaa6ea3e9ac0a13a2fe96f4de3bfd515c88f5d90c1fae79b956363d7f02c7fa060269
0047ecaa6ea3e9ac0a13a2fe96f4de3bfd515c88f5d90c1fae79b956363d7f02c7fa060269
 
0047ecaa6ea3e9ac0a13a2fe96f4de3bfd515c88f5d90c1fae79b956363d7f02c7fa060269
0047ecaa6ea3e9ac0a13a2fe96f4de3bfd515c88f5d90c1fae79b956363d7f02c7fa0602690047ecaa6ea3e9ac0a13a2fe96f4de3bfd515c88f5d90c1fae79b956363d7f02c7fa060269
0047ecaa6ea3e9ac0a13a2fe96f4de3bfd515c88f5d90c1fae79b956363d7f02c7fa060269
 
HowTo_CSS
HowTo_CSSHowTo_CSS
HowTo_CSS
 
HowTo_CSS
HowTo_CSSHowTo_CSS
HowTo_CSS
 
BloggingWithStyle_2008
BloggingWithStyle_2008BloggingWithStyle_2008
BloggingWithStyle_2008
 
BloggingWithStyle_2008
BloggingWithStyle_2008BloggingWithStyle_2008
BloggingWithStyle_2008
 
cascadingstylesheets
cascadingstylesheetscascadingstylesheets
cascadingstylesheets
 
cascadingstylesheets
cascadingstylesheetscascadingstylesheets
cascadingstylesheets
 

Último

How to write a Business Continuity Plan
How to write a Business Continuity PlanHow to write a Business Continuity Plan
How to write a Business Continuity PlanDatabarracks
 
"ML in Production",Oleksandr Bagan
"ML in Production",Oleksandr Bagan"ML in Production",Oleksandr Bagan
"ML in Production",Oleksandr BaganFwdays
 
New from BookNet Canada for 2024: Loan Stars - Tech Forum 2024
New from BookNet Canada for 2024: Loan Stars - Tech Forum 2024New from BookNet Canada for 2024: Loan Stars - Tech Forum 2024
New from BookNet Canada for 2024: Loan Stars - Tech Forum 2024BookNet Canada
 
Training state-of-the-art general text embedding
Training state-of-the-art general text embeddingTraining state-of-the-art general text embedding
Training state-of-the-art general text embeddingZilliz
 
Passkey Providers and Enabling Portability: FIDO Paris Seminar.pptx
Passkey Providers and Enabling Portability: FIDO Paris Seminar.pptxPasskey Providers and Enabling Portability: FIDO Paris Seminar.pptx
Passkey Providers and Enabling Portability: FIDO Paris Seminar.pptxLoriGlavin3
 
Take control of your SAP testing with UiPath Test Suite
Take control of your SAP testing with UiPath Test SuiteTake control of your SAP testing with UiPath Test Suite
Take control of your SAP testing with UiPath Test SuiteDianaGray10
 
Use of FIDO in the Payments and Identity Landscape: FIDO Paris Seminar.pptx
Use of FIDO in the Payments and Identity Landscape: FIDO Paris Seminar.pptxUse of FIDO in the Payments and Identity Landscape: FIDO Paris Seminar.pptx
Use of FIDO in the Payments and Identity Landscape: FIDO Paris Seminar.pptxLoriGlavin3
 
TeamStation AI System Report LATAM IT Salaries 2024
TeamStation AI System Report LATAM IT Salaries 2024TeamStation AI System Report LATAM IT Salaries 2024
TeamStation AI System Report LATAM IT Salaries 2024Lonnie McRorey
 
Gen AI in Business - Global Trends Report 2024.pdf
Gen AI in Business - Global Trends Report 2024.pdfGen AI in Business - Global Trends Report 2024.pdf
Gen AI in Business - Global Trends Report 2024.pdfAddepto
 
SALESFORCE EDUCATION CLOUD | FEXLE SERVICES
SALESFORCE EDUCATION CLOUD | FEXLE SERVICESSALESFORCE EDUCATION CLOUD | FEXLE SERVICES
SALESFORCE EDUCATION CLOUD | FEXLE SERVICESmohitsingh558521
 
What is DBT - The Ultimate Data Build Tool.pdf
What is DBT - The Ultimate Data Build Tool.pdfWhat is DBT - The Ultimate Data Build Tool.pdf
What is DBT - The Ultimate Data Build Tool.pdfMounikaPolabathina
 
Anypoint Exchange: It’s Not Just a Repo!
Anypoint Exchange: It’s Not Just a Repo!Anypoint Exchange: It’s Not Just a Repo!
Anypoint Exchange: It’s Not Just a Repo!Manik S Magar
 
DevoxxFR 2024 Reproducible Builds with Apache Maven
DevoxxFR 2024 Reproducible Builds with Apache MavenDevoxxFR 2024 Reproducible Builds with Apache Maven
DevoxxFR 2024 Reproducible Builds with Apache MavenHervé Boutemy
 
WordPress Websites for Engineers: Elevate Your Brand
WordPress Websites for Engineers: Elevate Your BrandWordPress Websites for Engineers: Elevate Your Brand
WordPress Websites for Engineers: Elevate Your Brandgvaughan
 
The Fit for Passkeys for Employee and Consumer Sign-ins: FIDO Paris Seminar.pptx
The Fit for Passkeys for Employee and Consumer Sign-ins: FIDO Paris Seminar.pptxThe Fit for Passkeys for Employee and Consumer Sign-ins: FIDO Paris Seminar.pptx
The Fit for Passkeys for Employee and Consumer Sign-ins: FIDO Paris Seminar.pptxLoriGlavin3
 
Merck Moving Beyond Passwords: FIDO Paris Seminar.pptx
Merck Moving Beyond Passwords: FIDO Paris Seminar.pptxMerck Moving Beyond Passwords: FIDO Paris Seminar.pptx
Merck Moving Beyond Passwords: FIDO Paris Seminar.pptxLoriGlavin3
 
The State of Passkeys with FIDO Alliance.pptx
The State of Passkeys with FIDO Alliance.pptxThe State of Passkeys with FIDO Alliance.pptx
The State of Passkeys with FIDO Alliance.pptxLoriGlavin3
 
The Ultimate Guide to Choosing WordPress Pros and Cons
The Ultimate Guide to Choosing WordPress Pros and ConsThe Ultimate Guide to Choosing WordPress Pros and Cons
The Ultimate Guide to Choosing WordPress Pros and ConsPixlogix Infotech
 
Transcript: New from BookNet Canada for 2024: Loan Stars - Tech Forum 2024
Transcript: New from BookNet Canada for 2024: Loan Stars - Tech Forum 2024Transcript: New from BookNet Canada for 2024: Loan Stars - Tech Forum 2024
Transcript: New from BookNet Canada for 2024: Loan Stars - Tech Forum 2024BookNet Canada
 
Artificial intelligence in cctv survelliance.pptx
Artificial intelligence in cctv survelliance.pptxArtificial intelligence in cctv survelliance.pptx
Artificial intelligence in cctv survelliance.pptxhariprasad279825
 

Último (20)

How to write a Business Continuity Plan
How to write a Business Continuity PlanHow to write a Business Continuity Plan
How to write a Business Continuity Plan
 
"ML in Production",Oleksandr Bagan
"ML in Production",Oleksandr Bagan"ML in Production",Oleksandr Bagan
"ML in Production",Oleksandr Bagan
 
New from BookNet Canada for 2024: Loan Stars - Tech Forum 2024
New from BookNet Canada for 2024: Loan Stars - Tech Forum 2024New from BookNet Canada for 2024: Loan Stars - Tech Forum 2024
New from BookNet Canada for 2024: Loan Stars - Tech Forum 2024
 
Training state-of-the-art general text embedding
Training state-of-the-art general text embeddingTraining state-of-the-art general text embedding
Training state-of-the-art general text embedding
 
Passkey Providers and Enabling Portability: FIDO Paris Seminar.pptx
Passkey Providers and Enabling Portability: FIDO Paris Seminar.pptxPasskey Providers and Enabling Portability: FIDO Paris Seminar.pptx
Passkey Providers and Enabling Portability: FIDO Paris Seminar.pptx
 
Take control of your SAP testing with UiPath Test Suite
Take control of your SAP testing with UiPath Test SuiteTake control of your SAP testing with UiPath Test Suite
Take control of your SAP testing with UiPath Test Suite
 
Use of FIDO in the Payments and Identity Landscape: FIDO Paris Seminar.pptx
Use of FIDO in the Payments and Identity Landscape: FIDO Paris Seminar.pptxUse of FIDO in the Payments and Identity Landscape: FIDO Paris Seminar.pptx
Use of FIDO in the Payments and Identity Landscape: FIDO Paris Seminar.pptx
 
TeamStation AI System Report LATAM IT Salaries 2024
TeamStation AI System Report LATAM IT Salaries 2024TeamStation AI System Report LATAM IT Salaries 2024
TeamStation AI System Report LATAM IT Salaries 2024
 
Gen AI in Business - Global Trends Report 2024.pdf
Gen AI in Business - Global Trends Report 2024.pdfGen AI in Business - Global Trends Report 2024.pdf
Gen AI in Business - Global Trends Report 2024.pdf
 
SALESFORCE EDUCATION CLOUD | FEXLE SERVICES
SALESFORCE EDUCATION CLOUD | FEXLE SERVICESSALESFORCE EDUCATION CLOUD | FEXLE SERVICES
SALESFORCE EDUCATION CLOUD | FEXLE SERVICES
 
What is DBT - The Ultimate Data Build Tool.pdf
What is DBT - The Ultimate Data Build Tool.pdfWhat is DBT - The Ultimate Data Build Tool.pdf
What is DBT - The Ultimate Data Build Tool.pdf
 
Anypoint Exchange: It’s Not Just a Repo!
Anypoint Exchange: It’s Not Just a Repo!Anypoint Exchange: It’s Not Just a Repo!
Anypoint Exchange: It’s Not Just a Repo!
 
DevoxxFR 2024 Reproducible Builds with Apache Maven
DevoxxFR 2024 Reproducible Builds with Apache MavenDevoxxFR 2024 Reproducible Builds with Apache Maven
DevoxxFR 2024 Reproducible Builds with Apache Maven
 
WordPress Websites for Engineers: Elevate Your Brand
WordPress Websites for Engineers: Elevate Your BrandWordPress Websites for Engineers: Elevate Your Brand
WordPress Websites for Engineers: Elevate Your Brand
 
The Fit for Passkeys for Employee and Consumer Sign-ins: FIDO Paris Seminar.pptx
The Fit for Passkeys for Employee and Consumer Sign-ins: FIDO Paris Seminar.pptxThe Fit for Passkeys for Employee and Consumer Sign-ins: FIDO Paris Seminar.pptx
The Fit for Passkeys for Employee and Consumer Sign-ins: FIDO Paris Seminar.pptx
 
Merck Moving Beyond Passwords: FIDO Paris Seminar.pptx
Merck Moving Beyond Passwords: FIDO Paris Seminar.pptxMerck Moving Beyond Passwords: FIDO Paris Seminar.pptx
Merck Moving Beyond Passwords: FIDO Paris Seminar.pptx
 
The State of Passkeys with FIDO Alliance.pptx
The State of Passkeys with FIDO Alliance.pptxThe State of Passkeys with FIDO Alliance.pptx
The State of Passkeys with FIDO Alliance.pptx
 
The Ultimate Guide to Choosing WordPress Pros and Cons
The Ultimate Guide to Choosing WordPress Pros and ConsThe Ultimate Guide to Choosing WordPress Pros and Cons
The Ultimate Guide to Choosing WordPress Pros and Cons
 
Transcript: New from BookNet Canada for 2024: Loan Stars - Tech Forum 2024
Transcript: New from BookNet Canada for 2024: Loan Stars - Tech Forum 2024Transcript: New from BookNet Canada for 2024: Loan Stars - Tech Forum 2024
Transcript: New from BookNet Canada for 2024: Loan Stars - Tech Forum 2024
 
Artificial intelligence in cctv survelliance.pptx
Artificial intelligence in cctv survelliance.pptxArtificial intelligence in cctv survelliance.pptx
Artificial intelligence in cctv survelliance.pptx
 

nukesop

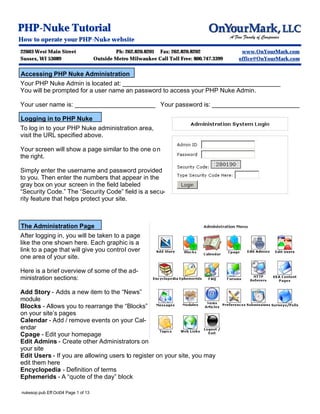
  • 1. PHP-Nuke Tutorial How to operate your PHP-Nuke website 22603 West Main Street Ph: 262.820.8201 Fax: 262.820.8202 www.OnYourMark.com Sussex, WI 53089 Outside Metro Milwaukee Call Toll Free: 800.747.3399 office@OnYourMark.com Accessing PHP Nuke Administration Your PHP Nuke Admin is located at: _____________________________________________ You will be prompted for a user name an password to access your PHP Nuke Admin. Your user name is: _______________________ Your password is: _________________________ Logging in to PHP Nuke To log in to your PHP Nuke administration area, visit the URL specified above. Your screen will show a page similar to the one o n the right. Simply enter the username and password provided to you. Then enter the numbers that appear in the gray box on your screen in the field labeled “Security Code.” The “Security Code” field is a secu- rity feature that helps protect your site. The Administration Page After logging in, you will be taken to a page like the one shown here. Each graphic is a link to a page that will give you control over one area of your site. Here is a brief overview of some of the ad- ministration sections: Add Story - Adds a new item to the “News” module Blocks - Allows you to rearrange the “Blocks” on your site’s pages Calendar - Add / remove events on your Cal- endar Cpage - Edit your homepage Edit Admins - Create other Administrators on your site Edit Users - If you are allowing users to register on your site, you may edit them here Encyclopedia - Definition of terms Ephemerids - A “quote of the day” block nukesop.pub Eff:Oct04 Page 1 of 13
  • 2. The Administration Page (Continued) FAQ - A Question and Answer Section Forums - A message board HTTP Referrers - Sites that link to your site KKA Content Pages - “Static” Text pages on your site Messages - Messages you may display to your visitors Modules - Edit modules on your site News Articles - Another self updateable news section Preferences - General site configuration op- tions Submissions - User submitted news items Surveys / Polls - Add a poll to your site Topics - Different topics you may have for the “Add Story” section Web Links - Manage your links directory Logout - Log out of the administration section nukesop.pub Eff:Oct04 Page 2 of 13
  • 3. The Modules Section In PHP Nuke, a “module” is a self- updateable section of your site. The “Modules” Link allows you to rename your modules, as well as turn them off or on. The image to the right shows a sample Mod- ules Administration page. Each of the mod- ules on your site are listed in the table, with the module’s original name, the custom name you have given it, whether the module is currently active on your site, which visitors to your site may use the module, and some administration options. The modules you have available to you may vary from the modules shown here. If you are interested in additional modules, please contact Keith Klein & Associates for more information. Editing a Module Lets say that you have the “Calendar” module installed and you would like to rename it to “Events.” In the “Title” column, find “Calendar.” In “Calendar’s” row, in the far right column, click the “Edit” link. You will see a page like the one on the right. In the “Custom Module Name” field, change “Calendar” to “Events.” If you would like to restrict access to the module, you may select “Administrators Only” in the “Who can View This?” drop down box. If you would like the module to be active, but not shown in the site’s menu, you may change “Visible in Modules Block?” from “Yes” to “No.” When you are finished, click the “Save Changes” button. If you have made changes to the module and decide that you do not wish to save them, click the “Go Back” link. You will be taken to the previous page and no changes will be made. nukesop.pub Eff:Oct04 Page 3 of 13
  • 4. Activating a Module All modules currently installed on your site are shown in the modules list. These modules are either “Active” or “Inactive.” Active modules are the modules that your site is currently using. Inactive modules are modules that are unavailable to your users. If you wish to activate one of your Inactive modules, simple click the “Activate” link in the “Functions” col- umn. Deactivating an Active module works the same way, except the link will read “Deactivate” in- stead of “Activate.” It is a good idea to make sure a module is fully con- figured before you decide to activate it. Also, do not deactivate any modules, unless you are sure of its purpose and that it is no longer desired. The “Put in Home” Option The module that is loaded when a visitor first goes to your site is said to be the “Home” module. This module appears in the list with a gray background. By de- fault, this is “cpage.” Cpage is a simple module that displays text to your visitor, and is normally used as the “Home” module. It is recommended that you do not change this setting. If you do wish to use another module as your “Home” mod- ule, click the “Put in Home” link next to the module you wish to set as your “Home” module. nukesop.pub Eff:Oct04 Page 4 of 13
  • 5. Changing Specific Modules - Cpage The “Modules” section allows you to configure how the modules appear on your site, but you are also able to configure specific modules. The simplest module to configure is Cpage. As discussed earlier, Cpage is your homepage, unless you have changed this in the modules section. To configure Cpage, click the “Cpage” icon in the Administration Menu. To preview your current Cpage, click the “Preview Page.” A new window will open with the contents of your Cpage. To edit Cpage, click the “Edit Page” link. If you are using Internet Explorer, you will be able to edit your page like you would edit a document in a word processor. The toolbar above the textbox allows you to make bold and italic text, bulleted lists, insert links and more. If you are using a dif- ferent a different browser, please refer to the HTML tutorial at the end of this document. When you finish your changes, click the update button on the bottom of your page. To return to the previous page without saving any changes you have made, click the “Cancel Changes” button. nukesop.pub Eff:Oct04 Page 5 of 13
  • 6. “Blocks” Administration “Blocks” are components that can be added to the sides, top, or bottom of your site. The “Blocks” Section of the Administration Menu allows you to add, remove, or rearrange the blocks on your site. Blocks may contain anything, but common uses of blocks include polls, search boxes, boxes con- taining address information, and news feeds. First, click the “Blocks” icon. The “Blocks Administration” page contains two parts. The fist part lists the blocks you currently have on your site. This is shown in the screenshot to the right. The second part allows you to add more blocks to your site. This is shown in the screenshot to the right. Ad- ministration of these fields is explained on Page 8 of this tutorial. nukesop.pub Eff:Oct04 Page 6 of 13
  • 7. “Blocks” Administration (Continued) First let’s look at how to edit the blocks you cur- rently have on your page. The image to the right is similar to your “Blocks Administration” page. Each block you have on your site is listed in the chart. The blocks are listed as they appear on your site. The blocks that are on the left side are listed first, with blocks on the top, bottom and right sides listed after. For example, the “Menu” block is the top block on the left side of the page, so it is listed in the chart first. You may rearrange the order of the blocks by clicking the up or down arrows in the weight col- umn. This will reorder how the blocks are dis- played on your site. Note that the top block will not have an up arrow, and the bottom block will not have a down arrow. You may also edit each of your blocks. You may change the side of the page the block appears on, the name of the block, whether the block is active, and the visitors the block is shown to. To edit your blocks, click the edit link in the far right column of the block yo u would like to edit. The “Title” of the block is the text that is shown in the title part of the block. In the example to the right, the title of the block is “Menu.” Filename is the actual name of the file. This should only be changed if you want to change the type of block you wish to display. Files will be covered in the “Adding New Blocks” section. Position determines whe re on your page the block will be displayed. You may choose to display the block on the Left, Top, Bottom, or Right side of a page. Note that the Top, Bottom, and Right blocks may not appear on every page. “Activate” shows the block on your site. This may be turned on or off as often as you like. “Who can view this?” selects which visitors will see the block. You may wish to create certain blocks for certain visitors. For example, if you are allowing your visitors to register for an account, you may wish to create a block that encourages visitors to register for an account, then set the “Who can view this?” to “Anonymous Users.” nukesop.pub Eff:Oct04 Page 7 of 13
  • 8. “Blocks” Administration (Continued) You may also choose to remove blocks from your site. This is done by clicking the “Deactivate” or “Delete” links next to the block you wish to remove. Deactivating a block will remove it from your site, but will keep it in your blocks list as “Inactive.” No- tice that all “Right” blocks in the screenshot above are listed as “Inactive.” Deleting a block will remove it from your site, and your list of blocks. There is no way to undo this ac- tion, so if you plan on removing a block, then add- ing it again later (For example, posting a message during the holidays) you may wish to deactivate the block instead of deleting it. If you wish to add more blocks to your site, you may use the “Add a New Block” form on the main blocks administration page. The “Add a New Block” form is very similar to the “Edit Block” form, but has a few extra options. “Title”, “Position”, “Activate”, and “Who can View This?” all function the same as the “Edit Page” screen. “Filename” and “Content” are for regular blocks and “RSS/RDF file URL:” and “Refresh Time” are for News Feeds. If you would like to use a previously made block, use the “Filename” block to pick one. Depending on the modules you are using, some of them may not apply to your site. If you would like to add a block that displays some text, such as your address, you may use the “Content” field. The text should be HTML format- ted (see the tutorial at the end of this document). The “RSS/RDF file URL:” is used to add news from another site, such as Slashdot, theBubbler, or Yahoo! News to your site. You may either enter the URL for the news feed in the “RSS/RDF file URL:” box, or select one of the preset news feeds from the dropdown to the right of the “RSS/RDF file URL:” box. There are many sites, such as www.syndic8.com, that provide news feeds. Your site may use any of the feeds marked “XML.” nukesop.pub Eff:Oct04 Page 8 of 13
  • 9. “Blocks” Administration (Continued) “Refresh Time” determines how frequently your site will check the news feed for new in- formation. For example, if the news feed you have on your page is updated daily, you should set this option to 24 hours. You may set it to 1/2 hour, but since the feed is updated Uploading Images to your site The “Upload Images” administration section allows you to upload images to your website. To upload an image, click the “Browse” but- ton. Use the window that pops up to find the image on your computer. When you find the image, click “Open.” Finally, click the “Add image” button next to the browse button. The image will be uploaded to PHPNuke. Directly under the “Add Image” form, there is a list of all images you have added to your site. Please note that the image name in this list will not be the same as the name of the image you uploaded; PHPNuke renames the files. If you uploaded an image named “flowerpicture.jpg” from your own files, PHPNuke may rename the file to “image2.jpg”. Clicking “Preview” next to the listed images will show you the image you have uploaded. To have the image appear on your pages, HTML must be added. Each image is listed with the HTML code necessary to add the image to your site and a link to preview the image. We recom- mend copying the block of code that says <img src=“userimages/image2.jpg” border=“0”> and past- ing it into your pages when adding images. You may change where the image ap- pears on your page by adding an “alignment” tag. To align an image on the right of a page, add align=“right” before the final bracket of the tag. <img src=“userimages/image2.jpg” border=“0” align=“right”> To align an image on the left of a page, add align=“left” before the final bracket of the tag. <img src=“userimages/image2.jpg” border=“0” align=“left”> nukesop.pub Eff:Oct04 Page 9 of 13
  • 10. Adding and Editing Your Site’s Pages There are two ways to add, edit, or delete the pages on your site. One method is to use the KKA Content Pages section of the Admin section. A directory of all your site’s pages will be displayed. If you wish to add a new page, click the “Add a page” link above the directory list. “Priority” determines how your pages will be organized. Higher priority pages will be listed above lower pages. To have your pages listed alphabetically, simple set them all to “0”. “Page Title” determines the name that will ap- pear at the top of the page and in menus. If you wish to add text after the title of the page, but before the content of the page, enter it in the “Page Subtitle” field. “List this page under” is for organizing your pages. It may help to think of your site as a di- rectory. The main pages with more generalized content are listed in the menu of your page. Pages that have more specific content are listed under the main pages. For example, if you have an Automotive website, one of your main pages might be called “Tires.” It would be listed in the menu of the site. Once a visitor views the “Tires” page, they would be shown links to sub pages in the “Tires” section, such as “Winter Tires” or “Racing Tires.” You may expand this further by adding sub pages to the “Winter Tires” section, such as “15 inch Winter Tires” or “20 inch Winter Tires.” Using this method, you will make your site more friendly to your visitors. The “Page Text” field contains the actual text that will be displayed on your site. The text in this field needs to be HTML formatted (See the tutorial at the end of this document) When you have finished entering the page’s information, click the “Create Page” Button at the bot- tom. nukesop.pub Eff:Oct04 Page 10 of 13
  • 11. Adding and Editing Your Site’s Pages (Continued) To edit one of your existing pages, click the “Edit” link next to page you wish to edit. The form that is displayed is nearly identical to the “Add a Page” form and it works the same way. You may change the information, then click the “Save Changes” link at the bottom when you are fin- ished. If you would like to remove a page from your site, click the “Delete” link next to the page. You will be shown the contents of the page, and will be asked if you really want to delete it. If you do, click the “YES” button, if not, click “NO,” you will be taken to the previous page. Another way to manage your pages As mentioned earlier, there is another way to edit your pages, which may be eas- ier for you than the above method. First, make sure you are logged in as an administrator. Next, use the navigation of your site to find the page you wish to edit. For example, if you wish to edit your “Contact Us” page, click the “Contact Us” page in the menu. Notice that there are two extra lines at the bottom of the page that only administra- tors receive. The Edit, Delete, and Add functions on the page are similar to the admin section. The major differ- ence is that if you are using Internet Explorer, you may edit the text of the page using a special tool- bar that works similar to a word processor. nukesop.pub Eff:Oct04 Page 11 of 13
  • 12. Another way to manage your pages (Continued) Just as in a word processor, you may highlight text and click icons in the toolbar to make the text bold, italic, or underlined. You may also create bulleted lists, indent the text and change colors. If you don’t know what a particular icon does in the toolbar, hold your mouse over the icon, and a short description will be displayed. If you are using the word processing view and wish to work with raw HTML, click the < > icon at the top of the word processor. You will then be able to view and edit the HTML coding. Clicking this icon in the HTML view will switch back to the word processor. nukesop.pub Eff:Oct04 Page 12 of 13
  • 13. HTML Quick Reference To have these effects appear on your pages, copy the tag and replace the content in red. Bold: <b>text between these tags will appear bold</b> Italic: <i>text between these tags will appear italic</i> Email Link: <a href="mailto:johndoe@domain.com">johndoe@domain.com</a> After the mailto:, enter your email address. Enter it again between the ></a>. This will appear as the text of your link: johndoe@domain.com Page Link: <a href="/modules.php?name=KKA_Content&pa=detail&cid=42">About Us</a> Enter the page URL between the " ".. Enter text describing the page between the ></a>. Text entered here will appear as the page name in your text: About Us When creating links to external websites, you must write the domain like this: <a href=“http://www.domain.com” target=“new”>Website Name</a> The target=“new” will cause the external website to open in a new browser window. Some characters in HTML must be written with special codes: &= &amp; Example: Thank you & come again must be written as Thank you &amp; come again “”=&quot; Example: Our new “Specials” must be written as Our new &quot;Specials&quot; HTML Example If you want the text on your pages to appear like this: Welcome to our new website! Visit our Capabilities page to see what w e can do for you! Learn more about our company at the Company Profile page. See us at the Trade Show this month! Write the text in a word processing program like this: Welcome to our new website! Visit our Capabilities page to see what we can do for you! Learn more about our company at the Company Profile page. See us at the Trade Show this month! Add HTML to create effects and links, then past into the page editor: <b>Welcome to our new website!</b> Visit our <a href=“/modules.php?name=KKA_Content&pa=detail&cid=42”>Capabilities</a> page to see what we can do for you! Learn more about our company at the <a href=“/modules.php?name=KKA_Content&pa=detail&cid=57”>Company Profile</a> page. See us at the <a href=“”http://www.tradeshow.com” target=“new”>Trade Show</a> this month! nukesop.pub Eff:Oct04 Page 13 of 13