
Recomendados
Mais conteúdo relacionado
Mais de tphalen
Mais de tphalen (17)
Último
Último (20)
Review: Hitec X2 AC Pro Multi-Charger
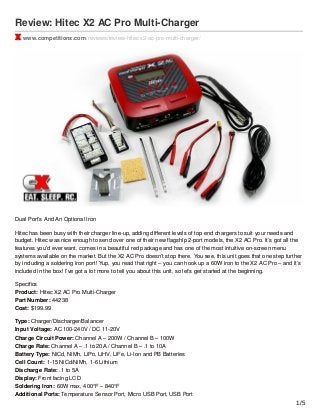
- 1. Review: Hitec X2 AC Pro Multi-Charger www.competitionx.com/reviews/review-hitec-x2-ac-pro-multi-charger/ Dual Port’s And An Optional Iron Hitec has been busy with their charger line-up, adding different levels of top end chargers to suit your needs and budget. Hitec was nice enough to send over one of their new flagship 2-port models, the X2 AC Pro. It’s got all the features you’d ever want, comes in a beautiful red package and has one of the most intuitive on-screen menu systems available on the market. But the X2 AC Pro doesn’t stop there. You see, this unit goes that one step further by including a soldering iron port! Yup, you read that right – you can hook up a 60W iron to the X2 AC Pro – and it’s included in the box! I’ve got a lot more to tell you about this unit, so let’s get started at the beginning. Specifics Product: Hitec X2 AC Pro Multi-Charger Part Number: 44238 Cost: $199.99 Type: Charger/Discharger/Balancer Input Voltage: AC 100-240V / DC 11-20V Charge Circuit Power: Channel A – 200W / Channel B – 100W Charge Rate: Channel A – .1 to 20A / Channel B – .1 to 10A Battery Type: NiCd, NiMh, LiPo, LiHV, LiFe, Li-Ion and PB Batteries Cell Count: 1-15 NiCd/NiMh, 1-6 Lithium Discharge Rate: .1 to 5A Display: Front facing LCD Soldering Iron: 60W max, 400°F – 840°F Additional Ports: Temperature Sensor Port, Micro USB Port, USB Port 1/5
- 2. What’s In The Box Because this is their ‘Big Boy’ 2-port unit, Hitec has loaded the box with more than just a pretty red charger and instruction manual. You also get a universal balance board, a XH-only balance board, a Deans-style charge lead, an XT60 charge lead and two blank charge leads to attach whatever connector you need. A 60W soldering iron is also included, however it comes unassembled so that you can build it with either a pencil or chisel tip – both of which are included. A soldering stand and cleaning sponge wrap up the ingredients. The Charger Ok, the box is open, the goods are out – let’s talk a bit about the charger. On the top there is a large LCD display surrounded by a black face with 5 function buttons just below it. The screen displays both the A and B channels in a split-screen setup; Channel A up top and Channel B on the bottom. Both channels remain on the display at all times. External On the front of the charger you will notice the left and right charging port setups, both exactly the same. Each side includes a 4mm positive and negative banana plug port, 6-pin balance connector port and a Temp port. Stationed between them is a USB port (great for charging things like your phone or GoPro), a micro USB port (for powering a PC Link or, one of my favorite items, Hitec’s WiFi Module) and a circular connector for the soldering iron. While the left and right sides of the charger don’t have any input areas, they do have large vent openings as well as a circular port for the cooling fans. These fans do a great job of keeping the X2 AC Pro cool even under heavy loads. The back of the X2 AC Pro has the AC power cord input as well as the DC input port. Internal Outside complete, let’s move on to the 5 function buttons and see what they do. The CH A and CH B button flips through the charging channels; the channel being used at the moment will be highlighted on the screen. The BATT/PROG button allows you to select which battery type you are using. In addition, you can also cycle through to the Battery Meter, Battery Resistance, Battery Memory and System Settings sections of the charger. This button is also used to stop the charging process. The DEC/INC button is used to cycle up or down through the menus to alter the values. It is also used to check the status of individual cells during the charging process. The ENTER button starts or resumes the charging process as well as confirming any value changes within the settings. Remember how I said the menus were very intuitive? I basically pulled the charger out of the box and within a minute was blazing through the menu to set it up – it’s really that easy. 2/5
- 3. Now that we’ve given you a basic overview of the X2 AC Pro, let’s dig even deeper into what makes it so good. First off, the X2 AC Pro has two different maximum charge rates on its two channels; 20A on Channel A (currently the highest charge rate Hitec offers on any of its models) and 10A on Channel B. It is capable of handling all the normal cell types – NiCd, NiMh, LiPo, LiFe, Li-Ion – but is also capable of handling the newer LiHV packs. The X2 AC Pro has the Charge, Fast Charge, Discharge and Balance functions as well as the all-important Storage function. In the System Settings, you can adjust things like Capacity Cut-Off, Temp Cut-Off (if you have the optional Temp Meter), Rest Time during battery cycling as well as having a Safety Timer. Additional systems include a built-in Battery Meter and Battery Resistance Monitor. The Battery Meter lets you to check your battery’s total voltage, highest voltage, lowest voltage and the voltage of each cell. The Battery Resistance Monitor checks the battery’s total internal resistance, highest total resistance, lowest total resistance and the resistance of each cell. Both of these are great features to help you monitor the health of your packs. The X2 AC Plus comes loaded with PC Control Software, aka “Charger Master”. This software lets you control ever facet of the X2 AC Pro right through your computer. It also lets you monitor a packs voltage, cell voltage and other charging data using real-time graphs. You can also use the Charge Master to update the firmware on the X2 AC Pro! Finally, there’s the soldering iron attachment. As I mentioned before, the iron comes unassembled, allowing you to build it with either a pencil or chisel tip depending on what you are soldering. Assembly is easy; insert the desired tip into the holder and attach the cord to the X2 AC Pro charger. To operate, select Channel A and use the DEC/INC button to cycle through to the ELECTRI C IR setting. You can set the desired tip temperature and the screen will show you two numbers; the ‘Set’ temp and the ‘Real’ temp. There is even an option to switch between Celsius and Fahrenheit. Performance We’ve talked about everything the X2 AC Pro can do, but how does it actually work? For this test, I charged multiple packs; a 4S LiPo for my 1:8 scale buggy and a 2S shorty pack for my 1:10 scale buggy – both being charged at the same time. Charging was easy; connect one end of the charging lead to charger, then connect the other end to the battery. Select CH A (port 1, or Channel A), set it to LiPo/2S/15A (starting ‘low’), then press start. Select CH B (port 2, or Channel B), set it to LiPo/4S/10A and press start. Immediately the X2 AC Pro did its pre-charge check to make sure everything was good, then proceeded to start the charging process. A few minutes in, I cycled the X2 over to the Battery Meter and Battery Resistance to check the condition of my 2S pack. This is a well-used LiPo, so I was half-expecting the charger to tell me it was in need of replacement, but instead showed me the pack’s voltage was good (you can see the voltage on each cell). It also informed me that the pack had decent Internal Resistance as well. I was able to gather the same information from the 4S pack, data that will certainly be useful from here on out with all my batteries. I noticed that, while I was charging at close to max amperage, the cooling fans kicked on a couple times. That’s good to see as I’d hate to have a melt-down in my pit area when there are two perfectly good fans there to keep temps under control. 3/5
- 4. Conclusion I’m a big fan of Hitec’s chargers; I have them at home and in my pit bag. Their simple menu is extremely easy to use and the dual-port functionality makes charging multiple batteries very simple. I wasn’t sure about the soldering iron since I have a full-blown iron setup at home, but I packed it away in my pit bag just in case. That turned out to be a good thing; the second time at the track, a local racer needed to solder a motor wire back on. I became the hero of the moment – thanks Hitec! Dual Port's And An Optional Iron Hitec has been busy with their charger line-up, adding different levels of top end chargers to suit your needs and budget. Hitec was nice enough to send over one of their new flagship 2-port models, the X2 AC Pro. It's got all the features you'd ever want, comes in a beautiful red package and has one of the most intuitive on-screen menu systems available on the market. But the X2 AC Pro doesn't stop there. You see, this unit goes that one step further by including a soldering iron port! Yup, you read that… Bottom Line: If you have the budget, I highly recommend this charger to help keep your batteries in tip-top condition. I know not everyone will need the soldering iron, but it does come in handy if you don't already have one. The footprint is compact for a charger with this many features and, as I said before, it looks great! Connect Hitec, www.hitecrcd.com Where to Buy 4/5
- 5. 5/5