Resin Cable Joints, Multicore Power Cables XLPE PILC - Branch Joints - Cable Joint Instruction
•
1 like•5,938 views

Resin Cable Joints, Multicore Power Cables XLPE PILC - Branch Joints - Cable Joint Instruction

Recommended
Recommended
More Related Content
What's hot
What's hot (20)
Viewers also liked
Viewers also liked (19)
Similar to Resin Cable Joints, Multicore Power Cables XLPE PILC - Branch Joints - Cable Joint Instruction
Similar to Resin Cable Joints, Multicore Power Cables XLPE PILC - Branch Joints - Cable Joint Instruction (20)
More from Thorne & Derrick International
More from Thorne & Derrick International (20)
Recently uploaded
Recently uploaded (20)
Resin Cable Joints, Multicore Power Cables XLPE PILC - Branch Joints - Cable Joint Instruction
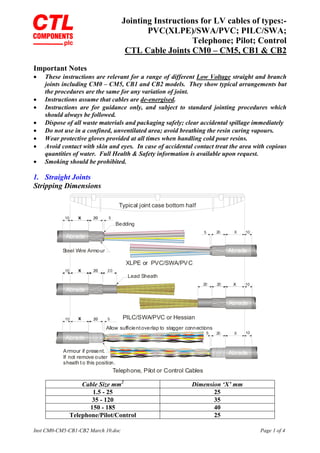
- 1. Jointing Instructions for LV cables of types:- PVC(XLPE)/SWA/PVC; PILC/SWA; Telephone; Pilot; Control CTL Cable Joints CM0 – CM5, CB1 & CB2 Important Notes • These instructions are relevant for a range of different Low Voltage straight and branch joints including CM0 – CM5, CB1 and CB2 models. They show typical arrangements but the procedures are the same for any variation of joint. • Instructions assume that cables are de-energised. • Instructions are for guidance only, and subject to standard jointing procedures which should always be followed. • Dispose of all waste materials and packaging safely; clear accidental spillage immediately • Do not use in a confined, unventilated area; avoid breathing the resin curing vapours. • Wear protective gloves provided at all times when handling cold pour resins. • Avoid contact with skin and eyes. In case of accidental contact treat the area with copious quantities of water. Full Health & Safety information is available upon request. • Smoking should be prohibited. 1. Straight Joints Stripping Dimensions X X X X X X X X 20 20 20 20 20 20 20 5 20 5 20 5 X20 5 X20 Typical joint case bottom half XLPE or PVC/SWA/PVC PILC/SWA/PVC or Hessian Telephone, Pilot or Control Cables Bedding Steel Wire Armour Armour if present. If not remove outer sheath to this position. Lead Sheath Allow sufficientoverlap to stagger connections 10 10 10 Abrade Abrade Abrade Abrade Abrade Abrade 10 10 10 Cable Size mm2 Dimension ‘X’ mm 1.5 - 25 25 35 - 120 35 150 - 185 40 Telephone/Pilot/Control 25 Inst CM0-CM5-CB1-CB2 March 10.doc Page 1 of 4 WWW.CABLEJOINTS.CO.UK THORNE & DERRICK UK TEL 0044 191 490 1547 FAX 0044 477 5371 TEL 0044 117 977 4647 FAX 0044 977 5582 WWW.THORNEANDDERRICK.CO.UK
- 2. 2. 2. Branch Joints Stripping Dimensions XX 2020 5 5 X20 Main Cable Branch Cable Bedding Steel Wire Armour Typical lower half of joint case (plan view) 10 Abrade Abrade Abrade 10 Main Cable Size mm2 Dimension ‘X’ mm 1.5 - 25 25 35 40 NB. The above joint may be constructed without cutting through the mains cable (“uncut main”) using the appropriate connectors. In this case remove the outer sheath, armours and bedding to the above dimensions. Both the service branch and mains cables may be 2, 3 or 4 core. 3. Transition Joints When jointing two different cable types, for example XLPE to PILC refer to the stripping dimensions for the straight joints and prepare them accordingly. Core separators Slide the open slots of the two core separators into one another to form a four-way cross Inst CM0-CM5-CB1-CB2 March 10.doc Page 2 of 4 Shell sizes CM0, CM1, CM2, CM3, CB1 and CB2 have plastic core separators and a filler cap included in the plastic parts of the shells. Break them away and use as a cross to separate the core connectors. The cross is formed as illustrated above. The filler cap should be used to close the mould after resin has been poured. Shell sizes CM4 and CM5 handle larger cables where core separators are not required.
- 3. Jointing the Cables Clean and decrease the armours and lead sheath (if present) and abrade the outer sheath from the armours to a distance of 10mm outside the joint case. When jointing the cables use the connectors (if provided) or other approved types. For power cables use phase separators (if supplied) in the vicinity of the connectors and in any event ensure approx. 10 mm separation between connectors. A typical connection for a branch joint is shown below using mechanical connectors. Branch (if required) Main cable Main cable Ensure that the connectors are separated by approx. 10mm. Applying the Earth Lead across the XLPE/SWA/PVC Joints Branch Main cable Main cable Remove sleeve from each end of earth strap leaving centre section across joint 2 1 Fold back braid after one full turn of spring. Remove the insulation from each end of the earth strap as shown. Attach the braid to the main cable armours using constant force spring 1. When attaching the ends of the braid allow the braid to extend beyond the spring and after applying one full turn fold the braid back over the spring, 2, as shown. Cut off any excess. For straight joints simply use spring 1 on each side of the joint. Applying the Earth Lead across the PILC/SWA Joints Apply the braid as shown using the smaller springs on the lead. Fold either end of the braid back on itself as shown in the drawing above and cut off any excess. If a branch cable is present connect the braid to this cable as described above. Completing the Joint After making the earth braid connections place a half of the joint case around the joint positioning centrally. Cut the ends of the case to suit the cables using a hacksaw. Make sure that the connectors are at least 10mm apart. Inst CM0-CM5-CB1-CB2 March 10.doc Page 3 of 4
- 4. a) Straight Joint Cut Here to accept cable Now place the two joint halves around the joint and snap together. b) Branch Joint General Instruction Use PVC tape at the cable entry points to seal the joint case. Mix the resin as instructed on the resin pack and pour into the joint case until the case is completely full. Finally fit the lid to the filler hole. Ensure cable joint is level and both cables and joint are supported independently. For applications up to 1000 volts, the joints may be filled under load conditions. The completed joint should be left uncovered before back-filling for two hours to allow the resin to fully cure. Ensure that there is no movement of the cable cores during curing of the resin. CTL Components plc Falcon House, 19 Deer Park Road, London SW19 3UX. Tel: +44 (0) 20 8545 8700 Fax: +44 (0) 20 8540 0034 E-mail info@ctl-components.com www ctl-components.com Inst CM0-CM5-CB1-CB2 March 10.doc Page 4 of 4 WWW.CABLEJOINTS.CO.UK THORNE & DERRICK UK TEL 0044 191 490 1547 FAX 0044 477 5371 TEL 0044 117 977 4647 FAX 0044 977 5582 WWW.THORNEANDDERRICK.CO.UK