

Recomendados
Mais conteúdo relacionado
Semelhante a Aplicación Android con acceso a base de datos
Semelhante a Aplicación Android con acceso a base de datos (20)
Mais de Sandy Montoya Reyes
Mais de Sandy Montoya Reyes (20)
Aplicación Android con acceso a base de datos
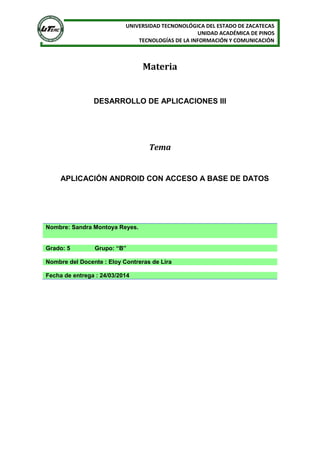
- 1. UNIVERSIDAD TECNONOLÓGICA DEL ESTADO DE ZACATECAS UNIDAD ACADÉMICA DE PINOS TECNOLOGÍAS DE LA INFORMACIÓN Y COMUNICACIÓN Materia DESARROLLO DE APLICACIONES III Tema APLICACIÓN ANDROID CON ACCESO A BASE DE DATOS Nombre: Sandra Montoya Reyes. Grado: 5 Grupo: “B” Nombre del Docente : Eloy Contreras de Lira Fecha de entrega : 24/03/2014
- 2. UNIVERSIDAD TECNONOLÓGICA DEL ESTADO DE ZACATECAS UNIDAD ACADÉMICA DE PINOS TECNOLOGÍAS DE LA INFORMACIÓN Y COMUNICACIÓN 1-Entrar al programa de eclipse das clic en FILE despues NEW despues ANDROID APLICATION PROJECT:
- 3. UNIVERSIDAD TECNONOLÓGICA DEL ESTADO DE ZACATECAS UNIDAD ACADÉMICA DE PINOS TECNOLOGÍAS DE LA INFORMACIÓN Y COMUNICACIÓN 2-ahora te aparece la vennta para que le agregues los datos de el nombre de tu proyecto y el nombre del packete o sol es asignado pr el mismo programa y clic en NEXT hasta que te aparesca la ventan de FINISH.
- 4. UNIVERSIDAD TECNONOLÓGICA DEL ESTADO DE ZACATECAS UNIDAD ACADÉMICA DE PINOS TECNOLOGÍAS DE LA INFORMACIÓN Y COMUNICACIÓN
- 5. UNIVERSIDAD TECNONOLÓGICA DEL ESTADO DE ZACATECAS UNIDAD ACADÉMICA DE PINOS TECNOLOGÍAS DE LA INFORMACIÓN Y COMUNICACIÓN Despues te aparecera el nombre de tu clase y el MAIN Activity en el cual le asiganremos este codigo que package com.javaya.proyecto015; import android.app.Activity; import android.content.ContentValues; import android.database.Cursor; import android.database.sqlite.SQLiteDatabase; import android.os.Bundle; import android.view.Menu; import android.view.View; import android.widget.EditText; import android.widget.Toast; public class MainActivity extends Activity { private EditText et1, et2, et3, et4; @Override protected void onCreate(Bundle savedInstanceState) { super.onCreate(savedInstanceState); setContentView(R.layout.activity_main); et1 = (EditText) findViewById(R.id.editText1); et2 = (EditText) findViewById(R.id.editText2); et3 = (EditText) findViewById(R.id.editText3); et4 = (EditText) findViewById(R.id.editText4); } @Override public boolean onCreateOptionsMenu(Menu menu) { // Inflate the menu; this adds items to the action bar if it is present. getMenuInflater().inflate(R.menu.activity_main, menu); return true; } public void alta(View v) { AdminSQLiteOpenHelper admin = new AdminSQLiteOpenHelper(this, "administracion", null, 1); SQLiteDatabase bd = admin.getWritableDatabase(); String dni = et1.getText().toString(); String nombre = et2.getText().toString(); String colegio = et3.getText().toString(); String nromesa = et4.getText().toString(); ContentValues registro = new ContentValues(); registro.put("dni", dni); registro.put("nombre", nombre); registro.put("colegio", colegio); registro.put("nromesa", nromesa); bd.insert("votantes", null, registro); bd.close(); et1.setText(""); La primera línea de código es el nombre de nuestro paquete. Los import son nuestras librerías. Con ayuda del getText guarda los datos que fueron ingresados en los campos. El set text“ ” nos limpia los campos. Este código sirve para que se crean las tablas.
- 6. UNIVERSIDAD TECNONOLÓGICA DEL ESTADO DE ZACATECAS UNIDAD ACADÉMICA DE PINOS TECNOLOGÍAS DE LA INFORMACIÓN Y COMUNICACIÓN et2.setText(""); et3.setText(""); et4.setText(""); Toast.makeText(this, "Se cargaron los datos de la persona", Toast.LENGTH_SHORT).show(); } public void consulta(View v) { AdminSQLiteOpenHelper admin = new AdminSQLiteOpenHelper(this, "administracion", null, 1); SQLiteDatabase bd = admin.getWritableDatabase(); String dni = et1.getText().toString(); Cursor fila = bd.rawQuery( "select nombre,colegio,nromesa from votantes where dni=" + dni + "", null); if (fila.moveToFirst()) { et2.setText(fila.getString(0)); et3.setText(fila.getString(1)); et4.setText(fila.getString(2)); } else Toast.makeText(this, "No existe una persona con dicho dni", Toast.LENGTH_SHORT).show(); bd.close(); } public void baja(View v) { AdminSQLiteOpenHelper admin = new AdminSQLiteOpenHelper(this, "administracion", null, 1); SQLiteDatabase bd = admin.getWritableDatabase(); String dni = et1.getText().toString(); int cant = bd.delete("votantes", "dni=" + dni + "", null); bd.close(); et1.setText(""); et2.setText(""); et3.setText(""); et4.setText(""); if (cant == 1) Toast.makeText(this, "Se borró la persona con dicho documento", Toast.LENGTH_SHORT).show(); else Toast.makeText(this, "No existe una persona con dicho documento", Toast.LENGTH_SHORT).show(); } Consulta los dato de la bdd y dependiendo de la clave es de donde te buscado de te busca los campos. Te agarra todos los datos y te los elimina de la tabla votantes que contengan el dni . Y ya eliminado te manda mensaje y si no existe igual te manda mensaje con el Toas.make.Text.
- 7. UNIVERSIDAD TECNONOLÓGICA DEL ESTADO DE ZACATECAS UNIDAD ACADÉMICA DE PINOS TECNOLOGÍAS DE LA INFORMACIÓN Y COMUNICACIÓN public void modificacion(View v) { AdminSQLiteOpenHelper admin = new AdminSQLiteOpenHelper(this, "administracion", null, 1); SQLiteDatabase bd = admin.getWritableDatabase(); String dni = et1.getText().toString(); String nombre = et2.getText().toString(); String colegio = et3.getText().toString(); String nromesa = et4.getText().toString(); ContentValues registro = new ContentValues(); registro.put("nombre", nombre); registro.put("colegio", colegio); registro.put("nromesa", nromesa); int cant = bd.update("votantes", registro, "dni=" + dni, null); bd.close(); if (cant == 1) Toast.makeText(this, "se modificaron los datos", Toast.LENGTH_SHORT) .show(); else Toast.makeText(this, "no existe una persona con dicho documento", Toast.LENGTH_SHORT).show(); } } El código que vimos anteriormente nos genera la siguiente imagen pero primero buscamos la carpeta clic en activity_main.xml Te agarra los datos de administrados y los busca y si existe la persona te muestro dos los registros y se modifican y si no existe te manda un mensaje de que no existe.
- 8. UNIVERSIDAD TECNONOLÓGICA DEL ESTADO DE ZACATECAS UNIDAD ACADÉMICA DE PINOS TECNOLOGÍAS DE LA INFORMACIÓN Y COMUNICACIÓN
- 9. UNIVERSIDAD TECNONOLÓGICA DEL ESTADO DE ZACATECAS UNIDAD ACADÉMICA DE PINOS TECNOLOGÍAS DE LA INFORMACIÓN Y COMUNICACIÓN Se crea nuestra nueva clase clic en new Clic en Class Y le asignas el nombre de tu clase que se va a llamar AdminSQLiteOpenHelper Y clic en finish y automáticamente aparecerá nuestra clase. Se inserta el siguiente código que se te muestra a continuacion import android.content.Context; import android.database.sqlite.SQLiteDatabase; import android.database.sqlite.SQLiteDatabase.CursorFactory; import android.database.sqlite.SQLiteOpenHelper; public class AdminSQLiteOpenHelper extends SQLiteOpenHelper { public AdminSQLiteOpenHelper(Context context, String nombre, CursorFactory factory, int version) { super(context, nombre, factory, version); } @Override public void onCreate(SQLiteDatabase db) { db.execSQL("create table votantes(dni integer primary key, nombre text, colegio text, nromesa integer)"); } @Override La primera línea de código es el nombre de nuestro paquete. Los import son nuestras librerías. Esta clase AdminSQLiteOpenHelper sirve Para utilizer la base de datos mediante SQL de forma sencilla y utilizando pocos recursos de sistemas.
- 10. UNIVERSIDAD TECNONOLÓGICA DEL ESTADO DE ZACATECAS UNIDAD ACADÉMICA DE PINOS TECNOLOGÍAS DE LA INFORMACIÓN Y COMUNICACIÓN public void onUpgrade(SQLiteDatabase db, int versionAnte, int versionNue) { db.execSQL("drop table if exists votantes"); db.execSQL("create table votantes(dni integer primary key, nombre text, colegio text, nromesa integer)"); }} Ya que no nos marca errores nuestro código lo ejecutamos con nuestro emulador nos esperamos un momento.
- 11. UNIVERSIDAD TECNONOLÓGICA DEL ESTADO DE ZACATECAS UNIDAD ACADÉMICA DE PINOS TECNOLOGÍAS DE LA INFORMACIÓN Y COMUNICACIÓN Aparecerá lo siguiente imagen: