1. Android Device Automation : Sandip Ganguli
Introduction
About UIAutomator
The UIAutomator is a testing framework in android platform which is used to test android
application through user interface (UI) efficiently by creating automated functional testcases.
While using uiautomator you need not to know the internal details of the application under tests,
therefore it offers great flexibility to create your automated testcases for different third party
applications as well. UIAutomator is available from the jelly bean release of android operating
systems.
How UIAutomator works
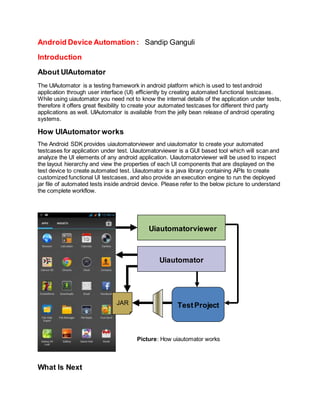
The Android SDK provides uiautomatorviewer and uiautomator to create your automated
testcases for application under test. Uiautomatorviewer is a GUI based tool which will scan and
analyze the UI elements of any android application. Uiautomatorviewer will be used to inspect
the layout hierarchy and view the properties of each UI components that are displayed on the
test device to create automated test. Uiautomator is a java library containing APIs to create
customized functional UI testcases, and also provide an execution engine to run the deployed
jar file of automated tests inside android device. Please refer to the below picture to understand
the complete workflow.
What Is Next
Picture: How uiautomator works
UIAutomator
Viewer
Uiautomatorviewer
Uiautomator
TestProjectJAR
2. In next chapter you will get to know the required tools and other setup to start automation.
Getting Started:
Setup Development Environment
Before getting started you need to install the required software into your development machine.
Please follow the below process step by step as explained.
1. Download ADT (Android Developer Tools) bundle and unzip into your system. After
unzip check that it contains two main folder called eclipse and sdk. Inside this sdk folder
you will find all required tools and java library to create uiautomator automated tests.
<link= http://developer.android.com/sdk/index.html>
2. Download latest version of Apache ANT and unzip the folder. You are going to use ant
build of test project to create jar file which will be deployed into android device.
<link=http://ant.apache.org/bindownload.cgi>
3. Make sure the android version of device is 4.2.1 or higher, since uiautomator released
with jelly bean version of android. Before connecting android device with development
machine go to Settings -- Developer options and enable “USB debugging” & “Stay
awake” options. In case you do not see the “Developer options” under Settings then go
to “About phone” and continue click “Build number” to enable “Developer options”. Now
connect your device with PC and install if any device driver required. You can search for
device driver from the web site of device manufacturer.
Scan User Interface ofAUT
One of the important aspects of any UI automation is to locate or search element from graphical
user interface (GUI). Here we are going to explore how uiautomatorviewer scan the application
UI and how to search element in automation code using various search criteria. Open command
prompt and move to sdktools directory of ADT bundle and run “.uiautomatorviewer.bat”.
Analyze Android System Settings UI:
Open the System Settings window from android device and start capture the UI using
uiautomatorviewer screenshot button. Now start analyzing the user interface. The ListView
marked in below picture is the container which contains all child options as separate block
called LinearLayout. And also note that ListView should have scrolling facility which is marked
as scrollable=true attribute. The marked LinearLayout have three child elements as
ImageView, TextView & Switch. Now select each element from uiautomatorviewer and analyze
the attributes for all. Note that for TextView and Switch elements text attribute have some
value. You can search for other elements where content-desc attribute will have some value.
Make a note in future you are going to use these attributes frequently to search or locate
elements from user interface. We will explain more about this in consecutive chapters.
3. Create UIAutomator Project
Open Eclipse from eclipse folder of ADT bundle. Follow the below steps to create the first
uiautomator project.
1. Create a new Java project in Eclipse, and give your project name as UITestProject.
Now create a package with name com.android.uitest under src folder and create a
class with name AppTest inside the package. Note that we encourage keeping the
same name as tutorial to make the rest of the work simple for consecutive chapters.
2. From the Project Explorer, right-click on the UITestProject , then select Properties >
Java Build Path, and do the following steps:
a. Click Add Library > JUnit then select JUnit3 to add JUnit support.
Picture: Analyzing System Settings User Interface
4. b. Click Add External JARs... and navigate to the sdkplatforms directory of ADT
bundle and both the uiautomator.jar and android.jar files.
3. Create a simple test which will press the home button of the device and open Apps
window from home screen. Demo program is given below with final setup screenshot.
Build, Deploy and Run UIAutomator Test
Now you are all set to deploy and run your first uiautomator test project into android device.
Make sure device is connected with development machine. Open a command prompt and move
to the directory sdk of ADT bundle. Now execute the below commands step by step and see
the test project working in your device. At the end you can create a batch file with all below
given commands and save it inside sdk of ADT bundle for future use. Make sure prepend call
with all commands when create the batch file.
1. Create the build config files to build deployable JAR. Here projName will be
UITestProject and projDirPath will be project directory path.
CMD > .toolsandroid create uitest-project -n <projName> -t 1 -p <projDirPath>
2. Now move to your project directory and create the output JAR
CMD > cd <projDirPath>
CMD > <ANT bin directory>ant build
CMD > cd <ADT bundle directory>sdk
3. Now deploy test JAR into android device and run the test
CMD > .platform-toolsadb push <projDirPath>binUITestProject.jar /data/local/tmp/
CMD > .platform-toolsadb shell uiautomator runtest UITestProject.jar -c
com.android.uitest.AppTest
What Is Next
In next chapter you will get to know important classes and APIs of uiautomator with example.
Picture: Final project setup
import com.android.uiautomator.core.*;
import
com.android.uiautomator.testrunner.UiAutomatorTestCase;
public class AppTest extends UiAutomatorTestCase {
public void testDemo() throws
UiObjectNotFoundException {
getUiDevice().pressHome();
UiObject appsButton = new UiObject(new
UiSelector().description("Apps"));
appsButton.clickAndWaitForNewWindow();
}
}
5. UIAutomator APIs & Usage:
ImportantUIAutomator APIs and Usage
We are all set to explore the important Classes and APIs of UIAutomator to go more in-depth.
UIDevice:In simple words it is used to perform device level actions such as pressing Home
or Menu buttons, rotate or fixed device orientation, accessing D-Pad hardware buttons and
many more. We will see the below example to understand more about UIDevice APIs.
getUiDevice().pressMenu(), getUiDevice().pressHome() and getUiDevice().pressBack()
are three very common APIs which are used in test code. The pressMenu API will open the
menu list for currently opened application in device, pressHome API will take the control back to
home page regardless of its current condition and pressBack API will take the control back by
one step from its current condition. Run the below program to see how these API works in
android device. We will see more UIDevice APIs usage in consecutive examples and chapters.
UISelector: It is used to form search criteria to find elements from current rendered user
interface. There are many APIs to form search criteria like className(), text(), description(),
scrollable(), instance() and few more. Mainly UISelector is used with UIObject in test code.
Refer to below example to see how UISelector can be used to form different search criteria.
public class AppTest extends UiAutomatorTestCase {
public void testDemo() throws UiObjectNotFoundException {
// go to home page and open app section //
getUiDevice().pressHome();
UiObject appsButton = new UiObject(new UiSelector().description("Apps"));
appsButton.clickAndWaitForNewWindow();
// go to home page from current app section //
getUiDevice().pressHome();
// open menu section from home page //
getUiDevice().pressMenu();
// close the menu by pressing back //
getUiDevice().pressBack();
}
}
6. UIObject: It is used to create an UI element instance using UISelector search criteria to take
any event on that element. Below example is explain how search a button with name Submit
and click on that.
UICollection:It is used to create a container UI element which contains multiple child UI
elements. Similar to UIObject we can construct an UICollection instance by specifying and
UISelector. We will see examples later in consecutive chapter.
UIScrollable:It is used to simulate vertical or horizontal scrolling across the display to make
an element visible when it is off the screen. Below example will describe how to scroll a listview
item until an element become visible with text “Sports” and then click on that element.
// DO NOT RUN THIS CODE, THIS IS JUST REFERENCE //
// search listview element with class name from UI //
new UiSelector().className("android.widget.ListView");
// search first listview element from UI //
new UiSelector().className("android.widget.ListView").instance(1);
// search element with text Contacts //
new UiSelector().text("Contacts");
// search a button with content-description GPS inside a listview element //
new UiSelector().className("android.widget.ListView").
childSelector(new UiSelector().description("GPS"));
// search listview element which is scrollable //
new UiSelector().className("android.widget.ListView").scrollable(true);
// DO NOT RUN THIS CODE, THIS IS JUST REFERENCE //
public class AppTest extends UiAutomatorTestCase {
public void testDemo() throws UiObjectNotFoundException {
// create a UIObject using UiSelector and click on that //
UiObject buttonObj = new UiObject(new UiSelector().
className("android.widget.Button").text("GPS"));
buttonObj.click();
}
}
7. UIWatcher: It is used to add asynchronous robustness in automation flow. We can register a
UIWatcher asynchronously while executing the normal flow of test to make sure this watcher
come alive and take appropriate action to maintain execution flow. One simple example is that a
UIWatcher can watch for any unwanted pop up while executing actual test automation flow. We
will see practical example and use later in consecutive chapter. UIAutomator framework will
invoke all registered watcher when some unexpected behavior happened. Refer the below
picture to understand how UIWatcher works.
What Is Next
In next chapter you will get to know UIAutomator basic use cases and scenarios with example.
// DO NOT RUN THIS CODE, THIS IS JUST REFERENCE //
// create a scrollable instance of a listview item //
UiScrollable sceneModeList = new UiScrollable(new UiSelector()
.className("android.widget.ListView").scrollable(true));
// scroll the listview until an element found with text Sports //
UiObject sportsMode = sceneModeList.getChildByText(new UiSelector()
.className("android.widget.TextView"),"Sports");
//select the Sports mode from that list //
sportsMode.click();
8. UIAutomator Use Cases & Scenarios:
Basic use cases & scenarios
We are ready to taste the actual flavor of android UIAutomator automation. Before taking up
complex automation project we need to understand the basic use cases and scenarios that can
be automated using UIAutomator APIs which will give us enough confidence to take it in the
next level. In this chapter we are going to learn many small automation modules which will be
strong base for next complex automation projects.
Start an application
Let’s create a simple automation code which will open the application tray, select APPS tab, and
swipe to select appropriate application. In below example we will open the default camera
application of android OS. Go through the below code thoroughly and run it in your android
device as explained in previous chapter. You can modify the code to open other application in
your device. Please note that open uiautomatorviewer to check the elements attribute used
inside code for searching elements from UI.
public void testDemo() throws UiObjectNotFoundException {
// go to home page and open app launcher //
getUiDevice().pressHome();
UiObject appLauncherButton = new UiObject(new
UiSelector().description("Apps"));
appLauncherButton.clickAndWaitForNewWindow();
// click to APPS tab to the top left corner and start swipe the screen
// unless it find out camera application in the tray //
UiObject appsTab = new UiObject(new UiSelector().text("Apps"));
appsTab.click();
UiScrollable appTray = new UiScrollable(new UiSelector().
className("android.view.View").scrollable(true));
appTray.setAsHorizontalList();
UiObject cameraAppIcon = appTray.getChildByText(new UiSelector().
className("android.widget.TextView"),"Camera");
// open the camera application //
cameraAppIcon.clickAndWaitForNewWindow();
// close the application and go back to home page //
getUiDevice().pressBack();
getUiDevice().pressHome();
}
9. Scrolllist and selectelement
In this example we will see how to scroll a list and select element from that. We will use default
camera application once again for this example. We are going to scroll the top list of modes
available for the application and select some modes from that. We are going to use the above
code to open required application in this new example, for this create a method in your test
class as openApplication(String appName) and copy the code inside it and change appName
string in proper place. Now go through the below code thoroughly with uiautomatorviewer to
understand it completely. Update your AppTest class with below two methods and run it.
public void testDemo() throws UiObjectNotFoundException {
try {
this.openApplication("Camera");
getUiDevice().setOrientationNatural();
// create scrollable object with horizontal scrolling //
UiScrollable cameraModeList = new UiScrollable(new UiSelector().
className("android.widget.ScrollView").scrollable(true));
cameraModeList.setAsHorizontalList();
// scroll to search and select mode <Switch to Best shot mode> //
UiObject cameraModeIcon = cameraModeList.getChildByDescription(new
UiSelector().description("Switch to Best shot mode"),
"Switch to Best shot mode");
cameraModeIcon.longClick();
// reverse scroll to search and select mode <Switch to Normal mode> //
cameraModeIcon = cameraModeList.getChildByDescription(new UiSelector().
description("Switch to Normal mode"),"Switch to Normal mode");
cameraModeIcon.longClick();
}
catch(Exception e) {}
// close the application and go back to home page //
getUiDevice().pressBack();
getUiDevice().pressHome();
}
public void openApplication(String appName) throws UiObjectNotFoundException {
// copy and edit the code from previous example //
}
10. Get elementlist from ListView
In this example we will learn how to scroll a ListView item and get all available elements as a
list. For simplicity we are going to use the same camera application as above. From the below
given picture we can see the ListView element referring to scene mode options contains
multiple RelativeLayout view. And each RelativeLayout view contains ImageView, TextView and
RadioButton. Now we want to scroll this ListView and get all available options inside it and
finally it will return an elements list. Now go through the below given code and run it when you
understand the logic completely.
11. public void testDemo() throws UiObjectNotFoundException {
try {
this.openApplication("Camera");
getUiDevice().setOrientationNatural();
// click to more settings button //
UiObject settCtrlBtn = new UiObject(new UiSelector().
description("More setting controls"));
settCtrlBtn.clickAndWaitForNewWindow();
// click to normal settings button form TAB widget //
UiObject tabWidget = new UiObject(new UiSelector().
className("android.widget.TabWidget"));
UiObject settBtnObj = tabWidget.getChild(new UiSelector().index(0));
settBtnObj.click();
// open Scene Mode and create the scrollable object //
new UiObject(new UiSelector().text("Scene mode")).clickAndWaitForNewWindow();
UiScrollable sceneViews = new UiScrollable(new UiSelector().
className("android.widget.ListView").scrollable(true));
ArrayList<String> sceneList = this.getListViewElements(sceneViews);
System.out.println(sceneList);
}
catch(Exception e) {}
// close the application and go back to home page //
getUiDevice().pressBack();
getUiDevice().pressHome();
}
public ArrayList<String> getListViewElements(UiScrollable scrollViewObj)
throws UiObjectNotFoundException {
ArrayList<String> childElemList = new ArrayList<String>();
while(true) {
// find the count of child elements visible in UI //
int childCnt = scrollViewObj.getChildCount(new UiSelector().
className("android.widget.TextView"));
// iterate for each child, get the text and add it inside list as unique //
for(int Idx=0; Idx<childCnt; Idx++) {
UiObject childElem = scrollViewObj.getChild(new UiSelector().
className("android.widget.TextView").instance(Idx));
if(!childElemList.contains(childElem.getText())) {
childElemList.add(childElem.getText());
}
}
// scroll forward the list with one page, when scroll come to an end //
// this API will return false and loop will break from here //
if(!scrollViewObj.scrollForward()) { break; }
}
return childElemList;
}
public void openApplication(String appName) throws UiObjectNotFoundException {
// copy and edit the code from previous example //
}