
![Scenario
◈ Objectives
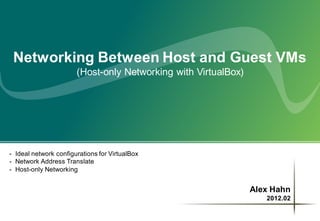
To develop and test in distributed environment you might use virtualizing tool like VirtualBox
to imitate the environment of where number of servers and complex networks resides. But
still, you have to move around through VM windows. In order to access all virtual servers
using SSH just like we do in the real world, several things should be done first.
- Setup Host-only Networking
- Configure guest OS
◈ Requirements
To achieve the goal, a virtualization tool (VirtualBox will be used here) and a little bit of
networking knowledge is necessary which will be handled below.
Of course you need your own laptop and Linux server OS for guest VMs.
Ubuntu 11.10 VirtualBox 4.1.8 for Linux
Desktop 32bit
- CPU 2 Core Window XP Ubuntu 11.10 Server Ubuntu 11.10 Server
- RAM 4 GB 1vCore / 1GB / 20GB 1vCore / 512MB / 3GB 1vCore / 512MB / 3GB
- HDD 256 GB
[An example of virtual environment]](data:image/gif;base64,R0lGODlhAQABAIAAAAAAAP///yH5BAEAAAAALAAAAAABAAEAAAIBRAA7)
Recomendados
Recomendados
Mais conteúdo relacionado
Último
Último (20)
Destaque
Destaque (20)
Networking between host and guest VMs in VirtualBox
- 1. Networking Between Host and Guest VMs (Host-only Networking with VirtualBox) - Ideal network configurations for VirtualBox - Network Address Translate - Host-only Networking Alex Hahn 2012.02
- 2. Scenario ◈ Objectives To develop and test in distributed environment you might use virtualizing tool like VirtualBox to imitate the environment of where number of servers and complex networks resides. But still, you have to move around through VM windows. In order to access all virtual servers using SSH just like we do in the real world, several things should be done first. - Setup Host-only Networking - Configure guest OS ◈ Requirements To achieve the goal, a virtualization tool (VirtualBox will be used here) and a little bit of networking knowledge is necessary which will be handled below. Of course you need your own laptop and Linux server OS for guest VMs. Ubuntu 11.10 VirtualBox 4.1.8 for Linux Desktop 32bit - CPU 2 Core Window XP Ubuntu 11.10 Server Ubuntu 11.10 Server - RAM 4 GB 1vCore / 1GB / 20GB 1vCore / 512MB / 3GB 1vCore / 512MB / 3GB - HDD 256 GB [An example of virtual environment]
- 3. Virtual Machine Network Structure ◈ Network configuration Separate network is necessary for host OS to access guest VMs To do that, each guest VMs should have two network adapters One is for guest VM to access outbound network, namely NAT adapter Another is for host OS to access each guest VM, namely Host-only adapter Host OS IP : 192.168.0.11 VirtualBox Virtual Domain Static IP Settings - 10.0.2.15 (IP) Host-only IP : 10.0.2.1 - 10.0.2.2 (Gateway) - 10.0.2.3(DNS) eth0 eth1 eth0 eth1 eth0 eth1 eth0 eth1 Guest VM #1 Guest VM #2 Guest VM #3 Guest VM #4 eth0 : 10.0.2.15 eth0 : 10.0.2.15 eth0 : 10.0.2.15 eth0 : 10.0.2.15 Virtual NIC eth1 : 10.1.2.11 eth1 : 10.1.2.12 eth1 : 10.1.2.13 eth1 : 10.1.2.14 NAT Network Host-only Network
- 4. Networking ◈ NAT (Network Address Translation) NAT feature is included in most of our home routers. It creates a single separate sub network below the inbound IP (public IP) so that number of machines can get an internet access and can share with each other too. But in VirtualBox, NAT is attached to each VM which is so called ‘Basic NAT’ that does one-to-one translation, and in contrast home routers do one-to-many translation. That’s why with default adapters for VMs, they can’t see each other, even from the host. Actually, IP, Gateway, DNS is somewhat ‘hard coded’ in VirtualBox’s NAT Adapter. ISP Host OS Home Router NAT VirtualBox NAT G/W : 192.168.0.1 Basic NAT Basic NAT IP : 192.168.0.2 IP : 192.168.0.3 IP : 10.0.2.15 IP : 10.0.2.15 G/W : 192.168.0.1 G/W : 192.168.0.1 G/W : 10.0.2.2 G/W : 10.0.2.2 DNS : x.x.x.x DNS : x.x.x.x DNS : 10.0.2.3 DNS : 10.0.2.3 □ All machines are allocated to one sub network. □ Each VM has its own sub network.
- 5. Networking ◈ Host-only Networking NAT is useful for guest VMs to access outbound network but as it is treated as a separate network, there is no way for host OS to access each guest OS. Bridged networking is used to handle this problem in real world, but it implies complexity. Host-only networking is kind of hybrid between internal and bridged networking. In VirtualBox (Host), Host-only network is a gateway for host (external network) to access guest VMs (internal network) to communicate with each other. So, it doesn’t need to be created as many the number of guest VMs. 192.168.0.1 Host-only Network Gateway 10.1.2.1 10.1.2.11 10.1.2.12
- 6. Considerations ◈ Each NAT adapters and Host-only adapter should not reside in same sub-network eth0 -10.0.2.15 and eth1-10.0.2.12 wouldn’t work eth0 -10.0.2.15 and eth1-10.1.2.11 is good Where eth0 is for NAT and eth1 is for Host-only ◈ Each VM should have different host name. VM1 : ubuntu1, VM2 : ubuntu2 “$ sudo hostname ubuntu2” on new VM and reboot ◈ Make sure to set different MAC address for new VM Rather installing a fresh new VM, use clone feature in VirtualBox First, take a snapshot of well setup VM and make a clone At clone, check ‘Reinitialize the MAC address of all network cards’ option ◈ After booting second VM, reset ‘udev’ network rules to set new IPs properly Remove /etc/udev/rules.d/70-persistent-net.rules (recreated at new boot) Check ‘ifconfig’ for eth0 and eth1 ◈ Use static IP rather than DHCP on Host-only Network and set host alias. IP of Host-only adapter will change when guest VM reboots, so turn off DHCP in VirtualBox When guest IPs are fixed define an alias for each guest and configure hosts file in host OS
- 7. Instructions ◈ Step by Step configuration Step 1 : Setup default networking for guest VM with NAT Step 2 : Create Host-only Networking in VirtualBox Step 3 : Setup secondary adapter for each guest VM Step 4 : Configure guest VM Step 5 : Easier access to guest VMs with ‘hosts’ configuration
- 8. Testing ◈ Host Machine Ping to all guest Host-only IPs (10.1.2.11, 10.1.2.12 …) SSH to all guest VM ◈ Guest Machine Ping to ‘www.google.com’ to make sure external network works well including DNS. Ping to gateway (10.1.2.1) Ping to other guest VM. Check SSH daemon running. (ps –ef | grep sshd) Check firewall open (default is all open in ubuntu server)
- 9. References ◈ Reference Sites http://christophermaier.name/blog/2010/09/01/host-only-networking-with-virtualbox http://allisterx.blogspot.com/2008/05/additions-and-ssh-access-to-virtualbox.html http://serverfault.com/questions/308229/virtual-box-host-only-adapter-configuration http://jackal777.wordpress.com/2012/02/13/internet-access-in-virtualbox-host-only-networking/ http://www.ubuntugeek.com/how-to-set-up-host-interface-networking-for-virtualbox-on-ubuntu.html http://superuser.com/questions/144453/virtualbox-guest-os-accessing-local-server-on-host-os http://www.virtualbox.org/manual/ch09.html#changenat