
Recommended
More Related Content
Viewers also liked
Viewers also liked (20)
Similar to Twc 400 presentation1
Similar to Twc 400 presentation1 (20)
Twc 400 presentation1
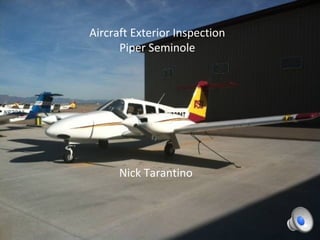
- 1. Aircraft Exterior Inspection Piper Seminole Nick Tarantino
- 2. Objective • Be able to inspect the exterior of a twin engine general aviation aircraft. • Complete the walk-around of the aircraft with reference to your company checklist. • Note that there is an entire interior inspection that should have taken place prior to the exterior inspection. This presentation focuses ONLY on the exterior inspection and is only a general description of an exterior inspection.
- 4. Fuel Drains • Fuel drains are located on the right side of the aircraft and are the starting point for the walk around. The fuel sumps will drain fuel from the left and right tanks. • Tip: Check fuel quantity before draining fuel. You may need to add fuel to the tanks and then drain fuel from sump.
- 5. Right Wing (Rear) • Start at the rear of the right wing and work around towards the tip and front. • Be visually inspecting for dents, chips, or loose screw or bolts.
- 6. Flap Section • Visually inspect the flap section.
- 7. Flap Section • Visually inspect the connecting screw for the flap section. • This is located all the way to the left of the flap.
- 8. Aileron Section • Visually inspect each connecting screw and the overall condition of the aileron. • Some company procedure do not allow you to push on the aileron.
- 9. Aileron Test Tip: The aileron section should be checked for correct rigging. Confirm proper direction of control column corresponds to the proper deflection of the ailerons.
- 10. Wing Tip • Visually inspect the wing tip for dents or chips. • Visually inspect the lights are working properly.
- 11. Front of Wing • Visually inspect the front of the wing as well as the recognition lights.
- 12. Right Engine, Fuel and Oil • Visually inspect the right engine area. • Check oil stick • Check fuel level • Inspect propeller
- 13. Propeller Check • Check the propeller for any dents or nicks. • Tip: actually run your hand across the propeller feeling for any deformities
- 14. Right Landing Gear • Inspect the right landing gear mechanism and tire. • Tire should be at 55 psi and strut approx. 2.6 inches.
- 15. Landing Gear Mechanism • Visually inspect the landing gear mechanism. • Tip: Be looking for any materials within the wheel well that can prevent the gear from be lowered or raised.
- 16. Nose Area • Visually inspect the nose area of the aircraft. • Includes inspection of the landing light, pictured here.
- 17. Nose Landing Gear • Inspect the landing gear mechanism and the tire.
- 18. Nose Wheel Well Visually inspect the nose wheel well area. Be looking for any foreign materials that would prevent the gear from being raised or lowered.
- 19. Left Front Wing and Engine • The same inspection procedure as the right wing. • Visually inspect the front of the left wing, including the propeller and the left main gear and tire. • Check the fuel quantity and oil level
- 20. Left Front Wing/Light • Visually inspect the left wing recognition light.
- 21. Pitot/Static Mast • Visually inspect the pitot static mast. • Make sure it is free ice or any other material that could potentially create a blockage.
- 22. Left Wing Tip • Check and inspect the condition of the strobe and navigation lights located on the wing tip.
- 23. Left Wing Rear • Left rear wing area starts with the inspection of the aileron. • Check for any loose screws, chips, or any other possible defects.
- 24. Left Fuselage • Located on the left fuselage is the ventilation filter for the cabin air. • Visually inspect this area for any possible cracks or blockage.
- 25. Empennage • Inspect the elevator which is located at the top of the tail or empennage. Look for any cracks or loose screws. • Below the elevator is the rudder. Visually inspect that the rudder is free of any cracks and not missing any bolts or screws. • Note: Both of these control surfaces should be tested by moving the control column up and down and the ruder pedals left and right.
- 26. General Overview and Tie Down Removals
- 27. The End
Editor's Notes
- The first step when initiating the exterior inspection, or walk around is to inspect the general condition of the aircraft as you approach it. Be looking for flat tires, oil, gas, etc.
- Drain fuel from both of the fuel sumps. This will take fuel from the right tank and then from the left tank. On this aircraft each sump is labeled. You will be looking for any contaminants such as water. Water will be settled at the bottom of the fuel draining container. If water is found in tank notify maintenance and do not fly they aircraft.
- Visually inspect the rearward side of the wing. This includes the flaps, which should be in the full down position, and the ailerons. Be looking for bolts and screws that are fasten tightly and correctly. Look for any dents or chips in the wing. The following slides will go into detail of the few specific areas of emphasis.
- Visually inspect the flap section for any loose screws, dents, or chips. You can pull up lightly on the flap to make sure it is secure.
- Make sure the screw that is connecting the flap to the rest of the wing is secure and free of any defects.
- Picture is showing right deflection of the control column and right aileron deflected upward. Reverse rigging of the flight controls would result in opposite turning direction when pilot
- Insure the navigation and strobe lights are working properly. Check for any dents or chips along the wing tip.
- Make sure the recognition lights are working properly and the front of the wing is free from any visual defects.
- Inspection of the engine includes checking fuel level in the right tank, oil level with dip stick, the propeller, and an overall codition check of the engine. Be looking for any suspicious cracks or loose wires around the engine.
- Be looking for any bald spots on the tire.
- Inspect the oil level and the overall condition of the left engine. Be looking for any cracks and loose wires.
- Some pitot/static mast have covers over them. Making sure you inspect and remove the cover before flight is critical otherwise your instruments within the cockpit may be inoperative.
- For purposes of general aviation the navigation lights should be tested but not required during day time VFR operations.
- Since the left aileron is deflected downward you should verify by looking in the cockpit and checking that the control column is rotated to the right to insure proper rigging of the controls.
- Once you are complete and ready to advance to the next stage of your checklist make sure to unsecure all three of the tie downs located one each wing and on the back of the tail. Only unsecure the tie downs when you are ready to get into the cockpit and advance to the next stage of your checklist. Leaving an aircraft unsecured by tie downs or chocks could create a hazard.