Java unit 4_cs_notes
•Transferir como DOCX, PDF•
1 gostou•499 visualizações

The document discusses defining client access to enterprise beans through interfaces. It covers: - Session and entity beans use interfaces to define client access, while message-driven beans do not. - Well-designed interfaces simplify application development and maintenance by shielding clients from bean complexities and allowing internal bean changes. - Clients can access beans remotely, locally, or through web services, and the document discusses the characteristics of each type of client access.

Recomendados
Mais conteúdo relacionado
Mais procurados
Mais procurados (20)
Destaque
Destaque (13)
Semelhante a Java unit 4_cs_notes
Semelhante a Java unit 4_cs_notes (20)
Último
Último (20)
Java unit 4_cs_notes
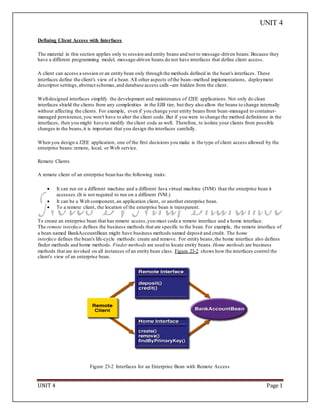
- 1. UNIT 4 UNIT 4 Page 1 Defining Client Access with Interfaces The material in this section applies only to session and entity beans and not to message-driven beans.Because they have a different programming model, message-driven beans do not have interfaces that define client access. A client can access a session or an entity bean only through the methods defined in the bean's interfaces. These interfaces define the client's view of a bean. All other aspects ofthe bean--method implementations, deployment descriptor settings,abstract schemas,and database access calls--are hidden from the client. Well-designed interfaces simplify the development and maintenance of J2EE applications. Not only do clean interfaces shield the clients from any complexities in the EJB tier, but they also allow the beans to change internally without affecting the clients. For example, even if you change your entity beans from bean-managed to container- managed persistence,you won't have to alter the client code. But if you were to change the method definitions in the interfaces, then you might have to modify the client code as well. Therefore, to isolate your clients from possible changes in the beans,it is important that you design the interfaces carefully. When you design a J2EE application, one of the first decisions you make is the type of client access allowed by the enterprise beans:remote, local, or Web service. Remote Clients A remote client of an enterprise bean has the following traits: It can run on a different machine and a different Java virtual machine (JVM) than the enterprise bean it accesses.(It is not required to run on a different JVM.) It can be a Web component, an application client, or another enterprise bean. To a remote client, the location of the enterprise bean is transparent. To create an enterprise bean that has remote access,you must code a remote interface and a home interface. The remote interface defines the business methods that are specific to the bean. For example, the remote interface of a bean named BankAccountBean might have business methods named deposit and credit. The home interface defines the bean's life-cycle methods: create and remove. For entity beans,the home interface also defines finder methods and home methods. Finder methods are used to locate entity beans. Home methods are business methods that are invoked on all instances of an entity bean class. Figure 23-2 shows how the interfaces control the client's view of an enterprise bean. Figure 23-2 Interfaces for an Enterprise Bean with Remote Access
- 2. UNIT 4 UNIT 4 Page 2 Local Clients A local client has these characteristics: It must run in the same JVM as the enterprise bean it accesses. It can be a Web component or anotherenterprise bean. To the local client, the location of the enterprise bean it accesses is not transparent. It is often an entity bean that has a container-managed relationship with another entity bean. To build an enterprise bean that allows local access,you must code the local interface and the local home interface. The local interface defines the bean's business methods,and the local home interface defines its life-cycle and finder methods. Local Interfaces and Container-Managed Relationships If an entity bean is the target of a container-managed relationship, then it must have local interfaces. The direction of the relationship determines whether or not a bean is the target. In Figure 23-1, for example, ProductBean is the target of a unidirectional relationship with LineItemBean. Because LineItemBean accesses ProductBean locally, ProductBean must have the local interfaces. LineItemBean also needs local interfaces, not because of its relationship with ProductBean, but because it is the target of a relationship with OrderBean. And because the relationship between LineItemBean and OrderBean is bidirectional, both beans must have local interfaces. Because they require local access,entity beans that participate in a container-managed relationship must reside in the same EJB JAR file. The primary benefit of this locality is increased performance: local calls are usually faster than remote calls. Deciding on Remote or Local Access Whetherto allow local or remote access depends on the following factors. Container-managed relationships:If an entity bean is the target of a container-managed relationship, it must use local access. Tight or loose coupling of related beans: Tightly coupled beans depend on one another. For example, a completed sales order must have one or more line items, which cannot exist without the order to which they belong. TheOrderBean and LineItemBean entity beans that model this relationship are tightly coupled. Tightly coupled beans are good candidates for local access.Because they fit togetheras a logical unit, they probably call each other often and would benefit from the increased performance that is possible with local access. Type of client: If an enterprise bean is accessed by application clients, then it should allow remote access. In a production environment, these clients almost always run on different machines than the Application Server does.If an enterprise bean's clients are Web components or other enterprise beans,then the type of access depends on howyou want to distribute your components. Component distribution:J2EE applications are scalable because their server-side components can be distributed across multiple machines. In a distributed application, for example, the Web components may run on a different server than do the enterprise beans they access.In this distributed scenario, the enterprise beans should allow remote access. Performance: Because of factors such as network latency, remote calls may be slower than local calls. On the otherhand, if you distribute components among different servers, you might improve the application's overall performance. Both of these statements are generalizations; actual performance can vary in different operational environments. Nevertheless,you should keep in mind how your application design might affect performance.
- 3. UNIT 4 UNIT 4 Page 3 If you aren't sure which type of access an enterprise bean should have, then choose remote access.This decision gives you more flexibility. In the future you can distribute your components to accommodate growing demands on your application. Although it is uncommon, it is possible for an enterprise bean to allow both remote and local access.Such a bean would require both remote and local interfaces. Web Service Clients A Web service client can access a J2EE application in two ways. First, the client can access a Web service created with JAX-RPC. (For more information on JAX-RPC, see Chapter 8, Building Web Services with JAX-RPC.) Second, a Web service client can invoke the business methods ofa stateless session bean.Other types of enterprise beans cannot be accessed by Web service clients. Provided that it uses the correct protocols (SOAP, HTTP, WSDL), any Web service client can access a stateless session bean,whether or not the client is written in the Java programming language. The client doesn't even "know" what technology implements the service--stateless session bean,JAX-RPC, or some other technology.In addition, enterprise beans and Web components can be clients of Web services. This flexibility enables you to integrate J2EE applications with Web services. A Web service client accesses a stateless session bean through the bean's Web service endpoint interface. Like a remote interface, a Web service endpoint interface defines the business methods of the bean.In contrast to a remote interface, a Web service endpoint interface is not accompanied by a home interface, which defines the bean's life- cycle methods. The only methods of the bean that may be invoked by a Web service client are the business methods that are defined in the Web service endpoint interface. For a code sample, see A Web Service Example: HelloServiceBean. Method Parameters and Access The type of access affects the parameters of the bean methods that are called by clients. The following topics apply not only to method parameters but also to method return values. Isolation The parameters of remote calls are more isolated than those of local calls. With remote calls, the client and bean operate on different copies of a parameter object. If the client changes the value of the object, the value of the copy in the bean does not change.This layer of isolation can help protect the bean if the client accidentally modifies the data. In a local call, both the client and the bean can modify the same parameter object. In general, you should not rely on this side effect of local calls. Perhaps someday you will want to distribute your components,replacing the local calls with remote ones. As with remote clients, Web service clients operate on different copies of parameters than does the bean that implements the Web service. Granularity of AccessedData
- 4. UNIT 4 UNIT 4 Page 4 Because remote calls are likely to be slower than local calls, the parameters in remote methods should be relatively coarse-grained. A coarse-grained object contains more data than a fine-grained one, so fewer access calls are required. For the same reason, the parameters of the methods called by Web service clients should also be coarse- grained. For example, suppose that a CustomerBean entity bean is accessed remotely. This bean would have a single getter method that returns a CustomerDetails object, which encapsulates all of the customer's information. But ifCustomerBean is to be accessed locally, it could have a getter method for each instance variable: getFirstName, getLastName, getPhoneNumber, and so forth. Because local calls are fast, the multiple calls to these finer-grained getter methods would not significantly degrade performance. Building Web Services with JAX-WS JAX-WS stands for Java API for XML Web Services. JAX-WS is a technology for building web services and clients that communicate using XML. JAX-WS allows developers to write message-oriented as well as RPC-oriented web services. In JAX-WS, a web service operation invocation is represented by an XML-based protocol such as SOAP. The SOAP specification defines the envelope structure,encoding rules, and conventions forrepresenting web service invocations and responses.These calls and responses are transmitted as SOAP messages (XML files) over HTTP. Although SOAP messages are complex, the JAX-WS API hides this complexity from the application developer. On the server side, the developer specifies the web service operations by defining methods in an interface written in the Java programming language. The developer also codes one or more classes that implement those methods. Client programs are also easy to code. A client creates a proxy (a local object representing the service) and then simply invokes methods on the proxy. With JAX-WS, the developer does not generate or parse SOAP messages.It is the JAX-WS runtime systemthat converts the API calls and responses to and from SOAP messages. With JAX-WS, clients and web services have a big advantage:the platform independence of the Java programming language. In addition, JAX-WS is not restrictive: a JAX-WS client can access a web service that is not running on the Java platform, and vice versa. This flexibility is possible because JAX-WS uses technologies defined by the World Wide Web Consortium (W3C): HTTP, SOAP, and the Web Service Description Language (WSDL). WSDL specifies an XML format for describing a service as a set of endpoints operating on messages. Setting the Port Several files in the JAX-WS examples depend on the port that you specified when you installed the Application Server. The tutorial examples assume that the server runs on the default port, 8080. If you have changed the port, you must update the port number in the following file before building and running the JAX-WS examples: tut-install/javaeetutorial5/examples/jaxws/simpleclient/src/java/simpleclient/HelloClient.java Creating a Simple Web Service and Client with JAX-WS This section shows how to build and deploy a simple web service and client. The source code for the service is in tut-install/javaeetutorial5/examples/jaxws/helloservice/ and the client is in tut- install/javaeetutorial5/examples/jaxws/simpleclient/. Figure 16-1 illustrates how JAX-WS technology manages communication between a web service and client. Figure 16-1 Communication between a JAX-WS Web Service and a Client
- 5. UNIT 4 UNIT 4 Page 5 The starting point for developing a JAX-WS web service is a Java class annotated with the javax.jws.WebService annotation.The @WebService annotation defines the class as a web service endpoint. A service endpoint interface or service endpoint implementation (SEI) is a Java interface or class, respectively, that declares the methods that a client can invoke on the service. An interface is not required when building a JAX- WS endpoint. The web service implementation class implicitly defines an SEI. You may specify an explicit interface by adding the endpointInterface element to the @WebService annotation in the implementation class.You must then provide an interface that defines the public methods made available in the endpoint implementation class. You use the endpoint implementation class and the wsgen tool to generate the web service artifacts that connect a web service client to the JAX-WS runtime. Together, the wsgen tool and the Application Server provide the Application Server’s implementation of JAX-WS. These are the basic steps for creating the web service and client: 1. Code the implementation class. 2. Compile the implementation class. 3. Use wsgen to generate the artifacts required to deploy the service. 4. Package the files into a WAR file. 5. Deploy the WAR file. The web service artifacts (which are used to communicate with clients) are generated by the Application Server during deployment. 6. Code the client class. 7. Use wsimport to generate and compile the web service artifacts needed to connect to the service. 8. Compile the client class. 9. Run the client. The sections that follow cover these steps in greater detail. Requirements of a JAX-WS Endpoint JAX-WS endpoints must follow these requirements: The implementing class must be annotated with either the javax.jws.WebService or javax.jws.WebServiceProvider annotation. The implementing class may explicitly reference an SEI through the endpointInterface element of the @WebService annotation,but is not required to do so.If no endpointInterface is specified in @WebService, an SEI is implicitly defined for the implementing class.
- 6. UNIT 4 UNIT 4 Page 6 The business methods of the implementing class must be public, and must not be declared static or final. Business methods that are exposed to web service clients must be annotated with javax.jws.WebMethod. Business methods that are exposed to web service clients must have JAXB-compatible parameters and return types.See Default Data Type Bindings. The implementing class must not be declared final and must not be abstract. The implementing class must have a default public constructor. The implementing class must not define the finalize method. The implementing class may use the javax.annotation.PostConstruct or javax.annotation.PreDestroy annotations on its methods for life cycle event callbacks. The @PostConstruct method is called by the container before the implementing class begins responding to web service clients. The @PreDestroy method is called by the container before the endpoint is removed from operation. Coding the Service Endpoint Implementation Class In this example, the implementation class, Hello, is annotated as a web service endpoint using the @WebService annotation.Hello declares a single method named sayHello, annotated with the @WebMethod annotation. @WebMethod exposes the annotated method to web service clients. sayHello returns a greeting to the client, using the name passed to sayHello to compose the greeting. The implementation class also must define a default, public, no-argument constructor. package helloservice.endpoint; import javax.jws.WebService; @WebService public class Hello { private String message = new String("Hello, "); public void Hello() {} @WebMethod public String sayHello(String name) { return message + name + "."; } } Building, Packaging, and Deploying the Service You can build, package, and deploy the helloservice application using either NetBeans IDE or ant. Building, Packaging, and Deploying the Service Using NetBeans IDE Follow these instructions to build, package, and deploy the helloservice example to yourApplication Server instance using NetBeans IDE. 1. In NetBeans IDE, select File→Open Project. 2. In the Open Project dialog, navigate to tut-install/javaeetutorial5/examples/jaxws/. 3. Select the helloservice folder. 4. Select the Open as Main Project check box. 5. Click Open Project. 6. In the Projects tab, right-click the helloservice project and select Undeploy and Deploy.
- 7. UNIT 4 UNIT 4 Page 7 This builds and packages to application into helloservice.war, located in tut- install/javaeetutorial5/examples/jaxws/helloservice/dist/, and deploys this WAR file to your Application Server instance. Building, Packaging, and Deploying the Service Using Ant To build and package helloservice using Ant,in a terminal window, go to the tut- install/javaeetutorial5/examples/jaxws/helloservice/ directory and type the following: ant This command calls the default target, which builds and packages the application into an WAR file, helloservice.war, located in the dist directory. To deploy the helloservice example, follow these steps: 1. In a terminal window, go to tut-install/javaeetutorial5/examples/jaxws/helloservice/. 2. Make sure the Application Server is started. 3. Run ant deploy. You can view the WSDL file of the deployed service by requesting the URL http://localhost:8080/helloservice/hello?WSDL in a web browser. Now you are ready to create a client that accesses this service. Undeploying the Service At this point in the tutorial, do not undeploy the service. When you are finished with this example, you can undeploy the service by typing this command: ant undeploy The all Task As a convenience, the all task will build, package, and deploy the application. To do this, enter the following command: ant all Testing the Service without a Client The Application Server Admin Console allows you to test the methods of a web service endpoint.To test the sayHello method of HelloService, do the following: 1. Open the Admin Console by typing the following URL in a web browser: http://localhost:4848/ 2. Enter the admin username and password to log in to the Admin Console. 3. Click Web Services in the left pane of the Admin Console. 4. Click Hello. 5. Click Test. 6. Under Methods,entera name as the parameter to the sayHello method. 7. Click the sayHello button. This will take you to the sayHello Method invocation page.
- 8. UNIT 4 UNIT 4 Page 8 8. Under Method returned, you’ll see the response from the endpoint. A Simple JAX-WS Client HelloClient is a stand-alone Java program that accesses the sayHello method of HelloService. It makes this call through a port, a local object that acts as a proxy for the remote service. The port is created at development time by the wsimport tool, which generates JAX-WS portable artifacts based on a WSDL file. Coding the Client When invoking the remote methods on the port, the client performs these steps: 1. Uses the javax.xml.ws.WebServiceRef annotation to declare a reference to a web service. @WebServiceRef uses the wsdlLocation element to specify the URI of the deployed service’s WSDL file. 2. @WebServiceRef(wsdlLocation="http://localhost:8080/helloservice/hello?wsdl") static HelloService service; 3. Retrieves a proxy to the service, also known as a port, by invoking getHelloPort on the service. Hello port = service.getHelloPort(); The port implements the SEI defined by the service. 4. Invokes the port’s sayHello method, passing to the service a name. String response = port.sayHello(name); Here is the full source of HelloClient, which is located in the tut- install/javaeetutorial5/examples/jaxws/simpleclient/src/java/ directory. package simpleclient; import javax.xml.ws.WebServiceRef; import helloservice.endpoint.HelloService; import helloservice.endpoint.Hello; public class HelloClient { @WebServiceRef(wsdlLocation="http://localhost:8080/ helloservice/hello?wsdl") static HelloService service; public static void main(String[] args) { try { HelloClient client = new HelloClient(); client.doTest(args); } catch(Exception e) { e.printStackTrace(); } } public void doTest(String[] args) { try { System.out.println("Retrieving the port from
- 9. UNIT 4 UNIT 4 Page 9 the following service: " + service); Hello port = service.getHelloPort(); System.out.println("Invoking the sayHello operation on the port."); String name; if (args.length > 0) { name = args[0]; } else { name = "No Name"; } String response = port.sayHello(name); System.out.println(response); } catch(Exception e) { e.printStackTrace(); } } } Building and Running the Client You can build and run the simpleclient application using either NetBeans IDE or ant. To build the client, you must first have deployed helloservice, as described in Building, Packaging, and Deploying the Service. Building and Running the Client in NetBeans IDE Do the following to build and run simpleclient: 1. In NetBeans IDE, select File→Open Project. 2. In the Open Project dialog, navigate to tut-install/javaeetutorial5/examples/jaxws/. 3. Select the simpleclient folder. 4. Select the Open as Main Project check box. 5. Click Open Project. 6. In the Projects tab, right-click the simpleclient project and select Run. You will see the output of the application client in the Output pane. Building and Running the Client Using Ant In a terminal navigate to tut-install/examples/jaxws/simpleclient/ and type the following command: ant This command calls the default target, which builds and packages the application into a JAR file, simpleclient.jar, located in the dist directory. The run the client, type the following command: ant run