SlideShare a Scribd company logo
1 of 4
Legend Tank / Legend Solar Tank List of Parts Color of actual parts may vary (black or white). There is no difference in the functionality of the part. Body x 1 Body2 x 1 Caterpillar x 4 Support  1 x 2 Support  2 x 2 Gear box wheel x 2 Front wheel x 2 Supporting wheel x 6 Wheel collar x 8 Tank barrel (L, R) x 2 LED Light x 2 Light x 2 Cannon 1 x 1 Cannon 2 x 1 Solar support 2 x 1 Solar support 3 x 1 Double-sided tape Slide switch x 1 Solar support 1 x 1 Solar cell x 1 Solar Tank Parts The instructions and parts available in the orange box are for  solar tank  use only. Regular tanks do not contain parts in orange boxes. Gear box Parts Gear box  x 1 Motor  x 1 Pinion gear  x 1 Gear 1  x 1 Gear 2  x 2 Gear 3  x 1 Gear support Solar tank  x 3 Regular tank  x 2 Electric wire Battery holder Parts Battery  holder x 1 Battery terminal 1 x 1 Battery terminal 2 x 2 Battery terminal 3 x 2 Hexagonal shaft 28mm  x 1  100mm  x 1  Cylindrical shaft 100mm  x 4 5x14mm  x 7 2x4mm  x 2 3x5mm  x 1 5x6mm  x 4 4x5mm  x 8 3x4mm  x 2 4x6mm  x 2 4x6mm  x 2 Frame support +nut  x 2 sets 4x8mm + nut  x 2 sets For fastening Gear boxes (motor) & Tank barrels For fastening Reverse switch For fastening Reverse switch & Battery holder For fastening Body For fastening Support 1 & body For fastening Sliding switch For fastening Gear box & Body For fastening Body & Frame For fastening Tank barrels & Cannons Switch 1 x 1 Switch 2 x 1 Switch handle x 1 Switch terminal 1 x 2 Switch terminal 2 x 2 Switch terminal 3 x 2 Reverse switch Parts
Gear box Assembly Assemble screws here For fastening Gear box (motor) & Tank barrels Hexagonal shaft (28 mm) Gear 2 Gear 1 Gear 2 Gear 3 Hexagonal shaft (100 mm) Gear support Use after removing opaque piece Gear support Properly assembled Gear box Read carefully Steps 1-8 on how to assemble the Gear box to the shafts in the correct direction. Gear support Use after removing 3mm opaque piece Affix the motor into the Gear box. Pinion Gear Electric Wire Motor Twist the electric wire, making sure the wire is in contact with the Motor terminal. Affix the motor upside-down in the direction of the arrow. Caution not to press down too hard. Motor Pinion Gear Switch terminal 3 Switch handle Switch 1 Switch terminal  2 Switch terminal 1 Switch 2 Reverse switch fastening screws  Caution! Make sure the terminal affixed to the home of Switch 2 falls off. Affix Terminal 1 & 2 to the switch home. Affix Switch 1, Switch handle, Switch terminal 3 in that order. After affixing the Switch terminals, use the appropriate screws to fasten Switch 1 & Switch 2 together Affix so the  ridges on the inside of  Switch 2 match up with the grooves in Switch 1.  Battery terminal 3 Battery terminal 2 Battery holder Battery terminal 1 Battery holder Switch Reverse switch & Battery holder fastening screws  Caution! Make sure the ridges are facing inward so that they come into contact with the battery. Caution! Affix so that the terminal on the Battery snap is located on the outer edge of the Switch home. Affix Switch terminal 1 & 2 to the battery holder home, making sure it is aligned properly. Affix Battery terminal 2 to the same location where you have affixed Battery terminal 3.  Align the Battery holder to the Switch home properly, then fasten with the appropriate screws.
Body 1 Affix the Gear box to Body 1. Body 2 Body 1 After connecting the electric wire to each part properly, insert batteries into the Battery holder and fasten Body 1 and Body 2 with the appropriate screws. Now connect Body 2 to the screw frame.  4x8mm + nut For use with Gear box & Body For fastening Body to Frame 4x6mm + nut Frame screw Body 2 Body 1 Frame support Gear box, Motor Gear box, Motor Solar cell Switch Solar tank Assembly Regular tank Assembly Body 2 Body 1 Gear box, Motor Solar cell Switch For fastening Body The Solar cell and Switch are not  used in the Regular tank Insert electric wiring into terminal holes Connect the Switch and Motor connected to Body 1, the Solar cell and Switch connected to Body 2 using the electric wiring.  The colors of the electric wires shown are for identification purposes only; actual colors may vary. Connect the electric wire as pictured for each type of tank (Solar or Regular). The colors of the electric wires shown are for identification purposes only; actual colors may vary. Solar tank Assembly Body 2 Switch Body 2 For fastening Sliding switch Assembly instructions contained in orange boxes are for Solar tank assembly only. Affix Switch to Body 2 with screws, then insert Solar cell electric wires into Body 2 and connect the electric wires to the Motor. Switch Solar cell Body 2 For fastening Support 1 & Body For fastening Support 1 & Body For fastening Body Fasten Support 2 with the appropriate screws. Support 1 Support 2 Frame support + nut Nut Support 1 Support 2 Body 1 After fastening Body 1 and Support 1 using the appropriate screws, fasten Support 2 and Frame support to Body 1 using the nut on the other side. After fastening Body 1 and Support 1 with the appropriate screws, fasten the Battery holder to the other side using the appropriate screws. Support 1 Body  1
Completed Legend Tank Completed Solar Legend Tank LED light Body 1 Connect the two Caterpillar pieces, binding the hook to the holes at each end. Caution! Make sure to align the ridges on the Caterpillars to the ridges of the Tank wheels properly. Light Affix the LED light to the Light after  cutting the leads off, then affix onto Body. Insert these hook edges  Into the portions as pictured. Cylindrical shaft Front wheel Supporting wheel Wheel collar Hexagonal shaft connected to Gear box Wheel collar Gear box wheel 4x5mm For fastening Body Tank barrel (L, R) For fastening Gear box (Motor) & Tank barrel Fasten with screws after facing L & R Tank barrels facing each other. Cannon 3 Cannon 2 4x6mm For fastening Cannons & Tank barrel  Affix Cannon 3 after fastening Cannon 2 to the front end of the Tank barrel with the appropriate screws. Fasten the completed Tank barrel to the Body using the appropriate screws. Affix wheels after inserting the Cylindrical shafts into the Support. Affix Wheel collars to ensure the wheels won’t fall off. Solar tank Assembly Regular tank Assembly Solar Support 2 Solar Support 3 Solar cell Double-sided tape Solar Support 1 Stick the Solar cell to the Body using the Solar cell frame. Regular tanks: Affix Solar support 2 and 3 to the Body.

More Related Content

Similar to Legend Tank

Hyster c019 (h330 xl) forklift service repair manual
Hyster c019 (h330 xl) forklift service repair manualHyster c019 (h330 xl) forklift service repair manual
Hyster c019 (h330 xl) forklift service repair manualfuksfemmeme
 
Hyster c019 (h300 xl) forklift service repair manual
Hyster c019 (h300 xl) forklift service repair manualHyster c019 (h300 xl) forklift service repair manual
Hyster c019 (h300 xl) forklift service repair manualfjskekdmmem
 
Hyster c019 (h360 xl) forklift service repair manual
Hyster c019 (h360 xl) forklift service repair manualHyster c019 (h360 xl) forklift service repair manual
Hyster c019 (h360 xl) forklift service repair manualifkskjdksmem
 
Hyster c019 (h300 xl) forklift service repair manual
Hyster c019 (h300 xl) forklift service repair manualHyster c019 (h300 xl) forklift service repair manual
Hyster c019 (h300 xl) forklift service repair manualufjjjskkefkmem
 
Hyster c019 (h360 xl) forklift service repair manual
Hyster c019 (h360 xl) forklift service repair manualHyster c019 (h360 xl) forklift service repair manual
Hyster c019 (h360 xl) forklift service repair manualfujjsefjkskem
 
Hyster c019 (h360 xl) forklift service repair manual
Hyster c019 (h360 xl) forklift service repair manualHyster c019 (h360 xl) forklift service repair manual
Hyster c019 (h360 xl) forklift service repair manualfujsefkksekfm
 
Hyster c019 (h300 xl) forklift service repair manual
Hyster c019 (h300 xl) forklift service repair manualHyster c019 (h300 xl) forklift service repair manual
Hyster c019 (h300 xl) forklift service repair manualufjjsjkfkmsem
 
Hyster c019 (h300 xl) forklift service repair manual
Hyster c019 (h300 xl) forklift service repair manualHyster c019 (h300 xl) forklift service repair manual
Hyster c019 (h300 xl) forklift service repair manualfjsqazkekdmme
 
Hyster c019 (h300 xl) forklift service repair manual
Hyster c019 (h300 xl) forklift service repair manualHyster c019 (h300 xl) forklift service repair manual
Hyster c019 (h300 xl) forklift service repair manualufjjsjefkskekmme
 
Hyster c019 (h300 xl) forklift service repair manual
Hyster c019 (h300 xl) forklift service repair manualHyster c019 (h300 xl) forklift service repair manual
Hyster c019 (h300 xl) forklift service repair manualfujsejfjksekkkm
 
Hyster g005 (h70 xl) forklift service repair manual
Hyster g005 (h70 xl) forklift service repair manualHyster g005 (h70 xl) forklift service repair manual
Hyster g005 (h70 xl) forklift service repair manualfujsjejfkskemm
 
Hyster g005 (h110 xl) forklift service repair manual
Hyster g005 (h110 xl) forklift service repair manualHyster g005 (h110 xl) forklift service repair manual
Hyster g005 (h110 xl) forklift service repair manualufjjsjekkemme
 
Hyster g005 (h70 xl) forklift service repair manual
Hyster g005 (h70 xl) forklift service repair manualHyster g005 (h70 xl) forklift service repair manual
Hyster g005 (h70 xl) forklift service repair manualfjsjfjskeksmem
 
Hyster g005 (h110 xl) forklift service repair manual
Hyster g005 (h110 xl) forklift service repair manualHyster g005 (h110 xl) forklift service repair manual
Hyster g005 (h110 xl) forklift service repair manualfjjskqazxedmmem
 
Hyster g005 (h100 xl) forklift service repair manual
Hyster g005 (h100 xl) forklift service repair manualHyster g005 (h100 xl) forklift service repair manual
Hyster g005 (h100 xl) forklift service repair manualfudjsjfekskkem
 
Hyster g005 (h110 xl) forklift service repair manual
Hyster g005 (h110 xl) forklift service repair manualHyster g005 (h110 xl) forklift service repair manual
Hyster g005 (h110 xl) forklift service repair manualfujsjefjkskemm
 
Hyster g005 (h110 xl) forklift service repair manual
Hyster g005 (h110 xl) forklift service repair manualHyster g005 (h110 xl) forklift service repair manual
Hyster g005 (h110 xl) forklift service repair manualfjsekkdmmmse
 
Hyster g005 (h80 xl) forklift service repair manual
Hyster g005 (h80 xl) forklift service repair manualHyster g005 (h80 xl) forklift service repair manual
Hyster g005 (h80 xl) forklift service repair manualufjjsjefkskekmme
 
Hyster g005 (h100 xl) forklift service repair manual
Hyster g005 (h100 xl) forklift service repair manualHyster g005 (h100 xl) forklift service repair manual
Hyster g005 (h100 xl) forklift service repair manualfujdjffjkskemme
 
Hyster g005 (h80 xl) forklift service repair manual
Hyster g005 (h80 xl) forklift service repair manualHyster g005 (h80 xl) forklift service repair manual
Hyster g005 (h80 xl) forklift service repair manualfjsqazkekdmme
 

Similar to Legend Tank (20)

Hyster c019 (h330 xl) forklift service repair manual
Hyster c019 (h330 xl) forklift service repair manualHyster c019 (h330 xl) forklift service repair manual
Hyster c019 (h330 xl) forklift service repair manual
 
Hyster c019 (h300 xl) forklift service repair manual
Hyster c019 (h300 xl) forklift service repair manualHyster c019 (h300 xl) forklift service repair manual
Hyster c019 (h300 xl) forklift service repair manual
 
Hyster c019 (h360 xl) forklift service repair manual
Hyster c019 (h360 xl) forklift service repair manualHyster c019 (h360 xl) forklift service repair manual
Hyster c019 (h360 xl) forklift service repair manual
 
Hyster c019 (h300 xl) forklift service repair manual
Hyster c019 (h300 xl) forklift service repair manualHyster c019 (h300 xl) forklift service repair manual
Hyster c019 (h300 xl) forklift service repair manual
 
Hyster c019 (h360 xl) forklift service repair manual
Hyster c019 (h360 xl) forklift service repair manualHyster c019 (h360 xl) forklift service repair manual
Hyster c019 (h360 xl) forklift service repair manual
 
Hyster c019 (h360 xl) forklift service repair manual
Hyster c019 (h360 xl) forklift service repair manualHyster c019 (h360 xl) forklift service repair manual
Hyster c019 (h360 xl) forklift service repair manual
 
Hyster c019 (h300 xl) forklift service repair manual
Hyster c019 (h300 xl) forklift service repair manualHyster c019 (h300 xl) forklift service repair manual
Hyster c019 (h300 xl) forklift service repair manual
 
Hyster c019 (h300 xl) forklift service repair manual
Hyster c019 (h300 xl) forklift service repair manualHyster c019 (h300 xl) forklift service repair manual
Hyster c019 (h300 xl) forklift service repair manual
 
Hyster c019 (h300 xl) forklift service repair manual
Hyster c019 (h300 xl) forklift service repair manualHyster c019 (h300 xl) forklift service repair manual
Hyster c019 (h300 xl) forklift service repair manual
 
Hyster c019 (h300 xl) forklift service repair manual
Hyster c019 (h300 xl) forklift service repair manualHyster c019 (h300 xl) forklift service repair manual
Hyster c019 (h300 xl) forklift service repair manual
 
Hyster g005 (h70 xl) forklift service repair manual
Hyster g005 (h70 xl) forklift service repair manualHyster g005 (h70 xl) forklift service repair manual
Hyster g005 (h70 xl) forklift service repair manual
 
Hyster g005 (h110 xl) forklift service repair manual
Hyster g005 (h110 xl) forklift service repair manualHyster g005 (h110 xl) forklift service repair manual
Hyster g005 (h110 xl) forklift service repair manual
 
Hyster g005 (h70 xl) forklift service repair manual
Hyster g005 (h70 xl) forklift service repair manualHyster g005 (h70 xl) forklift service repair manual
Hyster g005 (h70 xl) forklift service repair manual
 
Hyster g005 (h110 xl) forklift service repair manual
Hyster g005 (h110 xl) forklift service repair manualHyster g005 (h110 xl) forklift service repair manual
Hyster g005 (h110 xl) forklift service repair manual
 
Hyster g005 (h100 xl) forklift service repair manual
Hyster g005 (h100 xl) forklift service repair manualHyster g005 (h100 xl) forklift service repair manual
Hyster g005 (h100 xl) forklift service repair manual
 
Hyster g005 (h110 xl) forklift service repair manual
Hyster g005 (h110 xl) forklift service repair manualHyster g005 (h110 xl) forklift service repair manual
Hyster g005 (h110 xl) forklift service repair manual
 
Hyster g005 (h110 xl) forklift service repair manual
Hyster g005 (h110 xl) forklift service repair manualHyster g005 (h110 xl) forklift service repair manual
Hyster g005 (h110 xl) forklift service repair manual
 
Hyster g005 (h80 xl) forklift service repair manual
Hyster g005 (h80 xl) forklift service repair manualHyster g005 (h80 xl) forklift service repair manual
Hyster g005 (h80 xl) forklift service repair manual
 
Hyster g005 (h100 xl) forklift service repair manual
Hyster g005 (h100 xl) forklift service repair manualHyster g005 (h100 xl) forklift service repair manual
Hyster g005 (h100 xl) forklift service repair manual
 
Hyster g005 (h80 xl) forklift service repair manual
Hyster g005 (h80 xl) forklift service repair manualHyster g005 (h80 xl) forklift service repair manual
Hyster g005 (h80 xl) forklift service repair manual
 

Legend Tank

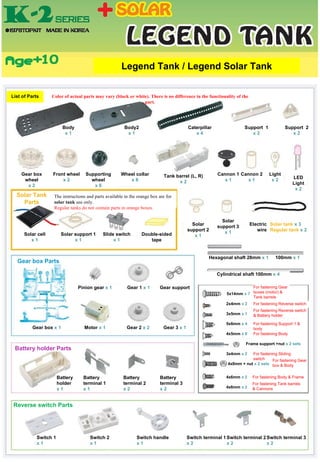
  • 1. Legend Tank / Legend Solar Tank List of Parts Color of actual parts may vary (black or white). There is no difference in the functionality of the part. Body x 1 Body2 x 1 Caterpillar x 4 Support 1 x 2 Support 2 x 2 Gear box wheel x 2 Front wheel x 2 Supporting wheel x 6 Wheel collar x 8 Tank barrel (L, R) x 2 LED Light x 2 Light x 2 Cannon 1 x 1 Cannon 2 x 1 Solar support 2 x 1 Solar support 3 x 1 Double-sided tape Slide switch x 1 Solar support 1 x 1 Solar cell x 1 Solar Tank Parts The instructions and parts available in the orange box are for solar tank use only. Regular tanks do not contain parts in orange boxes. Gear box Parts Gear box x 1 Motor x 1 Pinion gear x 1 Gear 1 x 1 Gear 2 x 2 Gear 3 x 1 Gear support Solar tank x 3 Regular tank x 2 Electric wire Battery holder Parts Battery holder x 1 Battery terminal 1 x 1 Battery terminal 2 x 2 Battery terminal 3 x 2 Hexagonal shaft 28mm x 1 100mm x 1 Cylindrical shaft 100mm x 4 5x14mm x 7 2x4mm x 2 3x5mm x 1 5x6mm x 4 4x5mm x 8 3x4mm x 2 4x6mm x 2 4x6mm x 2 Frame support +nut x 2 sets 4x8mm + nut x 2 sets For fastening Gear boxes (motor) & Tank barrels For fastening Reverse switch For fastening Reverse switch & Battery holder For fastening Body For fastening Support 1 & body For fastening Sliding switch For fastening Gear box & Body For fastening Body & Frame For fastening Tank barrels & Cannons Switch 1 x 1 Switch 2 x 1 Switch handle x 1 Switch terminal 1 x 2 Switch terminal 2 x 2 Switch terminal 3 x 2 Reverse switch Parts
  • 2. Gear box Assembly Assemble screws here For fastening Gear box (motor) & Tank barrels Hexagonal shaft (28 mm) Gear 2 Gear 1 Gear 2 Gear 3 Hexagonal shaft (100 mm) Gear support Use after removing opaque piece Gear support Properly assembled Gear box Read carefully Steps 1-8 on how to assemble the Gear box to the shafts in the correct direction. Gear support Use after removing 3mm opaque piece Affix the motor into the Gear box. Pinion Gear Electric Wire Motor Twist the electric wire, making sure the wire is in contact with the Motor terminal. Affix the motor upside-down in the direction of the arrow. Caution not to press down too hard. Motor Pinion Gear Switch terminal 3 Switch handle Switch 1 Switch terminal 2 Switch terminal 1 Switch 2 Reverse switch fastening screws Caution! Make sure the terminal affixed to the home of Switch 2 falls off. Affix Terminal 1 & 2 to the switch home. Affix Switch 1, Switch handle, Switch terminal 3 in that order. After affixing the Switch terminals, use the appropriate screws to fasten Switch 1 & Switch 2 together Affix so the ridges on the inside of Switch 2 match up with the grooves in Switch 1. Battery terminal 3 Battery terminal 2 Battery holder Battery terminal 1 Battery holder Switch Reverse switch & Battery holder fastening screws Caution! Make sure the ridges are facing inward so that they come into contact with the battery. Caution! Affix so that the terminal on the Battery snap is located on the outer edge of the Switch home. Affix Switch terminal 1 & 2 to the battery holder home, making sure it is aligned properly. Affix Battery terminal 2 to the same location where you have affixed Battery terminal 3. Align the Battery holder to the Switch home properly, then fasten with the appropriate screws.
  • 3. Body 1 Affix the Gear box to Body 1. Body 2 Body 1 After connecting the electric wire to each part properly, insert batteries into the Battery holder and fasten Body 1 and Body 2 with the appropriate screws. Now connect Body 2 to the screw frame. 4x8mm + nut For use with Gear box & Body For fastening Body to Frame 4x6mm + nut Frame screw Body 2 Body 1 Frame support Gear box, Motor Gear box, Motor Solar cell Switch Solar tank Assembly Regular tank Assembly Body 2 Body 1 Gear box, Motor Solar cell Switch For fastening Body The Solar cell and Switch are not used in the Regular tank Insert electric wiring into terminal holes Connect the Switch and Motor connected to Body 1, the Solar cell and Switch connected to Body 2 using the electric wiring. The colors of the electric wires shown are for identification purposes only; actual colors may vary. Connect the electric wire as pictured for each type of tank (Solar or Regular). The colors of the electric wires shown are for identification purposes only; actual colors may vary. Solar tank Assembly Body 2 Switch Body 2 For fastening Sliding switch Assembly instructions contained in orange boxes are for Solar tank assembly only. Affix Switch to Body 2 with screws, then insert Solar cell electric wires into Body 2 and connect the electric wires to the Motor. Switch Solar cell Body 2 For fastening Support 1 & Body For fastening Support 1 & Body For fastening Body Fasten Support 2 with the appropriate screws. Support 1 Support 2 Frame support + nut Nut Support 1 Support 2 Body 1 After fastening Body 1 and Support 1 using the appropriate screws, fasten Support 2 and Frame support to Body 1 using the nut on the other side. After fastening Body 1 and Support 1 with the appropriate screws, fasten the Battery holder to the other side using the appropriate screws. Support 1 Body 1
  • 4. Completed Legend Tank Completed Solar Legend Tank LED light Body 1 Connect the two Caterpillar pieces, binding the hook to the holes at each end. Caution! Make sure to align the ridges on the Caterpillars to the ridges of the Tank wheels properly. Light Affix the LED light to the Light after cutting the leads off, then affix onto Body. Insert these hook edges Into the portions as pictured. Cylindrical shaft Front wheel Supporting wheel Wheel collar Hexagonal shaft connected to Gear box Wheel collar Gear box wheel 4x5mm For fastening Body Tank barrel (L, R) For fastening Gear box (Motor) & Tank barrel Fasten with screws after facing L & R Tank barrels facing each other. Cannon 3 Cannon 2 4x6mm For fastening Cannons & Tank barrel Affix Cannon 3 after fastening Cannon 2 to the front end of the Tank barrel with the appropriate screws. Fasten the completed Tank barrel to the Body using the appropriate screws. Affix wheels after inserting the Cylindrical shafts into the Support. Affix Wheel collars to ensure the wheels won’t fall off. Solar tank Assembly Regular tank Assembly Solar Support 2 Solar Support 3 Solar cell Double-sided tape Solar Support 1 Stick the Solar cell to the Body using the Solar cell frame. Regular tanks: Affix Solar support 2 and 3 to the Body.