LMCurbs Roof Curb Installation Instructions For R-Panel Metal Roof
•
0 likes•1,988 views

Roof curb installation instructions for R-Panel metal roof.

Recommended
More Related Content
What's hot
What's hot (20)
Similar to LMCurbs Roof Curb Installation Instructions For R-Panel Metal Roof
Similar to LMCurbs Roof Curb Installation Instructions For R-Panel Metal Roof (12)
More from LMCurbs©
More from LMCurbs© (12)
Recently uploaded
Recently uploaded (20)
LMCurbs Roof Curb Installation Instructions For R-Panel Metal Roof
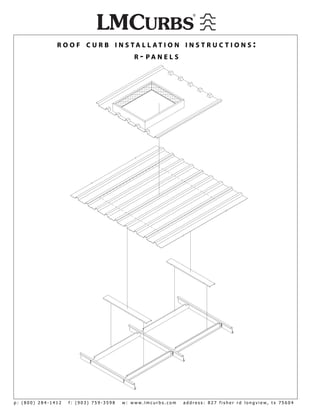
- 1. R O O F C U R B I N S TA L L AT I O N I N S T R U C T I O N S : R - PA N E L S p: (800) 284-1412 f: (903) 759-3598 w: www.lmcurbs.com address: 827 fisher rd longview, tx 75604
- 2. ROOF CURB INSTALLATION INSTRUCTIONS R-PANEL Installation Check List: _____Attach Sub-frame(s) Step 1 _____Layout Curb(s) on Roof Panel Step 2 _____Mount Back-up Channels Step 3 _____Apply Sealants & Set Curb in Place Step 4 _____Fasten Curb to Back-up Channels Step 5 PARTS LIST Flat Washer Polyurethane Sealant Caulk Nut 14 Gauge Galvinized Steel Subframe 5-1/2” tall 3/8” x 1” bolts Length is equal to the purlin spacing minus 1-3/8” #14 - 1 1/8” Neoprene Self-Tap Screw Back-up Channel Triple Bead Sealant Tape BEGIN INSTALLATION 1 ATTACH SUB-FRAMES Attach sub-frames to purlins (see drawing 1.1 and 1.2). Finger tighten all hardware, then upset threads to secure nuts. Attach sub-frames using the nuts, bolts, and washers. Sub-frame Washer Nut Bolt Drawing 1.2 Roof Purlin Drawing 1.1 *NOTICE* Sub-frame max. loading 500 lbs. WARNING! Page 1 ALWAYS USE FALL PROTECTION WHILE WORKING AROUND ROOF OPENINGS.
- 3. ROOF CURB INSTALLATION INSTRUCTIONS R-PANEL Cut Line will be 2 1/2” 2 LAYOUT CURB ON ROOF PANEL less than outer edge of Mark base ange locations and throat area cut lines by setting roof upslope/downslope curb base ange. curb in place on roof panel (DO NOT USE LEAD PENCIL). Upslope/downslope cut lines will be 2 1/2” less than outer edge of base ange. Note #1: For uninsulated curb(s), throat opeing is actual I.D. of curb. For insulated curb(s), use actual I.D. and add 1 3/4” to each side. Drawing 2.1 Top View Roof Panel Throat Opening Remove Insulation leaving insulation facing (see note #1) Roof Opening in place. Cut insulation facing diago- nally and tuck sections under roof panels to Insulation trim roof openings. Cu rb Ba se Fla n ge ng Fla Drawing 2.2 e B ase rb Cu Drawing 2.3 *Notice* Sub-frames and back-up channels not shown in the above picture. Roof Panel 3 MOUNT BACK-UP CHANNELS Center back-up channels with the center roof opening(s). Cut slots Back-up Channels (under roof panels) in back-up channels to slide over sub-frame(s) (see drawing 4.1). Back-up channels are not be screwed to sub-frame or purlin. Slide back-up channels underneath roof panel (see drawing 4.2). Back-up channels are to be ush with roof opening as showing in drawing 4.2. Roof Purlin 6” Fold cut tabs up 90 degrees DRAWING 4.2 11 / 2” BA underneath the back-up CK -UP OU CE CH T SID E NT ER NE L AN channels as shown. DIM OF EN SU SIO B-F NO RA FB ME AC K-U PC HA NN ELL 1” DRAWING 4.1 DRAWING 4.3 *NOTICE* DO NOT SCREW BACK-UP CHANNELS TO SUB-FRAMES! WARNING! Page 2 ALWAYS USE FALL PROTECTION WHILE WORKING AROUND ROOF OPENINGS.
- 4. ROOF CURB INSTALLATION INSTRUCTIONS R-PANEL The upslode highs are to be installed 4 APPLY SEALANTS & SET CURB IN PLACE UNDER the roof panel. Apply a strip of sealant tape on the upslope side of the roof curb(s) and on downslope side of the roof panel before setting roof curb(s) in place (see drawing 4.1). Roof Curb Roof Panel The downslope highs are to be installed OVER the roof panel. Caulk (apply as shown) Sealant Tape Sealant tape on both sides of roof opening. Drawing 4.1 *NOTICE* Sub-frames and back-up channels not shown in the above picture(s). 5 FASTEN CURB TO BACK-UP CHANNELS Fasten curb(s) to back-up channels and roof panel using self-tap Roof Panel screws (see drawing 5.2). DO NOT FASTEN CURB, ROOF PANEL, OR BACK-UP CHANNELS TO SUB-FRAMES. Drawing 5.2 Self Tap Screws Drawing 5.1 Back-up Channels (under roof panels) *NOTICE* Sub-frames and back-up channels not shown in the above picture(s). WARNING! Page 3 ALWAYS USE FALL PROTECTION WHILE WORKING AROUND ROOF OPENINGS.
- 5. ROOF CURB INSTALLATION INSTRUCTIONS R-PANEL COMPLETED INSTALLATION WARNING! Page 4 ALWAYS USE FALL PROTECTION WHILE WORKING AROUND ROOF OPENINGS.