Call Girls In Panjim North Goa 9971646499 Genuine Service
Sps Instruction Sheet
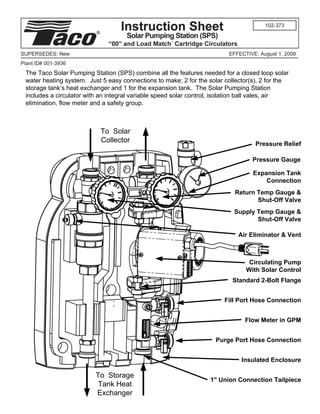
1. The Taco Solar Pumping Station (SPS) combine all the features needed for a closed loop solar
water heating system. Just 5 easy connections to make; 2 for the solar collector(s), 2 for the
storage tank’s heat exchanger and 1 for the expansion tank. The Solar Pumping Station
includes a circulator with an integral variable speed solar control, isolation ball vales, air
elimination, flow meter and a safety group.
To Solar
Collector Pressure Relief
Pressure Gauge
Expansion Tank
Connection
Return Temp Gauge &
Shut-Off Valve
Supply Temp Gauge &
Shut-Off Valve
Air Eliminator & Vent
Circulating Pump
With Solar Control
Standard 2-Bolt Flange
Fill Port Hose Connection
Flow Meter in GPM
Purge Port Hose Connection
Insulated Enclosure
To Storage
1" Union Connection Tailpiece
Tank Heat
Exchanger
2. Component Identification
(E) Safety Unit
The safety unit is CE and TUV approved
Supply
Return
and protects the installation from over
Supply Return
E pressurization. It is set to 87 psi (6 bar);
(A) Shut-off ball valve on the supply over this pressure the relief valve will open.
(thermometer with red ring and scale B The unit also comes with a pressure gauge
30-250°F & 0-120°C) with “Solar” check A
and a connection for the expansion tank by
valve. means of a 3/4" flexible hose kit (included).
(B) Shut-off ball on the return
(thermometer with blue ring and scale
30-250°F & 0-120°C) with “Solar” check
valve.
Solar Check Valve
The ball valves of both the supply and the
return feature an integral flow check (IFC).
It ensures no gravity flow and low head
losses. To manually open the check valve,
such as in the case of draining the system,
rotate the handle 45° clockwise.
(C) Circulating Pump C
The circulating pump is a standard variable
speed Taco 00 Series, 2 bolt flange style.
The ball valves before and after the
circulating pump, make it possible to
service the circulator without draining the
installation.
(D) Union Tailpiece (F) Flowmeter
The 1" unions on the Solar Pumping The flowmeter allows the installer to regulate the flow rate to
Station allow direct connections to flexible match the requirements of the installation, by means of a
stainless steel collector line sets as well as F balancing ball valve. If the balancing valve is closed then
adaptors to copper pipe. Adaptors (4) for circulation is cut off. Use the upper side fill valve to fill the solar
¾” copper pipe are supplied with unit. installation. Use the lower side purge valve for purging the
solar installation.
Optional Solar Differential
Temperature Control
D The convenience of the two valves helps to reduce the filling
(may be attached or shipped separate) and the purging time. The flow rate is measured and shown by
Please see manufactures supplied the sliding cursor inside the flowmeter. The flow rate is read
instructions for installation and set-up of from lower edge of sliding cursor. This measurement is
solar differential temperature control. effected by adjusting the balancing valve.
Directions for use of Flowmeter
Filling
Balancing Balancing
valve valve Balancing
closed open valve to
Flow
Locking the filling/drain
levers: regulate the
Remove the lever screw,
take off the lever, rotate flow rate
180°and replace it again. GPM
Flow rate shown
(in this case
8 GPM)
Drain
(2) – To starting up the installation:
(1) – Filling and purging the installation: Close the side filling and draining valves and open the balancing valve. (3) - Regulate the flow rate using the balancing
Remove the hose caps from the side filling and Remove the hose unions and replace hose caps. valve when circulator is running at full speed.
draining valves and connect the hose unions.
Close the balancing valve and open the side filling To avoid any unwanted opening of the side valves, it is better to lock Note: The flow rate is referenced from the lower
and draining valves. Use a pump to fill the system the levers in the close position, as shown. edge of sliding cursor. (See picture)
with a quality solar fluid to typically 20-40 psi.
3. Directions for Venting of Air
Supply
Return
Air Vent
The manual air vent is a device that continually removes air
that is entrained with the solar fluid. The air rises to the
upper part of the vent and it can be manually eliminated
through the special vent connection. Unscrew the knurled
metal ring lock 360° to vent any captured air.
This operation should to be done periodically.
Directions for Mounting Module
Epp Insulation Box Fastening holes on the back fixing plate. Openings on the
Measurements. 12.1” X 17.0” X 6.6” insulation box allow the fastening of pumping station without
(308 mm X 434 mm X 169 mm) disassembling the unit.
The enclosure has wiring channels suitable for routing
.40" of the power supply cable and of the temperature
sensor cables. A special window allows for reading
the flow rate without taking off the cover. The back
plate fastens the unit to the wall or to the storage tank.
6.3"
17.0"
.40"
12.1"
Back plate to fasten the unit to
the wall or to the storage tank.
4. Directions for Mounting Expansion Tank and Bracket
BRACKET AND CONNECTOR FOR THE EXPANSION TANK
(A) 3/4” flexible pipe connected to the safety unit of the solar pumping station.
A (B) Fiber sealing gasket included.
(C) Connector with double check valve to disconnect the expansion tank in a
reliable and fast way without any leakage.
(D) Expansion tank with 3/4” BSP threaded connection. (not included)
(E) Fixing bracket provided with plugs and screws to fix it to the wall.
(F) Bottom half of connector (C) that threads on to ¾” BSP expansion tank nipple.
B Attach the bracket (E) to the wall with the plugs or screws (centre distance 2.2" or
55 mm). Screw the Connector (F) to the expansion tank. Install the connector (C) F
on the fixing bracket using the special groove then lock with the nut. Screw
C connector (F) into the bottom of connector (C). Screw the flexible pipe from the
E safety unit (A) to the top of connector (C) with sealing gasket (B) in between.
REPLACEMENT OF THE EXPANSION TANK
The connector (C) holds up the expansion tank and allows for quick removal,
without any leakage. By unscrewing the nut (F) it is possible to disconnect one
D end of the connector from the expansion tank. The other end of the connector
stays fixed on the bracket connected to the safety unit. Both the ends have a
check valve that becomes operative at the time of the disconnection: this
prevents any leakage both from the expansion tank and from the flexible pipe.
To put in service again, it is necessary to reconnect the connector by screwing
the nut (F). In that way the two check valves are opened and the expansion
tank is again connected to the installation.
Note: If expansion tank nipple has NPT threads than use
a hardening type thread sealer like Loctite or SAF-T-LOC.
LIMITED WARRANTY STATEMENT
TACO OFFERS THIS WARRANTY IN LIEU
Taco, Inc. will repair or replace without Any Taco product or part not installed or OF ALL OTHER EXPRESS WARRANTIES.
charge (at the company’s option) any product operated in conformity with Taco instructions ANY WARRANTY IMPLIED BY LAW
or part which is proven defective under or which has been subject to misuse, INCLUDING WARRANTIES OF
normal use within one (1) year from the date misapplication, the addition of petroleum- MERCHANTABILITY OR FITNESS IS IN
of start-up or one (1) year and six (6) months based fluids or certain chemical additives to EFFECT ONLY FOR THE DURATION OF
from date of shipment (whichever occurs the systems, or other abuse, will not be THE EXPRESS WARRANTY SET FORTH
first). Taco, Inc. will repair or replace without covered by this warranty. If in doubt as to IN THE FIRST PARAGRAPH ABOVE. THE
charge (at the company’s option) any Taco whether a particular substance is suitable for ABOVE WARRANTIES ARE IN LIEU OF
“00” Series circulator cartridge that is proven use with a Taco product or part, or for any ALL OTHER WARRANTIES, EXPRESS OR
defective under normal use within three (3) application restrictions, consult the applicable STATUTORY, OR ANY OTHER
years from the date of start-up or three (3) Taco instruction sheets or contact Taco at WARRANTY OBLIGATION ON THE PART
years and six (6) months from date of [401-942-8000]. OF TACO. TACO WILL NOT BE LIABLE
shipment (whichever occurs first). In order to Taco reserves the right to provide FOR ANY SPECIAL, INCIDENTAL,
obtain service under this warranty, it is the replacement products and parts which are INDIRECT OR CONSEQUENTIAL
responsibility of the purchaser to promptly substantially similar in design and functionally DAMAGES RESULTING FROM THE USE
notify the local Taco stocking distributor or equivalent to the defective product or part. OF ITS PRODUCTS OR ANY INCIDENTAL
Taco in writing and promptly deliver the Taco reserves the right to make changes in COSTS OF REMOVING OR REPLACING
subject product or part, delivery prepaid, to details of design, construction, or DEFECTIVE PRODUCTS.
the stocking distributor. For assistance on arrangement of materials of its products This warranty gives the purchaser specific
warranty returns, the purchaser may either without notification. rights, and the purchaser may have other
contact the local Taco stocking distributor or rights which vary from state to state. Some
Taco. If the subject product or part contains states do not allow limitations on how long
no defect as covered in this warranty, the an implied warranty lasts or on the exclusion
purchaser will be billed for parts and labor of incidental or consequential damages, so
charges in effect at time of factory these limitations or exclusions may not apply
examination and repair. to you.
Solar MADE EASY. Printed in USA
TACO, INC., 1160 Cranston Street, Cranston, RI 02920 Telephone: (401) 942-8000 FAX: (401) 942-2360. Copyright 2009
TACO (Canada), Ltd., 8450 Lawson Road, Unit #3, Milton, Ontario L9T 0J8. Telephone: (905) 564-9422. FAX: (905) 564-9436. TACO, Inc.
Visit our web site at: http://www.taco-hvac.com