SlideShare a Scribd company logo
1 of 8
CISCO ROUTER CONFIGURATION TUTORIAL
Cisco Inter-network Operating System:
Cisco IOS Modes of Operation
The Cisco IOS software provides access to several different command modes. Each
command mode provides a different group of related commands.
For security purposes, the Cisco IOS software provides two levels of access to
commands: user and privileged. The unprivileged user mode is called user EXEC
mode. The privileged mode is called privileged EXEC mode and requires a password.
The commands available in user EXEC mode are a subset of the commands available
in privileged EXEC mode.
The following table describes some of the most commonly used modes, how to enter
the modes, and the resulting prompts. The prompt helps you identify which mode
you are in and, therefore, which commands are available to you

User EXEC Mode:
When you are connected to the router, you are started in user EXEC mode. The user
EXEC commands are a subset of the privileged EXEC commands.
Privileged EXEC Mode:
Privileged commands include the following:
•Configure–Changes the software configuration.
•Debug–Display process and hardware event messages.
•Setup–Enter configuration information at the prompts.
Enter the command disable to exit from the privileged EXEC mode and return to user
EXEC mode.
Configuration Mode
Configuration mode has a set of submodes that you use for modifying interface
settings, routing protocol settings, line settings, and so forth. Use caution with
configuration mode because all changes you enter take effect immediately.
To enter configuration mode, enter the command configure terminal and exit by
pressing Ctrl-Z.
Note:Almost every configuration command also has a no form. In general, use the no
form to disable a feature or function. Use the command without the keyword noto
re-enable a disabled feature or to enable a feature that is disabled by default. For
example, IP routing is enabled by default. To disable IP routing, enter the no ip
routing command and enterip routing to re-enable it.
Getting Help
In any command mode, you can get a list of available commands by entering a
question mark (?).
Router>?
To obtain a list of commands that begin with a particular character sequence, type in
those characters followed immediately by the question mark (?).
Router#co?
configure connect copy
To list keywords or arguments, enter a question mark in place of a keyword or
argument. Include a space before the question mark.
Router#configure ?
memory Configure from NV memory
network Configure from a TFTP network host
terminal Configure from the terminal
You can also abbreviate commands and keywords by entering just enough characters
to make the command unique from other commands. For example, you can
abbreviate the show command to sh.
Configuration Files
Any time you make changes to the router configuration, you must save the changes
to memory because if you do not they will be lost if there is a system reload or power
outage. There are two types of configuration files: the running (current operating)
configuration and the startup configuration.
Use the following privileged mode commands to work with configuration files.

•Configure terminal–modify the running configuration manually from the terminal.
•Show running-config–display the running configuration.
•Show startup-config–display the startup configuration.
•Copy running-config startup-config–copy the running configuration to the startup
configuration.

•Copy startup-config running-config–copy the startup configuration to the running
configuration.

•Erase startup-config–erase the startup-configuration in NVRAM.
•Copy tftp running-config–load a configuration file stored on a Trivial File Transfer
Protocol (TFTP)server into the running configuration.

•Copy running-configtftp–store the running configuration on a TFTP server.
IP Address Configuration
Take the following steps to configure the IP address of an interface.
Step1. Enter privileged EXEC mode:
Router>enable password
Step2. Enter the configure terminal command to enter global configuration mode.
Router#config terminal
Step3. Enter the interface type slot/port (for Cisco 7000 series) or interfacetype port
(for Cisco 2500 series) to enter the interface configuration mode.
Example:
Router (config)#interface ethernet 0/1
Step4. Enter the IP address and subnet mask of the interface using the ip address
ipaddresssubnetmask command.
Example,
Router (config-if)#ip address 192.168.10.1 255.255.255.0
Step5. Exit the configuration mode by pressing Ctrl-Z
Router(config-if)#[Ctrl-Z]
Routing Protocol Configuration
Routing Information Protocol (RIP)
Step1: Enter privileged EXEC mode:
Router>enable password
Step2: Enter the configure terminal command to enter global configuration mode.
Router#config terminal
Step3: Enter the router rip command
Router(config)#router rip
Step4: Add the network number to use RIP and repeat this step for all the numbers.
Router(config-router)#network network-number
Example: Router(config-router)#network 192.168.10.0
Note: To turn off RIP, use the no router rip command.
Router(config)#no router rip
Other useful commands
•Specify a RIP Version
By default, the software receives RIP version 1 and version 2 packets, but sends only
version 1 packets. To control which RIP version an interface sends, use one of the
following commands in interface configuration mode:

To control how packets received from an interface are processed, use one of the
following commands:

•Enable or Disable Split Horizon
Use one of the following commands in interface configuration mode:

Open Shortest Path First (OSPF)
Step1: Enter privileged EXEC mode:
Router>enable password
Step2: Enter the configure terminal command to enter global configuration mode.
Router#config terminal
Step3: Enter the router ospf command and follow by the process-id.
Router(config)#router ospf process-id
Pick the process-id which is not being used. To determine what ids are being used,
issue the show process command.
Router(config)#show process
Step4: Add the network number, mask and area-id
Router(config-router)#network network-number mask area area-id
The network-number identifies the network using OSPF. The mask tells which bits to
use from the network-number, and the area-id is used for determining areas in an
OSPF configuration.
Example:
Router(config-router)#network 192.168.10.0 255.255.255.0 area
0.0.0.0
Repeat this step for all the network numbers.
To turn off OSPF, use the following command.
Router(config)#no router ospf process-id
Other Useful Commands
•Configure OSPF Interface Parameters
You are not required to alter any of these parameters, but some interface parameters
must be consistent across all routers in an attached network.
In interface configuration mode, specify any of the following:
Interior Gateway Routing Protocol (IGRP)
•Create the IGRP Routing Process
To create the IGRP routing process, use the following required commands starting in
global configuration mode.

•Disable Holddown
The holddown mechanism is used to help avoid routing loop in the network, but has
the effect of increasing the topology convergence time.
To disable holddowns with IGRP, use the following command in router configuration
mode. All devices in an IGRP autonomous system must be consistent in their use of
holddowns.
•Enforce a Maximum Network Diameter
Define a maximum diameter to the IGRP network. Routes whose hop counts exceed
this diameter are not advertised. The default maximum diameter is 100 hops. The
maximum diameter is 255 hops.
Use the following command in router configuration mode.

•To turn off IGRP, use the following command.
Router(config)#no router igrp autonomous-system
Border Gateway Protocol (BGP)
•Enable BGP Routing
Use the following commands in global configuration mode.

•Configure BGP Neighbors
BGP must completely understand the relationships it has with its neighbors.

•Reset BGP Connections
Use either of the following commands in EXEC mode to reset BGP connections

•To turn off BGP, use the following command.
Router(config)#no router bgp autonomous-system
How to Read Router/Link Status
Status of router and links can be easily determined by power LED of router and link
LED of each interface (if any). However, you may find a transceiver connected to an
AUI port looks like the following:

When this transceiver is correctly connected, the “POWER” LED should light. Similarly,
the “LINK” and “POLARITY” LEDs should light when you inserted the cable into the
RJ45 socket on the transceiver. (Note that to get this result; the other end of the
cable should be connected to some other devices as well.) If these LEDs are not light,
you probably have problems with the link (cable).
More Related:
Cisco Router with Cisco ASA for Internet Access
Site to Site VPN between ASA Firewall & Cisco Router
How to Reset a Cisco Router Back to Factory Defaults?
How to Configure SNMP on Cisco IOS-based Router/Switch?
Basic Knowledge Related to Popular Cisco Cards and Cisco Modules

More Related Content

What's hot

CCNA Exploration 2 - Chapter 1
CCNA Exploration 2 - Chapter 1CCNA Exploration 2 - Chapter 1
CCNA Exploration 2 - Chapter 1
Irsandi Hasan
 

What's hot (20)

Chapter 15 : routing concepts
Chapter 15 : routing conceptsChapter 15 : routing concepts
Chapter 15 : routing concepts
 
CCNA 2 Routing and Switching v5.0 Chapter 4
CCNA 2 Routing and Switching v5.0 Chapter 4CCNA 2 Routing and Switching v5.0 Chapter 4
CCNA 2 Routing and Switching v5.0 Chapter 4
 
Cisco router-commands
Cisco router-commandsCisco router-commands
Cisco router-commands
 
Static Routing
Static RoutingStatic Routing
Static Routing
 
1000 Ccna Questions And Answers
1000 Ccna Questions And Answers1000 Ccna Questions And Answers
1000 Ccna Questions And Answers
 
EtherChannel Configuration
EtherChannel ConfigurationEtherChannel Configuration
EtherChannel Configuration
 
Presentation on ccna
Presentation on ccnaPresentation on ccna
Presentation on ccna
 
CCNA 1 Routing and Switching v5.0 Chapter 9
CCNA 1 Routing and Switching v5.0 Chapter 9CCNA 1 Routing and Switching v5.0 Chapter 9
CCNA 1 Routing and Switching v5.0 Chapter 9
 
How to configure vlan, stp, dtp step by step guide
How to configure vlan, stp, dtp step by step guideHow to configure vlan, stp, dtp step by step guide
How to configure vlan, stp, dtp step by step guide
 
Overview of Spanning Tree Protocol (STP & RSTP)
Overview of Spanning Tree Protocol (STP & RSTP)Overview of Spanning Tree Protocol (STP & RSTP)
Overview of Spanning Tree Protocol (STP & RSTP)
 
Les commandes CISCO (routeur)
Les commandes CISCO (routeur)Les commandes CISCO (routeur)
Les commandes CISCO (routeur)
 
IOS Cisco - Cheat sheets
IOS Cisco - Cheat sheetsIOS Cisco - Cheat sheets
IOS Cisco - Cheat sheets
 
Ccna PPT
Ccna PPTCcna PPT
Ccna PPT
 
Ccna command
Ccna commandCcna command
Ccna command
 
Modes of router
Modes of routerModes of router
Modes of router
 
CCNA2 Verson6 Chapter6
CCNA2 Verson6 Chapter6CCNA2 Verson6 Chapter6
CCNA2 Verson6 Chapter6
 
Routers and Routing Configuration
Routers and Routing ConfigurationRouters and Routing Configuration
Routers and Routing Configuration
 
Ccnp workbook network bulls
Ccnp workbook network bullsCcnp workbook network bulls
Ccnp workbook network bulls
 
CCNA Exploration 2 - Chapter 1
CCNA Exploration 2 - Chapter 1CCNA Exploration 2 - Chapter 1
CCNA Exploration 2 - Chapter 1
 
Ccna ppt1
Ccna ppt1Ccna ppt1
Ccna ppt1
 

Similar to Cisco router configuration tutorial

CCNA at a glance
CCNA at a glanceCCNA at a glance
CCNA at a glance
Vikas Raut
 
VESIT WORKSHOP SIMULATIONS.ppt
VESIT WORKSHOP SIMULATIONS.pptVESIT WORKSHOP SIMULATIONS.ppt
VESIT WORKSHOP SIMULATIONS.ppt
zmulani8
 
VESIT WORKSHOP SIMULATIONS.ppt
VESIT WORKSHOP SIMULATIONS.pptVESIT WORKSHOP SIMULATIONS.ppt
VESIT WORKSHOP SIMULATIONS.ppt
zmulani8
 

Similar to Cisco router configuration tutorial (20)

General lab documentation~cisco router configuration
General lab documentation~cisco router configurationGeneral lab documentation~cisco router configuration
General lab documentation~cisco router configuration
 
test
testtest
test
 
Cisco config
Cisco configCisco config
Cisco config
 
Cisco config
Cisco configCisco config
Cisco config
 
Cisco config
Cisco configCisco config
Cisco config
 
10 Command Line quan trọng để giao tiếp với Cisco IOs
10 Command Line quan trọng để giao tiếp với Cisco IOs10 Command Line quan trọng để giao tiếp với Cisco IOs
10 Command Line quan trọng để giao tiếp với Cisco IOs
 
Cisco Internetworking Operating System (ios)
Cisco Internetworking Operating System (ios)Cisco Internetworking Operating System (ios)
Cisco Internetworking Operating System (ios)
 
CCNA presentation.
CCNA presentation.CCNA presentation.
CCNA presentation.
 
Cis81 ccna1v5-2-configuring networkoperatingsystem
Cis81 ccna1v5-2-configuring networkoperatingsystemCis81 ccna1v5-2-configuring networkoperatingsystem
Cis81 ccna1v5-2-configuring networkoperatingsystem
 
Ccna command
Ccna commandCcna command
Ccna command
 
Mod11
Mod11Mod11
Mod11
 
CCNA at a glance
CCNA at a glanceCCNA at a glance
CCNA at a glance
 
OSWAN.pptx
OSWAN.pptxOSWAN.pptx
OSWAN.pptx
 
operating and configuring cisco a cisco IOS device
operating and configuring cisco a cisco IOS deviceoperating and configuring cisco a cisco IOS device
operating and configuring cisco a cisco IOS device
 
CCNA ALL IN ONE
CCNA ALL IN ONE CCNA ALL IN ONE
CCNA ALL IN ONE
 
C C N A Day2
C C N A  Day2C C N A  Day2
C C N A Day2
 
VESIT WORKSHOP SIMULATIONS.ppt
VESIT WORKSHOP SIMULATIONS.pptVESIT WORKSHOP SIMULATIONS.ppt
VESIT WORKSHOP SIMULATIONS.ppt
 
VESIT WORKSHOP SIMULATIONS.ppt
VESIT WORKSHOP SIMULATIONS.pptVESIT WORKSHOP SIMULATIONS.ppt
VESIT WORKSHOP SIMULATIONS.ppt
 
VESIT WORKSHOP SIMULATIONS.ppt
VESIT WORKSHOP SIMULATIONS.pptVESIT WORKSHOP SIMULATIONS.ppt
VESIT WORKSHOP SIMULATIONS.ppt
 
CCNA ppt Day 4
CCNA ppt Day 4CCNA ppt Day 4
CCNA ppt Day 4
 

More from IT Tech

More from IT Tech (20)

Cisco ip phone key expansion module setup
Cisco ip phone key expansion module setupCisco ip phone key expansion module setup
Cisco ip phone key expansion module setup
 
Cisco catalyst 9200 series platform spec, licenses, transition guide
Cisco catalyst 9200 series platform spec, licenses, transition guideCisco catalyst 9200 series platform spec, licenses, transition guide
Cisco catalyst 9200 series platform spec, licenses, transition guide
 
Cisco isr 900 series highlights, platform specs, licenses, transition guide
Cisco isr 900 series highlights, platform specs, licenses, transition guideCisco isr 900 series highlights, platform specs, licenses, transition guide
Cisco isr 900 series highlights, platform specs, licenses, transition guide
 
Hpe pro liant gen9 to gen10 server transition guide
Hpe pro liant gen9 to gen10 server transition guideHpe pro liant gen9 to gen10 server transition guide
Hpe pro liant gen9 to gen10 server transition guide
 
The new cisco isr 4461 faq
The new cisco isr 4461 faqThe new cisco isr 4461 faq
The new cisco isr 4461 faq
 
New nexus 400 gigabit ethernet (400 g) switches
New nexus 400 gigabit ethernet (400 g) switchesNew nexus 400 gigabit ethernet (400 g) switches
New nexus 400 gigabit ethernet (400 g) switches
 
Tested cisco isr 1100 delivers the richest set of wi-fi features
Tested cisco isr 1100 delivers the richest set of wi-fi featuresTested cisco isr 1100 delivers the richest set of wi-fi features
Tested cisco isr 1100 delivers the richest set of wi-fi features
 
Aruba campus and branch switching solution
Aruba campus and branch switching solutionAruba campus and branch switching solution
Aruba campus and branch switching solution
 
Cisco transceiver module for compatible catalyst switches
Cisco transceiver module for compatible catalyst switchesCisco transceiver module for compatible catalyst switches
Cisco transceiver module for compatible catalyst switches
 
Cisco ios on cisco catalyst switches
Cisco ios on cisco catalyst switchesCisco ios on cisco catalyst switches
Cisco ios on cisco catalyst switches
 
Cisco's wireless solutions deployment modes
Cisco's wireless solutions deployment modesCisco's wireless solutions deployment modes
Cisco's wireless solutions deployment modes
 
Competitive switching comparison cisco vs. hpe aruba vs. huawei vs. dell
Competitive switching comparison cisco vs. hpe aruba vs. huawei vs. dellCompetitive switching comparison cisco vs. hpe aruba vs. huawei vs. dell
Competitive switching comparison cisco vs. hpe aruba vs. huawei vs. dell
 
Four reasons to consider the all in-one isr 1000
Four reasons to consider the all in-one isr 1000Four reasons to consider the all in-one isr 1000
Four reasons to consider the all in-one isr 1000
 
The difference between yellow and white labeled ports on a nexus 2300 series fex
The difference between yellow and white labeled ports on a nexus 2300 series fexThe difference between yellow and white labeled ports on a nexus 2300 series fex
The difference between yellow and white labeled ports on a nexus 2300 series fex
 
Cisco transceiver modules for compatible cisco switches series
Cisco transceiver modules for compatible cisco switches seriesCisco transceiver modules for compatible cisco switches series
Cisco transceiver modules for compatible cisco switches series
 
Guide to the new cisco firepower 2100 series
Guide to the new cisco firepower 2100 seriesGuide to the new cisco firepower 2100 series
Guide to the new cisco firepower 2100 series
 
892 f sfp configuration example
892 f sfp configuration example892 f sfp configuration example
892 f sfp configuration example
 
Cisco nexus 7000 and nexus 7700
Cisco nexus 7000 and nexus 7700Cisco nexus 7000 and nexus 7700
Cisco nexus 7000 and nexus 7700
 
Cisco firepower ngips series migration options
Cisco firepower ngips series migration optionsCisco firepower ngips series migration options
Cisco firepower ngips series migration options
 
Eol transceiver to replacement model
Eol transceiver to replacement modelEol transceiver to replacement model
Eol transceiver to replacement model
 

Recently uploaded

Artificial Intelligence: Facts and Myths
Artificial Intelligence: Facts and MythsArtificial Intelligence: Facts and Myths
Artificial Intelligence: Facts and Myths
Joaquim Jorge
 
Cloud Frontiers: A Deep Dive into Serverless Spatial Data and FME
Cloud Frontiers:  A Deep Dive into Serverless Spatial Data and FMECloud Frontiers:  A Deep Dive into Serverless Spatial Data and FME
Cloud Frontiers: A Deep Dive into Serverless Spatial Data and FME
Safe Software
 

Recently uploaded (20)

Artificial Intelligence: Facts and Myths
Artificial Intelligence: Facts and MythsArtificial Intelligence: Facts and Myths
Artificial Intelligence: Facts and Myths
 
Strategize a Smooth Tenant-to-tenant Migration and Copilot Takeoff
Strategize a Smooth Tenant-to-tenant Migration and Copilot TakeoffStrategize a Smooth Tenant-to-tenant Migration and Copilot Takeoff
Strategize a Smooth Tenant-to-tenant Migration and Copilot Takeoff
 
Top 10 Most Downloaded Games on Play Store in 2024
Top 10 Most Downloaded Games on Play Store in 2024Top 10 Most Downloaded Games on Play Store in 2024
Top 10 Most Downloaded Games on Play Store in 2024
 
Repurposing LNG terminals for Hydrogen Ammonia: Feasibility and Cost Saving
Repurposing LNG terminals for Hydrogen Ammonia: Feasibility and Cost SavingRepurposing LNG terminals for Hydrogen Ammonia: Feasibility and Cost Saving
Repurposing LNG terminals for Hydrogen Ammonia: Feasibility and Cost Saving
 
Boost Fertility New Invention Ups Success Rates.pdf
Boost Fertility New Invention Ups Success Rates.pdfBoost Fertility New Invention Ups Success Rates.pdf
Boost Fertility New Invention Ups Success Rates.pdf
 
AWS Community Day CPH - Three problems of Terraform
AWS Community Day CPH - Three problems of TerraformAWS Community Day CPH - Three problems of Terraform
AWS Community Day CPH - Three problems of Terraform
 
Apidays New York 2024 - The Good, the Bad and the Governed by David O'Neill, ...
Apidays New York 2024 - The Good, the Bad and the Governed by David O'Neill, ...Apidays New York 2024 - The Good, the Bad and the Governed by David O'Neill, ...
Apidays New York 2024 - The Good, the Bad and the Governed by David O'Neill, ...
 
Apidays New York 2024 - Scaling API-first by Ian Reasor and Radu Cotescu, Adobe
Apidays New York 2024 - Scaling API-first by Ian Reasor and Radu Cotescu, AdobeApidays New York 2024 - Scaling API-first by Ian Reasor and Radu Cotescu, Adobe
Apidays New York 2024 - Scaling API-first by Ian Reasor and Radu Cotescu, Adobe
 
Cloud Frontiers: A Deep Dive into Serverless Spatial Data and FME
Cloud Frontiers:  A Deep Dive into Serverless Spatial Data and FMECloud Frontiers:  A Deep Dive into Serverless Spatial Data and FME
Cloud Frontiers: A Deep Dive into Serverless Spatial Data and FME
 
Top 5 Benefits OF Using Muvi Live Paywall For Live Streams
Top 5 Benefits OF Using Muvi Live Paywall For Live StreamsTop 5 Benefits OF Using Muvi Live Paywall For Live Streams
Top 5 Benefits OF Using Muvi Live Paywall For Live Streams
 
Strategies for Unlocking Knowledge Management in Microsoft 365 in the Copilot...
Strategies for Unlocking Knowledge Management in Microsoft 365 in the Copilot...Strategies for Unlocking Knowledge Management in Microsoft 365 in the Copilot...
Strategies for Unlocking Knowledge Management in Microsoft 365 in the Copilot...
 
Partners Life - Insurer Innovation Award 2024
Partners Life - Insurer Innovation Award 2024Partners Life - Insurer Innovation Award 2024
Partners Life - Insurer Innovation Award 2024
 
A Domino Admins Adventures (Engage 2024)
A Domino Admins Adventures (Engage 2024)A Domino Admins Adventures (Engage 2024)
A Domino Admins Adventures (Engage 2024)
 
TrustArc Webinar - Unlock the Power of AI-Driven Data Discovery
TrustArc Webinar - Unlock the Power of AI-Driven Data DiscoveryTrustArc Webinar - Unlock the Power of AI-Driven Data Discovery
TrustArc Webinar - Unlock the Power of AI-Driven Data Discovery
 
Bajaj Allianz Life Insurance Company - Insurer Innovation Award 2024
Bajaj Allianz Life Insurance Company - Insurer Innovation Award 2024Bajaj Allianz Life Insurance Company - Insurer Innovation Award 2024
Bajaj Allianz Life Insurance Company - Insurer Innovation Award 2024
 
Boost PC performance: How more available memory can improve productivity
Boost PC performance: How more available memory can improve productivityBoost PC performance: How more available memory can improve productivity
Boost PC performance: How more available memory can improve productivity
 
🐬 The future of MySQL is Postgres 🐘
🐬  The future of MySQL is Postgres   🐘🐬  The future of MySQL is Postgres   🐘
🐬 The future of MySQL is Postgres 🐘
 
Strategies for Landing an Oracle DBA Job as a Fresher
Strategies for Landing an Oracle DBA Job as a FresherStrategies for Landing an Oracle DBA Job as a Fresher
Strategies for Landing an Oracle DBA Job as a Fresher
 
Deploy with confidence: VMware Cloud Foundation 5.1 on next gen Dell PowerEdg...
Deploy with confidence: VMware Cloud Foundation 5.1 on next gen Dell PowerEdg...Deploy with confidence: VMware Cloud Foundation 5.1 on next gen Dell PowerEdg...
Deploy with confidence: VMware Cloud Foundation 5.1 on next gen Dell PowerEdg...
 
Powerful Google developer tools for immediate impact! (2023-24 C)
Powerful Google developer tools for immediate impact! (2023-24 C)Powerful Google developer tools for immediate impact! (2023-24 C)
Powerful Google developer tools for immediate impact! (2023-24 C)
 

Cisco router configuration tutorial

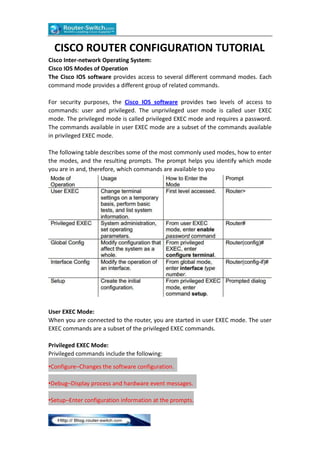
  • 1. CISCO ROUTER CONFIGURATION TUTORIAL Cisco Inter-network Operating System: Cisco IOS Modes of Operation The Cisco IOS software provides access to several different command modes. Each command mode provides a different group of related commands. For security purposes, the Cisco IOS software provides two levels of access to commands: user and privileged. The unprivileged user mode is called user EXEC mode. The privileged mode is called privileged EXEC mode and requires a password. The commands available in user EXEC mode are a subset of the commands available in privileged EXEC mode. The following table describes some of the most commonly used modes, how to enter the modes, and the resulting prompts. The prompt helps you identify which mode you are in and, therefore, which commands are available to you User EXEC Mode: When you are connected to the router, you are started in user EXEC mode. The user EXEC commands are a subset of the privileged EXEC commands. Privileged EXEC Mode: Privileged commands include the following: •Configure–Changes the software configuration. •Debug–Display process and hardware event messages. •Setup–Enter configuration information at the prompts.
  • 2. Enter the command disable to exit from the privileged EXEC mode and return to user EXEC mode. Configuration Mode Configuration mode has a set of submodes that you use for modifying interface settings, routing protocol settings, line settings, and so forth. Use caution with configuration mode because all changes you enter take effect immediately. To enter configuration mode, enter the command configure terminal and exit by pressing Ctrl-Z. Note:Almost every configuration command also has a no form. In general, use the no form to disable a feature or function. Use the command without the keyword noto re-enable a disabled feature or to enable a feature that is disabled by default. For example, IP routing is enabled by default. To disable IP routing, enter the no ip routing command and enterip routing to re-enable it. Getting Help In any command mode, you can get a list of available commands by entering a question mark (?). Router>? To obtain a list of commands that begin with a particular character sequence, type in those characters followed immediately by the question mark (?). Router#co? configure connect copy To list keywords or arguments, enter a question mark in place of a keyword or argument. Include a space before the question mark. Router#configure ? memory Configure from NV memory network Configure from a TFTP network host terminal Configure from the terminal You can also abbreviate commands and keywords by entering just enough characters to make the command unique from other commands. For example, you can abbreviate the show command to sh. Configuration Files Any time you make changes to the router configuration, you must save the changes to memory because if you do not they will be lost if there is a system reload or power outage. There are two types of configuration files: the running (current operating) configuration and the startup configuration.
  • 3. Use the following privileged mode commands to work with configuration files. •Configure terminal–modify the running configuration manually from the terminal. •Show running-config–display the running configuration. •Show startup-config–display the startup configuration. •Copy running-config startup-config–copy the running configuration to the startup configuration. •Copy startup-config running-config–copy the startup configuration to the running configuration. •Erase startup-config–erase the startup-configuration in NVRAM. •Copy tftp running-config–load a configuration file stored on a Trivial File Transfer Protocol (TFTP)server into the running configuration. •Copy running-configtftp–store the running configuration on a TFTP server. IP Address Configuration Take the following steps to configure the IP address of an interface. Step1. Enter privileged EXEC mode: Router>enable password Step2. Enter the configure terminal command to enter global configuration mode. Router#config terminal Step3. Enter the interface type slot/port (for Cisco 7000 series) or interfacetype port (for Cisco 2500 series) to enter the interface configuration mode. Example: Router (config)#interface ethernet 0/1 Step4. Enter the IP address and subnet mask of the interface using the ip address ipaddresssubnetmask command. Example, Router (config-if)#ip address 192.168.10.1 255.255.255.0 Step5. Exit the configuration mode by pressing Ctrl-Z Router(config-if)#[Ctrl-Z] Routing Protocol Configuration Routing Information Protocol (RIP) Step1: Enter privileged EXEC mode: Router>enable password Step2: Enter the configure terminal command to enter global configuration mode.
  • 4. Router#config terminal Step3: Enter the router rip command Router(config)#router rip Step4: Add the network number to use RIP and repeat this step for all the numbers. Router(config-router)#network network-number Example: Router(config-router)#network 192.168.10.0 Note: To turn off RIP, use the no router rip command. Router(config)#no router rip Other useful commands •Specify a RIP Version By default, the software receives RIP version 1 and version 2 packets, but sends only version 1 packets. To control which RIP version an interface sends, use one of the following commands in interface configuration mode: To control how packets received from an interface are processed, use one of the following commands: •Enable or Disable Split Horizon Use one of the following commands in interface configuration mode: Open Shortest Path First (OSPF) Step1: Enter privileged EXEC mode: Router>enable password Step2: Enter the configure terminal command to enter global configuration mode.
  • 5. Router#config terminal Step3: Enter the router ospf command and follow by the process-id. Router(config)#router ospf process-id Pick the process-id which is not being used. To determine what ids are being used, issue the show process command. Router(config)#show process Step4: Add the network number, mask and area-id Router(config-router)#network network-number mask area area-id The network-number identifies the network using OSPF. The mask tells which bits to use from the network-number, and the area-id is used for determining areas in an OSPF configuration. Example: Router(config-router)#network 192.168.10.0 255.255.255.0 area 0.0.0.0 Repeat this step for all the network numbers. To turn off OSPF, use the following command. Router(config)#no router ospf process-id Other Useful Commands •Configure OSPF Interface Parameters You are not required to alter any of these parameters, but some interface parameters must be consistent across all routers in an attached network. In interface configuration mode, specify any of the following:
  • 6. Interior Gateway Routing Protocol (IGRP) •Create the IGRP Routing Process To create the IGRP routing process, use the following required commands starting in global configuration mode. •Disable Holddown The holddown mechanism is used to help avoid routing loop in the network, but has the effect of increasing the topology convergence time. To disable holddowns with IGRP, use the following command in router configuration mode. All devices in an IGRP autonomous system must be consistent in their use of holddowns.
  • 7. •Enforce a Maximum Network Diameter Define a maximum diameter to the IGRP network. Routes whose hop counts exceed this diameter are not advertised. The default maximum diameter is 100 hops. The maximum diameter is 255 hops. Use the following command in router configuration mode. •To turn off IGRP, use the following command. Router(config)#no router igrp autonomous-system Border Gateway Protocol (BGP) •Enable BGP Routing Use the following commands in global configuration mode. •Configure BGP Neighbors BGP must completely understand the relationships it has with its neighbors. •Reset BGP Connections Use either of the following commands in EXEC mode to reset BGP connections •To turn off BGP, use the following command.
  • 8. Router(config)#no router bgp autonomous-system How to Read Router/Link Status Status of router and links can be easily determined by power LED of router and link LED of each interface (if any). However, you may find a transceiver connected to an AUI port looks like the following: When this transceiver is correctly connected, the “POWER” LED should light. Similarly, the “LINK” and “POLARITY” LEDs should light when you inserted the cable into the RJ45 socket on the transceiver. (Note that to get this result; the other end of the cable should be connected to some other devices as well.) If these LEDs are not light, you probably have problems with the link (cable). More Related: Cisco Router with Cisco ASA for Internet Access Site to Site VPN between ASA Firewall & Cisco Router How to Reset a Cisco Router Back to Factory Defaults? How to Configure SNMP on Cisco IOS-based Router/Switch? Basic Knowledge Related to Popular Cisco Cards and Cisco Modules