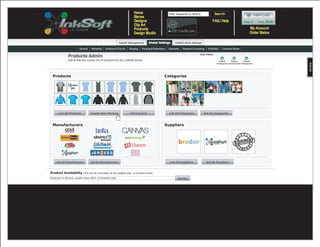
1. Products Categories
List All Products Create New Product Pricing Grid List All Categories Set Up Categories
Manufacturers Suppliers
List All Manufacturers Set Up Manufacturers List All Suppliers Set Up Suppliers
Product Availability (This can be overridden at the supplier and / or product levels)
Produced on demand, usually ships within 10 business days Update
2. Help Videos
Products Admin
Add & Edit the master list of products for ALL Custom Outfitters stores.
Back to Product Admin Dashboard
Create a New Product Create a Static Product
This feature allows you to upload a This feature allows you to add artwork
new garment into the system and to a product already in the system,
assign product name, price, colors, assign colors to the product and make
description, features, SKU, etc. the product uneditable to customers.
3. Help Videos
Create a New Product “Wizard”
Create and upload new products for All InkSoft Stores
Back to Product Admin Dashboard
1. Create name / sku / price 2. Choose colors / sizes 3. Select categories / stores 4. Upload product images 5. Define print regions 6. View product details
Create a New Product (please fill out all fields) Instructions:
Browse Sanmar Catalog
PRODUCT INFORMATION
Product Information
1. Choose a supplier from the pulldown menu.
Supplier: Broder Price: $ (+Printing)
2. Choose a manufacturer from the pulldown menu.
Manufacturer: Bella Cost: $ (+Printing)
3. Name your product.
Name: Radical Tee SKU:
4. Input the fabric weight of product.
Weight: oz Mfr. SKU:
5. Set retail price for product (this price to include printing).
Product Options 6. Set cost for product (this prict to include printing).
Printing ( FREE) Disable Names & Numbers 7. Assign product a SKU (stock keeping unit).
Embroidery ( FREE) Featured Product
8. Input manufacturer’s product SKU.
Print on Sleeves
PRODUCT OPTIONS
Product Description: 9. Select desired product options.
• Free = no charge to customer for printing or embroiodery.
10. • Featured Product = this product will show up on your stores’ home
11. pages in the “start with a product” section.
Product Availability:
Write a product description (this will be visible to the end user).
Produced on demand, usually ships within 10 business days
12. Write notes on product availability (this will be visible to the end user
Save Next > and gives a timeframe for product shipment).
Click the “next” button” to continue to the next step.
Note: Click the “Browse Sanmar Catalog” button to browse or load SKU’s from
Sanmar’s product catalog.
4. Help Videos
Create a New Product “Wizard”
Create and upload new products for All InkSoft Stores
Back to Product Admin Dashboard
1. Create name / sku / price 2. Choose colors / sizes 3. Select categories / stores 4. Upload product images 5. Define print regions 6. View product details
Choose Sizes and Colors Instructions:
Size Information (check available sizes below)
SIZE
Sizes Upcharge (make upcharge global)
1. Please select each size available for this product in any given
Small (Sm) $ 0.00
Medium (M) $ 0.00 style/color.
Large (L) $ 0.00 2. The order you enter sizes is the order which it will appear to your
X Large (XL) $ 0.00
customers, so be sure to order them appropriately.
XX Larrge (XXL) $
XXX Large (XXXL) $ 3. Add the upcharge (if any) for each size available (the upcharge
XXXX Large (XXXXL) $ SHOULD NOT include the price of the product).
Color Information (enter available colors below) 4. Select “make upcharge global” option if you would like this upcharge
Color HTML Colors (input the hex color value here) to apply to all colors/styles of this product.
Color Name Color 1: Color 2: COLOR
Light Blue DX718F
Light Green VNH887
5. Please enter the name of each style/color available for this product.
1A8EDB
Middle Grey FHR21A Once the product is created, you will have the opportunity to pick the
Violet BDL89D
HTML colors, override the price/cost/weight/sizes, and upload the
images for each one.
6. Prepare your product images to upload by creating 500x500 pixel
transparent images (preferrably PNG format) and naming each one
< Back Save Next > with the style/color name and side (front/back/etc.) within the file
name so you can batch upload them all at once.
7. Click the “next” button” to continue to the next step or click the back
button to go to the provious step.
5. Help Videos
Create a New Product “Wizard”
Create and upload new products for All InkSoft Stores
Back to Product Admin Dashboard
1. Create name / sku / price 2. Choose colors / sizes 3. Select categories / stores 4. Upload product images 5. Define print regions 6. View product details
Choose Categories and Stores Instructions:
Categories Stores CATEGORIES
Changes saved immediately Changes saved immediately
1. In the “Categories” section, please select the desired categories in
SELECT ALL which you would like this product to appear.
2. To add a new category, select from the drop down menu in the “Add
New Category field.
3. To create a new category, type in the category name in the ”Add New
Category” field and click the green plus sign.
STORES
4. In the “Stores” section, please select the desired stores in which you
would like this product to appear.
5. Click the “next” button” to continue to the next step or click the back
button to go to the provious step.
< Back Save Next >
6. Help Videos
Create a New Product “Wizard”
Create and upload new products for All InkSoft Stores
Back to Product Admin Dashboard
1. Create name / sku / price 2. Choose colors / sizes 3. Select categories / stores 4. Upload product images 5. Define print regions 6. View product details
Upload Product Image(s) Instructions:
Upload one image or multiple images 1. To upload a product image(s), click the “Browse Images on Computer”
button and locate the image(s) on your computer.
Browse Images on Computer
2. Select all the images you want to upload and click “open”. The images
will upload into the system from your computer.
See sample product images below (500 x 500 pixel transparent .png)
3. When creating product images, each file name must include the
500px 500px product color (black/white/etc.) and product side (front/back/etc.) in
order to be processed properly. ex. my_tee_sage_front.png
4. Click the “next” button” to continue to the next step or click the back
button to go to the provious step.
500px 500px
my_tee_sage_front.png my_tee_sage_back.png
Note: please upload 500 x 500 pixel transparent images (preferably PNG format).
< Back Save Next >
7. Help Videos
Create a New Product “Wizard”
Create and upload new products for All InkSoft Stores
Back to Product Admin Dashboard
1. Create name / sku / price 2. Choose colors / sizes 3. Select categories / stores 4. Upload product images 5. Define print regions 6. View product details
Define Product Print Regions Instructions:
Note: The print region is the maximum allowable area that can be printed
on the product.
Browse Images on Computer
1. Select “Side” of product (front/back/etc.) from the pull down menu.
2. Enter the name of the print region in the “Name” field.
(ex. full/left chest/etc.)
3. Click the red box and a new window will appear to allow you to
manually set the print region and print widths.
4. To make a print region the default, select the “Default” box.
Once you have selected all of the desired print regions, click the
5. “Create New Product” button to complete the process and create your
new product.
6. Click the “next” button” to continue to the next step or click the back
button to go to the provious step.
< Back Save Create New Product
8. Help Videos
Create a New Products “Wizard”
Create and upload new products for All InkSoft Stores
Back to Product Admin Dashboard
1. Create name / sku / price 2. Choose colors / sizes 3. Select categories / stores 4. Upload product images 5. Define print regions 6. View product details
Define Product Print Regions
Browse Images on Computer
Add a Print Width Size
Name Size
< Back Save Create New Product
Instructions:
1. PRINT REGIONS
Click and Drag mouse over product image to define the print region.
2. Click “Default” to make this the default print region in the designer.
PRINT WIDTHS
3. Enter the Names and Sizes in the ‘Print Width Sizes” field.
4. Click the “next” button” to continue to the next step or click the back
button to go to the provious step.
9. Help Videos
Create a New Products “Wizard”
Create and upload new products for All InkSoft Stores
Back to Product Admin Dashboard
1. Create name / sku / price 2. Choose colors / sizes 3. Select categories / stores 4. Upload product images 5. Define print regions 6. View product details
Save
View / Edit Product Details Sizes and Colors View Additional Product Details
Colors/Sizes
Product Information Categories/Stores
Size Information (check available sizes below)
Sizes Upcharge
Supplier: Broder Price: $ (+Printing) Print Regions
Small (Sm) $ 0.00
Manufacturer: Bella Cost: $ (+Printing)
Medium (M) $ 0.00
Name: SKU: Large (L) $ 0.00
Weight: oz Mfr. SKU: X Large (XL) $ 0.00
XX Larrge (XXL) $
Product Options XXX Large (XXXL) $
Printing ( FREE) Disable Names & Numbers XXXX Large (XXXXL) $
Embroidery ( FREE) Featured Product
Color Information (enter available colors below)
Print on Sleeves
Color HTML Colors
Product Description: Color Name Color 1: Color 2:
Light Blue DX718F
Light Green VNH887
Middle Grey FHR21A
Violet BDL89D
Product Availability:
Produced on demand, usually ships within 10 business days
CACTUS GREEN
Sizes Upcharge
Price: $ (+Printing) Color 1: A0B074
Default
Cost: $ (+Printing) Color 2:
Active
SKU:
Delete
Mfr. SKU:
CAROLINA BLUE
Sizes Upcharge
Price: $ (+Printing) Color 1: 1A8EDB
Default
Cost: $ (+Printing) Color 2:
Active Delete Product
SKU:
Delete
Mfr. SKU:
10. Help Videos
Create a New Products “Wizard”
Create and upload new products for All InkSoft Stores
Back to Product Admin Dashboard
1. Create name / sku / price 2. Choose colors / sizes 3. Select categories / stores 4. Upload product images 5. Define print regions 6. View product details
Save
View / Edit Product Details Categories / Stores View Additional Product Details
Colors/Sizes
Product Information Categories Categories/Stores
Stores
Supplier: Broder Price: $ (+Printing) Print Regions
Changes saved immediately Changes saved immediately
Manufacturer: Bella Cost: $ (+Printing)
SELECT ALL
Name: SKU:
Weight: oz Mfr. SKU:
Product Options
Printing ( FREE) Disable Names & Numbers
Embroidery ( FREE) Featured Product
Print on Sleeves
Product Description:
Product Availability:
Produced on demand, usually ships within 10 business days
CACTUS GREEN
Sizes Upcharge
Price: $ (+Printing) Color 1: A0B074
Default
Cost: $ (+Printing) Color 2:
Active
SKU:
Delete
Mfr. SKU:
CAROLINA BLUE
Sizes Upcharge
Price: $ (+Printing) Color 1: 1A8EDB
Default
Cost: $ (+Printing) Color 2:
Active Delete Product
SKU:
Delete
Mfr. SKU:
11. Help Videos
Create a New Products “Wizard”
Create and upload new products for All InkSoft Stores
Back to Product Admin Dashboard
1. Create name / sku / price 2. Choose colors / sizes 3. Select categories / stores 4. Upload product images 5. Define print regions 6. View product details
Save
View / Edit Product Details Print Regions View Additional Product Details
Colors/Sizes
Product Information Categories/Stores
Stores
Supplier: Broder Price: $ (+Printing) Print Regions
$ Browse Images on Computer
Manufacturer: Bella Cost: (+Printing)
Name: SKU:
Weight: oz Mfr. SKU:
Product Options
Printing ( FREE) Disable Names & Numbers
Embroidery ( FREE) Featured Product
Print on Sleeves
Product Description:
Product Availability:
Produced on demand, usually ships within 10 business days
CACTUS GREEN
Sizes Upcharge
Price: $ (+Printing) Color 1: A0B074
Default
Cost: $ (+Printing) Color 2:
Active
SKU:
Delete
Mfr. SKU:
CAROLINA BLUE
Sizes Upcharge
Price: $ (+Printing) Color 1: 1A8EDB
Default
Cost: $ (+Printing) Color 2:
Active Delete Product
SKU:
Delete
Mfr. SKU: