

Recomendados
Mais conteúdo relacionado
Destaque
Mais de Gopi Raghavendra
Mais de Gopi Raghavendra (12)
Appium Installation _steps
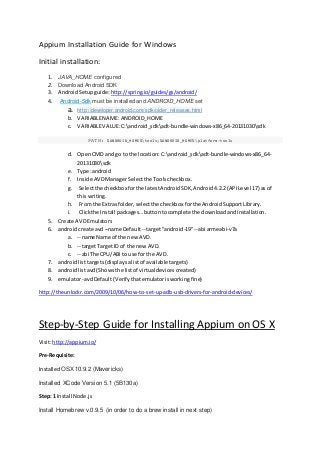
- 1. Appium Installation Guide for Windows Initial installation: 1. JAVA_HOME configured 2. Download Android SDK 3. AndroidSetupguide: http://spring.io/guides/gs/android/ 4. Android-Sdk must be installed and ANDROID_HOME set a. http://developer.android.com/sdk/older_releases.html b. VARIABLENAME: ANDROID_HOME c. VARIABLEVALUE:C:android_sdkadt-bundle-windows-x86_64-20131030sdk PATH: %ANDROID_HOME%tools;%ANDROID_HOME%platform-tools d. OpenCMD and go to the location: C:android_sdkadt-bundle-windows-x86_64- 20131030sdk e. Type:android f. Inside AVDManagerSelectthe Toolscheckbox. g. Selectthe checkbox forthe latestAndroidSDK,Android4.2.2(APILevel 17) as of thiswriting. h. From the Extras folder,selectthe checkbox forthe AndroidSupportLibrary. i. Clickthe Install packages…buttontocomplete the downloadandinstallation. 5. Create AVDEmulators 6. androidcreate avd –name Default--target"android-19"--abi armeabi-v7a a. --name Name of the new AVD. b. --targetTargetID of the new AVD. c. --abi The CPU/ABIto use for the AVD. 7. androidlisttargets (displaysalistof availabletargets) 8. androidlistavd (Showsthe listof virtual devicescreated) 9. emulator-avdDefault(Verifythatemulatorisworkingfine) http://theunlockr.com/2009/10/06/how-to-set-up-adb-usb-drivers-for-android-devices/ Step-by-Step Guide for Installing Appium on OS X Visit:http://appium.io/ Pre-Requisite: Installed OSX10.9.2 (Mavericks) Installed XCode Version 5.1 (5B130a) Step: 1 Install Node.js Install Homebrew v.0.9.5 (in order to do a brew install in next step)
- 2. Install Node.js and npm with Homebrew First, install Homebrew. Open the terminal and type: ruby -e "$(curl -fsSL https://raw.githubusercontent.com/Homebrew/install/master/install)" Then, run brew update to ensure your Homebrew is up to date. brew update As a safe measure, run brew doctor to make sure your system is ready to brew. Follow any recommendations from brew doctor. brew doctor Next, add the Homebrew location to your $PATH and source your bash or zsh profile file after adding/saving this: export PATH="/usr/local/bin:$PATH" Next, install Node (npm will be installed with node): brew install node Step2: Install APPIUM run ‘npm install -g appium’
- 3. run ‘npminstall wd’(youmightneedtoSUDO) Nowrun ‘authorize_ios’ You mightgetthiserror: “error stderr maxbugger exceeded” running again as ‘sudo authorize_ios’ but now seeing --- error: Appium will not function correctly if used under sudo. Please rerun as a non-root user. If you had to install Appium using `sudo npm install -g appium`, the solution is to reinstall Node using a method (Homebrew, for example) that doesn't require sudo to install global npm packages. since authorize_ios does not work with sudo you needed to manually run chown on the Applications dir. Just ran this: cd ‘/Applications/Xcode.app/Contents/Developer/Platforms/iPhoneSimulator.platform/De veloper/SDKs/iPhoneSimulator7.1.sdk’ sudo chown -R <yourusername>:staff Applications Once everything is done just type: ‘appium &’ in the terminal and it will start the Appium and you should be ready to use it. Appium On Windows Pre-requisite: Appium